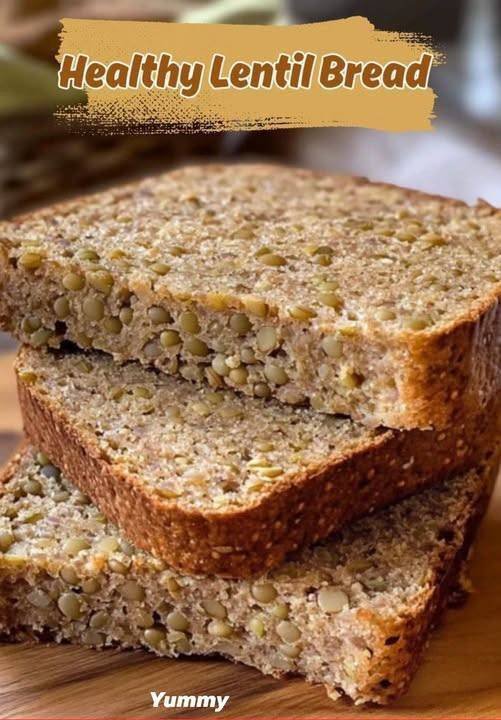
Healthy Lentil Bread

Healthy Lentil Bread

Table of Contents

This nourishing lentil bread combines cooked lentils, whole-grain flour, oats, and seeds to create a dense yet tender loaf that’s naturally hearty and satisfying. Lentils add protein and moisture, while oats contribute a lovely rustic texture. It’s an excellent option if you want a healthier everyday bread that still feels wholesome and homemade.

Ingredients

1 ½ cups cooked green or brown lentils (well-drained)

2 cups whole-wheat flour (or oat flour)

1 cup rolled oats

2 tbsp olive oil or melted butter

2 tbsp honey or maple syrup (optional)

1 ½ tsp salt

1 packet instant yeast (about 2 ¼ tsp)

1 cup warm water (more if needed)

2 tbsp flaxseed or chia seeds (optional)

Instructions

Start by preheating your oven to 375°F / 190°C and lightly greasing a standard loaf pan. Make sure your lentils are fully cooked and well-drained so the dough doesn’t become too wet.

In a large mixing bowl, combine the warm water and instant yeast. Let it sit for about five minutes until slightly foamy—this helps the dough rise well and gives the bread a soft crumb. Add the olive oil (or butter), honey or maple syrup if using, and salt. Stir in the lentils, lightly mashing them as you mix. Some texture is great; they don’t need to be fully puréed.

Next, add the whole-wheat flour, rolled oats, and seeds if using. Begin mixing until a rough dough forms. If the dough seems dry, add a splash more warm water, a tablespoon at a time. If it feels too sticky, sprinkle in a little extra flour. The dough should be soft, slightly tacky, and easy to handle.

See also  Caramel Chocolate Crunch Bars

Turn the dough onto a lightly floured surface and knead gently for 5–7 minutes, until smooth and elastic. Shape it into a loaf and place it in the prepared pan. Cover with a clean towel and let rise in a warm place for 30–45 minutes, or until slightly puffed.

Bake for 30–35 minutes, until the top is golden and the loaf sounds hollow when tapped. Allow the bread to cool in the pan for 10 minutes, then transfer to a rack to cool completely before slicing.

Serving & Storage

This bread is delicious toasted with avocado, nut butter, or soup. Store at room temperature for up to 2 days, refrigerate for 5 days, or freeze slices for later.

Hearty, nutritious, and beautifully homemade—enjoy your wholesome lentil bread! 🌾🍞

Old-Fashioned Southern Milk Muffins

Old-Fashioned Southern Milk Muffins

Ingredients

  • All-Purpose Flour: 2 cups

  • Sugar: 1 cup (or a sugar-substitute for a lighter version)

  • Whole Milk: 1 cup, room temperature

  • Butter: ½ cup (1 stick), melted and cooled

  • Eggs: 2 large, room temperature

  • Baking Powder: 2 teaspoons

  • Vanilla Extract: 1 tablespoon

  • Salt: ½ teaspoon

  • Optional: A pinch of nutmeg or cinnamon for extra warmth

Detailed Step-by-Step Instructions

  1. Preheat and Prep: Preheat your oven to 190°C (375°F). Line a 12-cup muffin tin with paper liners or grease it thoroughly with butter.

  2. Whisk Dry Ingredients: In a medium bowl, sift together the flour, baking powder, and salt. Sifting helps keep the muffins airy and prevents lumps.

  3. Cream Eggs and Sugar: In a large mixing bowl, beat the eggs and sugar together until the mixture is pale and slightly frothy (about 2 minutes).

  4. Add Wet Ingredients: Stir in the melted butter, room-temperature milk, and vanilla extract. Whisk until well combined.

  5. Combine: Gradually add the dry flour mixture into the wet ingredients. Fold gently with a spatula just until the flour disappears. Do not overmix, or the muffins will become tough.

  6. Fill the Tin: Scoop the batter into the prepared muffin tin, filling each cup about ¾ of the way full.

  7. Bake: Bake for 18–22 minutes. They are done when the tops are golden brown and a toothpick inserted into the center comes out clean.

  8. Cool: Let the muffins rest in the tin for 5 minutes before moving them to a wire rack.


Tips for the Perfect Muffin

  • The “Tops” Trick: For high, domed tops, let the batter rest for 10 minutes before putting it in the oven.

  • Flavor Variation: You can add a handful of blueberries or chocolate chips to the batter for a different twist.

  • Serving: These are best served warm with a small pat of butter.

Old-Fashioned Crispy Potato Pancakes

Old-Fashioned Crispy Potato Pancakes

Prep time: 15 minutes

Cooking time: 20 minutes

Yields: 10–12 pancakes


Ingredients

  • 4 Large Russet Potatoes (peeled)

  • 1 Medium Onion (yellow or white)

  • 2 Large Eggs (lightly beaten)

  • 3 tablespoons All-Purpose Flour (or almond flour for a gluten-free version)

  • 1 teaspoon Salt

  • ½ teaspoon Black Pepper

  • Vegetable Oil (for frying)

  • Optional: A pinch of garlic powder or fresh chives.


Detailed Step-by-Step Instructions

  1. Grate the Vegetables: Using a box grater or a food processor with a grating attachment, grate the potatoes and the onion into a large bowl.

  2. Drain the Moisture: This is the most important step for crispiness! Place the grated mixture into a clean kitchen towel or cheesecloth. Squeeze out as much liquid as possible over the sink. The drier the potatoes, the crispier the pancakes.

  3. Mix the Batter: In a clean bowl, combine the squeezed potato and onion mixture with the beaten eggs, flour, salt, and pepper. Stir until everything is evenly coated.

  4. Heat the Pan: Pour enough oil into a large skillet to generously coat the bottom (about ¼ inch deep). Heat over medium-high heat until the oil shimmers.

  5. Fry the Pancakes: Carefully drop a large spoonful of the mixture into the hot oil. Use the back of the spoon to flatten it into a circle. Do not overcrowd the pan; fry 3–4 at a time.

  6. The Golden Flip: Fry for 3–4 minutes on the first side until deeply golden and crispy. Flip carefully and fry for another 3 minutes on the other side.

  7. Drain and Serve: Transfer the finished pancakes to a plate lined with paper towels to soak up any excess oil. Serve immediately while they are hot and crunchy.


Serving Suggestion

These are delicious when served the traditional way with a side of cold sour cream or chunky applesauce.

Zero-Carb Savory Cheese Flatbread

Zero-Carb Savory Cheese Flatbread

Prep time: 10 minutes

Baking time: 20–25 minutes

Servings: 4–6 slices


Ingredients

  • 2 Large Eggs

  • 1 cup Low-Fat Cottage Cheese (Small curd works best)

  • 1 ½ cups Shredded Mozzarella Cheese (Divided)

  • ½ teaspoon Garlic Powder

  • 1 teaspoon Italian Seasoning (Dried oregano, basil, and thyme)

  • A pinch of Salt


Detailed Step-by-Step Instructions

  1. Prepare the Base: In a medium bowl, whisk the two eggs thoroughly. Add the cottage cheese and half of the shredded mozzarella (¾ cup). Stir in the garlic powder and salt until well combined.

  2. Blend for Smoothness (Optional): If you prefer a more uniform, bread-like texture without the visible curds of cottage cheese, you can pulse the mixture in a blender for 30 seconds until smooth.

  3. Spread the Batter: Line a baking sheet with parchment paper (this is crucial to prevent sticking). Pour the mixture onto the center of the tray and use a spatula to spread it into a rectangular or circular shape, about ½ inch thick.

  4. The First Bake: Place in a preheated oven at 190°C (375°F) for about 15–20 minutes. The edges should start to turn golden brown and the center should be firm to the touch.

  5. Add Toppings: Remove the tray from the oven. Sprinkle the remaining ¾ cup of shredded mozzarella and the Italian seasoning evenly over the top.

  6. The Final Melt: Return the flatbread to the oven for another 5 minutes, or until the cheese on top is bubbly and begins to brown slightly.

  7. Slice and Serve: Let it cool for 2–3 minutes before slicing into strips or squares. This allows the base to set firmly so you can pick up the slices easily.


Chef’s Tip

For a “crispy crust” feel, you can sprinkle a little grated Parmesan cheese on the parchment paper before pouring the batter. This creates a savory, golden crust on the bottom of your flatbread!

Classic Brazilian Pastel Recipe

Classic Brazilian Pastel Recipe

Ingredients

For the Dough:

• 3 cups All-purpose flour

• 1 cup Warm water

• 1 tbsp Vegetable oil

• 1 tbsp Cachaça (or white vinegar)

• 1 tsp Salt

For the Filling (Traditional Beef):

• 500g Ground beef

• 1 Small onion, finely diced

• 2 cloves Garlic, minced

• To taste: Salt, pepper, and chopped parsley

• Optional: Hard-boiled egg slices or green olives

Step-by-Step Instructions

1. Prepare the Dough: In a large bowl, mix the flour and salt. Create a well in the center and add the warm water, oil, and cachaça/vinegar. Mix until a dough forms.

2. Knead: Move the dough to a floured surface. Knead for about 10 minutes until it is smooth and elastic. Wrap in plastic and let it rest for at least 30 minutes.

3. Make the Filling: Brown the beef in a skillet. Add onions and garlic, sautéing until soft. Season with salt, pepper, and parsley. Let the filling cool completely before using (this prevents the dough from getting soggy).

4. Roll it Out: Roll the dough as thin as possible (about 1–2mm). This is crucial for the “bubbles.” Cut into rectangles or circles.

5. Assemble: Place a spoonful of filling in the center. Fold the dough over and press the edges firmly with a fork to seal them.

6. Fry: Heat vegetable oil to 180°C. Fry the pastéis until golden brown (usually 30–60 seconds per side). Use a slotted spoon to bathe the top with hot oil to help the bubbles form.

7. Drain: Place on paper towels to remove excess oil. Serve hot!

💡 Recipe Q&A

Q: Why do I need to add alcohol or vinegar to the dough?

A: The alcohol evaporates quickly during frying, creating those signature air bubbles and making the crust extra crispy and less greasy.

Q: Can I bake these instead of frying them?

A: You can, but they won’t have the same texture. Baked pastéis are more like empanadas. If you bake them, brush with egg wash and bake at 200°C until golden.

Q: My pastel opened up in the oil! What happened?

A: This usually happens if there is too much air trapped inside or if the edges weren’t sealed tightly enough. Make sure to press the fork tines hard into the dough.

Q: Can I use store-bought dough?

A: Yes! Look for “Wonton wrappers” or “Spring roll pastry” in the freezer section of Asian markets; they are very similar to authentic Pastel dough.

Creamy Garlic & Herb Cheese Spread

Creamy Garlic & Herb Cheese Spread

Ingredients

  • 8 oz Cream cheese, softened to room temperature

  • 1/2 cup Shredded carrots, finely grated

  • 1/2 cup Sharp cheddar cheese, finely shredded

  • 2-3 cloves Garlic, minced or pressed

  • 2 tbsp Fresh parsley, finely chopped

  • 1 tbsp Fresh chives or green onions, chopped

  • 1/4 tsp Smoked paprika

  • Salt and black pepper, to taste

  • Optional: A dash of hot sauce or a squeeze of lemon juice for brightness.


Step-by-Step Instructions

  1. Prep the Vegetables: Grate the carrots and cheddar cheese using the finest side of your grater. This ensures the texture remains creamy and easy to spread. Finely chop the parsley and chives.

  2. Soften the Base: In a medium mixing bowl, beat the softened cream cheese with a spatula or hand mixer until it is smooth and light.

  3. Combine Ingredients: Add the minced garlic, shredded carrots, shredded cheddar, parsley, and chives to the cream cheese.

  4. Season: Stir in the smoked paprika, salt, and pepper. If you want a little extra zest, add the lemon juice or hot sauce at this stage.

  5. Mix Thoroughly: Fold everything together until the herbs and vegetables are evenly distributed throughout the cheese.

  6. Chill and Serve: While you can serve this immediately, letting it sit in the refrigerator for at least 30 minutes allows the garlic and herb flavors to meld together beautifully.

  7. Pairing: Serve this spread on your favorite flourless flatbread, cucumber slices, or celery sticks for a high-protein, low-carb snack.