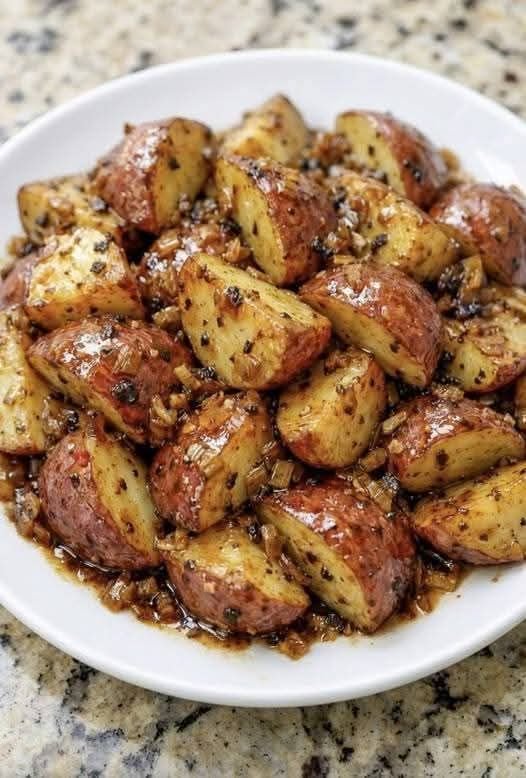
Slow Cooker Onion Butter Potatoes

Slow Cooker Onion Butter Potatoes

If you’re looking for an easy, comforting, and flavorful side dish that practically cooks itself,
these Slow Cooker Onion Butter Potatoes are exactly what you need. Tender baby potatoes,
sweet caramelized onions, rich butter, and aromatic garlic come together to create a simple yet satisfying dish.

Perfect for busy days, family dinners, or holiday meals, this slow cooker recipe delivers soft, buttery potatoes
infused with deep savory flavor—all with minimal effort.

Ingredients

  • 2 lbs (900g) baby potatoes, halved or quartered
  • 1 large onion, thinly sliced
  • 3 tablespoons unsalted butter, cubed
  • 3 cloves garlic, minced
  • Salt, to taste
  • Black pepper, to taste
  • Optional: fresh parsley, chopped (for garnish)

Instructions

Step 1: Prepare the Potatoes

Wash the potatoes thoroughly. Cut larger ones into halves or quarters so they cook evenly.

Step 2: Prepare Onion & Garlic

Thinly slice the onion and finely mince the garlic to ensure even flavor distribution.

Step 3: Assemble

Place potatoes in the slow cooker. Add onions and garlic on top, then scatter butter evenly.
Season with salt and black pepper.

Step 4: Cook

  • LOW: 6–7 hours
  • HIGH: 3–4 hours

Cook until potatoes are fork-tender.

Step 5: Serve

Gently stir to coat with butter and onions. Garnish with parsley if desired and serve warm.

Tips for Best Results

  • Use waxy potatoes like Yukon Gold for best texture.
  • Butter is essential—don’t skip it.
  • Add herbs like thyme or rosemary for extra flavor.
  • Sauté onions first for deeper taste.

Optional Variations

  • Cheesy: Add cheddar or Parmesan at the end.
  • Creamy: Stir in heavy cream before serving.
  • Spicy: Add red pepper flakes or paprika.
  • Garlic Boost: Double the garlic.

What to Serve With

  • Roasted or grilled chicken
  • Beef steak or roast
  • Baked fish
  • BBQ dishes

Final Result

Soft, buttery potatoes infused with garlic and sweet onions, delivering rich and comforting flavor in every bite.

🌼 Perfect Chamomile Tea (No Bitterness, Maximum Calm)

🌼 Perfect Chamomile Tea (No Bitterness, Maximum Calm)

https://images.openai.com/static-rsc-4/vNW5CYoRLuyjRCdhpjbNbuHwy1XgyxGlZhWbF5ivdQwW0Ot8YGPfM11Jx34FPRM5L-_ZhUJsltZeD241RePx0PcVo-uz48iiGf2F8Ryipxq470ynsKGA2mqATvoz1rP0mnFzsR--6qSLz56Us489dsLuvj_wwvpj2PP7hBq_bsF7uaTiVLfwAWbRwQb2QG1T?purpose=fullsize
https://images.openai.com/static-rsc-4/dWe6mDgxAsH0fbILB5HHb8zTS_TpK24V33iISq6_b5AYonDroSJ4algqAsA0J9phCcTP9cDXXuQvRldlY5PV8zfhmz7trS4ufNEuuzJJPmBV2NbibWBkcLhVGDOuZgGRZlyEFaGm0XvUUMR5xLKrPoKbJCX1LS4p1r3b190GGliWux2T_ToLJitxooEkXXaN?purpose=fullsize
https://images.openai.com/static-rsc-4/FZ87u7tDLVNOoGk1WkGC_82MPOn0b9Cr6UB5W_TqlE4YzqHE_liGmhHmk2GLBGY0JkYnc3ChQHkU7rjzpEpYxBd8uW3M9p5LWe49_z1JBNueFjd5LC8DGyQS5UC8oWpg5vSi1UTgE1FTHACMfvtFQuKzKAlY-LpIn44XlzXmkhSg0vxuUBzNrjAP1wfUXEz5?purpose=fullsize
https://images.openai.com/static-rsc-4/UTLXWTVdy6UbRllmyooBebYj2MfpHfKQTyfMPR0ivnTlC92f-pG-mTvl9ACS-ZJJ1oFb6jKy0mmmXBdIfRzc_yy4daw36APGxIwlsYM76azhH4Wy6_TiIHLE4JKT7asFrc8vxfscF0ymDgHDHRmOT2UK-CCCjFe23Fq0ZhRZNMxJniaDJ1D54ymrhWM2r2Vt?purpose=fullsize
https://images.openai.com/static-rsc-4/jEc8vVeNcQafxBQ5o8CCSdN2WYv2IfLiBeOv6lHB9rt_iP5e6LgrIrMU_w0jP500wFEyGbKuXGrJwSkNuLqL1LFvcB23PLEsolD6L3douEc5c4flNMoISw1reSQZ8kZ9pg7_4F-eRz42TNHT90U7eGGaXMVUvJzZTWMgUP0elqFCu62jt4Pneo4yXGd39-CY?purpose=fullsize

📝 Ingredients

  • 1 ½ cups filtered water (clean water = clean flavor)
  • 2 tbsp dried chamomile flowers (or 2 premium tea bags)
  • 1 tsp raw honey (optional, low-carb sweetness)
  • 1 thin slice lemon or fresh mint sprig (optional)

☕ Instructions (The Right Way)

1. Heat the Water
Bring water to about 90°C (not boiling).
👉 No thermometer? Let it rest 2 minutes after boiling.

2. The “Trap the Calm” Method
Add chamomile to your mug and pour hot water over it.
👉 Immediately cover with a lid or saucer.

3. Deep Steep (Don’t Rush This)
Let it steep for 5–7 minutes.
Chamomile needs time to release its full soothing compounds.

4. Strain & Finish
Remove flowers or tea bag gently.
Add honey and lemon/mint if desired.


🔬 Why This Method is Superior

✔ The Lid = Maximum Relaxation
Chamomile contains bisabolol, a delicate essential oil.
Without a lid → it evaporates → weaker tea.
With a lid → you keep the calming magic.

✔ Perfect Temperature = No Bitterness
Boiling water burns delicate floral notes → bitter taste.
90°C keeps it smooth, sweet, and apple-like.

✔ No Squeezing Rule
Squeezing tea bags releases tannins →
🚫 bitter
🚫 grassy (“wet hay” taste)
✔ smooth if left alone


💡 Pro Tips (Next-Level Upgrade)

  • Use a glass or ceramic cup (keeps flavor pure)
  • Add a tiny pinch of cinnamon for warmth
  • Drink before bed for best calming effect 😴
  • Try double steeping (reuse flowers once for lighter second cup)

🌿 What It Tastes Like (When Done Right)

  • Lightly sweet
  • Soft apple-like notes
  • Smooth, buttery floral finish
  • Zero bitterness

Easiest No-Knead Pantry Flatbread

Easiest No-Knead Pantry Flatbread

Prep time: 10 mins | Rest time: 1 hour | Cook time: 15 mins

Yields: 10–12 Flatbreads

Ingredients

  • All-Purpose Flour: 4 cups (500g)

  • Warm Water: 1 ½ cups (350ml) — ensure it is lukewarm, not hot

  • Instant Yeast: 2 ¼ teaspoons (1 packet)

  • Sugar: 1 tablespoon (helps activate the yeast)

  • Salt: 1 ½ teaspoons

  • Olive Oil: 2 tablespoons (plus a little extra for the bowl)

Instructions

  1. Activate the Yeast: In a large bowl, combine the warm water, sugar, and instant yeast. Let it sit for 5 minutes until it becomes slightly foamy on top.

  2. Mix the Dough: Add the olive oil and salt to the yeast mixture. Gradually stir in the flour with a wooden spoon or spatula. Mix until a shaggy, sticky dough forms and no dry flour remains. Do not knead.

  3. The First Rise: Lightly oil the top of the dough. Cover the bowl with a clean kitchen towel or plastic wrap. Place it in a warm, draft-free spot and let it rise for 1 hour, or until it has doubled in size.

  4. Shape the Bread: Gently deflate the dough with your hand. Turn it out onto a well-floured surface. Divide the dough into 10–12 equal portions. Roll each piece into a smooth ball.

  5. Flatten: Use your fingers or a rolling pin to flatten each ball into a circle about ½ inch thick.

  6. Bake or Pan-Sear:

    • Oven Method: Preheat your oven to 425°F (220°C). Place the circles on a parchment-lined baking sheet. Bake for 10–12 minutes until they puff up and turn golden brown.

    • Stovetop Method: Heat a non-stick skillet over medium-high heat. Place a circle of dough in the dry pan. Cook for 2 minutes until bubbles form, then flip and cook for another 1–2 minutes until golden spots appear.

  7. Keep Soft: As you remove the breads from the heat, stack them and wrap them in a clean towel. The steam will keep them soft and pliable.


Nutritional Benefits

  • Preservative-Free: Unlike store-bought bread, this contains zero additives, stabilizers, or hidden sugars.

  • Complex Carbohydrates: Provides a steady source of energy for your day.

  • Low Fat: By using a small amount of healthy olive oil instead of butter or lard, you keep the saturated fat content very low.

  • Digestive Friendly: The long fermentation (rising time) helps break down gluten slightly, making it easier on the digestive system for many people.


Q&A

Q: Can I use Whole Wheat flour? A: Yes! You can replace up to half of the all-purpose flour with whole wheat. You may need to add an extra tablespoon of water as whole wheat flour absorbs more moisture.

Q: My bread didn’t puff up, what happened? A: This usually means the water was either too cold (yeast didn’t wake up) or too hot (yeast was killed). Aim for “baby bath” temperature. Also, ensure your baking sheet or skillet is properly preheated.

Q: How do I store these? A: Once completely cool, store them in a zip-top bag at room temperature for 3 days. For longer storage, they freeze beautifully for up to 3 months. Just toast them briefly to revive the texture.

Q: Can I add flavors? A: Absolutely. Mix in 1 tablespoon of dried herbs (like rosemary or oregano) or 2 cloves of minced garlic into the dough for a savory twist.

Flourless High-Protein Flatbreads

Flourless High-Protein Flatbreads

Ingredients

  • 1 cup Low-fat or fat-free cottage cheese (ensure it is well-drained)

  • 2 large Eggs

  • ½ cup Egg whites (liquid or from about 3–4 eggs)

  • ¼ teaspoon Salt

  • Optional: Garlic powder, onion powder, or dried herbs (rosemary or thyme) for extra flavor.

Instructions

  1. Blend the Base: In a high-speed blender or food processor, combine the cottage cheese, whole eggs, egg whites, and salt. Blend until the mixture is completely smooth and liquid, with no visible curds.

  2. Preheat the Pan: Heat a non-stick skillet or griddle over medium heat. Lightly coat with a quick spray of olive oil or avocado oil.

  3. Cook the Flatbreads: Pour about ¼ to ⅓ cup of the batter onto the hot pan, tilting the pan slightly to spread it into a thin, even circle (similar to a crepe).

  4. Flip with Care: Let it cook for about 3–4 minutes until the edges start to lift and the bottom is golden brown. Gently slide a spatula underneath and flip. Cook for another 2 minutes on the other side.

  5. Cool and Stack: Remove from the pan and place on a wire rack or plate. Repeat with the remaining batter. As they cool slightly, they will become more flexible and “bready.”


💡 Chef’s Tips for the Best Texture

  • The “Dry” Secret: To get that perfect flaky look shown in the photo, you can lightly brush the cooked flatbread with a tiny amount of ghee or butter while it’s still warm.

  • Storage: These stay fresh in the fridge for up to 4 days. You can reheat them quickly in a dry pan to bring back the slightly crisp exterior.

  • Savory Wraps: Use these as a base for a high-protein wrap—fill them with grilled chicken, avocado, and fresh greens.

⚠️ A Quick Note on Nutrition

While these are incredibly low in carbohydrates and high in protein, no food technically “eats sugar” or physically “dries out” the body on its own. They are, however, an excellent choice for maintaining a balanced, sugar-free lifestyle and staying full for longer.

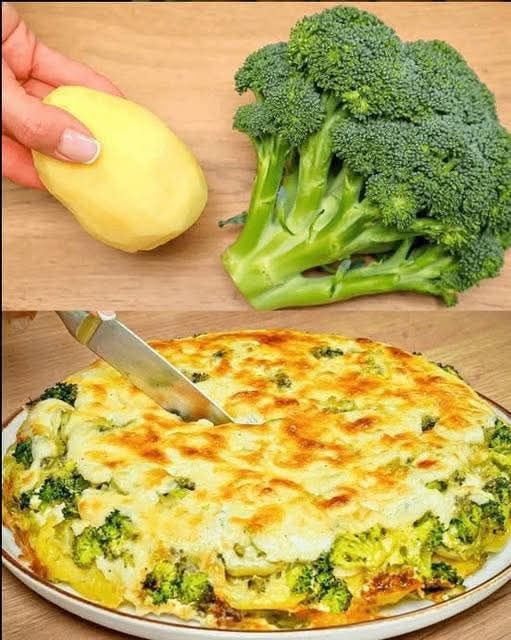
🧀🥦 The Viral Cheesy Broccoli & Potato Bake

🧀🥦 The Viral Cheesy Broccoli & Potato Bake

https://images.openai.com/static-rsc-4/mQpU5DmugNwSaGoskvyjRv222UQqqsaFM05S4WNRo6VPEP6tESlWeJhsaJDhUpoHnM4nHWQiwjlLNb0kwjpiAXFzuv6ZRzGPgH5csoKagqlUaoop4VRCTYtMIFpxAcecGsWnCJwpAkZfDDdqkn4T7yK4MEbsp5uMCUQ3z5k9VNwKmBGbZ_sQtbHYuM3slwC8?purpose=fullsize
https://images.openai.com/static-rsc-4/vpYJYKvUoLiDbOSpi8Jj5_-mOeYYj5Z0R5vcpRU8FtTFxFj_SYiGZp0OUMuUICNYfd-nKwHl5aGp7J7NpEIPAA4BH6GdEVxzavirx3Uog0hzJzWZLUJOH5oyx0x4UYleVa-PmiwDyqV6_CWEgv1EvaU50ZBqcY0xewuxyZqHbUU3x2fpw5F9zBrRvuYnQzE5?purpose=fullsize
https://images.openai.com/static-rsc-4/XfC8d9F1zPyLf0SSbNunvnksWlsRWdLNFxYbMYybNYiSfNBCYV04exNM7Z2W7BZOm3coGGCupkypN2fjZg30GHAp2IU0TM1wmfO-tdYCXtXRnZKHGFYJ9DqW9jdlI4mg6n8Irxvaqt7LvISFKyrxBhnO1UDXCeYvBFo53HA9sl3JZAU5aX7efnBm3Rwe0ybC?purpose=fullsize
https://images.openai.com/static-rsc-4/eJExpF-VIE5ivdfsnp4jG9h3keUBCzIH6r0vEmGwEzmKIVK94t2OuofqrDVrp25w63MuxXy2xbmat1_AyOZMYmpfqGkbfdLA4S7MLi34DzzWudWp_uldcEJ3dp671zjVTUr10NQykN6JZ6EtsDGEq0B8vfmClM9oecGKOUssFjpNy4JAvH7Sj5qiYVTKqUBk?purpose=fullsize
https://images.openai.com/static-rsc-4/cQpXXBF2pUz7UbfkMw6_NkCDOXTJyRHg0qMZ_uTVi0K3Ri2_0_UH5XfmMEOffPgDxzL0xB9222ajAajqYcZ7Bo1P0gXochB7mf5V4LUdDORM_PWX0mubHe1bPc-oVghjUZBqCTP58QzVQ5zzf7Fm3dA3OOd6Aabe6niJ5MvPdYHYx-qx-sFSSZ_ysQixtU7o?purpose=fullsize
https://images.openai.com/static-rsc-4/6An1upW377Eno20xQsbhYW3peILSzn-o1RuqJLh_ESyIQ8jh5bwWwJyp_4eEOXQ1YGc-vzXEcF0uSSvPX7CmB674i4evO7URJAQf-d5625k2lOXx1G0EoTGEXGmI1XBggtTUwwdgJLVFtOTRb2A9AKWhKnryp6vRRx3QBYWDbZJRQE9OyAGT4CzZ4Db-c9Nj?purpose=fullsize

This dish is the definition of comfort food—creamy, cheesy, and perfectly golden on top. It’s simple enough for a weeknight but delicious enough to feel special. That little pinch of nutmeg? That’s the secret touch that makes it taste like a restaurant-style gratin.


❤️ Why This Recipe Goes Viral

  • ✔️ Super creamy + cheesy texture
  • ✔️ Simple ingredients, big flavor
  • ✔️ Perfect side dish or main meal
  • ✔️ Family-friendly & filling
  • ✔️ That crispy golden cheese top 🤤

🛒 Ingredients

🥔 Vegetables

  • 2 lbs potatoes (Yukon Gold or Russet), cubed or sliced
  • 1 large head broccoli, cut into florets

🥛 Sauce/Base

  • 3 large eggs
  • 1 cup milk
  • 1 cup heavy cream (optional but rich)
  • 2 tbsp olive oil or melted butter

🧂 Seasoning

  • 1 tsp salt
  • ½ tsp black pepper
  • 1 tsp garlic powder (or fresh garlic)
  • ½ tsp paprika or chili flakes (optional)
  • Pinch of nutmeg ⭐

🧀 Topping

  • 2 cups shredded cheese (cheddar, mozzarella, or Gruyère)
  • ¼ cup breadcrumbs (optional crunch)

👩‍🍳 Step-by-Step Instructions

1️⃣ Preheat & Prep

  • Preheat oven to 200°C (400°F)
  • Grease a baking dish

2️⃣ Par-Cook (Important Step!)

https://images.openai.com/static-rsc-4/F_481Hk9bfYuK_fOw15Sfl-94vhr9QaZ5AhOT_oz_fn8Uc7NVsFckY80_G8VUQIHdvVv4rN3FUXuBWqqNXsYTKHyu21gNt0Wf2MJr91FMbLpfxaYIcbEL4Us4rdZeoGVk4YhtJvRtUtzAUc82cPfxTCB8ec7OnMGrhThjoOUldsdHRcrJLFlCK9iCETKbQss?purpose=fullsize
https://images.openai.com/static-rsc-4/LTqN-51c5aNCu1OmVvKT8S_PQm7zGfX4mTGEeenvK4EiYkKvt2trS7e28bJTjiHbURfheJK6bioaNpuzI0EJJozybCfSBmHV0FN91R3EJGppGJtSmcSzr9TDMCfcABcYmszxtQB-W4ILMzrFvN3uamHC6F6TZlUY8tClhZqzpLF3e5-yjVJ76zryGtlxPtOI?purpose=fullsize
https://images.openai.com/static-rsc-4/US1Nl37tLd6nc6ooJN8AkmPEzFvwYhPlaM7JKGkRdyoDML5-QJvyjF1_6HRwMkTejmKQ5CY3nksabfsvxVaHUfQ_H0HL505F1XhZQficS-kJnZWW-k-8f_4oLO-H6m1AshEBRR8a8t7EXWUBDvtMnWRHLZP5xEB8apgbclx2vMZ14xRX6GHMsuE5jpPoYa2J?purpose=fullsize
https://images.openai.com/static-rsc-4/pFsc9VrVmNh8Mo5Ey4mo49mY_NGW2XVes5I-W7I_WZym0d2ZWr_o33ogfxlVwpEaYiHgWJAB3IMwhtKRy84PnDYWnToqFD55Slx9Lgy1hukk64TAH3Mo8ZjNaip0jXnDJZa_uIyuL1af_eEvwj9G8pGJaFlKY3Ggmm_kzg6K-Nor67Lf71Ll39hZFrvStTLf?purpose=fullsize
https://images.openai.com/static-rsc-4/DuYmrxvxD0yF-i4kF4pHUzleRJiiDuyG7sGDr84L_Q7ou0A9ZdI0UMVry5G7g_lTZorYwQESeE34mpdj_Arz_nt3A_9-TX1BvaSQb0Q7DqAcV0MhLChvx4K5auNG4DmJDvMai0kFfEIqLOIH2WG3NFv_xIBS1I6wrccylYmB5ZOHlY8MgQmpS-ld5WpBkQ2p?purpose=fullsize
https://images.openai.com/static-rsc-4/_0NUfVoelcwvZi8a3xa5bOItIS80Qr11bGrSZ1-hcXJ47tYmKgmlqTaSkCf1jn0eY0AfU_-tASTbPFlKsTtfLHd3yiSkXKFWKDSCoepAeA-thTMcECJKPKUis9e2zMmM-t_QjpvQmnrPWOoIO9ioVCjXVuwywennDFop1_FoEWtYyYPrM7lgZ5xh9AqIhMUt?purpose=fullsize
  • Boil potatoes in salted water for 8–10 minutes
  • Add broccoli in last 3 minutes
  • Drain well

✔️ This ensures soft, perfectly cooked veggies


3️⃣ Make the Creamy Mixture

  • Whisk together:
    • Eggs
    • Milk
    • Cream (optional)
    • Oil/butter
    • All seasonings

4️⃣ Assemble

  • Add potatoes + broccoli to baking dish
  • Pour sauce evenly over

5️⃣ Add the Magic 🧀

  • Sprinkle cheese generously
  • Add breadcrumbs (optional)

6️⃣ Bake to Perfection

https://images.openai.com/static-rsc-4/vcUYuSUPNvpPJg4mTwmUvh-o4GZBpddS44ulSDTWWdF9vl5YzuFTdJ0q4DOwl2QwaQlOLA3sAhRYmrZYSDDVkT9EsBQLSIce3aQwusCdvvNfnCfehxiduifUWCEu2vIXFoqFh1u3yoDK1GDE_Plf2KKtF-7A5ad5qtlA2H0RNPBb3iUfeLWtZcdbYcLUZtE2?purpose=fullsize
https://images.openai.com/static-rsc-4/QgWjnHzyXR6yh4Kb5CYLswAmc4m5RB9WJF3s37V9nrmSvvXx5FzKZf8eCCSIR1VSpO3Zj7laaK0Cn3nsQkvoo8_ZVWrPm5wpIK4fMdNrZNa4TGjH42UoH3tFP5vpvNXq6p0I1fw757w9HqqXeKTl64JRTgadLwvl6_L9KXvQyWNRONzymFK8Zi7wrfMQM7Q7?purpose=fullsize
https://images.openai.com/static-rsc-4/bfBzxHFVMhC_lRS-PH4KMSkoCNB6uAyAYUVMLnSaxDXRJvSqm3Sgt_BFeTM0-k5BwnxokFEoAsqzcoqdnE5pT-4tpxcrcJn6L1k6gUeUS0WAxBlpKvASN_hKF-gKgxyD50DjqoQjiRYALKhSb1pjJ37PNix7IKdLgWBn2VPsuyq137vJX26mkLBP3IcQwJ1D?purpose=fullsize
https://images.openai.com/static-rsc-4/XfC8d9F1zPyLf0SSbNunvnksWlsRWdLNFxYbMYybNYiSfNBCYV04exNM7Z2W7BZOm3coGGCupkypN2fjZg30GHAp2IU0TM1wmfO-tdYCXtXRnZKHGFYJ9DqW9jdlI4mg6n8Irxvaqt7LvISFKyrxBhnO1UDXCeYvBFo53HA9sl3JZAU5aX7efnBm3Rwe0ybC?purpose=fullsize
https://images.openai.com/static-rsc-4/zZg-7DuuDH6CyTHiT11Cli7I5c70aEMld39QE6MWdgz0OlZtUeHIBhjXCkNQiD8X1grZKKycHjdhtxXsFFbTYMTTWCLWfhnW62mIqJ6OT6h-GmhVc56V85sy9pc4Z5tOp0l_y5GWx8Fx5i0jNVvAFSd6qu6T0k3RnO74CW17t2vXiLTPFhNnIvaLIHIq3g0C?purpose=fullsize
https://images.openai.com/static-rsc-4/r5GyXdYgqbtWGznvQqzgCBgQXXyc4DgQkBE9gaVU5b3i1af2whNTpKvDhjPhwwOx5sEHM6sxfsPB5P2XMScXKLvDqFuZb0FJwMkH2fRN9S9G0LG4jMtfhg6O5V92nYVnwEx4ofcsJRc_MY4SBhdWm1hrcwEIxB9cWlOD6-dv4UMRoa1eT2ZEFIpo_syoJyZ_?purpose=fullsize
  • With par-cooking: Bake 20–25 mins
  • Without par-cooking:
    • Cover → 45 mins
    • Uncover → 10 mins for browning

✔️ Ready when golden, bubbly, and irresistible


7️⃣ Rest & Serve

  • Let it sit 5 minutes
  • Slice and serve warm

🍽️ Serving Ideas

  • 🍗 With grilled chicken
  • 🥩 Alongside steak
  • 🥗 With a fresh salad
  • 🍞 Or enjoy it as a main dish

🔥 Pro Tips

  • Slice potatoes thin for faster cooking
  • Mix cheeses for better flavor (cheddar + mozzarella = 🔥)
  • Add cooked chicken or beef for a full meal
  • Don’t skip nutmeg—small but powerful

🧊 Storage

  • Fridge: 3–4 days
  • Freeze: Up to 2 months
  • Reheat: Oven for best texture

⏱️ Quick Info

  • Prep: 15 mins
  • Bake: 45–55 mins
  • Serves: 4–6

🍦 Keto Butter Pecan Ice Cream

🍦 Keto Butter Pecan Ice Cream

No Churn (No machine needed), Gluten-Free, Low-Carb

Ingredients

For the Buttery Pecans:

  • 1 cup Pecans (halves or chopped)

  • 2 tbsp Butter (salted is best for flavor)

  • 1 tbsp Keto Sweetener (Allulose or Erythritol)

  • Pinch of Sea Salt

For the Ice Cream Base:

  • 2 cups Heavy Whipping Cream (cold)

  • 1/2 cup Unsweetened Almond Milk (or more heavy cream for extra richness)

  • 1/2 cup Powdered Keto Sweetener (Allulose is recommended for a softer scoop)

  • 1 tsp Vanilla Extract

  • 1/2 tsp Butter Extract (optional, but gives it that “bakery” taste)


Instructions

1. Prep the Pecans

In a small skillet over medium heat, melt the 2 tbsp butter. Add the pecans and a pinch of salt. Sauté for 3–5 minutes until fragrant and toasted. Stir in 1 tbsp sweetener at the very end until melted. Remove from heat and let them cool completely on parchment paper.

2. Whip the Base

In a large chilled bowl, use a hand mixer to beat the heavy whipping cream and powdered sweetener until stiff peaks form (it should look like thick whipped cream).

3. Combine

Gently fold in the almond milk, vanilla extract, and butter extract using a spatula. Be careful not to deflate the cream. Once smooth, fold in most of your cooled pecans (save a few for the top!).

4. Freeze

Transfer the mixture into a loaf pan or freezer-safe container. Smooth the top and sprinkle the remaining pecans. Cover tightly with plastic wrap or a lid.

  • Freeze for 4–6 hours. > Pro Tip: Since homemade keto ice cream doesn’t have chemical softeners, let it sit on the counter for 5–10 minutes before scooping so it softens up perfectly!


Why this works:

  • No Flour: We use heavy cream and air (whipping) to create structure.

  • No Sugar: Keto sweeteners don’t spike insulin, helping you stay in fat-burning mode.

  • The “Dry Out” Effect: By keeping carbs very low, your body drops excess water weight (often called “drying out” in fitness circles).