The Ultimate Blood-Sugar-Friendly Seed Bread

The Ultimate Blood-Sugar-Friendly Seed Bread

This bread relies on “psyllium husk” to bind the seeds together, making it incredibly high in fiber and low in net carbs.

Ingredients

  • 1 cup Sunflower seeds

  • ½ cup Flax seeds (whole)

  • ½ cup Hazelnuts or almonds (roughly chopped)

  • 1 ½ cups Rolled oats (ensure they are gluten-free if needed)

  • 2 tbsp Chia seeds

  • 4 tbsp Psyllium husk powder (this is the “glue”)

  • 1 tsp Fine sea salt

  • 1 tbsp Maple syrup or honey (optional, for a hint of balance)

  • 3 tbsp Melted coconut oil or ghee

  • 1 ½ cups Water


Step-by-Step Instructions

  1. Combine Dry Ingredients: In a flexible silicone loaf pan (or a greased metal one), whisk together the sunflower seeds, flax seeds, chopped nuts, oats, chia seeds, psyllium husk, and salt. Mix very well.

  2. Whisk Wet Ingredients: In a separate small bowl, whisk together the water, melted oil, and sweetener.

  3. Mix Everything: Pour the liquid over the dry ingredients. Mix with a spoon until everything is soaked and the dough becomes very thick (the psyllium husk will absorb the water quickly).

  4. Smooth the Top: Level the top of the dough with the back of a spoon.

  5. The “Secret” Rest: Let the dough sit on the counter for at least 2 hours, or even overnight. This is vital so the seeds and husk bind together; otherwise, the bread will crumble.

  6. Preheat and Bake: Preheat your oven to 175°C (350°F). Place the loaf pan on the middle rack and bake for 20 minutes.

  7. The Flip: Remove the loaf from the oven, carefully take the bread out of the pan, and place it upside down directly on the oven rack. Bake for another 30 to 40 minutes. It is done when it sounds hollow when tapped.

  8. The Wait: Let the bread cool completely before slicing. If you cut it while hot, it will be gummy inside.


5 Breads to Look For (or Bake)

If you prefer traditional textures, look for these varieties which have a lower Glycemic Index (GI):

  1. 100% Stone-Ground Whole Wheat: Less processed than “enriched” wheat.

  2. Sprouted Grain Bread: (Like Ezekiel bread) Uses germinated grains which are easier to digest.

  3. Traditional Sourdough: The fermentation process creates acids that slow down starch digestion.

  4. Pumpernickel: Real pumpernickel is made from coarsely ground rye and is very dense and fibrous.

  5. Almond Flour Bread: Uses nut flour instead of grain, resulting in very low carb counts.

Pro-Tip: To further reduce the blood sugar impact, always pair your bread with a healthy fat or protein, like avocado, peanut butter, or a boiled egg.

Diabetes signs on skin

Here are the details according to each part of the image:

1. Very Dry and Cracked Skin

The first part shows a person with dry, rough, and cracked skin on the hands and face.

This can happen because diabetes may reduce moisture in the skin.

Possible signs:

  • Dryness
  • Cracked or peeling skin
  • Itching

Reason: High blood sugar can cause dehydration and poor skin hydration.

2. Dark or Brown Spots on Legs

The image of the legs shows dark round spots on the lower legs.

This condition is often called Diabetic Dermopathy.

Features:

  • Light to dark brown spots
  • Usually appear on the shins
  • Often harmless but common in diabetics

Reason: Changes in small blood vessels due to diabetes.

3. Thick or Yellow Nails and Foot Problems

The picture of the feet shows yellowish and thick toenails.

People with diabetes can develop Fungal Nail Infection more easily.

Possible signs:

  • Thick nails
  • Yellow or discolored nails
  • Brittle nails

Reason: High sugar levels and weaker immunity can allow fungal infections to grow.

4. Yellow Bumps on the Skin

The last image shows yellow or skin-colored bumps on the face.

This may be related to Eruptive Xanthomatosis, which can appear when blood sugar and fat levels are very high.

Features:

  • Small yellow bumps
  • Can appear on face, arms, legs, or buttocks
  • Sometimes itchy

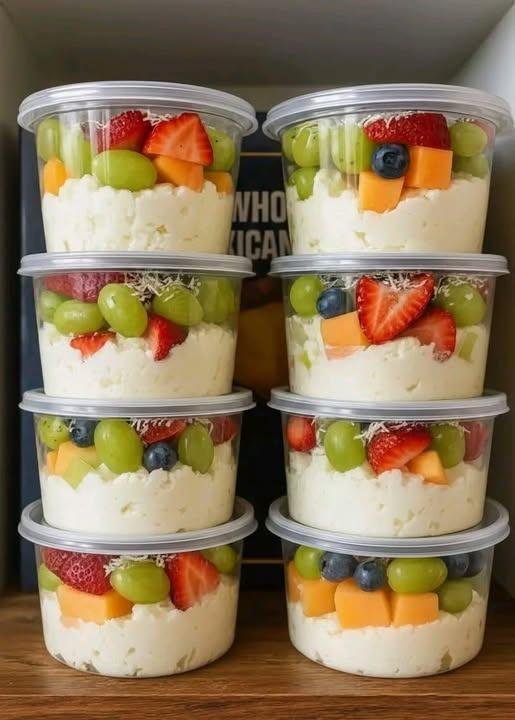
High-Protein Tropical Fruit & Yogurt Cups

High-Protein Tropical Fruit & Yogurt Cups

Prep time: 10–15 minutes | Servings: 4–6 cups

Ingredients (Per Cup)

  • ½ cup Pineapple chunks (fresh or canned in juice)

  • ½ cup Mango chunks

  • ¼ cup Sliced kiwi

  • ¼ cup Sliced strawberries

  • 2–3 tbsp Low-fat cottage cheese or Greek yogurt (plain or vanilla)

  • 1 tsp Unsweetened shredded coconut

  • 1 tsp Chia seeds or hemp hearts

Optional Upgrades:

  • Crushed almonds or walnuts for added crunch

  • A dash of cinnamon or vanilla extract for deeper flavor


Step-by-Step Instructions

1. Prepare the Fruit

Wash and slice all the fresh fruit (strawberries, kiwi, mango, and pineapple) into bite-sized pieces as needed.

2. Layer Your Containers

In each individual container, begin layering the fruit. Start with the pineapple and mango at the bottom, then layer the strawberries and kiwi on top.

3. Add the Protein

Place 2–3 tablespoons of your chosen Greek yogurt or cottage cheese directly on top of the fruit layer.

4. Garnish and Finish

Sprinkle the chia seeds (or hemp hearts) and shredded coconut over the top. If you are using nuts or cinnamon, add those now.

5. Seal and Store

Seal the containers tightly. They can be stored in the refrigerator for up to 4 days, making them an excellent choice for weekly meal prep.


Why This Recipe Works

  • Balanced Nutrition: The Greek yogurt or cottage cheese provides high protein to support muscle maintenance and keep you feeling full.

  • Fiber-Rich: Using a variety of fresh fruits and chia seeds ensures you get a good dose of fiber.

  • Portion Control: This recipe is specifically designed to be bariatric-friendly and easy to manage for those watching their intake.

  • Cost-Effective: You can easily use frozen or seasonal fruit to keep this recipe budget-friendly.

Ginger, Onion, and Garlic Wellness Tonic

Ginger, Onion, and Garlic Wellness Tonic

Prep time: 15 mins | Infusion time: 7 days | Yield: Approximately 1 jar

Ingredients

  • 1 medium White or yellow onion (thinly sliced or grated)

  • 1 large bulb Garlic (all cloves peeled and crushed or finely minced)

  • 3-inch piece Fresh ginger root (peeled and grated)

  • 1 cup Raw, organic honey (or enough to fully submerge the ingredients)

  • 2-3 tbsp Freshly squeezed lemon juice


Step-by-Step Instructions

1. Prepare Your Ingredients

Ensure your jar is thoroughly cleaned and dried. Finely grate the ginger and onion to release their natural juices. Crush or mince the garlic and let it sit for about 5 minutes before adding to the jar; this helps activate its beneficial compounds.

2. Layer the Jar

Place the grated ginger, sliced onion, and minced garlic into the glass jar. Pour the lemon juice over the top.

3. Add the Honey

Pour the raw honey into the jar until all the solid ingredients are completely submerged. Use a clean spoon to stir gently, ensuring there are no air bubbles trapped at the bottom. The honey acts as the extracting agent and preservative.

4. The Seven-Day Infusion

Seal the jar tightly. Store it in a cool, dark place (like a kitchen cupboard) for 7 days. During this time, the honey will draw out the juices from the onion, garlic, and ginger, turning into a thin, potent syrup. You can flip the jar upside down once a day to keep the ingredients mixed.

5. Strain (Optional)

On the seventh day, you can either strain the solids out using a fine-mesh sieve or leave them in the jar. Storing the finished syrup in the refrigerator will help it last longer.


How to Use

  • Dosage: As requested, take one teaspoon a day starting on the seventh day.

  • Serving Tip: If the flavor is too intense, you can stir your teaspoon of syrup into a cup of warm (not boiling) water or herbal tea.


A Note on Safety

While these are natural kitchen ingredients, this tonic is a supplement and not a replacement for professional medical advice. Honey should never be given to infants under one year old. If you have specific health conditions or are taking medications, it is always best to consult with a healthcare provider before starting a new daily regimen.

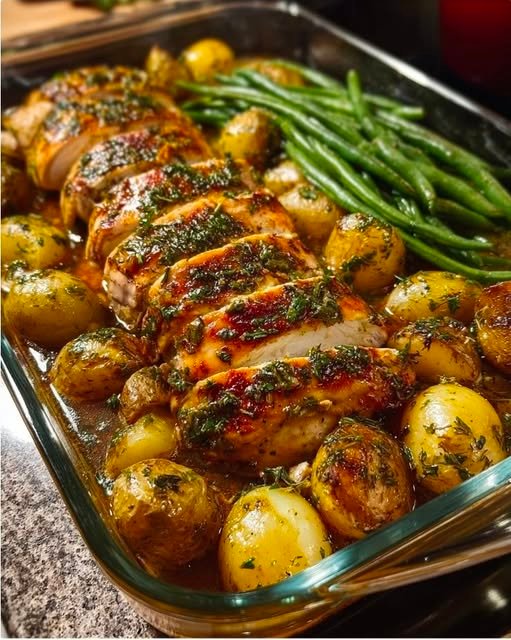
Garlic Butter Chicken with Roasted Potatoes & Green Beans

Garlic Butter Chicken with Roasted Potatoes & Green Beans

Prep: 10 mins | Cook: 35 mins | Serves: 4

Introduction

garlic butter chicken and potatoes is the kind of comforting one-pan dinner that feels fancy but cooks effortlessly on a busy night. Juicy golden chicken, crispy roasted potatoes, and tender green beans all soak up a rich garlic butter sauce that smells incredible as it roasts. The flavors are savory, buttery, and slightly caramelized, with fresh herbs brightening every bite. It’s special because everything cooks together, building flavor in one pan. Quick tip: cut your potatoes evenly so they roast at the same speed and get perfectly crisp edges.

Ingredients

  • 4 boneless skinless chicken thighs (about 1 ½ lb / 680 g)
  • 1 lb baby Yukon gold potatoes, halved (450 g)
  • 8 oz fresh green beans, trimmed (225 g)
  • 4 tbsp unsalted butter, melted (60 g)
  • 4 cloves garlic, minced
  • 1 tbsp olive oil (15 ml)
  • 1 tsp salt (5 g)
  • ½ tsp black pepper (2 g)
  • 1 tsp paprika (5 g)
  • 1 tsp Italian seasoning (5 g)
  • ½ tsp chili flakes (optional)
  • 1 tbsp fresh parsley, chopped (15 g)
  • 1 tbsp lemon juice (15 ml)

Step-by-Step Instructions

  1. Preheat your oven to 425°F (220°C) and line a large sheet pan with parchment or lightly oil it. Toss the halved potatoes with olive oil, half the salt, and half the pepper, then spread them cut-side down and roast for 12 minutes until they start to soften and lightly brown.
  2. Mix the melted butter, garlic, paprika, Italian seasoning, chili flakes (if using), and remaining salt and pepper. Pat the chicken dry so it browns beautifully and holds seasoning evenly.
  3. Remove the pan from the oven and push the potatoes to one side. Add the chicken and brush generously with the garlic butter mixture, then scatter green beans around the chicken and drizzle the remaining butter over everything.
  4. Roast for 20–25 minutes, or until the chicken reaches 165°F (74°C). The potatoes should be crisp outside and fluffy inside, and the beans tender with slightly blistered edges; broil for 2–3 minutes at the end for extra browning if you like.
  5. Finish with parsley and lemon juice to brighten the rich butter. Rest for 3 minutes before serving so the chicken stays juicy.

FAQs

Q: Can I use chicken breasts instead of thighs?

Yes. Slice breasts in half horizontally so they cook evenly, and start checking doneness around 18–20 minutes since breasts dry out faster than thighs.

Q: How do I make this ahead for meal prep?

Roast fully, cool, and store in airtight containers for up to 4 days. Reheat in a 375°F (190°C) oven for 10–12 minutes to keep the potatoes crisp.

Q: Can I add other vegetables?

Absolutely. Broccoli, carrots, or zucchini work well—just choose veggies that roast in a similar time to green beans so nothing overcooks.

Flu Fighting Tea

Flu Fighting Tea

This soothing blend uses natural ingredients like ginger, turmeric, and lemon to create a comforting, warm beverage.

Ingredients

  • 3 cups Water

  • Juice of 1/2 Lemon

  • 1 Cinnamon stick

  • 1/4 inch Fresh ginger

  • 1/4 tsp Cloves

  • 1 tsp Turmeric

  • 1 pinch Cayenne pepper

  • 1 tbsp Honey (added after simmering)


Instructions

  1. Combine Ingredients: Place the water, lemon juice, cinnamon stick, fresh ginger, cloves, turmeric, and cayenne into a medium-sized pot.

  2. Boil: Bring the entire mixture to a rolling boil over medium-high heat.

  3. Simmer: Once the tea reaches a boil, reduce the heat to low and let it simmer for approximately 10 minutes to allow the flavors and nutrients to infuse.

  4. Strain: Carefully pour the tea through a fine-mesh strainer into a mug to remove the cinnamon stick, ginger pieces, and cloves.

  5. Sweeten: Stir in 1 tablespoon of honey until fully dissolved.

  6. Serve: Drink the tea while it is still warm for the best experience.