The Perfect Boiled Egg Guide


The Perfect Boiled Egg Guide

Timings (from a boiling start)

  • 6 Minutes: Liquid gold yolk, soft set white.

  • 7 Minutes: Jammy, custard-like yolk (perfect for sourdough toast).

  • 8 Minutes: Softly set yolk, fully firm white.

  • 10–12 Minutes: Classic hard-boiled (ideal for salads or meal prep).

Instructions

  1. Boil the Water: Fill a saucepan with enough water to cover the eggs by an inch. Bring to a rolling boil.

  2. Lower Gently: Use a slotted spoon to gently lower cold eggs into the water to prevent cracking. Turn the heat down slightly to a simmer.

  3. The Ice Bath: While they cook, prepare a bowl of ice and cold water.

  4. Shock Them: Once the timer goes off, immediately move the eggs to the ice bath for at least 5 minutes. This stops the cooking process and makes them much easier to peel.


Recipe Q&A: Boiled Egg Nutrition

Q: Does boiling an egg change its nutritional value compared to frying? A: Boiling is generally considered one of the healthiest ways to prepare eggs because it doesn’t require added fats or oils. It also keeps the yolk contained, which helps protect the delicate antioxidants like lutein from high-heat oxidation.

Q: Why do some hard-boiled eggs have a green ring around the yolk? A: That green ring is a harmless reaction between sulfur in the white and iron in the yolk. It usually happens when eggs are overcooked or not cooled quickly enough. Using the “ice bath” method mentioned above prevents this!

Q: Are boiled eggs really good for weight management? A: Yes! Because they are high in protein and healthy fats, they have a high “satiety index.” This means they make you feel full for longer, which can naturally reduce the urge to reach for processed snacks later in the day.

Q: Can I get enough Vitamin D just from eggs? A: While eggs are one of the few natural food sources of Vitamin D, one egg typically provides about 5–10% of your daily needs. They are a great supplement to your intake, especially when paired with other nutrient-dense foods.
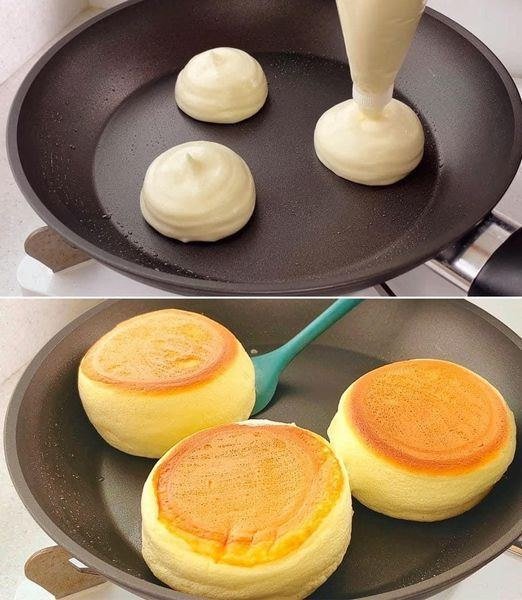

3-Ingredient Soufflé Skillet Cakes

3-Ingredient Soufflé Skillet Cakes

Ingredients

  • 2 large eggs (separated into whites and yolks)

  • 1 tablespoon whole milk

  • 2 tablespoons all-purpose flour

  • Optional: 1 tablespoon sugar (if you prefer them sweet)

Step-by-Step Instructions

  1. Prepare the Egg Yolks: In a small bowl, whisk the egg yolks with the milk until combined. Sift in the flour and whisk until you have a smooth, thick paste.

  2. Whisk the Egg Whites: In a separate, very clean bowl, beat the egg whites (and sugar, if using) until they reach stiff peaks. You should be able to hold the bowl upside down without the whites falling out.

  3. Combine Gently: Fold a small scoop of the egg whites into the yolk mixture to lighten it. Then, very gently fold the rest of the whites into the yolk mixture. Use a spatula and a “cut and fold” motion to keep as much air in the batter as possible.

  4. Heat the Pan: Lightly grease a non-stick skillet and set it over the lowest possible heat.

  5. Cook the Cakes: Spoon or pipe the batter into the pan to form tall mounds. Add a few drops of water to empty spaces in the pan (this creates steam) and cover with a lid immediately.

  6. Flip Carefully: Cook for about 4–5 minutes until the bottom is golden and the top looks set. Carefully flip them over, add another drop of water, cover, and cook for another 3 minutes.

  7. Serve: Transfer to a plate and serve immediately with a dusting of powdered sugar or a drizzle of honey.


Recipe Q&A: Soufflé Skillet Cakes

Q: Why did my cakes deflate after I took them out of the pan? A: This is normal for soufflé-style cakes, but if they collapse instantly, it usually means the egg whites weren’t beaten to stiff enough peaks or the batter was over-mixed, which popped the air bubbles.

Q: Can I make these without a lid? A: The lid is essential because it traps the steam and heat needed to “bake” the inside of these thick cakes. Without it, the bottom will burn before the center is cooked through.

Q: My cakes are raw in the middle; what did I do wrong? A: The heat was likely too high. These need a very low, slow cook. If the outside browns too fast, the inside won’t have time to set.

Q: Can I add flavorings like vanilla or cocoa? A: Yes! You can add a drop of vanilla extract to the yolk mixture. If you want chocolate cakes, replace one teaspoon of flour with cocoa powder.

No-Cook Spicy Carrot Pickle

No-Cook Spicy Carrot Pickle (Instant Achaar)

📝 Ingredients:

•4–5 medium carrots (grated or julienne)

•3–4 cloves garlic (finely chopped)

•2 green chilies (finely chopped)

•1 tbsp red chili flakes

•½ tsp turmeric powder

•1 tsp salt (adjust to taste)

•1 tbsp sugar (optional, for balance)

•2 tbsp lemon juice OR vinegar

•3 tbsp mustard oil (or any oil)

•1 tbsp fresh coriander (chopped)

⸻

👩‍🍳 Step-by-Step Method:

Step 1: Prepare the carrots

Wash, peel, and grate or thinly slice the carrots. Put them in a large mixing bowl.

Step 2: Add aromatics

Add chopped garlic, green chilies, and fresh coriander to the carrots.

Step 3: Add spices

Sprinkle in:

•Red chili flakes

•Turmeric

•Salt

•Sugar (if using)

Mix everything well so spices coat the carrots evenly.

Step 4: Add tanginess

Pour in lemon juice or vinegar. This gives the pickle its signature tangy flavor.

Step 5: Add oil

Heat mustard oil slightly (optional but enhances flavor), let it cool a bit, then pour over the mixture.

Step 6: Mix thoroughly

Mix everything very well using a spoon or clean hands.

Step 7: Store

Transfer into clean, dry glass jars. Press down slightly so everything settles.

Step 8: Rest time

Let it sit for 4–6 hours at room temperature before eating.

For best taste, leave it overnight.

⸻

😋 Serving Tips:

•Serve with roti, paratha, or rice

•Use as a side with BBQ or fried food

•Can also be eaten as a crunchy salad!

⸻

❓ Q&A (Helpful Tips)

Q1: How long does this pickle last?

👉 It stays fresh for 1–2 weeks in the fridge if stored in a clean jar.

Q2: Can I skip mustard oil?

👉 Yes, you can use any oil, but mustard oil gives authentic achaar flavor.

Q3: Why is my pickle watery?

👉 Carrots release water naturally. Just mix again before serving.

Q4: Can I make it less spicy?

👉 Reduce green chilies and chili flakes according to your taste.

Q5: Can I add other vegetables?

👉 Yes! You can add cabbage, radish, or turnip for variation.

Q6: Is cooking required at all?

👉 No 😊 This is a completely no-cook recipe, which makes it quick and easy!­

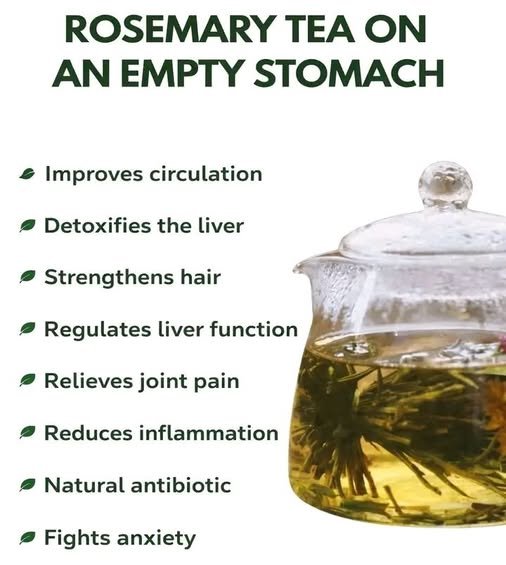
☕ The Real Benefits of Rosemary Tea

☕ The Real Benefits of Rosemary Tea

  • High in Antioxidants: Rosemary contains compounds like rosmarinic acid and carnosic acid, which help protect your cells from damage.

  • Anti-Inflammatory Properties: It is scientifically recognized for its ability to help lower inflammation in the body, which may indirectly help with mild joint discomfort.

  • Mental Clarity & Mood: There is promising research suggesting that the aroma and consumption of rosemary can improve focus and reduce cortisol (the stress hormone), helping with anxiety.

  • Digestive Aid: It can help with indigestion and bloating, which is likely why the “empty stomach” recommendation exists.


⚠️ A Reality Check on Common Claims

While rosemary is great, some of the claims in the image are a bit of an “AI-exaggeration” or medical oversimplification:

Claim The Reality
“Detoxifies the Liver” Your liver detoxifies itself! While rosemary supports liver health via antioxidants, “detox” is a marketing term. It supports function, it doesn’t “cleanse.”
“Natural Antibiotic” Rosemary has antimicrobial properties in a lab setting (petri dish), but drinking a cup of tea isn’t a substitute for antibiotics if you have a bacterial infection.
“Strengthens Hair” Applying rosemary oil topically to the scalp has shown results similar to Minoxidil for hair growth, but drinking the tea hasn’t been proven to have the same effect.

A Quick Tip for Safety

Rosemary is generally safe, but because it can act as a mild diuretic or interact with certain medications (like blood thinners or ACE inhibitors), it’s always a good idea to chat with a doctor if you plan on making it a daily high-dose habit.

Guava Leaf Wellness Tea

Guava Leaf Wellness Tea

The plant in your image is a Guava tree. Its leaves are traditionally brewed into a tea known for being rich in antioxidants.

Ingredients

  • 5–7 Fresh Guava Leaves: (Or 1 tablespoon of dried leaves).

  • 2 cups Water.

  • Optional: A slice of ginger or a teaspoon of honey for taste.

Step-by-Step Instructions

  1. Clean the Leaves: Wash fresh guava leaves thoroughly to remove any dust.

  2. Boil Water: Bring 2 cups of water to a boil in a small pot.

  3. Simmer: Add the leaves to the boiling water. Reduce heat and let it simmer for 10 minutes until the water turns a light yellow or green hue.

  4. Steep: Turn off the heat and let it sit for 2 minutes.

  5. Strain: Pour the tea through a sieve into a cup. Add honey or lemon if desired.

Q&A

  • Q: What does it taste like? * A: It has a mild, earthy, and slightly herbal flavor, similar to green tea.

  • Q: Can it cure diabetes? * A: While some studies suggest it may help support healthy blood sugar levels, it is a wellness tea and not a replacement for medical treatment. Always consult a doctor for health conditions.

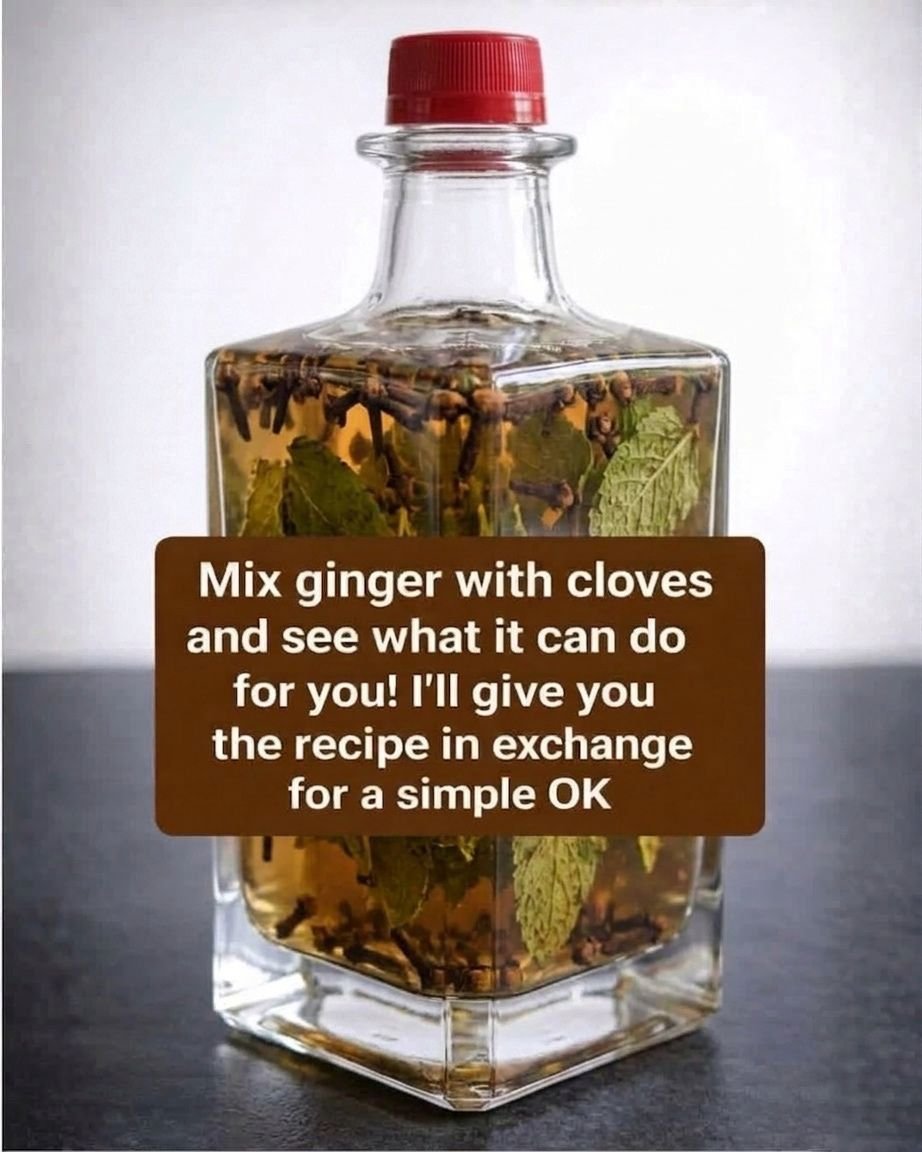
Ginger, Clove & Mint Wellness Infusion

Ginger, Clove & Mint Wellness Infusion

Ingredients

  • 2-inch piece of Fresh Ginger: Peeled and thinly sliced or grated to release the juices.

  • 10–12 Whole Cloves: High in antioxidants and known for their soothing properties.

  • A handful of Fresh Mint Leaves: For a refreshing finish and to aid digestion.

  • 4 cups Filtered Water: This will be the base of your infusion.

  • Optional: A squeeze of fresh lemon or a teaspoon of raw honey for added flavor.


Step-by-Step Instructions

  1. Prepare the Aromatics: Wash the ginger root thoroughly. Peel the skin and slice it into very thin rounds. This increases the surface area, allowing the water to absorb more of the active compounds.

  2. Combine in a Pot: Place the ginger slices and the whole cloves into a medium-sized pot.

  3. Simmer: Add the 4 cups of water and bring the mixture to a gentle boil. Once boiling, reduce the heat to low and let it simmer for 10–15 minutes. The water will begin to turn a light amber color.

  4. Add the Mint: Turn off the heat. Add the fresh mint leaves to the hot water. Do not boil the mint, as high heat can make the leaves taste bitter; instead, let them steep in the hot water for about 5 minutes.

  5. Strain and Cool: Strain the mixture through a fine-mesh sieve into a heat-resistant glass bottle or jar (similar to the one in your photo).

  6. Storage: You can serve this infusion warm immediately, or allow it to cool and store it in the refrigerator for up to 3 days. It is very refreshing when served chilled over ice.


Common Questions & Answers

Q: What are the benefits of drinking this infusion? A: Ginger and cloves are traditionally used to help soothe an upset stomach and support digestive health. The combination is also popular during the colder months for its warming effect on the body.

Q: Can I leave the ginger and cloves inside the bottle? A: You can, but the flavor will become much stronger and more pungent the longer they sit. For a balanced taste, it is usually best to strain them after the initial steeping.

Q: Is it safe to drink this every day? A: For most people, a cup or two a day is perfectly fine. However, cloves are quite potent, so if you are pregnant or taking specific medications (like blood thinners), it is always best to check with a healthcare professional first.

Q: Can I use ground spices instead of whole ones? A: You can use ground ginger or ground cloves if that is all you have, but the infusion will be very cloudy and might have a gritty texture. Using fresh and whole ingredients provides a much clearer, “cleaner” liquid.