Creamy Cheesy Chicken Roll-UpsΒ 

Creamy Cheesy Chicken Roll-Ups

πŸ“Œ About This Dish

These baked chicken roll-ups are soft, juicy, and filled with a rich creamy cheese mixture. They’re rolled into spirals and baked until golden, making them perfect for dinner, lunch, or even special gatherings ✨


πŸ₯£ Ingredients (Serves 4–5)

πŸ— For the Chicken

πŸ‘‰ 4 large chicken breasts (boneless, skinless)
πŸ‘‰ Β½ tsp salt
πŸ‘‰ Β½ tsp black pepper


πŸ§€ For the Creamy Filling

πŸ‘‰ Β½ cup cream cheese (softened)
πŸ‘‰ Β½ cup mozzarella cheese (shredded)
πŸ‘‰ Β½ cup cheddar cheese (shredded)
πŸ‘‰ 2 tbsp mayonnaise or thick yogurt
πŸ‘‰ 2 tbsp green onions (finely chopped) 🌿
πŸ‘‰ 1 tsp garlic powder
πŸ‘‰ Β½ tsp black pepper
πŸ‘‰ Β½ tsp salt


πŸ›’οΈ For Baking

πŸ‘‰ 1–2 tbsp olive oil or butter


πŸ”ͺ Step-by-Step Instructions

πŸ”Ή Step 1: Prepare the Chicken

➑️ Place chicken breasts on a cutting board
➑️ Slice each breast horizontally OR gently flatten with a rolling pin
➑️ Aim for thin, even pieces (this helps rolling)

πŸ’‘ Tip: Cover chicken with plastic while flattening to keep it neat


πŸ”Ή Step 2: Season the Chicken

➑️ Sprinkle salt and black pepper on both sides
➑️ Set aside for 5–10 minutes


πŸ”Ή Step 3: Prepare the Filling

➑️ Take a mixing bowl
➑️ Add:
βœ” cream cheese
βœ” mayonnaise or yogurt
βœ” garlic powder
βœ” salt + pepper

➑️ Mix until smooth and creamy


πŸ”Ή Step 4: Add Cheese & Herbs

➑️ Add mozzarella + cheddar
➑️ Add chopped green onions 🌿
➑️ Mix gently

πŸ‘‰ The mixture should be thick, creamy, and easy to spread


πŸ”Ή Step 5: Fill the Chicken

➑️ Take one chicken piece
➑️ Spread 2–3 tablespoons of filling evenly
➑️ Leave a little space at edges


πŸ”Ή Step 6: Roll the Chicken

➑️ Carefully roll from one side to the other
➑️ Keep it tight (like a spiral)
➑️ Place seam-side down

πŸ’‘ Tip: You can use toothpicks to hold shape if needed


πŸ”Ή Step 7: Prepare Baking Dish

➑️ Grease a baking dish with olive oil or butter
➑️ Arrange all chicken rolls neatly


πŸ”Ή Step 8: Bake

➑️ Preheat oven to 180°C (350°F)
➑️ Bake for 25–30 minutes

πŸ‘‰ For extra golden top:
➑️ Bake 5 more minutes or use top heat


πŸ”Ή Step 9: Rest & Serve

➑️ Remove from oven
➑️ Let rest for 5 minutes
➑️ Garnish with green onions 🌿
➑️ Serve warm


😍 Texture & Taste

βœ” Outside: light golden and slightly crisp
βœ” Inside: creamy, cheesy, soft
βœ” Flavor: rich, mild, and comforting


🍽️ Serving Ideas

πŸ‘‰ Serve with:
➑️ mashed potatoes πŸ₯”
➑️ rice 🍚
➑️ fresh salad πŸ₯—
➑️ garlic bread πŸ₯–


❓ Q & A

❓ Q1: Can I use only one type of cheese?

➑️ Yes πŸ‘
Use mozzarella for stretch OR cheddar for stronger flavor


❓ Q2: Can I make it ahead of time?

➑️ Yes 😊
βœ” Prepare rolls
βœ” Cover and refrigerate (up to 24 hours)
βœ” Bake when needed


❓ Q3: How do I keep rolls from opening?

➑️ Roll tightly
➑️ Place seam side down
➑️ Use toothpicks if needed


❓ Q4: Can I cook without oven?

➑️ Yes πŸ‘‡
➑️ Use a covered pan
➑️ Cook on low heat
➑️ Turn gently until done


❓ Q5: How to make it lighter?

➑️ Use yogurt instead of mayonnaise
➑️ Reduce cheese slightly
➑️ Add spinach or herbs 🌿


πŸ’‘ Pro Tips

πŸ‘‰ Don’t overfill (prevents spilling)
πŸ‘‰ Thin chicken cooks better
πŸ‘‰ Let it rest before cutting
πŸ‘‰ Use fresh ingredients for best taste

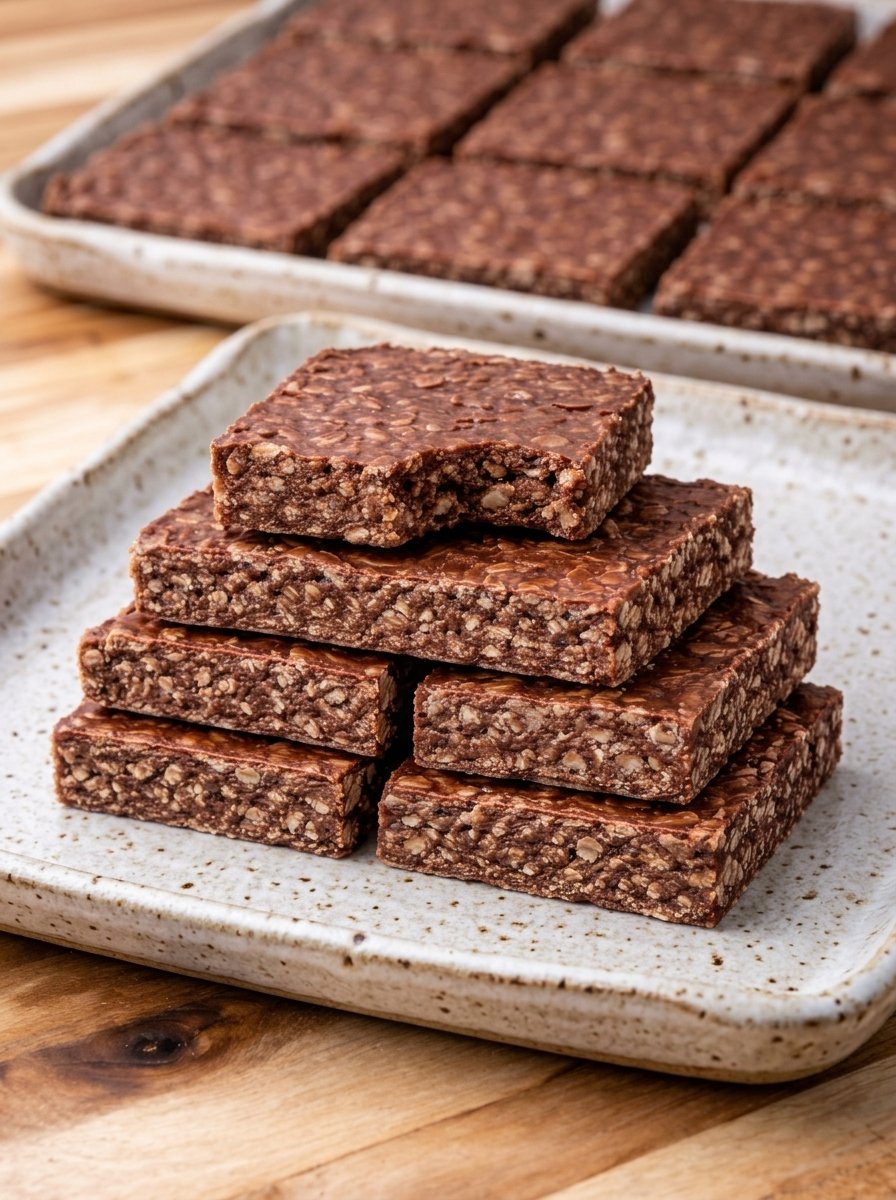
No-Bake Chocolate Oat Bars

No-Bake Chocolate Oat Bars

πŸ›’ Ingredients

  • 3 cups Rolled oats (Old-fashioned oats work best for texture) 🌾

  • 1 cup Creamy peanut butter (or almond butter) πŸ₯œ

  • 1/2 cup Honey or maple syrup 🍯

  • 1/4 cup Unsweetened cocoa powder 🍫

  • 1/2 cup Coconut oil (melted) πŸ₯₯

  • 1 tsp Vanilla extract 🍦

  • 1/4 tsp Salt πŸ§‚


πŸ“ Step-by-Step Instructions

  1. Prepare the Pan ➑️ Line an 8×8 inch square baking pan with parchment paper. Leave a little overhang on the sides so you can lift the bars out easily later. πŸ“

  2. Mix Wet Ingredients ➑️ In a large microwave-safe bowl (or a small saucepan over low heat), combine the peanut butter, honey, and coconut oil. Heat gently and stir until the mixture is completely smooth and liquid. πŸ”₯

  3. Add Flavor ➑️ Whisk in the cocoa powder, vanilla extract, and salt until there are no cocoa clumps left. You should have a glossy chocolate sauce. 🍫✨

  4. Incorporate the Oats ➑️ Pour the rolled oats into the chocolate mixture. Use a sturdy spatula to fold them in until every single oat is thoroughly coated in chocolate. πŸ₯£

  5. Press into Pan ➑️ Transfer the mixture into your prepared pan. Use the back of a spoon or a piece of parchment paper to press down firmly. The harder you press, the better the bars will hold together! πŸ’ͺ

  6. Chill ➑️ Place the pan in the refrigerator for at least 2 hours (or the freezer for 30 minutes) until they are completely firm to the touch. ❄️

  7. Slice and Serve ➑️ Lift the bars out using the parchment paper overhang. Use a sharp knife to cut them into even squares. πŸ”ͺπŸ“


❓ Common Questions (Q&A)

Q: Can I make these nut-free? A: Absolutely! ➑️ Swap the peanut butter for sunflower seed butter or tahini. They will still be delicious and creamy. 🌻

Q: My bars are crumbling when I cut them. What happened? A: This usually happens if they weren’t pressed down hard enough in the pan or if they haven’t chilled long enough. ➑️ Try pressing them more firmly next time and ensure they stay cold until serving! 🧊

Q: How should I store these? A: Because they use coconut oil (which melts at room temperature), it is best to keep them in an airtight container in the fridge for up to 1 week or the freezer for up to 3 months. β„οΈπŸ“¦

Q: Can I add “mix-ins”? A: Yes! ➑️ Fold in some shredded coconut, chia seeds, or mini dark chocolate chips for extra texture and flavor. πŸ₯₯🍫

Enjoy your homemade treats! πŸ˜‹βœ¨

Apple Cider Vinegar & Ginger Morning Tonic

Apple Cider Vinegar & Ginger Morning Tonic

This tonic is a popular wellness drink often shared in digital culinary communities. It combines fermented apple cider vinegar with warming spices and citrus to create a pungent, refreshing morning ritual. It is designed to be consumed on an empty stomach to “wake up” the digestive system.


The Full Recipe

  • Prep time: 2 minutes

  • Servings: 1

Ingredients:

  • 2 tablespoons Apple Cider Vinegar (Raw, unfiltered, with “the mother”)

  • 1 tablespoon Freshly squeezed lemon juice

  • 1/2 teaspoon Fresh grated ginger (or a pinch of ground ginger)

  • 1 teaspoon Raw honey or Stevia (optional, for sweetness)

  • 1 pinch Cayenne pepper (optional, for a metabolic kick)

  • 10 oz Lukewarm water (Avoid boiling water, as it can kill the beneficial bacteria in the vinegar)

Instructions:

  1. Combine: In a large glass, add the apple cider vinegar and lemon juice.

  2. Infuse: Stir in the grated ginger and honey until the honey is fully dissolved.

  3. Dilute: Pour in the lukewarm water.

  4. Mix: Stir well and drink immediately, ideally through a straw to protect your tooth enamel.


Reported Benefits

  • Digestive Aid: The acetic acid in the vinegar may help increase stomach acidity to assist in breaking down food.

  • Blood Sugar Management: Some studies suggest that vinegar can improve insulin sensitivity after high-carb meals.

  • Anti-Inflammatory Properties: Ginger and lemon are rich in antioxidants that help combat oxidative stress in the body.

  • Hydration: Starting the day with 10–12 ounces of water helps rehydrate the body after sleep.


Common Questions & Answers

Q: Can I drink this multiple times a day? A: It is generally recommended to limit this to 1–2 times per day. Excessive vinegar consumption can lead to low potassium levels or digestive upset.

Q: Does it have to be “with the mother”? A: Yes. The “mother” contains the beneficial proteins, enzymes, and friendly bacteria that give the vinegar its cloudy appearance and most of its health properties.

Q: Will this cure my joint pain or depression? A: No. While it can be part of a healthy lifestyle, it is not a medical treatment for clinical conditions. These claims in social media images are often exaggerated.


Important Things to Remember

  • Protect Your Teeth: Vinegar is highly acidic. Never drink it straight. Always dilute it in water and consider rinsing your mouth with plain water afterward to prevent enamel erosion.

  • Listen to Your Body: If you experience stomach pain, heartburn, or nausea after drinking this, discontinue use or reduce the amount of vinegar to 1 teaspoon.

  • Consult a Doctor: If you are on medication for diabetes or heart disease (specifically diuretics), talk to your doctor before adding daily apple cider vinegar to your routine, as it can interact with certain drugs.

Mexican Oregano Wellness Tea

Mexican Oregano Wellness Tea

This is the most common β€œrecipe” associated with the claims in your image. It’s soothing, aromatic, and great for digestion.

  • Prep time:Β 2 mins

  • Steep time:Β 5 mins

  • Servings:Β 1

Ingredients

  • 1 to 2 largeΒ fresh Mexican Oregano leaves (washed)

  • 1 cupΒ boiling water

  • Optional:Β 1 tsp honey or a squeeze of fresh lime

Instructions

  1. Bruise the Leaf:Β Gently tear or bruise the fresh leaf with your fingers to release the essential oils.

  2. Steep:Β Place the leaf in a mug and pour the boiling water over it.

  3. Cover:Β Cover the mug with a saucer. This prevents the beneficial aromatic oils from escaping with the steam.

  4. Wait:Β Let it sit for about 5 minutes.

  5. Enjoy:Β Remove the leaf and add honey if you prefer a sweeter taste.

πŸ“‹Β Recipe Notes & Tips

  • Fresh is Best:Β This specific variety is much more potent when used fresh rather than dried.

  • Potency:Β One leaf is usually enough! The flavor is very strongβ€”much more intense than the Mediterranean oregano you find on pizza.

  • Cooking:Β You can also finely mince one leaf and add it to black beans, stews, or fatty meats. It helps β€œcut” the heaviness and aids digestion.

πŸ’‘Β Benefits & Nutritional Info

Mexican Oregano contains compounds likeΒ carvacrolΒ andΒ thymol, which are known for:

  • Antioxidant Properties:Β Helping the body fight oxidative stress.

  • Digestive Support:Β Traditionally used to reduce bloating and gas.

  • Respiratory Comfort:Β The aromatic vapors can help clear nasal passages (similar to eucalyptus).

Component Level
Calories ~2 kcal per leaf
Vitamin C Trace amounts
Vitamin A High (in the form of carotenoids)
Fiber Low (if consumed as tea)

❓ Common Q&A

Q: Can I eat the leaf raw?

A: Yes, but it is very pungent and has a fuzzy, thick texture that some find unpleasant. Steeping it is usually preferred.

Q: Can I drink this every day?

A: For most people, a cup of herbal tea is safe. However, if you are pregnant, breastfeeding, or on medication, always check with a doctor first, as concentrated herbs can interact with certain treatments.

Q: Does it actually cure anxiety and insomnia?

A: No. While the ritual of drinking warm tea can be relaxing (which helps with sleep), it is not a clinical treatment for anxiety disorders.

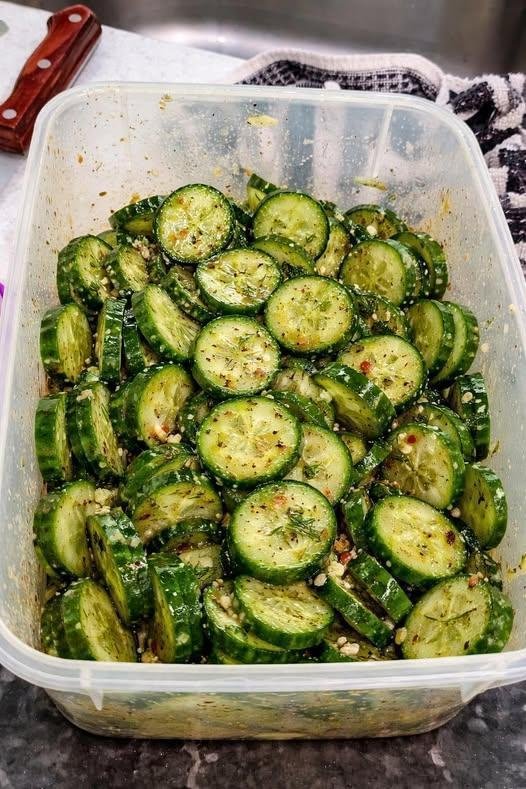
Garlic Herb Cucumber Salad

Garlic Herb Cucumber Salad

Description

A crisp and refreshing salad made from sliced cucumbers tossed with garlic, herbs, olive oil, vinegar, and a touch of chili for a flavorful bite. Perfect for summer meals, BBQs, or as a healthy side dish to any main course.

Ingredients

  • 4–5 medium cucumbers, thinly sliced

  • 2–3 cloves garlic, minced

  • 2 tbsp olive oil

  • 2 tbsp white vinegar or apple cider vinegar

  • 1 tsp dried oregano or Italian seasoning

  • 1/4 tsp crushed red pepper flakes (optional, for heat)

  • Salt and black pepper, to taste

  • 1–2 tbsp crumbled feta cheese (optional)

  • Fresh dill or parsley, chopped (optional garnish)

Instructions

  1. Prepare Cucumbers: Wash and slice cucumbers into thin rounds. Pat dry with a paper towel to remove excess moisture.

  2. Mix Dressing: In a bowl, whisk together minced garlic, olive oil, vinegar, herbs, red pepper flakes, salt, and pepper.

  3. Combine: Add cucumber slices to the bowl and toss until evenly coated with the dressing.

  4. Optional Additions: Sprinkle feta cheese and fresh herbs on top for extra flavor.

  5. Chill: Refrigerate for at least 30 minutes to allow the flavors to meld. Serve cold.

Notes & Tips

  • For Crispier Cucumbers: Sprinkle a pinch of salt on the sliced cucumbers and let them sit for 10 minutes, then drain excess water before tossing with the dressing.

  • Variation: Add thinly sliced red onion or cherry tomatoes for extra color and flavor.

  • Make Ahead: Can be prepared a few hours in advance and stored in an airtight container in the fridge.

  • Vegan Option: Skip the feta or use a plant-based cheese substitute.

Servings

  • Serves 4–6 as a side dish

Nutritional Info (per serving, approx.)

  • Calories: 60 kcal

  • Protein: 1 g

  • Fat: 4 g

  • Carbohydrates: 6 g

  • Fiber: 1 g

  • Sugar: 3 g

  • Sodium: 150 mg (depending on added salt and feta)

Health Benefits

  • Low Calorie: Great for weight management.

  • Hydrating: Cucumbers are over 95% water, helping with hydration.

  • Antioxidants: Garlic and herbs provide antioxidants and anti-inflammatory properties.

  • Digestive Support: High water and fiber content aids digestion.

Q/A for Recipe

Q:Β Can I use other types of cucumbers?
A:Β Yes! English cucumbers work best, but regular cucumbers are fineβ€”just peel if the skin is thick.

Q:Β How long does it last in the fridge?
A:Β Up to 3 days in an airtight container, though it’s best fresh for crunch.

Q:Β Can I make it spicy?
A:Β Absolutely! Increase red pepper flakes or add a dash of hot sauce.

Q:Β Can this be served warm?
A:Β It’s best served chilled, but it can be served at room temperature if needed.

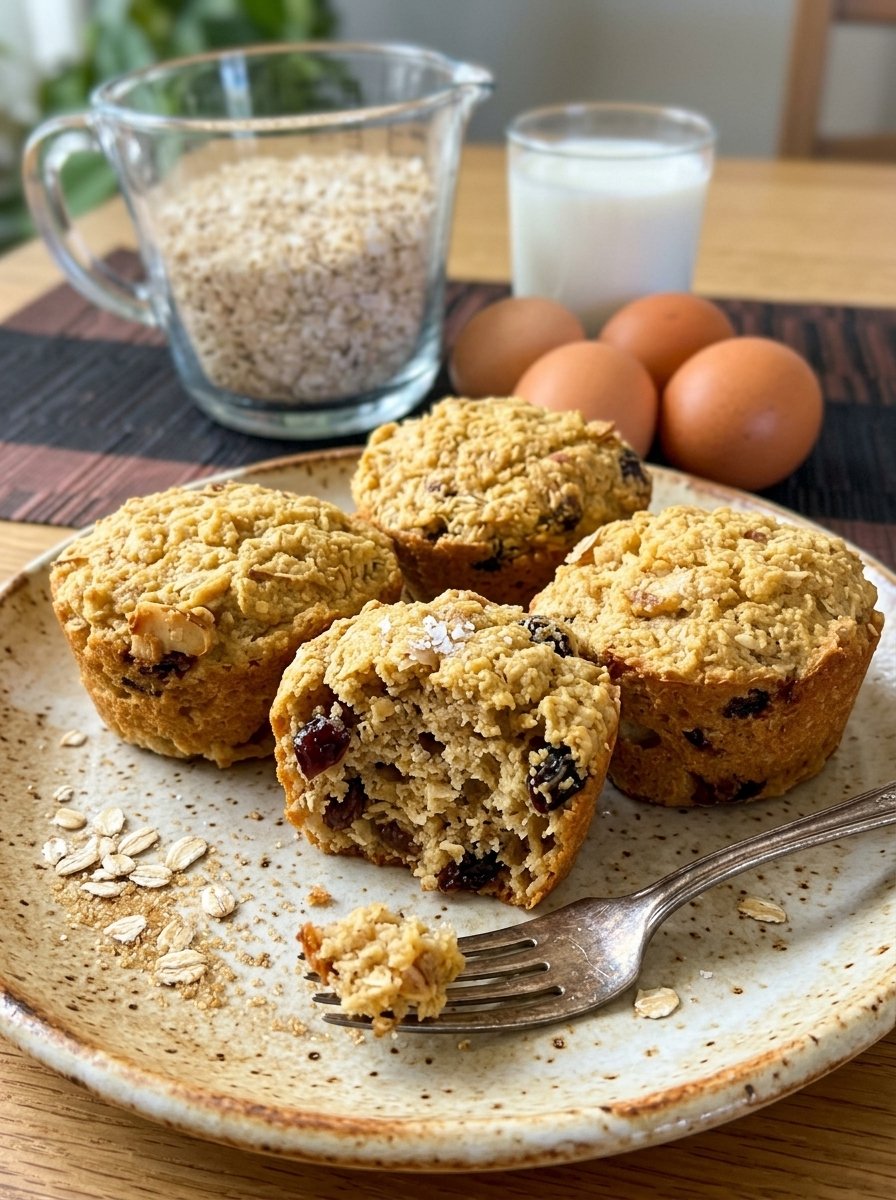
Protein-Packed Golden Oat Muffins

Protein-Packed Golden Oat Muffins 🌾

A simple, wholesome recipe that uses pantry staples to create a soft, satisfying texture perfect for busy mornings.

πŸ›’ Ingredients

  • Oats: 2 cups Rolled oats (or quick oats) πŸ₯£

  • Liquid: 1 cup Milk (dairy or plant-based) πŸ₯›

  • Eggs: 4 Large eggs πŸ₯š

  • Sweetener: 3-4 tbsp Honey or Maple syrup (optional) 🍯

  • Leavening: 1 tsp Baking powder πŸ§‚

  • Flavor: 1 tsp Vanilla extract & a pinch of Cinnamon ✨

  • Mix-ins: A handful of raisins or chopped nuts (as seen in the photo) πŸ₯œ


πŸ‘©β€πŸ³ Step-by-Step Instructions

  1. Soak the Oats ➑️ In a medium bowl, combine the oats and milk. Let them sit for about 10 minutes. This softens the oats and ensures your muffins aren’t dry. πŸ₯£πŸ₯›

  2. Whisk the Eggs ➑️ In a separate large bowl, whisk the 4 eggs until light and frothy. Add your honey, vanilla extract, and cinnamon. πŸ₯šβœ¨

  3. Combine ➑️ Pour the soaked oat mixture into the egg mixture. Add the baking powder and stir gently until everything is well incorporated. πŸŒ€

  4. Add Texture ➑️ Fold in your raisins or chopped nuts. This adds a lovely contrast to the soft muffin base. πŸ₯œπŸ‡

  5. Fill the Tins ➑️ Grease a muffin tray with a little butter or oil. Pour the batter into the cups, filling them about 3/4 of the way full. 🧁➑️

  6. Bake ➑️ Place in a preheated oven at 180Β°C for 20–25 minutes. They are done when the tops are golden brown and spring back when lightly touched. πŸ•’πŸ”₯

  7. Cool & Serve ➑️ Let them cool in the pan for a few minutes before moving to a wire rack. Enjoy them warm! ☁️✨


❓ Common Questions (Q&A)

Q: Can I make these flourless? A: Yes! This specific recipe relies on the oats and eggs for structure, so there is no need for traditional white flour. It’s a great option for those looking for a more natural treat. πŸŒΎβœ…

Q: My muffins stuck to the pan, what should I do? A: Because these are quite moist, they can stick. Using paper liners or silicone muffin molds makes it much easier to pop them out perfectly every time! πŸ§πŸ›‘οΈ

Q: Can I blend the batter? A: If you prefer a smoother, cake-like texture instead of the “chunky” oat look in the photo, you can put all the ingredients (except the raisins/nuts) in a blender before baking. πŸŒͺ️

Q: How do I store these? A: Since they contain eggs and milk, keep them in an airtight container in the fridge for up to 4 days. You can also freeze them for up to a month and just pop one in the microwave for 30 seconds! β„οΈπŸ“±