Butter Biscuits & Soft Melting Cookies

Butter Biscuits & Soft Melting Cookies

Yields: Approximately 40–50 biscuits
Preparation Time: 20 minutes
Baking Time: 10–12 minutes

These butter-based biscuits are light, tender, and gently crisp at the edges. The same dough can be shaped in different ways to create both simple butter biscuits and soft, swirl-style cookies. They are perfect for sharing, gifting, or enjoying with tea.


📋 Ingredients

  • 500 g butter, softened at room temperature

  • 1 cup fine or granulated sugar

  • 3 large eggs

  • 3 tablespoons neutral oil

  • 1 teaspoon vanilla flavoring

  • 5 cups all-purpose flour, sifted

  • 4 teaspoons baking powder

  • ¼ teaspoon bicarbonate of soda

Optional Decorations

  • Glacé cherries, finely chopped

  • Fruit jam (such as apricot or strawberry)

  • Melted chocolate for drizzling


👩‍🍳 Step-by-Step Instructions

Step 1: Prepare the Butter Mixture

  1. Place the softened butter and sugar in a large mixing bowl.

  2. Beat together until light in color and creamy in texture.

  3. Add the oil and vanilla flavoring.

  4. Beat in the eggs one at a time, mixing well after each addition.


Step 2: Add Dry Ingredients

  1. In a separate bowl, sift together the flour, baking powder, and bicarbonate of soda.

  2. Gradually add the dry mixture to the butter mixture.

  3. Mix gently until a soft, smooth dough forms.

  4. Stop mixing once combined to keep the biscuits tender.


Step 3: Shape the Biscuits

  1. Preheat the oven to 180°C (350°F).

  2. Lightly grease or line baking trays with parchment paper.

For Swirl-Style Cookies

  • Transfer the dough to a piping bag fitted with a large star nozzle.

  • Pipe small swirls onto the tray.

  • Add a small amount of jam or a piece of cherry in the center if desired.

For Simple Butter Biscuits

  • Roll small portions of dough into balls and flatten gently with a fork,
    or

  • Roll the dough out and cut into shapes using a cutter.


Step 4: Bake

  1. Place trays in the preheated oven.

  2. Bake for 10–12 minutes, until the edges are lightly colored.

  3. The biscuits should remain pale for a soft texture.


Step 5: Cool and Finish

  1. Remove biscuits from the oven.

  2. Allow them to cool completely on a wire rack.

  3. Once cooled, drizzle with melted chocolate if desired.


🧊 Storage Tips

  • Store in an airtight container at room temperature for up to 2 weeks

  • Flavors develop further after resting for a day


💡 Helpful Notes

  • Butter should be soft, not melted, before mixing

  • Avoid overmixing to maintain a light texture

  • Use similar-sized portions for even baking
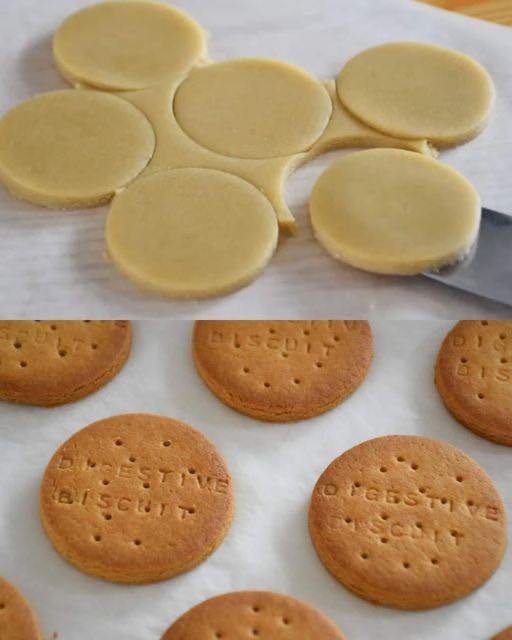
Homemade Whole Wheat Digestive Biscuits

🍪 Homemade Whole Wheat Digestive Biscuits

Yields: Approximately 15–20 biscuits
Preparation Time: 20 minutes
Chilling Time: 30 minutes
Baking Time: 15–18 minutes

These homemade digestive-style biscuits are crisp, lightly sweet, and made with simple pantry ingredients. They are ideal for enjoying with tea, coffee, or as a light snack.


📋 Ingredients

Dry Ingredients

  • 1½ cups (240 g) whole wheat flour

  • ½ cup (75 g) powdered sugar

  • 1 teaspoon baking powder

  • ¼ teaspoon salt (use only if butter is unsalted)

Fat

  • ½ cup (130 g) cold butter, cut into small cubes

Liquid

  • 5 tablespoons cold milk


👩‍🍳 Step-by-Step Instructions

Step 1: Combine Dry Ingredients

  1. In a large mixing bowl, sift together the whole wheat flour, powdered sugar, and baking powder.

  2. Add salt if using unsalted butter.

  3. Whisk until evenly mixed.


Step 2: Add the Butter

  1. Add the cold butter cubes to the flour mixture.

  2. Using your fingertips or a pastry cutter, rub the butter into the flour.

  3. Continue until the mixture resembles fine crumbs.
    Keeping the butter cold helps create a crisp texture.


Step 3: Form the Dough

  1. Add the cold milk one tablespoon at a time.

  2. Mix gently until the dough just comes together.

  3. Avoid kneading; the dough should be firm, not soft.

  4. If the mixture feels too dry, add 1 teaspoon of milk.


Step 4: Chill the Dough

  1. Shape the dough into a flat disc.

  2. Wrap it and refrigerate for 30 minutes.
    Chilling helps with rolling and improves texture.


Step 5: Roll and Shape

  1. Preheat the oven to 180°C (350°F).

  2. Place the chilled dough between two sheets of parchment paper.

  3. Roll to about 5 mm thickness.

  4. Cut into rounds using a cookie cutter.

  5. If desired, lightly press or mark the surface with a fork or toothpick.


Step 6: Bake

  1. Arrange the biscuits on a parchment-lined baking tray.

  2. Leave a little space between each biscuit.

  3. Bake for 15–18 minutes, or until the edges turn lightly golden.


Step 7: Cool Completely

  1. Remove the tray from the oven.

  2. Transfer biscuits to a wire rack.

  3. Allow them to cool fully; they will become crisp as they rest.


🍽️ Serving Suggestions

  • Enjoy with tea, coffee, or warm milk

  • Serve with fruit spreads or nut butter

  • Use as a base for layered desserts


🧊 Storage Tips

  • Store in an airtight container at room temperature for up to 1 week

  • Keep away from moisture to maintain crispness


💡 Helpful Notes

  • For less sweetness, reduce powdered sugar slightly

  • Butter can be replaced with chilled plant-based fat if needed

  • Thinner biscuits will bake faster and become crisper

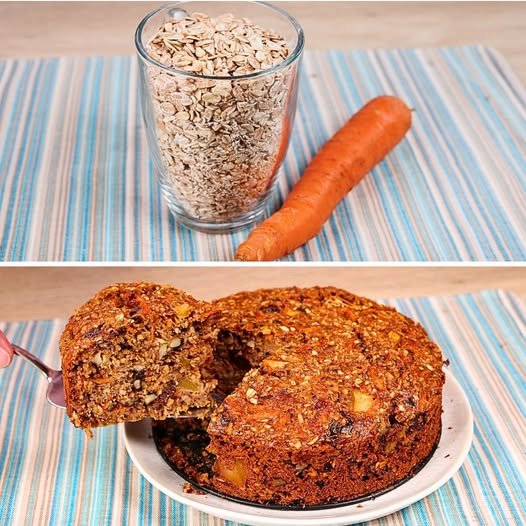
Wholesome Carrot Cake (No Refined Flour, No Added Sugar)

🥕 Wholesome Carrot Cake (No Refined Flour, No Added Sugar)

Serves: 6 slices
Preparation Time: 15 minutes
Baking Time: 45–50 minutes

This carrot cake is soft, naturally sweet, and easy to prepare using simple ingredients. It relies on oats, fruits, and nuts for structure and flavor, making it suitable for breakfast, snacks, or a light dessert. No special equipment is needed—just a bowl, a spoon, and an oven.


📋 Ingredients

  • 2 cups (200 g) oat flakes

  • 1 teaspoon baking powder

  • 1 cup (240 ml) milk of choice

  • 1 medium carrot, finely grated

  • 1 medium apple, finely grated

  • 4 tablespoons raisins, rinsed and drained

  • ¼ cup (50 g) walnuts, chopped

  • 3 large eggs

  • 2 tablespoons olive oil

  • 4 tablespoons stevia or preferred sweetener

  • ½ teaspoon vanilla flavoring (optional)


👩‍🍳 Step-by-Step Instructions

Step 1: Prepare the Oats

Place the oat flakes in a mixing bowl. For a softer texture, you may blend them briefly to create a coarse flour.


Step 2: Add Dry Ingredients

Add the baking powder to the oats and mix well to distribute evenly.


Step 3: Prepare Fruits and Vegetables

Grate the carrot and apple using a fine grater. Add them directly to the oat mixture.


Step 4: Add Liquid Ingredients

Crack the eggs into the bowl. Pour in the milk and olive oil. Add the sweetener and vanilla flavoring if using.


Step 5: Mix the Batter

Stir everything together until well combined. The batter will be thick.
Let it rest for 5 minutes so the oats can absorb moisture.


Step 6: Add Raisins and Nuts

Gently fold in the raisins and chopped walnuts until evenly distributed.


Step 7: Prepare the Baking Tin

Line an 18 cm (7-inch) round cake tin with parchment paper or lightly grease it.


Step 8: Bake

  1. Preheat the oven to 180°C (360°F).

  2. Pour the batter into the prepared tin and smooth the top.

  3. Bake for 45–50 minutes, until the top is set and lightly golden.

  4. Insert a toothpick into the center; it should come out clean.


Step 9: Cool and Serve

Remove the cake from the oven and allow it to cool completely before slicing.


🍽️ Serving Ideas

  • Serve warm or chilled

  • Pair with plain yogurt or fresh fruit

  • Slice into smaller portions for snacks or packed meals


🧊 Storage Tips

  • Store in an airtight container in the refrigerator for up to 5 days

  • Individual slices can be frozen for up to 2 months

  • Warm briefly before serving if desired


💡 Helpful Notes

  • Walnuts can be replaced with seeds for a nut-free version

  • Raisins may be replaced with chopped dates

  • Apples with natural sweetness work best

The Best Air Fryer Grilled Cheese Sandwich

The Best Air Fryer Grilled Cheese Sandwich

Serves: 1–2 people
Preparation Time: 5 minutes
Cooking Time: 8–10 minutes

This Air Fryer Grilled Cheese Sandwich delivers a perfectly crisp outside with a warm, creamy cheese center—all made quickly and easily. Using an air fryer allows even browning with minimal effort, making this a reliable go-to meal any time of day.


📋 Ingredients

  • 2 slices bread (white, sourdough, whole wheat, or preferred type)

  • 2–3 slices cheese (cheddar, mozzarella, American, or a combination)

  • 1–2 tablespoons butter, softened
    or mayonnaise for a crisp finish

Optional Add-Ins

  • Thinly sliced tomatoes

  • Cooked bacon or ham

  • Avocado slices

  • Jalapeños or red pepper flakes (optional)


👩‍🍳 Step-by-Step Instructions

Step 1: Preheat the Air Fryer

  1. Preheat the air fryer to 375°F (190°C).

  2. Allow it to warm for 2–3 minutes to ensure even cooking.


Step 2: Prepare the Bread

  1. Spread a thin, even layer of butter or mayonnaise on one side of each slice of bread.

  2. This coated side will become the outer, crispy surface.


Step 3: Assemble the Sandwich

  1. Place one slice of bread on a plate, coated side down.

  2. Layer the cheese evenly over the bread.

  3. Add any optional ingredients if desired.

  4. Top with the second slice of bread, coated side facing up.


Step 4: Cook

  1. Place the sandwich carefully into the air fryer basket.

  2. Cook for 4–5 minutes, then gently flip the sandwich.

  3. Continue cooking for another 4–5 minutes, or until:

    • The bread is golden and crisp

    • The cheese is fully melted


Step 5: Serve

  1. Remove the sandwich from the air fryer.

  2. Let it rest for 1 minute.

  3. Slice in half and serve warm.


🌟 Why This Recipe Works

  • Even Crisping: Hot air circulates evenly for consistent browning.

  • Smooth Melting: The closed air fryer environment helps melt the cheese evenly.

  • Simple Technique: Butter or mayonnaise creates a beautifully crisp texture.


🔄 Variations to Try

  • Cheese Upgrade: Use gouda, brie, or a cheese blend

  • Vegetable Option: Add spinach, roasted peppers, or caramelized onions

  • Spicy Style: Try pepper jack cheese or mild chili flakes

  • Gluten-Free: Use gluten-free bread

  • Sweet Version: Use chocolate spread with banana slices for a dessert-style sandwich


💡 Helpful Tips

  • Do not overfill the sandwich to keep it easy to flip

  • Flip gently using a spatula or tongs

  • Best enjoyed fresh, but leftovers can be reheated in the air fryer for 1–2 minutes


🍽️ Serving Ideas

  • Pair with tomato soup for a comforting meal

  • Serve with a fresh salad or sliced fruit

  • Cut into smaller portions for sharing

No-Bake Banana Chocolate Walnut Cake

🍌🍫 No-Bake Banana Chocolate Walnut Cake

Serves: 6–8 people
Preparation Time: 15 minutes
Chilling Time: 2–4 hours

This No-Bake Banana Chocolate Walnut Cake is smooth, rich, and naturally satisfying. It comes together quickly without using an oven, making it perfect for warm days, quick desserts, or special family treats. The combination of banana, chocolate, and walnuts creates a balanced texture and flavor everyone enjoys.


📋 Ingredients

  • 2 large ripe bananas, mashed until smooth

  • 1 cup (300 g) condensed milk

  • 1 tablespoon cocoa powder

  • 7 oz (200 g) digestive biscuits or graham crackers, crushed into fine crumbs

  • ½ cup walnuts, roughly chopped

Optional Topping

  • 1 additional banana, thinly sliced for decoration

  • Extra chopped walnuts or a light dusting of cocoa powder (optional)


👩‍🍳 Step-by-Step Instructions

Step 1: Prepare the Chocolate Banana Mixture

  1. Place a medium saucepan over low heat.

  2. Add the condensed milk and cocoa powder.

  3. Stir continuously until the mixture becomes smooth and evenly blended.

  4. Add the mashed bananas.

  5. Continue stirring gently for 2–3 minutes until the mixture thickens slightly.

  6. Remove from heat and allow it to cool for a minute.


Step 2: Add Crunch and Texture

  1. Add the crushed biscuits to the warm mixture.

  2. Add the chopped walnuts.

  3. Fold everything together gently until all crumbs are evenly coated.

  4. The mixture should be thick and easy to shape.


Step 3: Shape the Cake

  1. Lightly grease an 8×8-inch baking dish or line it with parchment paper.

  2. Transfer the mixture into the dish.

  3. Press it down firmly using the back of a spoon or spatula.

  4. Smooth the surface evenly.


Step 4: Decorate

  1. Arrange banana slices neatly across the top.

  2. Sprinkle extra walnuts or cocoa powder if desired.

  3. Press lightly so the topping stays in place.


Step 5: Chill and Serve

  1. Place the dish in the refrigerator.

  2. Chill for at least 2 to 4 hours, or until firm.

  3. Once set, slice into squares or rectangles.

  4. Serve cold for best texture and flavor.


🌟 Helpful Tips

  • Fresh Appearance: If preparing ahead, lightly brush banana slices with a small amount of lemon juice to help maintain their color.

  • Extra Smooth Finish: A thin layer of melted chocolate can be spread on top before decorating for added richness.

  • Nut Options: Pecans or hazelnuts can be used instead of walnuts for a different texture.

Crispy Potato & Egg Nest Muffins

🥔🍳 Crispy Potato & Egg Nest Muffins

Yields: 12 muffins
Prep Time: 15 minutes
Bake Time: 25–30 minutes

These Crispy Potato & Egg Nest Muffins are a comforting and satisfying dish made with simple ingredients. Grated potatoes form a crisp outer layer, while the inside stays soft and flavorful. They are perfect for breakfast, brunch, or light meals and are easy to prepare ahead of time.


📋 Ingredients

  • 3 large potatoes, peeled and grated

  • 4–5 large eggs, well beaten

  • 1 cup shredded cheese (cheddar or mozzarella works well)

  • 12 cherry tomatoes (one per muffin)

  • 2 green onions, finely chopped

  • Salt, to taste

  • Black pepper, to taste

  • A small pinch of garlic powder or paprika (optional)

  • Vegetable oil or butter, for greasing the muffin tin


👩‍🍳 Step-by-Step Instructions

Step 1: Prepare the Potatoes

  1. Preheat your oven to 400°F (200°C).

  2. Place the grated potatoes into a bowl of cold water.

  3. Rinse well to remove excess starch.

  4. Drain and squeeze the potatoes firmly using a clean kitchen towel until they are as dry as possible.
    Dry potatoes help create a crisp texture during baking.


Step 2: Make the Potato Nests

  1. Transfer the dried potatoes to a mixing bowl.

  2. Add salt, black pepper, and half of the shredded cheese.

  3. Mix gently until evenly combined.

  4. Grease a 12-cup muffin tin thoroughly.

  5. Divide the potato mixture evenly among the cups.

  6. Press the mixture firmly into the bottom and up the sides of each cup to form a nest shape.


Step 3: Prepare the Egg Mixture

  1. In a separate bowl or jug, whisk the eggs until smooth.

  2. Add chopped green onions and any remaining seasoning.

  3. Stir gently to combine.


Step 4: Assemble and Bake

  1. Carefully pour the egg mixture into the center of each potato nest.

  2. Place one cherry tomato in the center of each muffin.

  3. Sprinkle the remaining shredded cheese evenly on top.

  4. Bake for 25–30 minutes, or until:

    • The potato edges are golden and crisp

    • The egg filling is fully set


Step 5: Cool and Serve

  1. Remove the muffin tin from the oven.

  2. Allow the muffins to rest for 5 minutes.

  3. Use a small knife to gently loosen the edges.

  4. Lift the muffins out carefully.

Serve warm for the best texture and flavor.


🌟 Why You’ll Love This Recipe

  • Crispy Outside, Soft Inside: The potato base becomes golden and crunchy while the egg stays tender.

  • Easy to Customize: Add extra vegetables like spinach, bell peppers, or mushrooms for variety.

  • Great for Planning Ahead: These muffins can be prepared in advance and reheated while keeping their texture.