Tomato Basil Garlic Bread

Tomato Basil Garlic Bread

Ingredients

  • Bread: 1 large baguette or Italian loaf

  • Tomatoes: 3 ripe tomatoes, finely diced

  • Garlic: 4 cloves, minced

  • Fresh Basil: 1/4 cup leaves, chopped

  • Cheese: 1/4 cup grated Parmesan (optional) or sliced fresh Mozzarella

  • Oil: 1/4 cup olive oil

  • Vinegar: 1 tablespoon balsamic vinegar

  • Seasoning: Salt and freshly cracked black pepper to taste


Instructions

1. Prepare the Topping

  • In a medium bowl, combine the diced tomatoes, minced garlic, chopped basil, olive oil, and balsamic vinegar.

  • Season with salt and pepper. Let this mixture sit for at least 15 minutes at room temperature; this allows the tomatoes to release their juices and the garlic flavor to mellow.

2. Prepare the Bread

  • Preheat your oven to 400°F (200°C).

  • Slice the baguette or Italian loaf in half lengthwise, or cut it into thick individual slices.

  • Place the bread on a baking sheet. For extra flavor, you can lightly brush the cut side of the bread with a little extra olive oil or butter.

3. Assemble

  • Using a slotted spoon (to avoid too much liquid soaking the bread), distribute the tomato mixture evenly over the bread.

  • Top with the grated Parmesan or slices of Mozzarella cheese.

4. Bake and Broil

  • Bake for 8 to 10 minutes, or until the bread is toasted and the cheese is melted.

  • For a golden, bubbly finish (as seen in the image), turn the oven to Broil for the last 1–2 minutes. Watch closely to prevent burning!

5. Garnish and Serve

  • Remove from the oven and top with an additional sprinkle of fresh basil if desired. Serve warm while the bread is at its crunchiest.


Chef’s Tips

  • Avoid Soggy Bread: If your tomatoes are very juicy, seed them before dicing. This keeps the topping flavorful without making the bread soft.

  • The Bread Choice: A sturdier Italian loaf or sourdough works better than a soft sandwich loaf because it holds up under the weight of the tomatoes.

  • Rub with Garlic: For an even deeper garlic flavor, rub a raw, halved garlic clove directly onto the toasted bread before adding the tomato topping.


Tropical Tiger Nut Smoothie

Tropical Tiger Nut Smoothie

A creamy fruit and nut–based blended drink

This smoothie combines soaked tiger nuts with tropical fruits and warming ginger to create a naturally sweet, creamy drink. It can be enjoyed as a refreshing beverage or a light snack.


Ingredients

(Makes 2 servings)

  • Tiger nuts — 1 cup, soaked for 4–6 hours or overnight

  • Dates — 4–5, pitted

  • Fresh coconut pieces — ½ cup

  • Pineapple chunks — 1 cup

  • Fresh ginger — 1 small piece (about 1 inch), peeled

  • African cherry (Agbalumo) — 1 fruit, flesh only

  • Cold water — 1 cup (adjust for desired thickness)

  • Ice cubes — optional


Step-by-Step Instructions

1. Prepare the Tiger Nuts

  • Rinse the tiger nuts thoroughly.

  • Soak them in clean water for at least 4–6 hours or overnight.

  • Drain and rinse again before blending.
    Soaking softens the nuts and helps achieve a smoother texture.


2. Prepare the Fruits

  • Pit the dates.

  • Cut the pineapple into chunks if not already prepared.

  • Remove the flesh from the African cherry, discarding the seed.

  • Peel and slice the ginger.


3. Blend

  • Add the soaked tiger nuts to a high-speed blender.

  • Add dates, coconut pieces, pineapple chunks, ginger, and African cherry flesh.

  • Pour in the cold water.

  • Blend until smooth and creamy, stopping to scrape down the sides if needed.


4. Adjust Texture

  • If the smoothie is too thick, add a little more water.

  • If you prefer it colder, add a few ice cubes and blend again.


5. Serve

  • Pour into glasses and serve immediately.

  • Best enjoyed fresh.


Helpful Tips

  • Use a high-speed blender for the smoothest result

  • Strain the smoothie if you prefer a thinner, juice-like consistency

  • Adjust the number of dates based on your sweetness preference


Variations

  • Replace water with coconut water for a lighter texture

  • Add a pinch of cinnamon or nutmeg for extra aroma

  • Substitute mango for pineapple if desired


Storage

  • Best consumed immediately

  • If needed, refrigerate for up to 24 hours in a sealed container and shake well before drinking

Creamy House Dressing

Creamy House Dressing

A smooth, balanced dressing for salads and light meals

This creamy house dressing has a smooth texture and a well-balanced flavor. It works well on fresh salads, pasta salads, or as a light coating for cooked meats or vegetables.


Ingredients

  • Extra-virgin olive oil — ¾ cup

  • White wine vinegar or fresh lemon juice — ¼ cup

  • Mayonnaise or plain Greek yogurt — 2 tablespoons

  • Dijon mustard — 1 tablespoon

  • Honey or agave syrup — 2 teaspoons

  • Garlic — 1 small clove, finely grated or mashed

  • Dried Italian herbs — 1 teaspoon
    (such as oregano, basil, and thyme)

  • Salt — to taste

  • Black pepper — to taste

  • Finely grated Parmesan cheese — 2 tablespoons (optional)


Step-by-Step Instructions

1. Mix the Flavor Base

  • In a medium bowl or glass jar, add:

    • Garlic

    • Dijon mustard

    • Honey

    • Dried herbs

    • Salt and black pepper

  • Whisk until the mixture is smooth and evenly combined.


2. Add the Creamy Element

  • Add the mayonnaise (or yogurt) and the vinegar or lemon juice.

  • Whisk until the mixture is completely smooth with no visible lumps.


3. Blend in the Oil

Choose one method:

Whisking Method

  • While whisking continuously, slowly pour in the olive oil in a thin stream.

  • Continue whisking until the dressing thickens and looks smooth.

Jar Method

  • Add the olive oil to the jar.

  • Seal tightly and shake well for about 60 seconds, until fully blended.


4. Adjust the Flavor

  • Taste the dressing.

  • If it tastes too sharp, add a small amount of honey.

  • If it feels too thick, stir in 1–2 teaspoons of water or vinegar.

  • Stir in Parmesan cheese, if using.


5. Serve and Store

  • Use immediately over salads or cooked vegetables.

  • Store leftovers in an airtight container in the refrigerator for up to 7 days.

  • Shake or whisk before each use.


Helpful Tips

  • Letting the garlic sit briefly in the vinegar before mixing can soften its flavor

  • Greek yogurt creates a lighter dressing, while mayonnaise adds richness

  • The dressing should lightly coat a spoon without being overly thick


Variations

  • Add a teaspoon of lemon zest for brightness

  • Use apple cider vinegar for a slightly different flavor

  • Add a small amount of milk or water for a pourable consistency

Easy One-Bowl Chocolate Cake

Easy One-Bowl Chocolate Cake

A soft, moist chocolate cake made with yogurt

This one-bowl chocolate cake is simple to prepare and uses everyday ingredients. Yogurt helps create a tender texture, while a small amount of coffee powder (optional) deepens the chocolate flavor without tasting like coffee.


Ingredients

  • All-purpose flour — 1 cup (120 g)

  • Baking powder — 2 teaspoons

  • Unsweetened cocoa powder — ¾ cup

  • Coffee powder — 1 teaspoon (optional)

  • Granulated sugar — 1 cup

  • Plain yogurt (or Greek yogurt) — 1 cup

  • Vegetable oil — ½ cup

  • Vanilla extract — 1 teaspoon

  • Eggs — 3 large, at room temperature


Step-by-Step Instructions

1. Prepare the Pan and Oven

  • Preheat the oven to 175°C (350°F).

  • Grease a 9-inch round cake pan or a standard loaf pan.

  • Line the base with parchment paper for easy removal.


2. Mix the Wet Ingredients

  • In a large mixing bowl, add:

    • Eggs

    • Sugar

    • Yogurt

    • Vegetable oil

    • Vanilla extract

  • Whisk until the mixture is smooth and well combined.


3. Add the Dry Ingredients

  • Place a sieve over the bowl.

  • Sift in:

    • Flour

    • Cocoa powder

    • Baking powder

    • Coffee powder (if using)

Sifting helps remove cocoa lumps and creates a smoother batter.


4. Combine Gently

  • Fold or whisk gently until no dry flour remains.

  • Stop mixing as soon as the batter is smooth.

    • Overmixing can make the cake dense.


5. Bake

  • Pour the batter into the prepared pan.

  • Smooth the top evenly.

  • Bake:

    • 30–35 minutes for a round pan

    • 40–45 minutes for a loaf pan

Doneness Test:
Insert a toothpick into the center. It should come out clean or with a few moist crumbs.


6. Cool

  • Let the cake rest in the pan for 10 minutes.

  • Run a knife around the edges.

  • Turn out onto a wire rack and allow to cool completely before slicing or frosting.


Helpful Tips

  • Room-temperature eggs blend more easily into the batter

  • Coffee powder is optional and does not create a coffee flavor

  • For a lighter finish, dust with powdered sugar

  • For a richer dessert, serve with chocolate sauce or fresh fruit


Storage

  • Store at room temperature for 2 days in an airtight container

  • Refrigerate for up to 5 days

  • Can be frozen (wrapped well) for up to 1 month

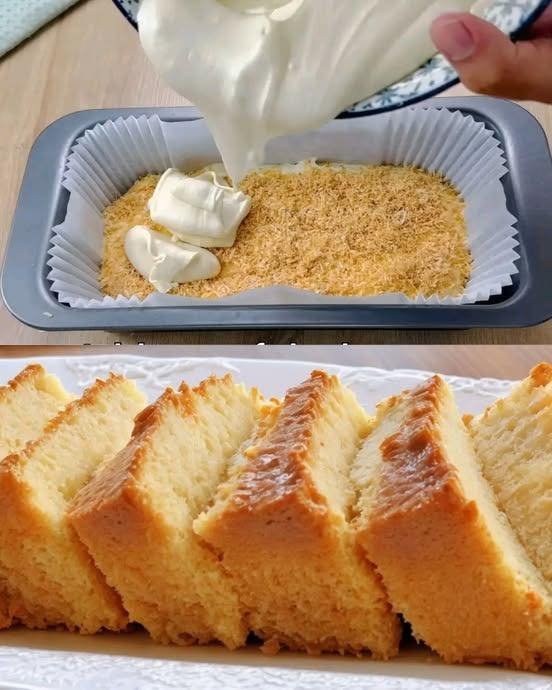
Quick Coconut Loaf Cake

Quick Coconut Loaf Cake

A soft, buttery loaf with a rich coconut flavor

This coconut loaf cake comes together quickly using simple pantry ingredients. It has a tender, slightly dense crumb and a gentle coconut aroma, making it a lovely choice for tea time, breakfast, or a light dessert.


Ingredients

Cake Batter

  • Granulated sugar — 175 g (¾ cup + 2 tablespoons)

  • Unsalted butter — 110 g (½ cup), softened to room temperature

  • Vegetable oil — 30 ml (2 tablespoons)

  • Eggs — 2 large, room temperature

  • All-purpose flour — 190 g (1½ cups)

  • Baking powder — 1 teaspoon

  • Desiccated coconut — ½ cup

  • Milk or coconut milk — 60 ml (¼ cup)

  • Vanilla extract — 1 teaspoon


For the Pan

  • Butter or oil for greasing

  • Extra desiccated coconut for coating the pan


Step-by-Step Instructions

1. Prepare the Oven and Pan

  • Preheat the oven to 175°C (350°F).

  • Grease a standard loaf pan with butter or oil.

  • Sprinkle desiccated coconut evenly over the greased pan, tilting and tapping to coat the bottom and sides.

    • This adds texture and a lightly toasted coconut layer on the outside of the cake.


2. Cream the Butter and Sugar

  • In a large mixing bowl, add the softened butter and sugar.

  • Beat together for 2–3 minutes until the mixture looks pale and creamy.

  • Add the vegetable oil and vanilla extract.

  • Mix until fully combined.


3. Add the Eggs

  • Add the eggs one at a time, mixing well after each addition.

  • The batter should look smooth and well blended.


4. Combine Dry Ingredients

  • In a separate bowl, whisk together:

    • Flour

    • Baking powder


5. Make the Batter

  • Add half of the dry ingredients to the butter mixture and mix gently.

  • Pour in the milk or coconut milk and mix until incorporated.

  • Add the remaining dry ingredients and the ½ cup desiccated coconut.

  • Fold gently with a spatula until just combined.

    • Avoid overmixing to keep the loaf soft.


6. Bake

  • Pour the batter into the prepared loaf pan.

  • Smooth the top evenly.

  • Bake for 40–45 minutes, or until a toothpick inserted in the center comes out clean.


7. Cool

  • Remove the cake from the oven.

  • Let it cool in the pan for 10 minutes.

  • Transfer to a wire rack to cool completely before slicing.


Optional Finishing Touch

  • While the cake is still warm, lightly brush the top with a small amount of milk or coconut milk for added softness and shine.


Helpful Tips

  • Room-temperature ingredients help create a smooth batter

  • Coconut milk gives a deeper coconut flavor, while regular milk keeps it lighter

  • If the top browns too quickly, loosely cover with foil during the last 10 minutes


Storage

  • Store at room temperature for 2–3 days in an airtight container

  • Refrigerate for up to 5 days

  • Can be frozen (wrapped well) for up to 1 month

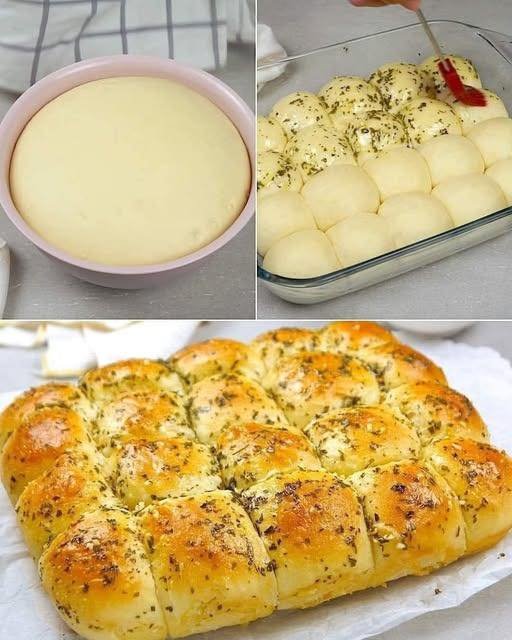
Homemade Garlic Buns

Homemade Garlic Buns

Soft, fluffy buns brushed with aromatic garlic butter

These homemade garlic buns are tender on the inside with a lightly golden top and a rich garlic aroma. They are perfect as a side for soups, pasta, or enjoyed on their own while warm.


Ingredients

Dough

  • All-purpose flour — 400 g (about 3¼ cups)

  • Sugar — 50 g (¼ cup)

  • Salt — 1 teaspoon

  • Instant dry yeast — 7 g (1 packet)

  • Lukewarm milk — 250 ml (1 cup)

  • Egg — 1 large, room temperature

  • Butter — 55 g (¼ cup), softened

  • Minced garlic — 1 tablespoon


Garlic Butter Topping

  • Minced garlic — 1 tablespoon

  • Dried parsley — 2 teaspoons

  • Salted butter — 55 g (¼ cup), melted


Step-by-Step Method

1. Prepare the Dough

  • In a large bowl, combine the flour, sugar, salt, and instant yeast.

  • Add the lukewarm milk and egg.

  • Mix until a rough dough forms.


2. Knead the Dough

  • Knead using a stand mixer or by hand for 5 minutes, until smooth.

  • Cover the dough with a clean towel and let it rest for 20 minutes.


3. Add Butter and Garlic

  • Add the softened butter and minced garlic to the dough.

  • Continue kneading for 5–7 minutes until the dough becomes elastic and slightly glossy.


4. First Rise

  • Lightly grease a bowl with oil.

  • Place the dough inside, cover, and let rise in a warm place for 1 hour, or until doubled in size.


5. Shape the Buns

  • Gently press the dough to release excess air.

  • Shape into a square and divide into 25 equal pieces.

  • Roll each piece into a smooth ball.

  • Cover and let rest for 15 minutes.


6. Second Rise

  • Lightly flatten each dough ball and tuck the edges underneath to create a smooth top.

  • Place in a greased baking pan.

  • Cover and let rise again for 30 minutes, until puffy.


7. Prepare Garlic Butter

  • In a small bowl, combine:

    • Melted butter

    • Minced garlic

    • Dried parsley

  • Mix well.


8. Bake

  • Preheat the oven to 180°C (350°F).

  • Brush the tops of the buns generously with garlic butter.

  • Bake for 15–17 minutes, until lightly golden.


9. Finish and Serve

  • Remove from the oven.

  • While still warm, brush with more garlic butter for extra flavor.

  • Serve warm.


Serving Suggestions

  • Pair with soups or pasta dishes

  • Serve as a dinner roll or party bread

  • Enjoy plain or with cheese spread


Storage Tips

  • Store at room temperature for 1 day

  • Refrigerate for up to 3 days

  • Reheat gently before serving