Blueberry Lemon Almond Flour Bread (Detailed & Gentle Recipe) 🫐🍋

Blueberry Lemon Almond Flour Bread (Detailed & Gentle Recipe) 🫐🍋

This blueberry lemon bread is soft, fragrant, and naturally satisfying, with bright citrus notes and bursts of juicy blueberries in every slice. Made with almond flour and simple pantry ingredients, it’s perfect for breakfast, afternoon tea, or a light dessert. The lemon glaze is optional but adds a lovely finishing touch.


⏱️ Time & Yield

  • Prep Time: 15 minutes

  • Bake Time: 45–55 minutes

  • Cooling Time: 30–40 minutes

  • Yield: 1 loaf (8–10 slices)


🧾 Ingredients

For the Bread

  • 2½ cups super-fine almond flour
    Fine texture gives the best crumb.

  • ½ cup granulated erythritol or monk fruit sweetener
    Choose one with a texture similar to sugar.

  • 1½ teaspoons baking powder

  • ¼ teaspoon salt

  • 3 large eggs, room temperature

  • ⅓ cup butter, melted and cooled slightly
    (Coconut oil may also be used.)

  • ¼ cup unsweetened almond milk

  • 2 tablespoons fresh lemon juice

  • 1 tablespoon lemon zest (from about 1 large lemon 🍋)

  • 1 teaspoon vanilla extract

  • 1 cup fresh blueberries
    Toss with 1 teaspoon almond flour to help distribute them evenly.


Optional Lemon Glaze

  • ½ cup powdered sweetener

  • 1–2 tablespoons fresh lemon juice


👩‍🍳 Step-by-Step Instructions

1️⃣ Prepare the Pan and Oven

Preheat your oven to 350°F (175°C).
Grease an 8×4-inch loaf pan or line it with parchment paper, leaving overhang on the sides for easy lifting.


2️⃣ Mix the Dry Ingredients

In a large bowl, whisk together:

  • Almond flour

  • Sweetener

  • Baking powder

  • Salt

Break up any lumps so the mixture is light and even.


3️⃣ Mix the Wet Ingredients

In a separate bowl, whisk together:

  • Eggs

  • Melted butter (make sure it’s warm, not hot)

  • Almond milk

  • Lemon juice

  • Lemon zest

  • Vanilla extract

Whisk until smooth and well combined.


4️⃣ Combine the Batter

Pour the wet mixture into the bowl with the dry ingredients.
Stir gently with a spatula until just combined—do not overmix.

Carefully fold in the blueberries, using a light hand to keep them whole.


5️⃣ Bake

Pour the batter into the prepared loaf pan and smooth the top.
Bake for 45–55 minutes, until:

  • The top is lightly golden

  • A toothpick inserted in the center comes out clean

👉 If the top browns too quickly, loosely cover with foil during the last 15 minutes.


6️⃣ Cool Completely

Let the bread cool in the pan for at least 20 minutes, then gently transfer to a wire rack.
Allow it to cool fully before slicing—this helps the loaf set properly.


7️⃣ Add the Lemon Glaze (Optional)

In a small bowl, whisk powdered sweetener with lemon juice until smooth.
Drizzle over the completely cooled loaf and let it set before slicing.


🍽️ Serving Ideas

  • Enjoy plain or with a little butter

  • Serve with tea or coffee

  • Slice and warm gently before serving for extra aroma


🧊 Storage Tips

  • Store in an airtight container in the refrigerator for up to 5 days

  • For longer keeping, slice and freeze; thaw at room temperature


💡 Helpful Notes

  • If using frozen blueberries, add them directly without thawing

  • Super-fine almond flour gives the best texture

  • Lemon flavor deepens after the bread rests overnight

30-Minute Homemade Margherita Pizza (Detailed & Gentle Recipe) ✨🍕

30-Minute Homemade Margherita Pizza (Detailed & Gentle Recipe) ✨🍕

This classic Margherita pizza is all about simple ingredients and fresh flavor. With a soft crust, rich tomato sauce, creamy mozzarella, and fragrant basil, it comes together quickly and delivers bakery-style results at home. Perfect for busy days when you still want something special.


⏱️ Time & Yield

  • Total Time: 30 minutes

  • Servings: 2–3

  • Style: Simple, fresh, and comforting


🧾 Ingredients

For the Pizza Base

  • 1 prepared pizza dough (store-bought or homemade, room temperature)

  • 1 tablespoon olive oil (for brushing)

For the Sauce

  • ½ cup crushed tomatoes or pizza sauce

  • 1 tablespoon olive oil

  • 1 small garlic clove, finely minced

  • ¼ teaspoon salt

  • ¼ teaspoon dried oregano (optional)

Toppings

  • 200 g (about 7 oz) fresh mozzarella cheese, sliced or torn

  • 1 small tomato, thinly sliced (optional but lovely 🍅)

  • Fresh basil leaves, torn 🌿

  • Freshly ground black pepper (optional)


👩‍🍳 Step-by-Step Instructions

1️⃣ Preheat the Oven

Preheat your oven to 475°F (245°C).
If using a pizza stone or steel, place it in the oven while it heats for best results.


2️⃣ Prepare the Sauce

In a small bowl, mix together:

  • Crushed tomatoes

  • Olive oil

  • Garlic

  • Salt

  • Oregano (if using)

Stir until smooth and set aside.


3️⃣ Shape the Dough

Lightly flour your work surface.
Stretch or roll the dough into a round or oval shape, about 10–12 inches wide.
Transfer it to a parchment-lined baking tray or pizza peel.

Brush the edges lightly with olive oil for a golden finish.


4️⃣ Add Sauce and Toppings

Spread a thin, even layer of sauce over the dough, leaving a small border around the edges.
Arrange the mozzarella evenly on top, then add tomato slices if using.


5️⃣ Bake

Bake for 10–14 minutes, or until:

  • The crust is golden

  • The cheese is melted and lightly bubbling


6️⃣ Finish and Serve

Remove from the oven and immediately scatter fresh basil over the top 🌿.
Add a light sprinkle of black pepper if you like.

Let rest for 1–2 minutes, then slice and enjoy warm 🍕


🍽️ Serving Ideas

  • Serve with a simple green salad 🥗

  • Pair with roasted vegetables

  • Enjoy as-is for a classic, comforting meal


💡 Helpful Tips

  • Less sauce keeps the crust crisp

  • Fresh mozzarella gives the best texture

  • Tear basil by hand to keep its aroma bright

Easy Zucchini Flatbread with Herbs (Detailed & Gentle Recipe) ✨🥒

Easy Zucchini Flatbread with Herbs (Detailed & Gentle Recipe) ✨🥒

This zucchini flatbread is light, flavorful, and surprisingly satisfying. Made with simple ingredients and baked until golden, it’s a wonderful option for a light meal, snack, or side dish. The key to success is removing excess moisture from the zucchini, which gives you a flatbread that holds together beautifully and has a pleasant texture.


🧾 Ingredients

  • 1 medium zucchini (about 200 g / 7 oz)
    Fresh, firm zucchini works best.

  • 4 tablespoons oat flour (about 30 g)
    You can make this at home by blending rolled oats until fine.

  • 100 g (1 cup) mozzarella cheese, grated
    Divided, for mixing and topping.

  • 2 large eggs
    Helps bind the mixture and add structure.

  • ½ teaspoon salt

  • ¼ teaspoon freshly ground black pepper

  • 1 teaspoon dried herbs
    Thyme, oregano, or Italian-style herb blend all work well.

  • Optional additions:

    • A pinch of red pepper flakes for warmth

    • Fresh parsley or basil for garnish 🌿


👩‍🍳 Step-by-Step Instructions

1️⃣ Prepare the Zucchini (Very Important)

Grate the zucchini using the coarse side of a grater.
Place it in a clean kitchen towel or cheesecloth and squeeze firmly to remove as much liquid as possible.
This step helps the flatbread bake evenly and hold its shape.


2️⃣ Preheat and Prepare the Pan

Preheat your oven to 400°F (200°C).
Line a baking sheet or round pan with parchment paper to prevent sticking.


3️⃣ Mix the Batter

In a medium bowl, whisk the eggs until well blended.
Add:

  • The squeezed zucchini

  • Oat flour

  • Half of the mozzarella (50 g)

  • Salt, black pepper, and dried herbs

Stir until everything is evenly combined and the mixture looks cohesive.


4️⃣ Shape the Flatbread

Spoon the mixture onto the prepared baking sheet.
Using a spatula, spread it into an even circle or rectangle, about ¼ inch thick.


5️⃣ First Bake

Place the tray in the oven and bake for 15–18 minutes, until:

  • The edges turn lightly golden

  • The center feels set when gently touched


6️⃣ Add the Cheese

Remove from the oven and sprinkle the remaining mozzarella evenly over the top.
Return to the oven and bake for about 5 more minutes, until the cheese is melted and lightly bubbly.


7️⃣ Rest, Slice, and Serve

Let the flatbread rest for a few minutes after baking.
This helps it firm up and makes slicing easier.
Cut into wedges or squares and serve warm.


🍽️ Serving Ideas

  • Dip: Marinara sauce or a simple yogurt-based dip

  • Topping: Fresh greens like arugula and a light drizzle of balsamic glaze

  • Side: Pairs nicely with soup or salad


🧊 Storage & Reheating

  • Store leftovers in a covered container in the refrigerator for up to 3 days

  • Reheat in a dry pan, oven, or air fryer to maintain texture

2-Ingredient Homemade Condensed Milk (Detailed & Gentle Method)

2-Ingredient Homemade Condensed Milk (Detailed & Gentle Method) ✨🥛

Making condensed milk at home is easy, budget-friendly, and gives you full control over the ingredients. With just two simple items, you can create a smooth, creamy condensed milk perfect for desserts, drinks, and baking—no additives, no extras.

This method uses slow, gentle heat and patience to naturally thicken the milk and develop its rich texture.


🧾 Ingredients

  • 2 cups (500 ml) whole milk
    Full-cream milk gives the best creamy body and smooth mouthfeel.

  • ⅔ cup (150 g) granulated sugar
    Sweetens the milk and helps it thicken naturally as it reduces.


👩‍🍳 Step-by-Step Instructions

1️⃣ Combine the Ingredients

Pour the milk into a heavy-bottomed saucepan. Add the sugar and gently stir to combine.
Using a thick pan helps the milk heat evenly and stay smooth.


2️⃣ Dissolve the Sugar

Place the saucepan over medium-low heat.
Stir slowly and continuously until the sugar fully dissolves into the milk.
This step is important for a silky texture later.


3️⃣ Gentle Simmer & Reduce

Once the sugar has dissolved, reduce the heat slightly so the milk stays at a very gentle simmer (small bubbles at the edges, not active bubbling).

  • Let it cook for 35–45 minutes

  • Stir every few minutes to keep the mixture smooth

  • If light foam forms on top, gently skim it off with a spoon

As it cooks, you’ll notice:

  • The color changing from white to a soft creamy tone

  • The volume gradually reducing to about half

  • The texture becoming thicker and glossy


4️⃣ Check the Consistency

The condensed milk is ready when it:

  • Looks smooth and shiny

  • Feels lightly thick and coats the back of a spoon

👉 Keep in mind: it will become thicker as it cools.


5️⃣ Cool and Smooth

Remove the pan from heat and let the condensed milk cool completely.
If you notice tiny lumps:

  • Strain through a fine sieve or

  • Blend briefly for a perfectly smooth finish


6️⃣ Store

Pour into clean, dry glass jars.
Store covered in the refrigerator for up to 2 weeks.


🌟 Helpful Tips & Variations

  • 🥥 Dairy-free option: Full-fat coconut milk works very well and gives a rich result

  • 🍯 Flavor boost: Add a small splash of vanilla after cooling

  • 🧁 Uses: Perfect for desserts, no-bake treats, tea, coffee, and baking

  • ❄️ Texture tip: If it thickens too much in the fridge, stir in a little warm milk to loosen


❓ Common Questions

Can I use sugar alternatives?
Yes, but the texture may be lighter since regular sugar thickens more naturally.

How long does it last?
Up to 2 weeks when kept cold in a sealed container.

🌿✨ Mediterranean Diet (SHORT & SIMPLE GUIDE) ✨

🌿✨ Mediterranean Diet (SHORT & SIMPLE GUIDE) ✨🌿

If you want a balanced, sustainable way of eating without strict counting or complicated rules, the Mediterranean Diet is a great choice 🥗. It’s not a quick plan—it’s a long-term lifestyle inspired by traditional foods from Mediterranean regions 🌍 and focuses on overall wellness ❤️.


🍅 What Is the Mediterranean Diet?

A way of eating that emphasizes whole foods and healthy fats, not restrictions.

✔️ Vegetables, fruits, beans, lentils, nuts 🥬 🍎
✔️ Whole grains like brown rice and whole-wheat bread 🥖
✔️ Extra virgin olive oil as the main fat 🫒
✔️ Fish several times a week 🐟
✔️ Small amounts of cheese and yogurt 🧀
✔️ Poultry and eggs in moderation 🍗 🥚
✔️ Sweets and sugary drinks only occasionally 🍰


🌟 Key Benefits

❤️ Supports heart wellness
⚖️ Helps maintain a healthy weight
💪 Supports healthy blood sugar and cholesterol
🌱 Improves digestion
🧠 Supports brain health
🕰️ Encourages long-term vitality


🥑 Foods to Enjoy Often

🥕 Vegetables: tomatoes, spinach, zucchini
🍇 Fruits: berries, oranges, grapes
🌰 Nuts & seeds: almonds, walnuts
🫘 Legumes: chickpeas, lentils
🐟 Fish: salmon, sardines
🫒 Healthy fats: olive oil, avocado
🌿 Herbs & spices instead of heavy sauces


🚫 Foods to Limit

🥤 Sugary drinks
🍟 Highly processed foods
🍞 Refined grains
🥓 Processed meats
🍩 Store-bought sweets


🍽️ Easy Meal Ideas

☀️ Breakfast: Greek yogurt with fruit & nuts
🥙 Lunch: Whole-grain wrap with hummus & veggies
🌇 Dinner: Baked fish with salad & olive oil
🥒 Snack: Fruit, nuts, or veggies with hummus


🌸 Final Note

The Mediterranean Diet is about simple, colorful food and enjoying meals mindfully 🫶. Small changes—like using olive oil or adding more vegetables—can make a big difference over time. 🌟

Sugar-Free Chia Seed Breakfast Pudding

Slim Waist Morning Bowl

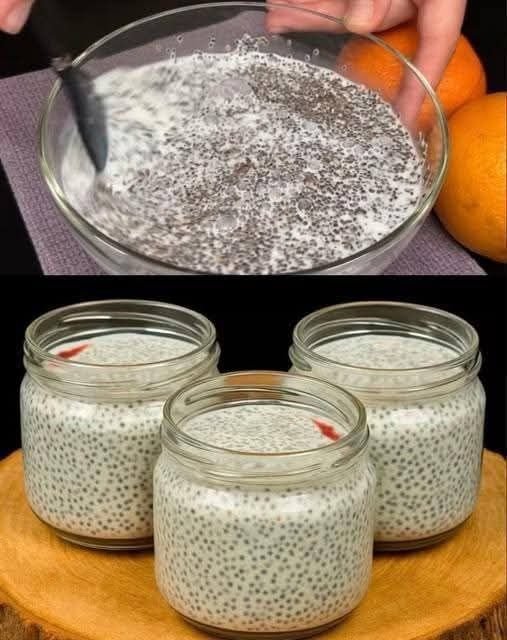
This Sugar-Free Chia Seed Breakfast Pudding is a simple, nourishing way to start your day without added sugars. Creamy, lightly sweet, and packed with fiber, protein, and healthy fats, it keeps you full for hours while supporting digestion and steady energy. Chia seeds absorb liquid overnight, creating a pudding-like texture that feels indulgent but is incredibly healthy. This recipe is perfect for weight management, gut health, and busy mornings since it can be prepared ahead of time.

Ingredients (Serves 1–2)

  • 3 tablespoons chia seeds
  • 1 cup unsweetened almond milk (or coconut milk, oat milk, or dairy milk)
  • ½ teaspoon vanilla extract
  • ½ teaspoon cinnamon
  • ¼ teaspoon ground ginger (optional)
  • 1–2 tablespoons mashed ripe banana or sugar-free sweetener to taste (optional)
  • Pinch of sea salt

Optional Toppings

  • Fresh berries (strawberries, blueberries, or raspberries)
  • Sliced almonds or walnuts
  • Unsweetened coconut flakes
  • Chia seeds or flaxseeds
  • Plain Greek yogurt (for extra protein)

Instructions

  1. Mix the Base
    In a medium bowl or jar, add chia seeds, almond milk, vanilla extract, cinnamon, ginger (if using), sea salt, and mashed banana or sugar-free sweetener. Stir well for 1–2 minutes to evenly distribute the chia seeds and prevent clumping.
  2. Rest and Stir Again
    Let the mixture sit at room temperature for 5 minutes, then stir again. This second stir is important—it helps the chia seeds absorb the liquid evenly and creates a smooth, creamy texture.
  3. Chill Overnight
    Cover the bowl or jar and refrigerate for at least 4 hours, preferably overnight. During this time, the chia seeds will swell and thicken the mixture into a pudding-like consistency.
  4. Check Consistency
    In the morning, give the pudding a good stir. If it feels too thick, add a splash of almond milk and mix until creamy. If it’s too thin, add 1 teaspoon of chia seeds and let it sit for 10 more minutes.
  5. Add Toppings and Serve
    Spoon the pudding into a bowl or enjoy it straight from the jar. Top with fresh berries, nuts, coconut flakes, or yogurt for added texture and nutrition.
See also  Lemon Cream Puff Pastry Tarts

Why This Bowl Supports a Slim Waist

  • Chia seeds are rich in soluble fiber, which promotes fullness and supports digestion.
  • No added sugar helps prevent blood sugar spikes and cravings.
  • Healthy fats and plant protein provide long-lasting energy.
  • Cinnamon and ginger may help support metabolism and reduce inflammation.

Make-Ahead & Storage Tips

  • Store chia pudding in an airtight container in the refrigerator for up to 4 days.
  • Prepare multiple jars at once for an easy grab-and-go breakfast.

This Slim Waist Morning Bowl is creamy, satisfying, and naturally nourishing—proof that healthy breakfasts can be simple, delicious, and sugar-free. 🌱✨