Savory Pumpkin & Cheese Patties

Savory Pumpkin & Cheese Patties

Yields: 4–6 patties
Prep Time: 15 minutes
Cook Time: 10–12 minutes

These pumpkin patties are soft inside, lightly crisp outside, and full of fresh herb flavor. They are perfect as a snack, side dish, or light meal. The cheese adds richness and helps with structure, while dill and green onions give freshness.


🧾 Ingredients

  • 200 g pumpkin, finely grated

  • 1 cup mozzarella or cheddar cheese, shredded (optional but recommended for better texture)

  • 1 small bunch fresh dill, finely chopped

  • 1 small bunch green onions, finely chopped

  • 1 clove garlic, finely minced

  • 1 large egg, lightly beaten

  • 3–4 tablespoons all-purpose flour or breadcrumbs, added gradually

  • Salt, to taste

  • Black pepper, to taste

  • 2 tablespoons olive oil or butter, for cooking


👩‍🍳 Instructions

1. Prepare the Pumpkin

Grate the pumpkin using the large holes of a grater.
If the pumpkin releases a lot of liquid, place it in a clean kitchen towel and gently press to remove excess moisture.
This helps the patties hold together better and improves their texture.


2. Combine the Vegetables

Place the grated pumpkin in a mixing bowl.
Add the chopped dill, green onions, and minced garlic.
If using cheese, add it now and mix gently until evenly distributed.


3. Bind the Mixture

Pour in the beaten egg.
Season with salt and black pepper.
Mix until everything is well combined.

Gradually add the flour or breadcrumbs, one tablespoon at a time.
Mix after each addition until the mixture becomes thick enough to shape without falling apart.
The mixture should be moist but not watery.


4. Shape the Patties

Divide the mixture into 4–6 equal portions.
Gently shape each portion into a round patty about 2–3 cm (1 inch) thick.
Place them on a plate while you heat the pan.


5. Cook the Patties

Heat olive oil or butter in a non-stick skillet over medium heat.
Carefully place the patties into the pan, leaving space between them.

Cook for 4–5 minutes on each side, turning once, until they are golden and cooked through.


6. Serve

Transfer the patties to a plate lined with paper towel to absorb any excess oil.
Serve warm with:

  • Greek yogurt

  • Sour cream

  • Garlic yogurt sauce

  • Or a fresh salad


🌟 Helpful Tips

  • You can bake these at 180°C (350°F) for 20–25 minutes for a lighter option.

  • Add paprika or cumin for extra flavor.

  • These patties freeze well after cooking.

Healing Turmeric Vegetable Soup with Cauliflower, Carrots & Celery

This Healing Turmeric Vegetable Soup is a soothing, anti-inflammatory bowl of comfort that’s perfect for boosting immunity, calming digestion, and warming the body from the inside out. Made with simple vegetables, fragrant spices, and fresh lemon, this soup is light yet deeply satisfying. Turmeric and cumin bring earthy warmth, while cauliflower and carrots add gentle sweetness and texture. It’s ideal for detox days, cold evenings, or whenever you need a nourishing reset.

Ingredients

  • 1 tablespoon olive oil
  • 1 yellow onion, finely chopped
  • 3 garlic cloves, minced
  • 2 celery stalks, finely chopped
  • 2 large carrots, peeled and sliced into rounds
  • 2 cups cauliflower florets
  • 1 teaspoon ground turmeric
  • ½ teaspoon ground cumin
  • Salt and black pepper, to taste
  • 4 cups low-sodium vegetable broth
  • 1 cup water
  • Juice of ½ lemon
  • ¼ cup chopped fresh parsley, plus extra for garnish

Instructions

  1. Sauté the aromatics
    Heat the olive oil in a large pot or Dutch oven over medium heat. Add the chopped onion and cook for 3–4 minutes, stirring occasionally, until soft and translucent. This step builds the soup’s flavor base.
  2. Add garlic and vegetables
    Stir in the minced garlic and cook for 30 seconds until fragrant. Add the chopped celery and sliced carrots. Sauté for another 3–4 minutes, allowing the vegetables to soften slightly and release their natural sweetness.
  3. Incorporate the spices
    Sprinkle in the turmeric and ground cumin. Stir well to coat the vegetables evenly. Cooking the spices briefly in oil helps awaken their aroma and enhances their healing properties. Season lightly with salt and black pepper.
  4. Simmer the soup
    Add the cauliflower florets, vegetable broth, and water. Stir to combine, then bring the soup to a gentle boil. Reduce the heat to low, cover partially, and let it simmer for 20–25 minutes, or until the vegetables are tender but not mushy.
  5. Finish with brightness
    Once the soup is cooked, turn off the heat. Stir in the fresh lemon juice and chopped parsley. Taste and adjust seasoning with more salt, pepper, or lemon juice if needed.
  6. Serve and enjoy
    Ladle the soup into bowls and garnish with extra fresh parsley. Serve warm on its own or with whole-grain toast or a simple side salad.

Tips & Variations

  • For a creamier texture, blend half the soup and return it to the pot.
  • Add a pinch of red pepper flakes or fresh ginger for extra warmth.
  • This soup stores well in the refrigerator for up to 4 days and tastes even better the next day.

This golden, healing soup is gentle, flavorful, and deeply nourishing—perfect for restoring balance and comfort with every spoonful. 🌿✨

Mexican Salmon Patties

Mexican Salmon Patties

Prep Time: 20 minutes
Cook Time: 10–15 minutes
Servings: 6 patties

Flavorful, hearty, and crisp on the outside while tender inside. These patties combine salmon, beans, corn, and fresh herbs for a balanced Tex‑Mex-inspired dish. Perfect for lunch, dinner, or meal prep.


🧾 Ingredients

  • 25 oz (1 can) canned salmon, drained & deboned

  • Juice of 2 limes

  • 1½ sleeves original saltine crackers, crushed (or other crackers/binder)

  • 15 oz can black beans, drained & rinsed

  • 15 oz can corn, drained

  • 2 tablespoons mayonnaise

  • 4 eggs

  • 1 medium-large onion, minced

  • 1 cup fresh cilantro, chopped

  • 3–4 jalapeños, diced (adjust seeds for heat preference)

  • 4 tablespoons taco seasoning

  • 2 tablespoons garlic powder

  • Salt and pepper, to taste

  • Vegetable oil, for frying


👩‍🍳 Instructions

Step 1: Mix the Patty Mixture

  1. In a large bowl, combine:

    • Drained salmon

    • Lime juice

    • Crushed crackers

    • Black beans

    • Corn

    • Mayonnaise

    • Eggs

    • Minced onion

    • Chopped cilantro

    • Diced jalapeños

    • Taco seasoning

    • Garlic powder

    • Salt and pepper

  2. Mix gently until everything is evenly combined.

  3. If mixture feels too loose, add more crushed crackers until it holds together.


Step 2: Form the Patties

  1. Using your hands, shape the mixture into 6 evenly sized patties.

  2. Make them thick enough to hold together but not so large that they won’t cook through.

  3. Optional: Chill patties in the fridge for 10–15 minutes for better stability.


Step 3: Fry the Patties

  1. Heat enough vegetable oil in a skillet over medium-high heat to coat the bottom.

  2. Carefully place patties into hot oil.

  3. Fry for 3–4 minutes on each side, until golden brown and cooked through.

  4. Use a spatula to flip carefully to maintain shape.


Step 4: Drain & Serve

  1. Remove patties from skillet and place on paper towels to drain excess oil.

  2. Serve hot with:

    • Cilantro cream sauce

    • Salsa or ranch

    • Fresh salad or grilled veggies


🌟 Tips for Success

  • Ensure salmon is well-drained so patties hold together.

  • Adjust jalapeño seeds to control heat.

  • Use enough oil to prevent sticking and ensure even browning.

  • Leftovers reheat well: re-sear in a skillet for crispness.


🍽 Serving Suggestions

  • Serve in tacos or wraps with fresh veggies.

  • Pair with cilantro-lime rice for a full meal.

  • Top with avocado slices or a dollop of yogurt for creaminess.

Easy and Fluffy Vanilla Muffins

Easy and Fluffy Vanilla Muffins

Prep Time: 10 minutes
Bake Time: 20–25 minutes
Yields: 12 standard muffins

Soft, airy, and golden muffins that are simple to make and perfect for breakfast, snacks, or dessert.


🧾 Ingredients

  • 2 eggs

  • 125 ml (½ cup) vegetable oil

  • 250 ml (1 cup) milk

  • 200 g (1 cup) sugar

  • 360 g (3 cups) all-purpose flour

  • 1 teaspoon baking powder

  • ½ teaspoon salt

  • 100 g (⅔ cup) raisins or chocolate chips (optional)

  • 1 teaspoon vanilla extract (optional, for extra flavor)


👩‍🍳 Step-by-Step Instructions

🔥 Step 1: Prepare Oven and Muffin Pan

  1. Preheat oven to 375°F (190°C).

  2. Line a 12-cup muffin tin with paper liners or grease each cup lightly with butter or oil.


🥄 Step 2: Whisk Wet Ingredients

  1. In a large mixing bowl, whisk eggs and sugar until pale and slightly frothy.

  2. Add vegetable oil, milk, and vanilla extract (if using).

  3. Whisk until fully combined.


🥣 Step 3: Combine with Dry Ingredients

  1. Sift flour, baking powder, and salt directly into the wet mixture.

  2. Use a spatula or wooden spoon to fold gently until just combined.

    • Stop mixing when flour streaks disappear to keep muffins light and fluffy.


🍫 Step 4: Add Mix-ins (Optional)

  1. Gently fold in raisins or chocolate chips if desired.


🧁 Step 5: Fill Muffin Cups

  1. Divide batter evenly among the 12 cups, filling about ¾ full.

  2. Place the tin in the center of the oven.


🔥 Step 6: Bake

  1. Bake for 20–25 minutes.

  2. Muffins are done when:

    • Tops are golden brown

    • They spring back when lightly pressed

    • Toothpick inserted comes out clean or with a few moist crumbs


❄ Step 7: Cool

  1. Let muffins cool in the tin for 5 minutes.

  2. Transfer to a wire rack to cool completely.


🌟 Pro-Tips for Success

  • Room Temperature Ingredients: Eggs and milk at room temperature give a smoother, well-incorporated batter.

  • Storage: Keep in an airtight container at room temperature for up to 3 days. Freeze for up to 2 months.

  • Optional Flavors: Add cinnamon, nutmeg, or lemon zest for a flavor twist.

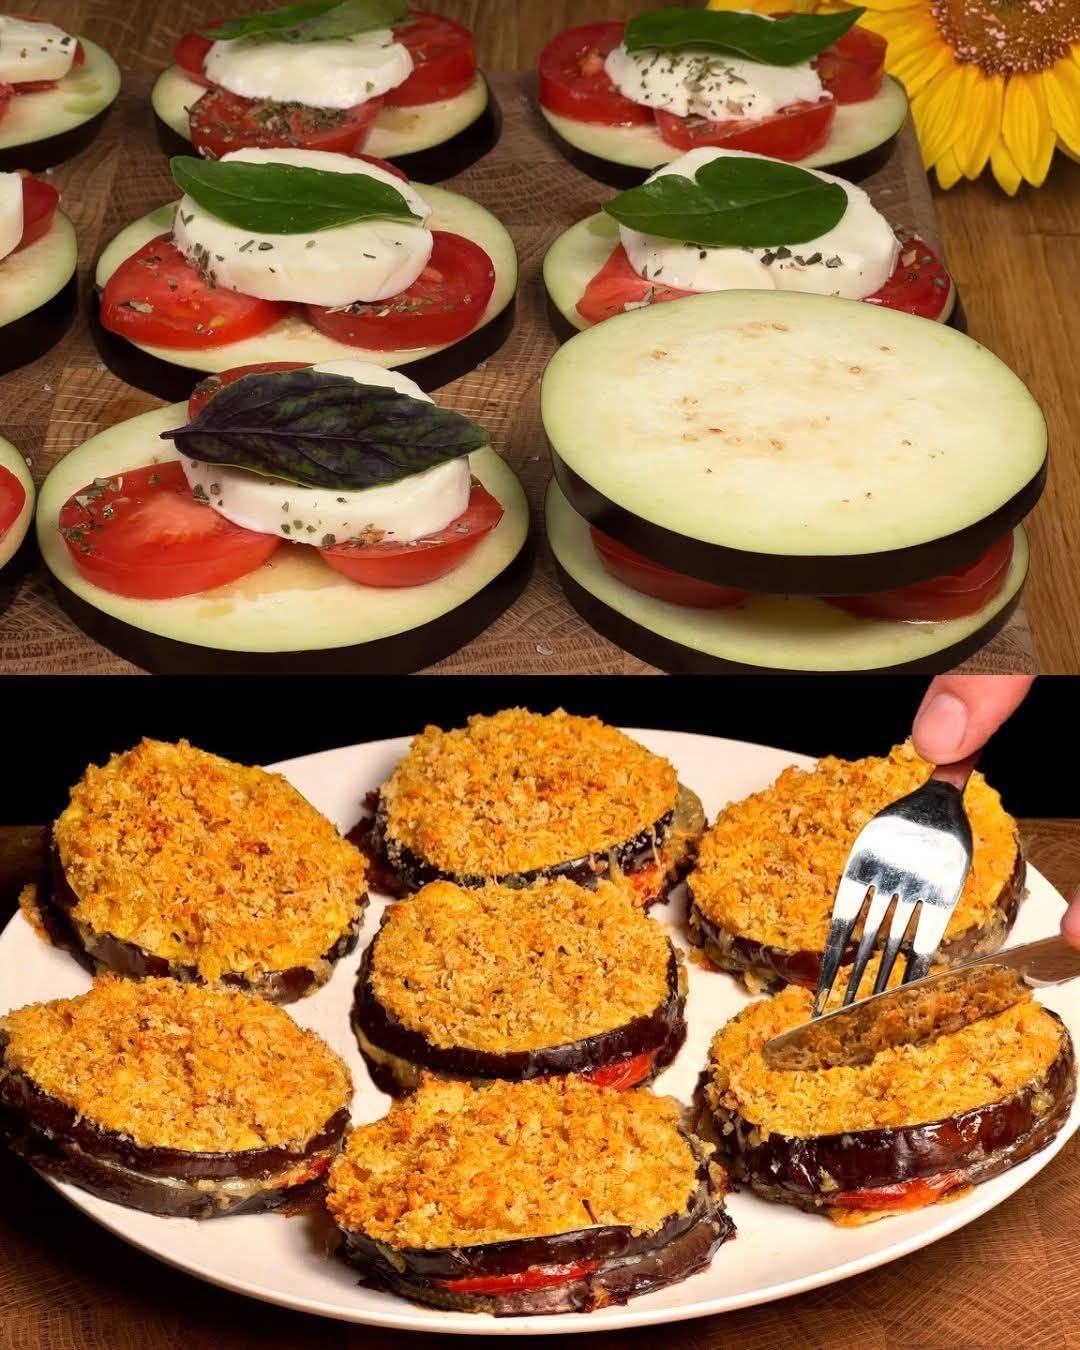
Crispy Eggplant & Mozzarella Bake

Crispy Eggplant & Mozzarella Bake

Prep Time: 10 minutes
Cook Time: 15–20 minutes
Servings: 3–4 portions

Golden, crisp eggplant layered with juicy tomatoes and melted mozzarella. Light, comforting, and perfect as a main dish or side.


🧾 Ingredients

  • 2 large eggplants

  • 3 eggs

  • 180 g mozzarella cheese, shredded

  • 6–8 cherry tomatoes (or 2 medium tomatoes), sliced

  • 1 tablespoon mayonnaise or Greek yogurt

  • Olive oil, for brushing

  • Breadcrumbs or Panko (for coating)

  • Sea salt, to taste

  • Ground black pepper, to taste

Optional

  • Fresh basil leaves (for garnish)

  • Dried oregano (for flavor)


👩‍🍳 Step-by-Step Instructions

🍆 Step 1: Prepare the Eggplant

  1. Wash the eggplants and trim off the ends.

  2. Slice into rounds about ½ inch (1 cm) thick.

  3. If desired, sprinkle lightly with salt and let sit for 5 minutes.

  4. Pat dry with a paper towel to remove extra moisture.


🥚 Step 2: Make the Egg Coating

  1. In a shallow bowl, whisk together:

    • Eggs

    • Mayonnaise (or yogurt)

    • Salt

    • Black pepper

  2. Mix until smooth.


🍞 Step 3: Coat the Slices

  1. Dip each eggplant slice into the egg mixture.

  2. For extra crispness, coat with breadcrumbs or Panko.

  3. Place coated slices on a plate while preparing the pan.


🧀 Step 4: Assemble the Layers

  1. Preheat oven to 400°F (200°C).

  2. Line a baking tray with parchment paper and lightly brush with olive oil.

  3. Arrange half of the eggplant slices on the tray.

  4. Top each slice with:

    • A slice of tomato

    • A generous pinch of mozzarella

    • A sprinkle of dried oregano (optional)

  5. Add another eggplant slice on top to form stacks
    (or bake as single layers if preferred).


🔥 Step 5: Bake

  1. Lightly brush the tops with olive oil.

  2. Bake for 15–20 minutes until:

    • Eggplant is tender

    • Cheese is melted and lightly golden

    • Coating is crisp


🌿 Step 6: Serve

  1. Garnish with fresh basil leaves.

  2. Serve warm for best texture and flavor.


🌟 Helpful Tips

✔ Use Panko for extra crunch
✔ Add garlic powder for extra flavor
✔ Serve with a green salad or yogurt dip
✔ Best enjoyed fresh and warm

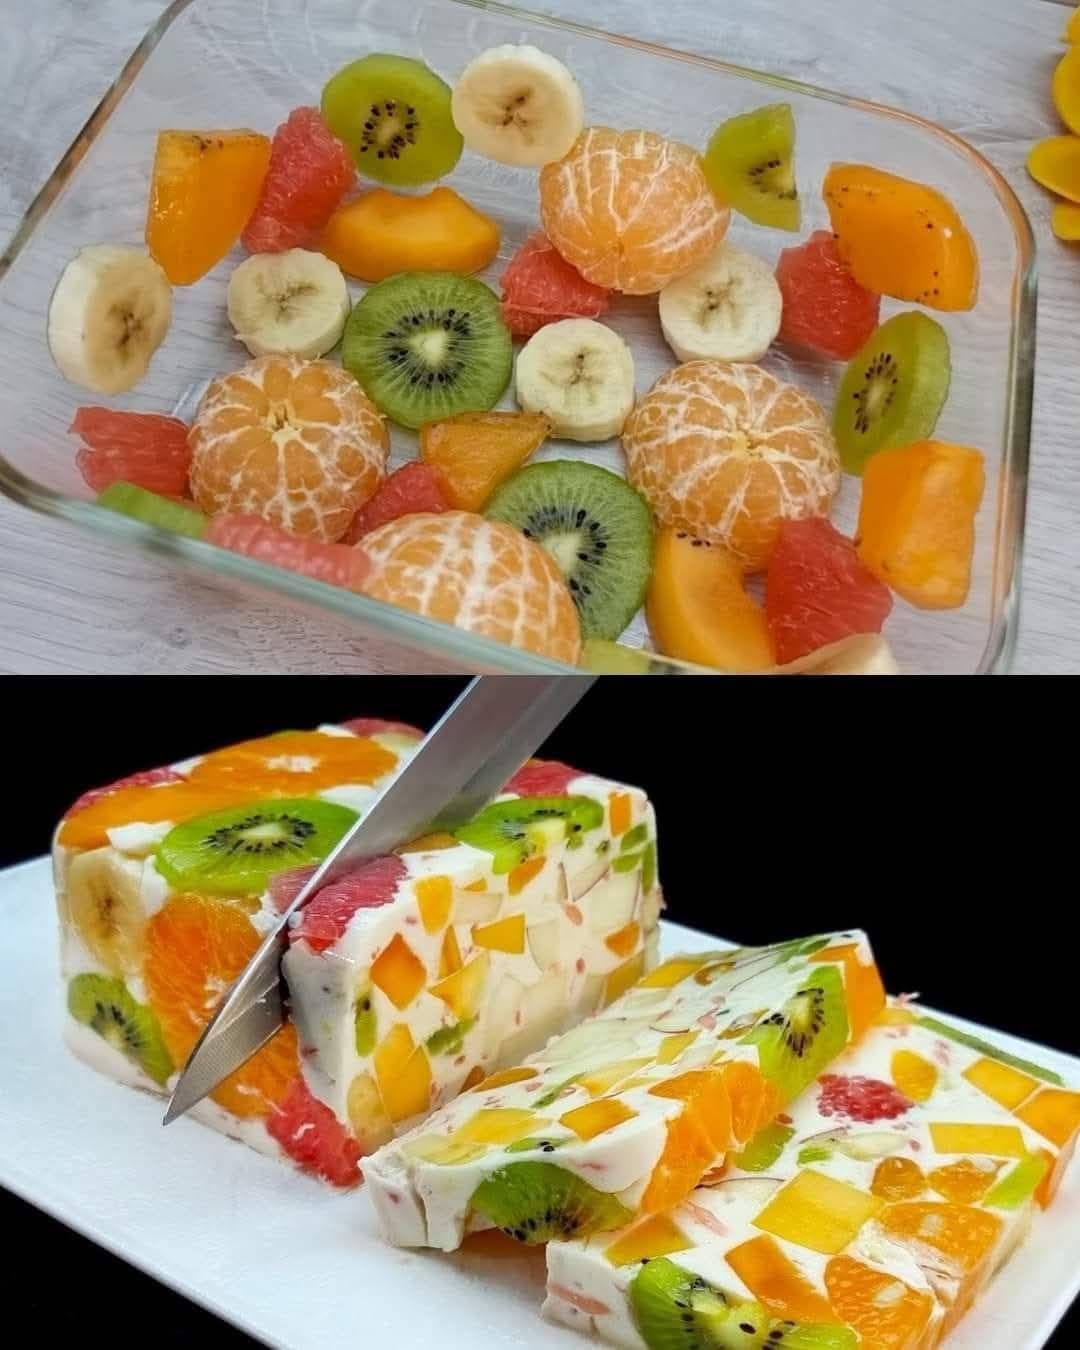
Creamy Milk & Fruit Terrine (Agar-Agar Dessert)

Creamy Milk & Fruit Terrine (Agar-Agar Dessert)

Prep Time: 15 minutes
Setting Time: 2–3 hours
Servings: 6–8 slices

This colorful terrine is a light, refreshing dessert made with fresh fruit and creamy milk, set naturally with agar-agar. Each slice looks like stained glass and tastes cool, smooth, and fruity.


🧾 Ingredients

🍊 Fruit Layer

  • 2–3 tangerines, peeled and separated

  • 2 kiwis, peeled and sliced

  • 1–2 persimmons, peeled and sliced

  • ½ grapefruit, peeled and segmented (white pith removed)

  • 1 apple, cored and finely chopped

  • 1 banana, sliced


🥛 Milk Layer

  • 500 ml (2 cups) milk

  • 3–4 tablespoons sugar or honey (adjust to taste)

  • 8 g agar-agar powder

  • 50 ml water (to dissolve agar)

  • 1 teaspoon vanilla extract (optional)


👩‍🍳 Step-by-Step Instructions

🍓 Step 1: Prepare the Fruit

  1. Wash, peel, and slice all fruits as listed.

  2. Arrange the fruit evenly inside a rectangular glass dish or silicone loaf mold.

  3. Mix colors and shapes for a bright, mosaic look in every slice.


🌿 Step 2: Dissolve the Agar-Agar

  1. In a small bowl, combine agar-agar powder and water.

  2. Stir until smooth and lump-free.

  3. Let it sit for 1 minute.


🔥 Step 3: Heat the Milk Mixture

  1. Pour milk and sugar (or honey) into a saucepan.

  2. Heat gently over medium heat until warm.

  3. Add the agar mixture to the milk and stir well.


🍲 Step 4: Activate the Agar-Agar

  1. Bring the mixture to a gentle boil while stirring continuously.

  2. Let it boil for 1–2 minutes to fully activate the agar.

  3. Remove from heat and stir in vanilla extract.


🥄 Step 5: Assemble the Terrine

  1. Let the milk mixture cool for 3–5 minutes (it must remain liquid).

  2. Slowly pour over the arranged fruit.

  3. Use a spoon to gently press down floating fruit so everything stays covered.


❄ Step 6: Set and Chill

  1. Allow the dish to cool at room temperature until it begins to firm.

  2. Transfer to the refrigerator for 2–3 hours until fully set and chilled.


🔪 Step 7: Serve

  1. Run a thin knife around the edges of the dish.

  2. Turn out onto a serving plate.

  3. Slice and serve chilled.


🌟 Helpful Tips

✔ Use firm fruit for clean slices
✔ Adjust sweetness to taste
✔ Coconut milk can replace regular milk
✔ Add a little citrus zest for extra aroma
✔ Best served cold