Cheesy Bacon Egg Toast Cups

🧀🥓 Cheesy Bacon Egg Toast Cups

A quick baked breakfast made with bread, eggs, cheese, and bacon.

⏱ Prep Time: 5 minutes

🔥 Bake Time: 12–15 minutes

🍽 Serves: 6


📝 Ingredients

  • 6 slices sandwich bread

  • 6 slices cheese (cheddar, mozzarella, or your choice)

  • 6 slices cooked bacon (chopped)

  • 4 large eggs

  • Salt, to taste

  • Black pepper, to taste

  • 1 tbsp fresh parsley, chopped

  • 1 tbsp green onion, chopped

  • Butter or oil (for greasing pan)


👩‍🍳 Instructions

  1. Preheat oven to 180°C (350°F). Grease a muffin tin.

  2. Flatten each slice of bread with a rolling pin.

  3. Press each slice of bread into the muffin tin to form a cup.

  4. Place one slice of cheese inside each bread cup.

  5. Sprinkle chopped bacon evenly into each cup.

  6. In a bowl, beat the eggs with:

    • salt

    • black pepper

    • parsley

    • green onion

  7. Pour the egg mixture evenly into each bread cup.

  8. Bake for 12–15 minutes, or until:

    • eggs are set

    • cheese is melted

    • edges are golden

  9. Let cool for 2–3 minutes, then remove gently.


🌟 Optional Add-Ins

  • Bell peppers

  • Mushrooms

  • Spinach

  • Tomatoes

  • Chili flakes


🧊 Storage

  • Refrigerate up to 3 days

  • Reheat in oven or air fryer for best texture

Grandma’s Apple Puff Pastry Bars

Grandma’s Apple Puff Pastry Bars

A simple baked dessert made with tender apples and flaky pastry.

⏱ Prep Time: 15 minutes

🔥 Bake Time: 30–35 minutes

🍽 Serves: 9–12 pieces


📝 Ingredients

Filling:

  • 4 medium apples (peeled and diced)

  • ⅓ cup granulated sugar

  • 1 tsp cinnamon

  • ¼ tsp nutmeg (optional)

  • 1 tbsp lemon juice

  • 1 tbsp cornstarch

Pastry:

  • 2 sheets puff pastry (thawed)

  • 1 egg (beaten, for brushing)

Glaze:

  • 1 cup powdered sugar

  • 2–3 tbsp milk

  • ½ tsp vanilla extract


👩‍🍳 Instructions

  1. Preheat oven to 180°C (350°F). Grease or line a rectangular baking pan.

  2. In a bowl, mix:

    • diced apples

    • sugar

    • cinnamon

    • nutmeg

    • lemon juice

    • cornstarch
      Stir until apples are coated.

  3. Roll out one sheet of puff pastry and place it in the bottom of the pan.

  4. Spread the apple mixture evenly over the pastry.

  5. Roll out the second puff pastry sheet and place it on top.
    Seal the edges and lightly score the top into squares.

  6. Brush the top with beaten egg.

  7. Bake for 30–35 minutes or until golden brown and bubbling.

  8. Let cool for 15 minutes.

  9. Mix glaze ingredients and drizzle over the warm pastry.

  10. Slice into squares and serve.


🍽 Storage

  • Store covered at room temperature for 1 day

  • Refrigerate up to 4 days

  • Reheat lightly before serving

Crispy Roasted Cauliflower Steaks

Crispy Roasted Cauliflower Steaks

Gluten-Free, Low-Carb, and Budget-Friendly

Ingredients

  • 1 Large Head of Cauliflower: Fresh and firm.

  • 1/4 cup Olive Oil or Melted Butter: For that golden crispness.

  • 2 cloves Garlic: Minced (or 1 tsp garlic powder).

  • 1 tsp Smoked Paprika: Gives it that “better than meat” savory depth.

  • Salt and Black Pepper: To taste.

  • Optional Garnish: Fresh chopped parsley and a squeeze of lemon juice.

Instructions

  1. Prep the Oven: Preheat your oven to 400°F (200°C). Line a large baking sheet with parchment paper.

  2. Slice the “Steaks”: Remove the outer leaves from the cauliflower but keep the core intact (this holds the steaks together). Slice the head vertically into 3/4-inch thick slabs.

  3. Seasoning Blend: In a small bowl, whisk together the olive oil (or butter), minced garlic, paprika, salt, and pepper.

  4. The Coating: Lay the steaks on the baking sheet. Generously brush both sides of each steak with your seasoning blend.

  5. The Roast: Bake for 25–30 minutes, flipping halfway through. You want the edges to be dark golden brown and the center to be tender when pierced with a fork.

  6. The Finish: For extra crunch, you can broil them for the last 2 minutes. Sprinkle with fresh parsley and lemon juice immediately before serving.


Why this is a “Win” for your 22+ Day Streak:

  • Texture: When roasted at high heat, the cauliflower develops a meaty, satisfying texture that hits those savory cravings perfectly.

  • Affordability: This entire meal usually costs less than a few dollars but looks like a gourmet restaurant dish.

  • Versatility: You can dip these in the same garlic-lemon sauce shown in your photo for an extra layer of flavor.

Green Wellness Smoothie (Soursop–Turmeric Blend)

Green Wellness Smoothie (Soursop–Turmeric Blend)

Description

A creamy, antioxidant-rich smoothie made with soursop (graviola), turmeric, and optional hibiscus, blended into a refreshing green drink. Traditionally used in tropical cultures for general wellness, digestion, and immune support.


Ingredients (1 serving)

  • 1 cup fresh or frozen soursop pulp (seeds removed)

  • 1 cup water or unsweetened coconut water

  • ½ teaspoon fresh grated turmeric (or ¼ tsp ground turmeric)

  • A pinch black pepper (helps turmeric absorption)

  • 1 teaspoon fresh lime or lemon juice

  • Optional:

    • 1 teaspoon hibiscus petals (steeped and cooled)

    • ½ teaspoon raw honey (optional, skip if diabetic)


Instructions

  1. Add all ingredients to a blender

  2. Blend until smooth and creamy

  3. Taste and adjust water or citrus

  4. Serve chilled


Tips for Best Results

  • ✅ Remove soursop seeds completely (they are not edible)

  • ✅ Use fresh turmeric if possible

  • ❌ Do not drink excessively (1 serving/day max)

  • ❌ Avoid if pregnant or on blood-pressure medication without doctor approval


Servings

  • 1 glass (10–12 oz)

  • Can be doubled, but drink fresh


Approximate Nutritional Info (per serving)

  • Calories: ~140

  • Carbohydrates: ~32 g

  • Fiber: ~5 g

  • Vitamin C: ~45% DV

  • Potassium: ~10% DV

  • Fat: ~1 g

  • Protein: ~2 g

(Values vary depending on exact ingredients)


Realistic Health Benefits

✔ Supports hydration
✔ Rich in antioxidants
✔ May support digestion
✔ Helps reduce inflammation (turmeric)
✔ Provides vitamin C for immune health

What it does NOT do:

❌ Does not cure cancer
❌ Does not reverse diabetes
❌ Does not replace medication
❌ Does not “detox” organs


Q & A

Q: Is soursop proven to cure cancer?
A: No. Some lab studies exist, but no human clinical proof. It should never replace treatment.

Q: Can diabetics drink this?
A: Possibly in small amounts without honey, but only with blood sugar monitoring.

Q: Can I drink it daily?
A: Yes, once a day max, not long-term continuously.

Q: Is this better than green smoothies?
A: It’s just different, not superior.

Q: Why is black pepper included?
A: It improves turmeric absorption by up to 2000%.

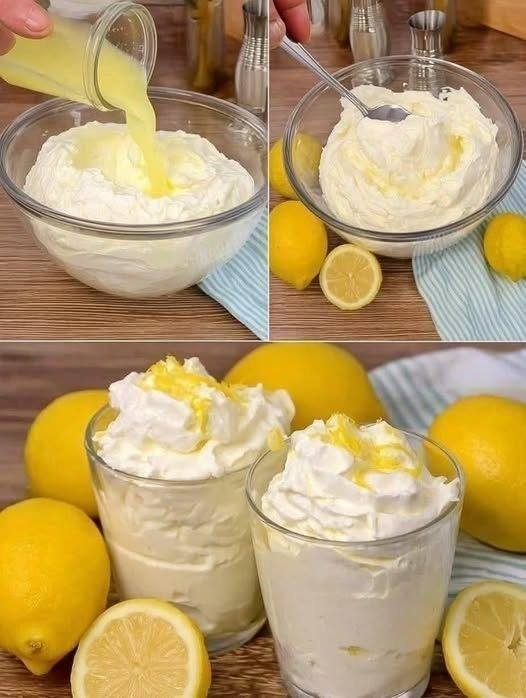
Creamy Lemon Cheesecake Mousse (No-Bake Dessert)

Creamy Lemon Cheesecake Mousse (No-Bake Dessert)

This smooth and creamy lemon dessert combines the richness of cream cheese with fresh citrus flavor. It requires no oven and can be prepared in minutes.

Preparation Time: 10 minutes
Chilling Time (optional but recommended): 30 minutes
Servings: 4


🧾 Ingredients

  • 225 g (8 oz) cream cheese, softened at room temperature

  • 240 ml (1 cup) heavy whipping cream, cold

  • 120 g (½ cup) powdered sugar, adjust to taste

  • 60 ml (¼ cup) freshly squeezed lemon juice

  • 1 tablespoon lemon zest, finely grated

  • 1 teaspoon vanilla extract


👩‍🍳 Instructions

Step 1: Whip the Cream

  1. Place a mixing bowl and beaters in the refrigerator for 10 minutes before use (this helps the cream whip properly).

  2. Pour the cold heavy whipping cream into the chilled bowl.

  3. Beat using an electric mixer on medium-high speed until thick and firm peaks form.

  4. Place the whipped cream in the refrigerator while preparing the base mixture.


Step 2: Prepare the Cream Cheese Mixture

  1. Add the softened cream cheese to a large mixing bowl.

  2. Beat with an electric mixer on medium speed until completely smooth.

  3. Add the powdered sugar gradually and continue beating until fully blended and free of lumps.


Step 3: Add Flavoring

  1. Pour in the lemon juice slowly while mixing on low speed.

  2. Add lemon zest and vanilla extract.

  3. Mix just until evenly combined. Do not overmix.


Step 4: Combine Mixtures

  1. Remove the whipped cream from the refrigerator.

  2. Add it to the lemon cream cheese mixture in three portions.

  3. Gently fold using a spatula with slow, circular movements until fully blended.
    (Do not stir aggressively — this keeps the texture light and smooth.)


Step 5: Portion and Chill

  1. Spoon or pipe the mousse into serving glasses or bowls.

  2. Refrigerate for at least 30 minutes for better texture and flavor.


🍋 Garnishing Ideas (Optional)

  • Sprinkle with fresh lemon zest

  • Add thin lemon slices

  • Top with crushed biscuits or cookie crumbs

  • Add a few fresh mint leaves


✅ Storage

Keep refrigerated in a covered container for up to 2 days.

Mediterranean Fruit & Nut Shortbread

Mediterranean Fruit & Nut Shortbread

Buttery, zesty, and perfectly crisp cookies studded with jewel-toned fruits and crunchy nuts.

  • Prep time: 15 minutes (plus chilling)

  • Bake time: 12–15 minutes

  • Yields: Approx. 24 cookies

Ingredients

The Dry Base

  • 2 cups All-purpose flour

  • ¼ cup Fine semolina (adds a traditional, delicate crunch)

  • ½ tsp Baking powder

  • ¼ tsp Sea salt

The Aromatics & Fats

  • ¾ cup Unsalted butter, softened (For a true Mediterranean profile, use ½ cup butter + ¼ cup mild olive oil)

  • ¾ cup Powdered sugar (confectioners’ sugar)

  • 1 tbsp Fresh lemon or orange zest

  • 1 tsp Pure vanilla extract

The Textures

  • ½ cup Dried cranberries or cherries, roughly chopped

  • ½ cup Pistachios or almonds, chopped

  • Optional: 1 tbsp sesame seeds or a pinch of ground anise for extra depth.


Instructions

  1. Cream the Base: In a large bowl, beat the softened butter (and olive oil, if using) with the powdered sugar until the mixture is pale, light, and smooth. Stir in the citrus zest and vanilla extract until fragrant.

  2. Combine Dry Ingredients: In a separate medium bowl, whisk together the flour, semolina, baking powder, and salt.

  3. Form the Dough: Gradually fold the dry ingredients into the butter mixture. Mix just until a cohesive dough forms—do not overwork it, or the shortbread will lose its tender texture.

  4. Fold in Jewels: Gently fold in your chopped dried fruits, nuts, and any optional seeds/spices until evenly distributed.

  5. Shape and Chill: Place the dough on a piece of plastic wrap or parchment paper. Shape it into a log approximately 5 cm (2 inches) in diameter. Wrap it tightly and refrigerate for at least 1–2 hours. This step is crucial to ensure the cookies hold their shape when sliced.

  6. Prep the Oven: Preheat your oven to 170°C (340°F) and line a large baking sheet with parchment paper.

  7. Slice and Bake: Use a sharp knife to slice the chilled log into rounds about 1 cm (½ inch) thick. Place them on the prepared tray, leaving a little space between each. Bake for 12–15 minutes or until the edges are just barely golden.

  8. Cool: Allow the cookies to firm up on the baking sheet for 5 minutes before transferring them to a wire rack to cool completely.