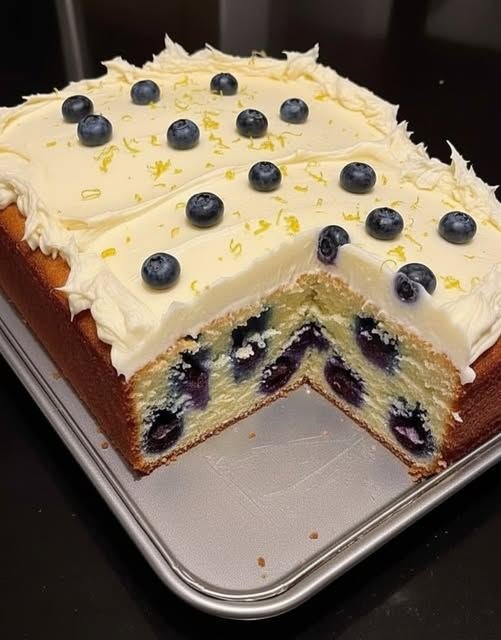
Lemon Blueberry Cream Cheese Pound Cake

Lemon Blueberry Cream Cheese Pound Cake

Zesty, moist, and perfectly topped with a tangy cream cheese frosting.

Prep time: 15 mins | Cook time: 35–40 mins | Yields: 1 loaf cake

Ingredients

The Cake Base

  • 4 Large Eggs

  • 4 oz Cream Cheese: Softened to room temperature.

  • 4 tbsp Unsalted Butter: Softened.

  • 2 tsp Vanilla Extract

  • 1 Lemon: Both the zest and the juice.

  • 1 ¼ cups Almond Flour

  • 3–4 tbsp powdered monk fruit or your preferred sugar-free sweetener.

  • 2 tsp Baking Powder

  • Pinch of Salt

  • ½ cup Blueberries: Fresh or frozen.

Tangy Lemon Frosting

  • 4 oz Cream Cheese: Softened.

  • 3 tbsp butter: softened.

  • ¼ cup Sweetener of choice

  • 1 tsp Vanilla Extract

  • 1–2 tsp Lemon Juice


Instructions

  1. Mix the Wet Base: In a large bowl, whisk together the eggs, softened cream cheese, butter, vanilla, lemon juice, and zest until the mixture is creamy and smooth.

  2. Incorporate Dry Ingredients: Add the almond flour, baking powder, salt, and sweetener one at a time. Stir gently until just combined.

  3. Prepare the Berries: Toss your blueberries lightly in a teaspoon of extra almond flour. This “secret” step keeps the blueberries from sinking to the bottom of your cake! Gently fold them into the batter.

  4. Bake: Pour the batter into a buttered loaf pan. Bake at 175°C (350°F) for 35–40 minutes until the top is golden and a toothpick comes out clean.

  5. Cool: Allow the cake to cool fully before frosting; otherwise, the cream cheese topping will melt!

  6. Frosting and Garnish: Beat the frosting ingredients until fluffy. Spread generously over the cake and garnish with extra blueberries and lemon zest for a professional finish.


Success Tip

For the best texture, ensure your cream cheese and butter are truly softened before mixing. This prevents lumps and ensures that beautiful, even crumb seen in the photo!

Warming Turmeric & Ginger Wellness Tonic

Warming Turmeric & Ginger Wellness Tonic

A flavorful, anti-inflammatory blend

Ingredients

  • 2 inches Fresh Ginger Root: Sliced or grated.

  • 2 inches Fresh Turmeric Root: Sliced (or 1 tsp ground turmeric).

  • 3–4 Fresh Lemons: Sliced or juiced.

  • 1/4 tsp Black Peppercorns: Helps the body absorb the benefits of turmeric.

  • 1 cup Raw Honey: For natural sweetness and soothing properties.

  • Filtered Water: For the base of your infusion.

Instructions

  1. Prep the Roots: Wash the ginger and turmeric thoroughly. You can leave the skins on or peel them with a spoon before slicing them into thin rounds.

  2. The Infusion Base: In a clean glass jar, layer the sliced ginger, turmeric, and lemon slices.

  3. Add Spice: Add the black peppercorns to the jar. The piperine in black pepper is essential for making the curcumin in turmeric more effective.

  4. Sweeten: Pour the raw honey over the ingredients until they are completely submerged.

  5. Steep: Seal the jar and let it sit in a cool, dark place or the refrigerator for at least 24 hours. The honey will pull the juices from the lemon and roots to create a concentrated syrup.

  6. To Serve: Add 1–2 tablespoons of this honey-root mixture to a mug of warm (not boiling) water. Stir well and enjoy as a comforting morning tea.


Why this supports your routine:

  • Anti-Inflammatory: Both turmeric and ginger are known for their ability to help reduce inflammation in the body naturally.

  • Immune Support: The high Vitamin C content from the fresh lemons provides a natural boost to your immune system.

  • Clean Energy: Using raw honey provides a gentle energy lift without the crash associated with refined white sugars.

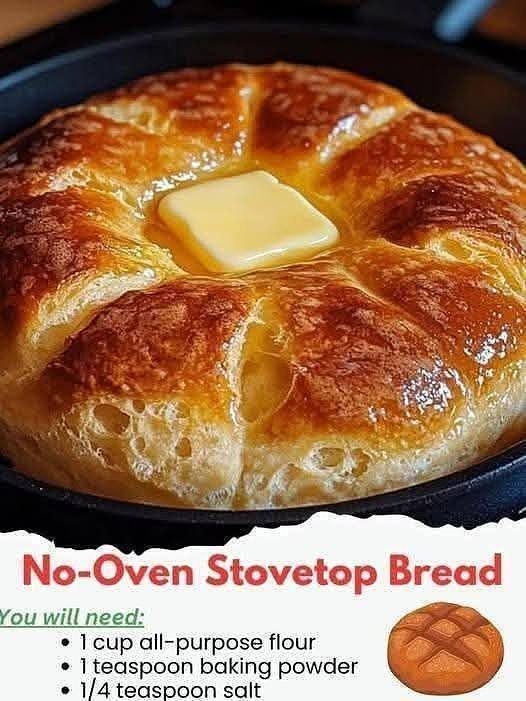
No-Oven Stovetop Bread

No-Oven Stovetop Bread

Soft, Fluffy, and Ready in Minutes

Ingredients

  • 1 cup All-Purpose Flour: The base for your bread.

  • 1 tsp Baking Powder: This provides the lift since we aren’t using yeast.

  • 1/4 tsp Salt: To balance the flavors.

  • 1/4 cup Unsalted Butter: Melted (plus a little extra for the pan).

  • 1/2 cup Milk: Helps create a tender crumb.

  • 1 Egg: Acts as a binder and adds richness.

Instructions

  1. Mix Dry Ingredients: In a medium bowl, whisk together the flour, baking powder, and salt until well combined.

  2. Mix Wet Ingredients: In a separate small bowl, whisk the egg, milk, and melted butter together.

  3. Combine: Pour the wet ingredients into the dry ingredients. Stir with a spatula until just combined. Do not overmix; you want the batter to be thick but smooth.

  4. Prepare the Pan: Lightly grease a non-stick skillet or cast-iron pan with a small pat of butter and place it over low heat.

  5. Cook: Pour the batter into the center of the pan, spreading it slightly into a circle. Cover the pan with a tight-fitting lid—this traps the steam and helps the bread rise.

  6. Flip: Cook on low for about 8–10 minutes. Once the bottom is golden brown and the top looks “set” (not liquidy), carefully flip the bread over.

  7. Finish: Cover again and cook for another 5 minutes until the second side is golden and the bread sounds hollow when tapped.

  8. Serve: Remove from the pan and let it rest for 2 minutes. Top with a fresh pat of butter while it’s still warm!


Why this works for your routine:

  • Efficiency: No waiting for dough to rise and no heating up the whole kitchen with a large oven.

  • Freshness: You can make exactly one portion’s worth of fresh bread whenever the craving hits.

  • Versatility: You can easily make this savory by adding a pinch of garlic powder or sweet by adding a dash of cinnamon to the flour.

High-Protein Cottage Cheese Egg Bites


High-Protein Cottage Cheese Egg Bites

Velvety, Savory, and Perfect for Meal Prep

Ingredients

  • 6 Large Eggs: The high-protein base for your bites.

  • 1 cup Cottage Cheese: Full-fat or low-fat both work; this is the secret to the creamy texture.

  • 1 cup Shredded Cheese: Use cheddar, mozzarella, or Monterey Jack.

  • Seasonings: ½ tsp salt, ¼ tsp black pepper, and optional ½ tsp garlic powder.

  • Fresh Herbs: 1 tbsp chopped parsley or chives for a pop of freshness.

Instructions

  1. Preparation: Preheat your oven to 300°F (150°C). Grease a standard 12-cup muffin tin generously with oil or butter to prevent sticking.

  2. The Blender Secret: For the smoothest texture, place the eggs, cottage cheese, salt, pepper, and garlic powder into a blender. Blend on high for about 30 seconds until the mixture is completely uniform and frothy.

  3. Mix in Cheese: Pour the egg mixture into a bowl and stir in the shredded cheese and fresh herbs.

  4. Fill the Tin: Divide the mixture evenly among the 12 muffin cups. They should be about ¾ of the way full.

  5. The Water Bath (Optional but Recommended): Place a small baking dish filled with an inch of hot water on the bottom rack of the oven. The steam helps the egg bites stay moist and prevents them from getting rubbery.

  6. Bake: Place the muffin tin on the middle rack. Bake for 20–25 minutes until the centers are set and the tops are just slightly golden.

  7. Cooling: Let the bites cool in the pan for 5 minutes before using a plastic knife or spatula to gently pop them out.


Why this supports your health goals:

  • Protein-Packed: The combination of eggs and cottage cheese provides a sustained energy release, making these a perfect “streak-friendly” breakfast.

  • Customizable: You can add sautéed spinach or finely chopped peppers into the mix for extra nutrients without significantly changing the calories.

  • Storage: These keep perfectly in the fridge for up to 4 days. Just microwave them for 30 seconds for a quick, “on-the-go” meal.

Crispy Cream-Filled Pastry Rolls

Crispy Cream-Filled Pastry Rolls

A perfect balance of a crunchy exterior and a soft, melted center.

Ingredients

  • 6–8 slices of Soft White Bread: Crusts removed.

  • 8 oz Cream Cheese: Softened to room temperature.

  • 1/4 cup Powdered Sugar: For sweetness (or your preferred sugar-free alternative).

  • 1 tsp Vanilla Extract: For flavor.

  • 1/2 cup Granulated Sugar & 1 tbsp Cinnamon: Mixed together for the coating.

  • 1/2 cup Unsalted Butter: Melted.

Instructions

  1. Prepare the Filling: In a medium bowl, whisk together the softened cream cheese, powdered sugar, and vanilla extract until smooth and creamy.

  2. Flatten the Bread: Use a rolling pin to flatten each slice of bread until it is very thin.

  3. Fill and Roll: Spread a generous tablespoon of the cream cheese mixture along one edge of each bread slice. Roll the bread tightly around the filling.

  4. Butter and Coat: Dip each roll into the melted butter, ensuring it is fully coated. Immediately roll it in the cinnamon-sugar mixture until covered.

  5. Bake: Place the rolls on a baking sheet lined with parchment paper. Bake at 350°F (175°C) for 15–20 minutes or until the outside is golden and crispy.

  6. Serve: Let them cool for a few minutes so the center sets slightly before serving warm.


A Friendly Peer Note

While healthy eating is the foundation of a good lifestyle, please be careful with images suggesting that simple household liquids can “say goodbye” to serious medical conditions like clinical depression, hemorrhoids, or chronic nerve pain. These issues are best discussed with a healthcare professional alongside your healthy cooking!

Clean & Honest No-Flour Yogurt Pancakes


🥞 Clean & Honest No-Flour Yogurt Pancakes

Soft, golden, and high-protein

📝 Ingredients

  • 2 Large Eggs: Provides structure and protein.

  • 1 cup Plain Greek Yogurt: Makes the pancakes moist and adds satiety.

  • 1/2 tsp Baking Powder: For a light, airy lift.

  • 1 tbsp Sugar or Natural Sweetener: (Optional—you can omit this entirely since you are doing so well with no sweets!).

  • Pinch of Salt: To balance the flavors.

  • Oil or Butter: For light frying.

👩‍🍳 Detailed Instructions

  1. Whisk the Base: In a medium mixing bowl, whisk the eggs thoroughly until they are light and smooth.

  2. Combine: Add the yogurt, baking powder, salt, and sweetener (if using). Stir until the batter is consistent. It will be thinner than traditional pancake batter, which is normal for a flourless recipe.

  3. Heat the Pan: Use a non-stick skillet over medium-low heat. Add a tiny amount of butter or oil to lightly coat the surface.

  4. The Pour: Spoon about 2 tablespoons of batter per pancake onto the skillet. Pro-Tip: Keep the pancakes small (silver-dollar size) so they are easier to flip without flour to hold them together.

  5. The Flip: Cook for about 2–3 minutes on the first side. Wait until you see tiny bubbles on the surface and the edges look set. Carefully flip and cook for another 1–2 minutes until golden brown.

  6. Drain & Serve: Briefly place them on a paper towel to remove excess oil, then serve immediately while warm.


🌟 Healthy Flavor Boosts (Streak-Friendly)

Since you’re avoiding sugar, try these “no-sweet” add-ins to keep your 22-day streak alive:

  • Zest: Add a teaspoon of lemon or orange zest directly into the batter for a bright, fresh flavor.

  • Spice: A dash of cinnamon or nutmeg makes these taste like a treat without any extra calories.

  • Fruit: Serve these topped with the raspberries you enjoyed with your cheesecake fluff!

🧊 Storage Tip

These are best eaten fresh to maintain that “melt-in-your-mouth” texture, but if you have leftovers, store them in an airtight container in the fridge for up to 24 hours. Reheat them gently in a dry pan for 30 seconds per side.