Ham and Cheese Sticks

Flaky crescent dough wrapped around smoky deli ham and gooey cheddar sticks, brushed with a buttery Dijon-poppy seed glaze — a quick and irresistible snack or party appetizer!

Prep Time: 10 minutes
Cook Time: 12–15 minutes
Total Time: 25 minutes
Servings: 8
Dietary: Comfort food, Kid-friendly

Ingredients

  • Crescent dough sheets – 2 tubes

  • Deli-sliced ham – 1 lb

  • Cheddar cheese sticks – 8

  • Butter – ¼ cup, melted

  • Worcestershire sauce – 1 tsp

  • Dijon mustard – ½ tbsp

  • Dried minced onion or onion powder – ½ tbsp

  • Poppy seeds – ½ tbsp

Instructions

  1. Preheat oven: Set to 350°F (175°C). Grease or line a baking sheet with parchment paper.

  2. Prepare dough: Roll out crescent dough sheets. Cut each sheet into 4 equal pieces for a total of 8 pieces.

  3. Assemble sticks: Place ham slices on each dough piece. Add a cheddar stick on top. Fold in the ends and roll tightly to seal.

  4. Arrange: Place prepared rolls on the baking sheet.

  5. Make glaze: In a small bowl, mix melted butter, Worcestershire sauce, Dijon mustard, dried onion, and poppy seeds.

  6. Brush & bake: Brush glaze over each roll. Bake for 12–15 minutes or until golden brown.

  7. Serve: Enjoy hot, fresh from the oven!

Quick Notes & Pro Tips

  • Seal tightly: Press dough edges firmly to prevent cheese from oozing out during baking.

  • Cheese options: Use Swiss, mozzarella, or pepper jack for a fun flavor twist.

  • Make it mini: Cut each dough sheet into smaller strips for bite-sized party appetizers.

Why You’ll Love It

These buttery, cheesy sticks are the ultimate quick snack or appetizer — perfect for game day, lunchboxes, or when you need something warm and satisfying in minutes.

Ingredient Details & Substitutions

  • Dough: Substitute with puff pastry or pizza dough for a flakier or chewier texture.

  • Ham: Try turkey, prosciutto, or even pepperoni for different flavor profiles.

  • Toppings: Add shredded Parmesan or Everything Bagel seasoning before baking.

Variations & Serving Suggestions

  • Dipping sauce: Serve with honey mustard, marinara, or ranch.

  • Breakfast twist: Swap ham for cooked bacon or sausage and add a sprinkle of scrambled eggs inside.

  • Party platter: Make double or triple batches for a crowd — these disappear fast!

Storage & Make-Ahead

  • Refrigerate: Store leftovers in an airtight container for up to 3 days.

  • Reheat: Warm in the oven at 350°F for 5–7 minutes or air fry for a crispier finish.

  • Make-ahead: Assemble rolls and refrigerate up to 24 hours before baking.

FAQs

Q: Can I freeze them?
A: Yes — freeze unbaked assembled sticks. Bake from frozen, adding 3–5 minutes to the cooking time.

Q: Can I use shredded cheese instead of cheese sticks?
A: Absolutely. Just mound it in the center before rolling (and seal carefully).

Personal Note

This recipe is my go-to for easy entertaining — it feels like a fun upgrade from a ham-and-cheese sandwich but takes almost no time at all. That buttery poppy seed glaze? Pure magic.

Your turn!
Tried these Ham and Cheese Sticks? Leave a comment or tag me on social media — I’d love to see your twist on them!

Tennessee Onions – Better Than Onion Rings!

Sweet Vidalia onions baked with butter and garlic until tender and golden — a simple yet irresistible Southern side dish that’s even better than onion rings!

Prep Time: 10 minutes
Cook Time: 35–40 minutes
Total Time: ~50 minutes
Servings: 4–6
Dietary: Vegetarian, Gluten-Free

Ingredients

  • Vidalia sweet onions – 3–4, sliced into thick rings

  • Unsalted butter – 4 tbsp

  • Salt – 1 tsp

  • Garlic powder – 1 tsp

Instructions

  1. Prep the onions: Preheat oven to 375°F (190°C). Peel and slice Vidalia onions into thick rings. Arrange them in a lightly greased baking dish.

  2. Add butter & seasoning: Cut butter into small pieces and scatter over the onions. Sprinkle with salt and garlic powder.

  3. Bake: Cover with foil and bake for 25–30 minutes. Remove foil and bake another 10–15 minutes until onions are tender and slightly caramelized.

  4. Serve: Enjoy hot as a side dish or topping for steaks, burgers, or grilled meats.

Quick Notes & Pro Tips

  • Use sweet onions: Vidalia onions work best for this recipe thanks to their natural sweetness.

  • Cheesy variation: Add shredded mozzarella or Parmesan on top during the last 10 minutes of baking for extra richness.

  • Make it a full dish: Sprinkle breadcrumbs or crushed crackers on top for a crispy finish.

Why You’ll Love It

This dish transforms simple onions into a buttery, savory-sweet side that’s hands-off and bursting with flavor. It’s perfect for BBQs, weeknight dinners, or a Southern-inspired feast.

Variations & Serving Suggestions

  • Cheesy Tennessee onions: Add a layer of cheddar or Swiss cheese before baking uncovered.

  • Spicy kick: Sprinkle red pepper flakes or cayenne before baking.

  • Serve with: Grilled steaks, chicken, or as a side to burgers.

Storage & Make-Ahead

  • Refrigerate: Store in an airtight container for up to 3 days.

  • Reheat: Warm in the oven at 350°F until heated through.

FAQs

Q: Can I use regular yellow onions?
A: Yes, but Vidalia onions provide the best sweetness for this recipe.

Q: Can I double the recipe?
A: Absolutely — just use a larger baking dish and increase butter accordingly.

Personal Note

This recipe proves you don’t need a long ingredient list for big flavor. These onions are buttery, tender, and so addictive — you may never crave fried onion rings again!

Your turn!
Tried these Tennessee Onions? Leave a comment or tag me on social media — I’d love to hear how you served them!

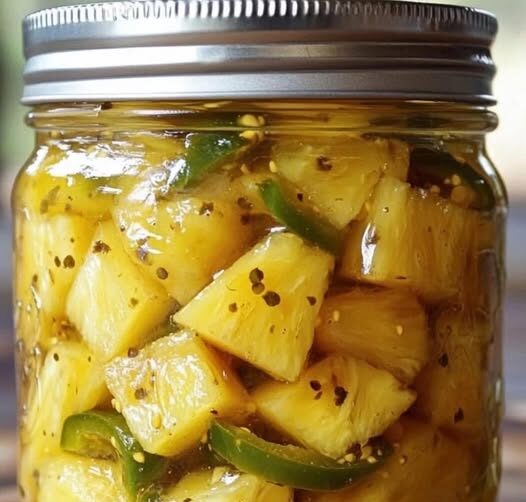
Pineapple Cowboy Candy

A sweet, tangy, and spicy condiment made with fresh pineapple, apple cider vinegar, and red pepper flakes — perfect for topping burgers, tacos, or enjoying straight from the jar.

Prep Time: 15 minutes
Cook Time: 10 minutes
Cool Time: 30 minutes
Total Time: ~55 minutes (plus 24-hour refrigeration)
Servings: About 2–3 cups
Dietary: Vegan, Gluten-Free

Ingredients

  • Fresh pineapple – 1 medium, peeled, cored, and diced

  • Granulated sugar – 1½ cups

  • Apple cider vinegar – ¾ cup

  • Red pepper flakes – 1½ tsp

  • Ground ginger – ½ tsp

  • Fresh mint leaves – optional, for garnish

Instructions

  1. Prep the pineapple: Peel, core, and dice pineapple into small chunks. Set aside.

  2. Make the syrup: In a medium saucepan, combine sugar, apple cider vinegar, red pepper flakes, and ground ginger. Stir well and bring to a gentle boil over medium heat.

  3. Add pineapple: Stir in diced pineapple. Reduce heat to low and simmer for 10 minutes, stirring occasionally, until the fruit absorbs some of the syrup.

  4. Cool: Remove from heat and let the mixture cool for 30 minutes. Stir in fresh mint leaves if using.

  5. Jar & store: Transfer pineapple and syrup into sterilized jars. Seal tightly and refrigerate for at least 24 hours to let flavors meld.

  6. Serve: Use as a topping for burgers, tacos, grilled meats, or enjoy straight from the jar.

Quick Notes & Pro Tips

  • Fresh vs. canned: Fresh pineapple gives the best texture and flavor, but canned can work in a pinch.

  • Control the heat: Adjust red pepper flakes based on your spice preference.

  • Sterilizing jars: Pour boiling water over jars and lids or run them through a dishwasher on the sterilize setting for safe storage.

Why You’ll Love It

This recipe transforms pineapple into a spicy-sweet condiment that’s incredibly versatile. It’s like cowboy candy (candied jalapeños) but with a tropical twist!

Ingredient Details & Substitutions

  • Sweetener: Swap granulated sugar with honey or brown sugar for deeper flavor.

  • Vinegar: Use white wine vinegar for a slightly different tang.

  • Herbs: Add cilantro or basil instead of mint for an herbal twist.

Variations & Serving Suggestions

  • Mix with jalapeños: Add sliced fresh or pickled jalapeños for a more authentic “cowboy candy” kick.

  • As a glaze: Brush over grilled chicken or pork for a sweet-spicy finish.

  • With cheese: Spoon over cream cheese and serve with crackers for an easy appetizer.

Storage & Make-Ahead

  • Refrigerate: Keeps in the fridge for up to 2 weeks.

  • Freezer-friendly: Store in a freezer-safe container for up to 3 months.

  • Make-ahead: Best when refrigerated for at least 24 hours before serving.

FAQs

Q: Can I can this for shelf storage?
A: Yes — follow proper water-bath canning procedures for safe long-term storage.

Q: How spicy is this?
A: Mild to medium heat — add more or fewer red pepper flakes to adjust.

Q: Can I use canned pineapple?
A: Yes, but reduce simmering time to avoid mushy texture.

Personal Note

This recipe came from my love of balancing sweet and spicy flavors — it’s the perfect “condiment meets side dish” that works on everything from grilled chicken to charcuterie boards.

Your turn!
Tried this Pineapple Cowboy Candy? Leave a comment or tag me on social media — I’d love to see how you use it!

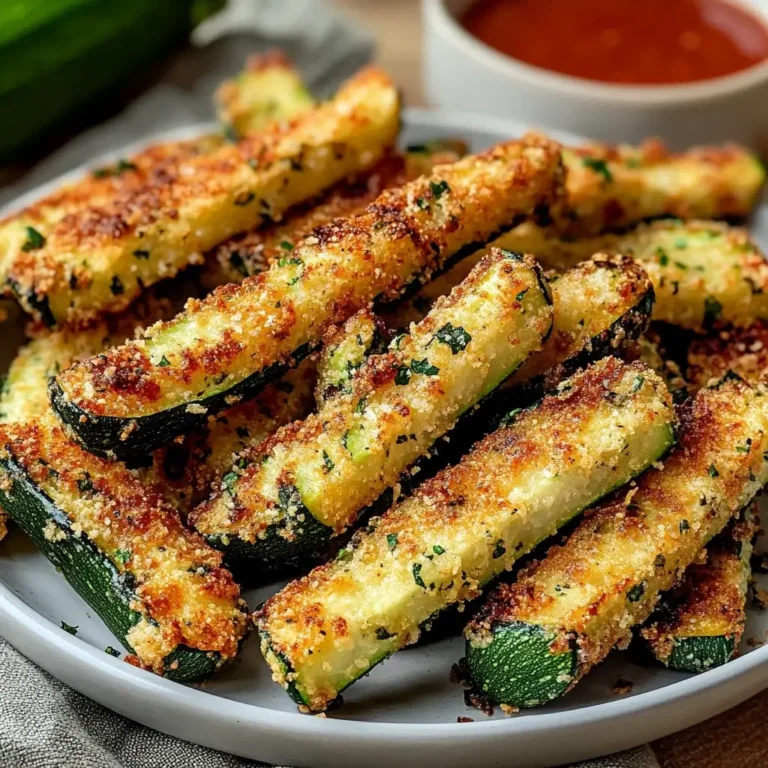
Crispy Air Fryer Zucchini Fries

Golden and crunchy on the outside, tender on the inside — these Parmesan-coated zucchini fries are the perfect guilt-free snack or side dish made effortlessly in the air fryer.

Prep Time: 15 minutes
Cook Time: 10–12 minutes
Total Time: ~25 minutes
Servings: 4
Dietary: Vegetarian, Low-oil, Air fryer

Ingredients

  • Zucchini – 2 medium, sliced into fries or sticks

  • Breadcrumbs – 1 cup (panko or regular)

  • Parmesan cheese – ½ cup, grated

  • Garlic powder – 1 tsp

  • Onion powder – 1 tsp

  • Paprika – ½ tsp

  • Salt – ½ tsp

  • Black pepper – ¼ tsp

  • Eggs – 2 large, beaten

  • Cooking spray or olive oil spray

Instructions

  1. Preheat air fryer: Set to 400°F (200°C).

  2. Make coating mix: In a shallow bowl, mix breadcrumbs, Parmesan, garlic powder, onion powder, paprika, salt, and black pepper.

  3. Dip & coat: Dip each zucchini stick into beaten eggs (let excess drip off), then roll in the breadcrumb mixture to coat completely.

  4. Arrange in fryer: Place coated fries in a single layer in the air fryer basket. Lightly spray with cooking spray or olive oil for maximum crisp.

  5. Cook: Air fry for 10–12 minutes, shaking halfway through, until golden brown and crispy.

  6. Cool & serve: Let sit for 2–3 minutes, then serve warm with your favorite dipping sauce.

Quick Notes & Pro Tips

  • Cut evenly: Uniform size ensures even cooking.

  • Crispier texture: Use panko breadcrumbs and spray well with oil.

  • Don’t overcrowd: Cook in batches if needed to keep fries crisp, not soggy.

Why You’ll Love It

These fries are the ultimate combo of crispy, cheesy, and savory — without deep frying! They’re a fun and healthy way to use up garden zucchini and totally kid-approved.

Ingredient Details & Substitutions

  • Breadcrumbs: Use gluten-free breadcrumbs if needed.

  • Cheese: Swap Parmesan for pecorino or a dairy-free alternative.

  • Spices: Add cayenne or Italian seasoning for a flavor twist.

Variations & Serving Suggestions

  • Dip ideas: Marinara, ranch, garlic aioli, or tzatziki.

  • Make it spicy: Add red pepper flakes to the breading mix.

  • Serve as: A side dish with burgers or a healthy appetizer for game day.

Storage & Make-Ahead

  • Refrigerate: Store leftovers in an airtight container for up to 2 days.

  • Reheat: Re-crisp in the air fryer at 375°F for 3–4 minutes.

  • Make-ahead tip: Bread zucchini sticks and refrigerate up to 4 hours before air frying.

FAQs

Q: Can I bake these instead of using an air fryer?
A: Yes — bake at 425°F on a wire rack for 18–22 minutes, flipping halfway through.

Q: Can I make these vegan?
A: Use plant-based Parmesan and replace eggs with aquafaba or a flax egg substitute.

Q: Why are my fries soggy?
A: They may be overcrowded or not sprayed with enough oil. Cook in a single layer and ensure a light, even spray for the best crunch.

Personal Note

These zucchini fries have saved me more times than I can count when I needed a quick snack that felt indulgent but wasn’t. They’re one of those “you won’t believe it’s healthy” recipes!

Your turn!
Tried these Crispy Air Fryer Zucchini Fries? Leave a comment or tag me on social media — I’d love to see your version!

Would you like a baked version with a spicy chipotle dip or a low-carb version using almond flour and no cheese?

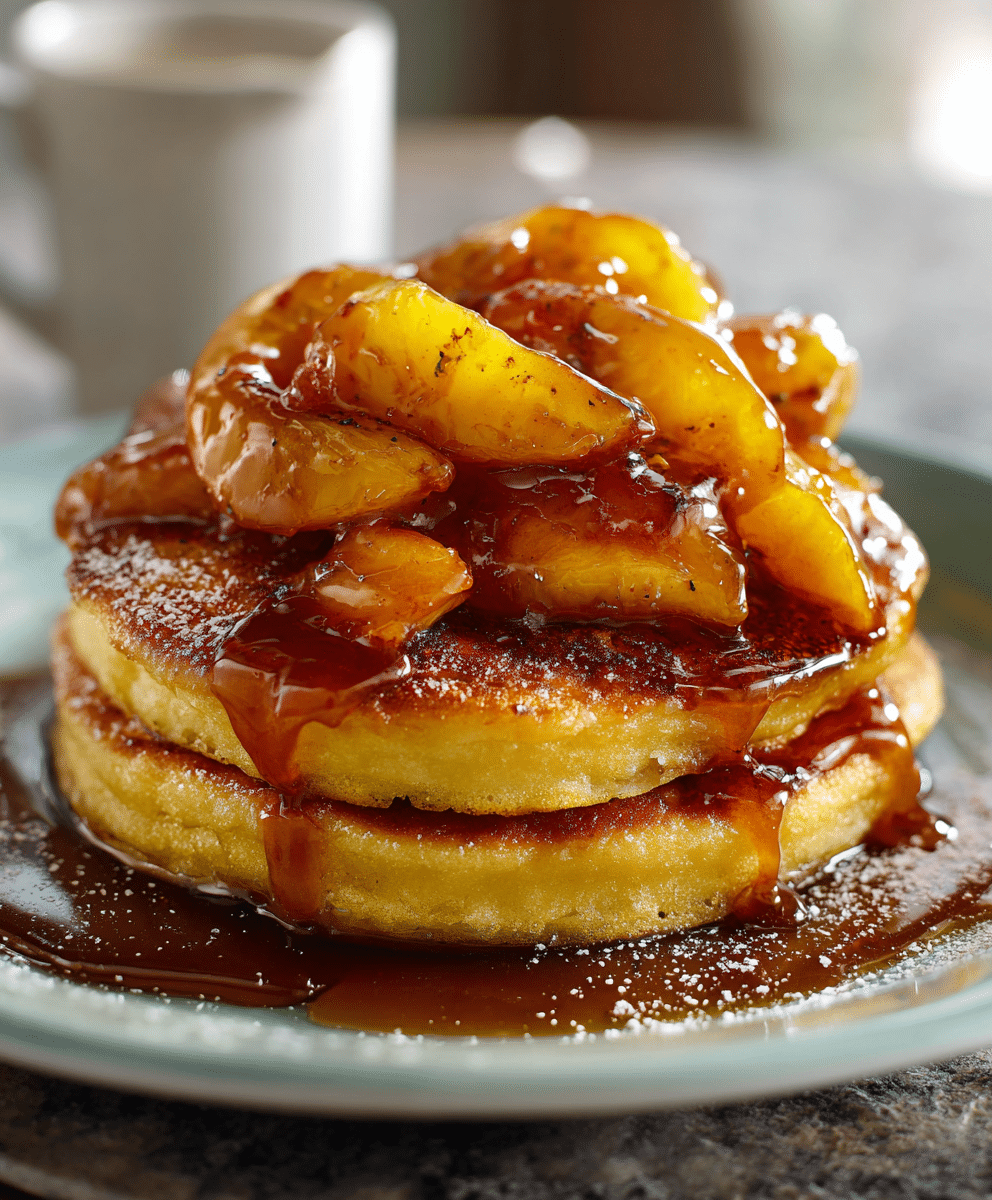
Caramel Peach Upside-Down Pancakes

A decadent skillet-baked pancake topped with buttery caramelized peaches — a showstopping breakfast (or dessert!) that’s as beautiful as it is indulgent.

Prep Time: 15 minutes
Cook Time: 20–25 minutes
Total Time: ~40 minutes
Servings: 4–6
Dietary: Vegetarian-friendly

Ingredients

For the caramel peach topping:

  • Ripe peaches – 2, sliced

  • Brown sugar – ¼ cup

  • Unsalted butter – 2 tbsp

  • Vanilla extract – 1 tsp

  • Cinnamon – ¼ tsp

For the pancake batter:

  • All-purpose flour – 1 cup

  • Granulated sugar – 2 tbsp

  • Baking powder – 1 tbsp

  • Salt – ½ tsp

  • Milk (dairy or non-dairy) – 1 cup

  • Large egg – 1

  • Melted butter – 2 tbsp

  • Vanilla extract – 1 tsp

Instructions

  1. Make the caramel peach topping: Heat a 9-inch oven-safe or cast-iron skillet over medium heat. Melt butter and swirl to coat the bottom. Sprinkle brown sugar over the butter, then add cinnamon and vanilla. Stir gently and cook for 1–2 minutes until bubbly and caramelized.

  2. Arrange the peaches: Remove from heat. Arrange sliced peaches in an overlapping pattern across the caramel layer, covering the bottom of the pan. Set aside.

  3. Mix the pancake batter: In a large bowl, whisk flour, sugar, baking powder, and salt. In another bowl, whisk milk, egg, melted butter, and vanilla. Pour wet ingredients into dry and fold gently until just combined. (A few lumps are fine.)

  4. Assemble: Preheat oven to 375°F (190°C). Pour the batter over the arranged peaches, spreading evenly to cover without disturbing the design.

  5. Bake: Transfer skillet to the oven. Bake 20–25 minutes, or until golden brown and a toothpick inserted into the center comes out clean.

  6. Flip & serve: Let cool 2–3 minutes. Run a knife along the edges. Place a serving plate over the skillet, then confidently flip. Let sit for 30 seconds before lifting off the pan. Serve warm.

Quick Notes & Pro Tips

  • Use firm peaches: Slightly underripe peaches hold their shape better during baking.

  • Don’t overmix the batter: This keeps the pancake tender and fluffy.

  • Be confident with the flip: Use oven mitts and commit to one quick, smooth motion.

Why You’ll Love It

This skillet pancake combines caramelized fruit, soft and fluffy cake-like texture, and a stunning upside-down presentation — perfect for brunch, special occasions, or when you want to impress without a ton of effort.

Ingredient Details & Substitutions

  • Fruit: Swap peaches for nectarines, plums, or pineapple for a twist.

  • Milk: Use almond, oat, or coconut milk for a dairy-free version.

  • Spice it up: Add nutmeg or cardamom for a warm flavor boost.

Variations & Serving Suggestions

  • Make it dessert: Top with whipped cream or a scoop of vanilla ice cream.

  • Nutty crunch: Sprinkle chopped pecans or almonds over the caramel layer before adding the batter.

  • Extra sauce: Drizzle with additional caramel or maple syrup when serving.

Storage & Make-Ahead

  • Refrigerate: Store leftovers in an airtight container for up to 3 days.

  • Reheat: Warm slices in the oven at 300°F or briefly in the microwave.

  • Make-ahead: Prepare caramel and slice peaches in advance; assemble and bake when ready.

FAQs

Q: Can I use canned peaches?
A: Yes, but drain them well and pat dry to prevent excess moisture.

Q: Can I make it gluten-free?
A: Substitute with a 1:1 gluten-free baking flour blend.

Q: Can I make it in advance?
A: It’s best served fresh, but you can bake ahead and reheat gently before serving.

Personal Note

This recipe is my go-to for weekend brunch when I want something that feels bakery-special but is simple enough to make at home. The caramelized peaches add a bright, fruity sweetness that pairs perfectly with the fluffy pancake base.

Your turn!
Tried these Caramel Peach Upside-Down Pancakes? Leave a comment or tag me on social media — I’d love to see your version!

Would you like me to create a “mini-skillet version” for individual servings or a “fall-inspired version” with apples and warm spices?

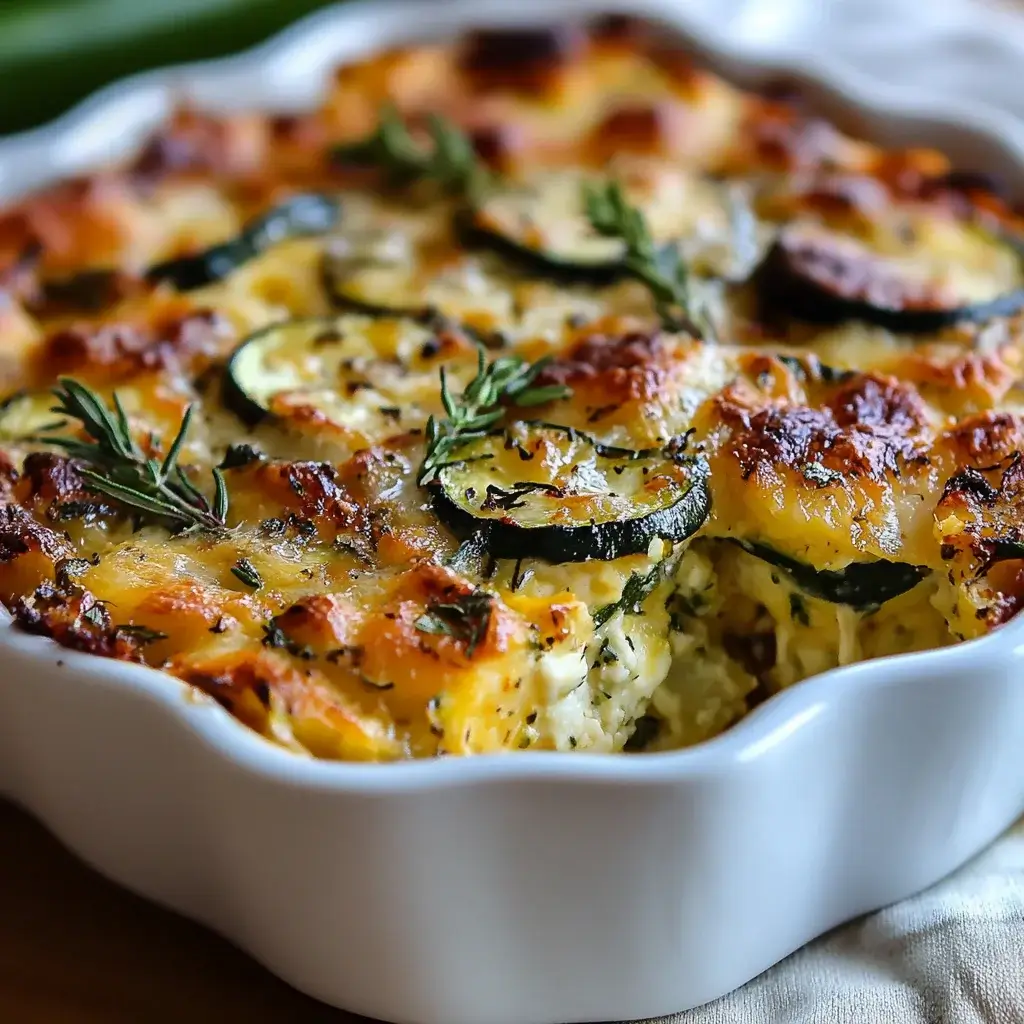
Garden Zucchini Casserole

A hearty, cheesy casserole loaded with fresh zucchini, spinach, bell peppers, and a creamy ricotta base — topped with a golden, crispy breadcrumb-Parmesan crust.

Prep Time: 20 minutes
Cook Time: 25–30 minutes
Total Time: ~50 minutes
Servings: 6–8
Dietary: Vegetarian, Comfort food

Ingredients

Vegetables:

  • Zucchini – 2 medium, sliced (about 4 cups)

  • Onion – 1 medium, chopped

  • Red bell pepper – 1, chopped

  • Fresh spinach – 2 cups, chopped

  • Garlic – 2 cloves, minced

Cheese & creamy base:

  • Mozzarella cheese – 1 cup, shredded

  • Ricotta cheese – 1 cup

  • Egg – 1 large

Seasoning:

  • Italian seasoning – 1 tsp

  • Salt – ½ tsp

  • Black pepper – ¼ tsp

Topping:

  • Breadcrumbs – 1 cup

  • Olive oil – 2 tbsp

  • Parmesan cheese – ½ cup, grated

Instructions

  1. Preheat oven: Set to 375°F (190°C). Grease a 9×13-inch baking dish with olive oil or cooking spray.

  2. Cook vegetables: In a skillet over medium heat, warm olive oil. Sauté onion and bell pepper for 5 minutes. Add garlic and cook for 1 minute. Stir in zucchini and spinach. Cook 5–7 minutes until zucchini is tender. Remove from heat and let cool slightly.

  3. Prepare ricotta mixture: In a bowl, combine ricotta, egg, Italian seasoning, salt, and pepper. Mix well.

  4. Assemble casserole: Stir the sautéed vegetables into the ricotta mixture. Pour into the prepared baking dish. Top with shredded mozzarella.

  5. Add breadcrumb topping: In a small bowl, mix breadcrumbs with Parmesan. Sprinkle evenly over the casserole.

  6. Bake: Bake uncovered for 25–30 minutes until the top is golden brown and bubbly.

  7. Rest & serve: Let cool for 5–10 minutes before slicing and serving.

Quick Notes & Pro Tips

  • Dry the zucchini: If your zucchini releases a lot of water, lightly salt and pat dry before cooking to avoid a watery casserole.

  • Make it ahead: Assemble up to 1 day in advance and refrigerate. Bake just before serving.

  • Crispier topping: Broil for 1–2 minutes at the end for a deeper golden crust.

Why You’ll Love It

This casserole is the perfect way to enjoy an abundance of fresh garden veggies — creamy, cheesy, and layered with texture from the crispy topping. It’s family-friendly, versatile, and makes a great side or main dish.

Ingredient Details & Substitutions

  • Cheese: Swap ricotta for cottage cheese or use fontina in place of mozzarella.

  • Breadcrumbs: Use panko for extra crunch or gluten-free breadcrumbs if needed.

  • Veggies: Add mushrooms or yellow squash for extra variety.

Variations & Serving Suggestions

  • Protein boost: Add cooked chicken or ground turkey for a heartier meal.

  • Spicy twist: Sprinkle red pepper flakes into the ricotta mixture.

  • Pair with: A crisp green salad and crusty bread for a complete dinner.

Storage & Make-Ahead

  • Refrigerate: Store leftovers in an airtight container for up to 4 days.

  • Freeze: Wrap tightly and freeze for up to 2 months. Thaw overnight before reheating.

  • Reheat: Warm in a 350°F oven until heated through to maintain crispness.

FAQs

Q: Can I use frozen spinach?
A: Yes — thaw and squeeze out excess water before adding.

Q: How do I keep the casserole from getting soggy?
A: Salt and pat the zucchini dry, and don’t overcook the veggies in the skillet.

Q: Can I make this dairy-free?
A: Substitute ricotta with dairy-free alternatives and use vegan cheese shreds.

Personal Note

This is one of my favorite ways to make a summer veggie harvest feel indulgent. The creamy ricotta base balances the fresh vegetables perfectly, and the crispy breadcrumb-Parmesan topping adds the ultimate finishing touch.

Your turn!
Tried this Garden Zucchini Casserole? Leave a comment or tag me on social media — I’d love to see your version!

Would you like me to make a “low-carb version” (no breadcrumbs, extra cheese) or a “Mediterranean version” with feta and sun-dried tomatoes?