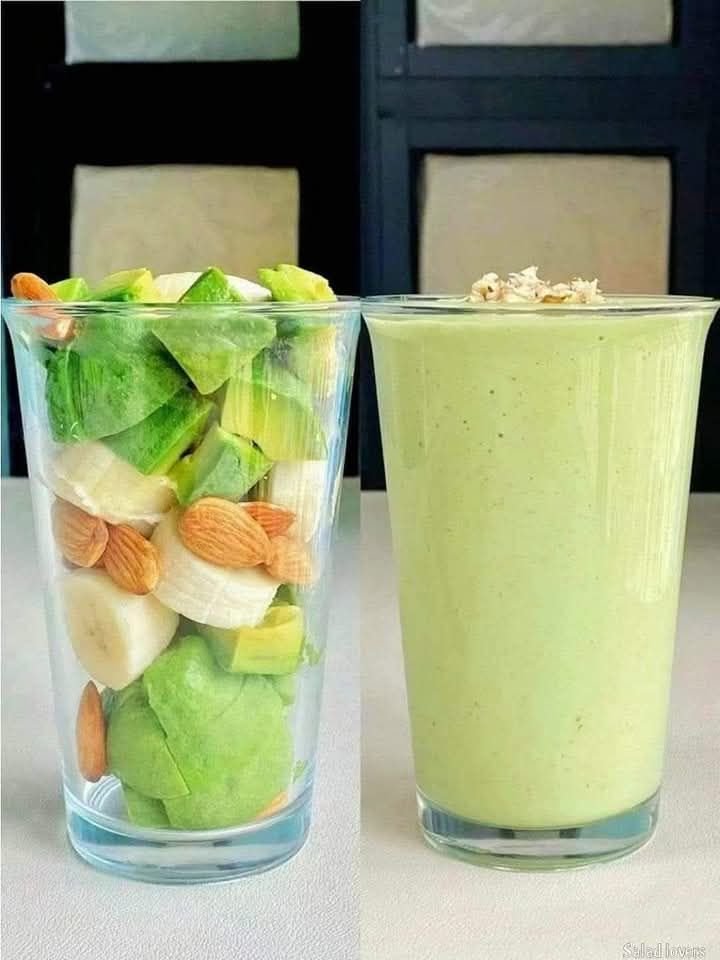
Creamy Avocado & Banana Energy Smoothie

Creamy Avocado & Banana Energy Smoothie

This recipe yields approximately one large serving.


Ingredients

  • 1/2 Medium Avocado: Pitted and peeled (provides the creamy texture and healthy fats).

  • 1 Frozen Banana: Sliced (frozen works best for a “milkshake” consistency).

  • 1/4 Cup Whole Almonds: (as seen in the glass) or 1 tablespoon of almond butter.

  • 1 Cup Liquid Base: Unsweetened almond milk, coconut water, or regular milk.

  • Optional Sweetener: 1 teaspoon of honey or a pitted date if you prefer it sweeter.

  • Optional Topping: A sprinkle of crushed walnuts or extra sliced almonds.


Instructions

  1. Prep the Fruit: If you haven’t already, slice your banana and scoop the avocado out of its skin.

  2. Layer the Blender: Add the liquid base first (this helps the blender run smoothly), followed by the almonds, banana, and avocado.

  3. Blend: Start on a low speed and gradually increase to high. Blend for about 45–60 seconds until the mixture is completely smooth and no almond bits remain.

  4. Adjust Consistency: If the smoothie is too thick, add a splash more liquid. If you want it colder/thicker, add 2–3 ice cubes and blend again.

  5. Serve: Pour into a glass and top with crushed nuts as shown in the photo.


Quick Nutrition Tip

This combination is excellent for long-lasting energy because the healthy fats from the avocado and almonds slow down the absorption of the natural sugars in the banana, preventing a “sugar crash” later.

Homemade Lemon Water

Homemade Lemon Water

Ingredients

  • 2 Large Lemons: Choose firm, bright yellow lemons.

  • 4–6 Cups Water: Filtered or spring water works best.

  • Ice: Optional, for serving.

  • Optional Sweetener: A small amount of honey or stevia if you find it too tart.


Instructions

  1. Wash the Lemons: Since you are putting the slices directly into the water, scrub the skin thoroughly to remove any wax or residue.

  2. Slice: Cut one lemon into thin rounds.

  3. Juice: Squeeze the juice of the second lemon into your pitcher.

  4. Combine: Add the lemon slices to the pitcher and fill with water.

  5. Infuse: Let the pitcher sit in the refrigerator for at least 30 minutes before drinking. This allows the lemon oils and juice to blend with the water.


Healthy Tips for Use

  • Protect Your Teeth: The acid in lemons can soften tooth enamel. It is best to drink this through a straw or rinse your mouth with plain water afterward.

  • Temperature: Many people prefer drinking this warm in the morning to help wake up their digestive system, or ice-cold for refreshment.

  • Manage Expectations: While staying hydrated can reduce bloating and help you feel better, sustainable body changes come from a balanced diet and regular physical activity.

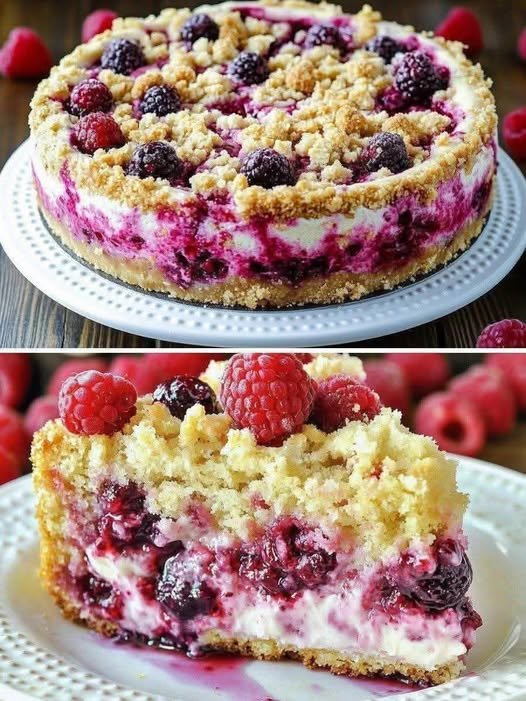
Mixed Berry Crumb Cheesecake


Mixed Berry Crumb Cheesecake

Ingredients

Crust Base:

  • 1½ cups graham cracker crumbs
  • ⅓ cup melted butter
  • 2 tablespoons sugar

Cheesecake Filling:

  • 24 oz (3 blocks) cream cheese, softened
  • 1 cup granulated sugar
  • 1 cup sour cream
  • 3 large eggs

Berry Swirl:

  • 1 cup fresh raspberries
  • 1 cup fresh blackberries
  • 2 tablespoons sugar
  • 1 teaspoon lemon juice

Crumb Topping:

Discover more
Bread
Garlic
Cake
CREAM CHEESE
cheese
Cream Cheese
bread
cream cheese
Cheese
cake

  • ½ cup all-purpose flour
  • ½ cup brown sugar
  • 4 tablespoons cold butter, cubed

Flavoring:

  • 2 teaspoons vanilla extract

Instructions

Prepare the crust by combining graham cracker crumbs, melted butter, and sugar.

Press the mixture firmly into the bottom of a 9-inch spring form pan.

Bake at 175°C (350°F) for 8 minutes, then cool completely.

Simmer raspberries, blackberries, sugar, and lemon juice in a small pan for 5–7 minutes until thickened.

Strain through a mesh sieve to remove seeds, then let the berry sauce cool.

Beat softened cream cheese and sugar until smooth.

Add sour cream and vanilla extract, mixing until incorporated.

Add eggs one at a time on low speed to avoid incorporating excess air.

Pour half the cheesecake batter over the cooled crust.

Drop spoonfuls of berry sauce on top and swirl lightly with a knife.

Add the remaining batter and repeat the berry swirl.

Mix flour, brown sugar, and cold butter until crumbly.

Sprinkle the streusel topping generously over the cheesecake.

Bake at 160°C (325°F) for 55–65 minutes, until edges are set but the center still has a slight jiggle.

Cool completely before removing from the pan.

The Surprising Health Benefits of Boiled Eggs

Boiled eggs have been a staple in human diets for centuries. Their simplicity, versatility, and impressive nutritional profile make them one of the most complete and affordable foods available. But beyond their convenience, doctors and nutrition experts are now highlighting that regularly eating boiled eggs can deliver an array of powerful health benefits.

For years, eggs were unfairly criticized due to their cholesterol content. However, recent research has turned that perception around, revealing that moderate egg consumption can actually support heart health, brain function, and more. Let’s dive into why the humble boiled egg deserves a regular spot on your plate.

1. A Natural Protein Powerhouse

Each boiled egg contains about 6 grams of high-quality protein — the kind your body can absorb and use efficiently. Protein is essential for muscle repair, tissue growth, and hormone production. Including boiled eggs in your daily meals helps preserve lean muscle mass, especially as you age. Athletes, fitness enthusiasts, and anyone looking to boost recovery or stay energized can benefit from this simple, nutrient-dense food.


2. Protects Eye Health

Boiled eggs are rich in lutein and zeaxanthin, two antioxidants that play a crucial role in maintaining good vision. These compounds help prevent damage from blue light and reduce the risk of cataracts and age-related macular degeneration — common causes of vision loss in older adults. Adding just one or two boiled eggs to your daily routine is a simple and effective way to protect your eyesight naturally.


3. Supports Brain Function and Memory

Eggs are one of the best natural sources of choline, a nutrient vital for brain health. Choline helps produce acetylcholine, a neurotransmitter responsible for learning, focus, and memory. Studies suggest that sufficient choline intake can reduce the risk of cognitive decline as you age. That makes boiled eggs an excellent choice for students, professionals, and older adults alike.


4. Helps Control Appetite and Weight

Thanks to their protein and healthy fat content, boiled eggs are highly satisfying and can keep you full for hours. Eating them for breakfast or as a snack can reduce overall calorie intake and help prevent cravings. This makes them ideal for those aiming to manage their weight naturally — no extreme diets required. Replacing processed snacks with a couple of boiled eggs can make a noticeable difference in your daily energy levels and hunger control.


5. Packed with Essential Nutrients

Boiled eggs provide a concentrated source of key vitamins and minerals your body needs every day. They’re loaded with:

  • Vitamin B12, which supports red blood cell production and energy metabolism.

  • Vitamin D, essential for bone health and immune support.

  • Selenium, a powerful antioxidant that protects your cells from oxidative stress.

This nutrient combination helps strengthen your immune system, support thyroid function, and promote overall well-being.


Final Thoughts

Boiled eggs are more than just a breakfast favorite — they’re a true superfood that deserves more recognition. Whether you’re looking to boost your protein intake, sharpen your mind, protect your eyes, or simply eat healthier, adding boiled eggs to your diet is a smart move.

Enjoy them as part of a balanced breakfast, in salads, or as a quick post-workout snack. Simple, affordable, and packed with nutrients, boiled eggs prove that sometimes, the healthiest foods are the ones we’ve had all along.
🍋 Ginger Water (Fresh & Refreshing Homemade Drink)

🍋 Ginger Water (Fresh & Refreshing Homemade Drink)

A simple, warming drink made with fresh ginger and water. This ginger water has a gentle spice, light sweetness (optional), and a clean, refreshing finish. It can be enjoyed warm or chilled and is easy to prepare with everyday ingredients.


Recipe Overview

  • Prep Time: 5 minutes

  • Cook Time: 10–15 minutes

  • Cooling Time: Optional

  • Yield: 2–3 servings


Ingredients

  • 1–2 tablespoons fresh ginger, peeled and thinly sliced

  • 3 cups (750 ml) water

  • 1–2 teaspoons honey or sugar (optional, to taste)

  • 1 tablespoon lemon juice (optional, for brightness)

  • Fresh mint leaves (optional, for serving)


Equipment Needed

  • Small saucepan

  • Knife and cutting board

  • Strainer

  • Heat-safe jug or glass


Step-by-Step Instructions

1. Prepare the Ginger

  • Peel the ginger using a spoon or knife

  • Slice thinly to expose more surface area for flavor


2. Simmer the Ginger

  • Add the ginger slices and water to a saucepan

  • Bring to a gentle boil over medium heat

  • Reduce heat to low and simmer for 10–15 minutes

    • Longer simmer = stronger flavor


3. Strain

  • Remove from heat

  • Strain the liquid into a jug or glass, discarding the ginger slices


4. Flavor (Optional)

  • Stir in honey or sugar while the liquid is warm

  • Add lemon juice if desired

  • Taste and adjust sweetness or strength


5. Serve

  • Serve warm for a cozy drink

  • Or let cool and serve chilled over ice

  • Garnish with fresh mint or a slice of lemon if desired


Taste & Texture

  • Flavor: Lightly spicy, clean, and refreshing

  • Texture: Smooth and clear

  • Aroma: Warm ginger with subtle citrus notes (if lemon is added)


Helpful Tips

  • Use fresh ginger for best flavor

  • Slice ginger thinly, not thick

  • Avoid boiling aggressively to keep taste balanced

  • Store leftovers in the refrigerator for up to 2 days


Variations

  • Mint Ginger Water: Add mint leaves while cooling

  • Lemon Ginger Water: Increase lemon juice slightly

  • Cold Infusion: Simmer briefly, then refrigerate overnight

  • Light Sweet Version: Use a small amount of honey


Storage

  • Keep refrigerated in a covered container

  • Shake or stir before serving

Ultimate Crock Pot Chicken and Dumplings

This Best Ever Crock Pot Chicken and Dumplings is the definition of a true “set it and forget it” comfort meal. Chicken thighs stay juicy and tender during the slow cook, and refrigerated biscuits make an easy shortcut for soft, fluffy dumplings—no homemade dough required.

Best Ever Crock-Pot Chicken and Dumplings

Ingredients

INGREDIENT AMOUNT
Boneless, skinless chicken thighs 6
Buttermilk refrigerated biscuits 1 can
Frozen mixed vegetables, thawed 2 cups
Chicken broth 2 cups
Cream of chicken soup 1 can
Cream of celery soup 1 can
Onion, diced 1
Fresh parsley, chopped (divided) 2 tablespoons
Poultry seasoning 1 teaspoon
Black pepper To taste

How to Make Best Ever Crock-Pot Chicken and Dumplings

Step 1: Build the Base
Scatter the diced onion evenly across the bottom of the crock pot. Arrange the chicken thighs in a single layer on top of the onions.

Step 2: Mix the Sauce
In a medium bowl, whisk together the cream of chicken soup, cream of celery soup, poultry seasoning, fresh parsley, and black pepper until smooth. Pour the mixture evenly over the chicken.

Discover more
Buttermilk
stuffed
Bread
Beef
Dressing
buttermilk
bread
gravy
Sunscreen
Meatloaf recipes cookbook

Step 3: Slow Cook
Pour the chicken broth over the contents of the crock pot. Cover and cook on high for 5 hours.
Important: Keep the lid closed for the first 4 hours to retain steam and ensure the chicken cooks properly.

Step 4: Shred the Chicken & Add Vegetables
With 1 hour remaining, remove the lid and add the thawed mixed vegetables. Shred the chicken directly in the crock pot using two forks, stirring to combine.

Step 5: Add the Dumplings
Lightly flatten each biscuit and cut into 4 long strips. Place the biscuit strips evenly over the top of the chicken mixture.

Discover more
gravy
Dressing
Buttermilk
buttermilk
bread
Beef
Bread
stuffed
Sunscreen
Vegetable

Step 6: Finish and Serve
Cover and continue cooking for the final hour. Once the dumplings are cooked through and fluffy, gently stir to distribute them throughout the dish. Serve hot, topped with additional fresh parsley if desired.