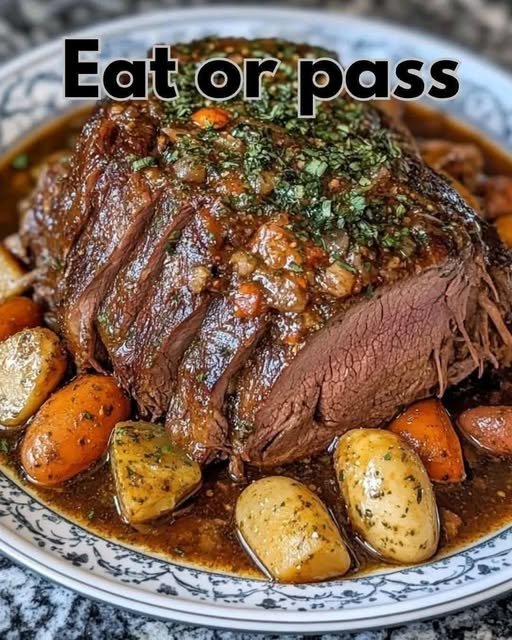
Slow-Cooker Pot Roast Recipe

Ingredients:

For the Roast:

  • 3 lbs chuck roast (well-marbled)
  • Salt and pepper (to taste)
  • 2 tbsp olive oil

Aromatics & Veggies:

  • 1 large onion, sliced
  • 4 cloves garlic, minced
  • 4 large carrots, cut into 2-inch pieces
  • 1 lb baby potatoes, halved

Braising Liquid:

  • 2 cups  beef  broth
  • 1 cup red wine (optional, but recommended)
  • 2 tbsp tomato paste
  • 1 tbsp Worcestershire sauce
  • 1 tsp dried thyme
  • 1 tsp dried rosemary
  • 2 bay leaves

 Gravy Thickener (Optional):

Keto Recipes Cookbook
  • 2 tbsp cornstarch + 2 tbsp water

Instructions: 

Discover more
garlic
Beef
Slow Cooker
Garlic
gravy
slow cooker
beef
Gravy
Slow-Cooker
cream

Sear the Roast:

  • Season the chuck roast with salt/pepper.
  • Heat olive oil in a skillet over medium-high. Sear for 3-4 mins per side until crusted.

Layer in the Slow Cooker:

  • Place onion, carrots, and potatoes in slow cooker.
  • Set the seared roast atop the veggies.

Add Braising Liquid:

  • Sprinkle garlic over the roast.
  • Whisk beef broth, wine, tomato paste, Worcestershire, thyme, rosemary, and bay leaves. Pour around roast.

Cook:

  • Cover. Low: 8-10 hrs / High: 4-5 hrs until fork-tender (203°F internal).

Optional Gravy:

  • Remove roast/veggies; cover.
  • Strain liquid into saucepan. Simmer.
  • Mix cornstarch and water; whisk into liquid. Boil for 2-3 mins until thickened.

Serve:

  • Slice the roast against the grain. Serve with veggies and gravy.

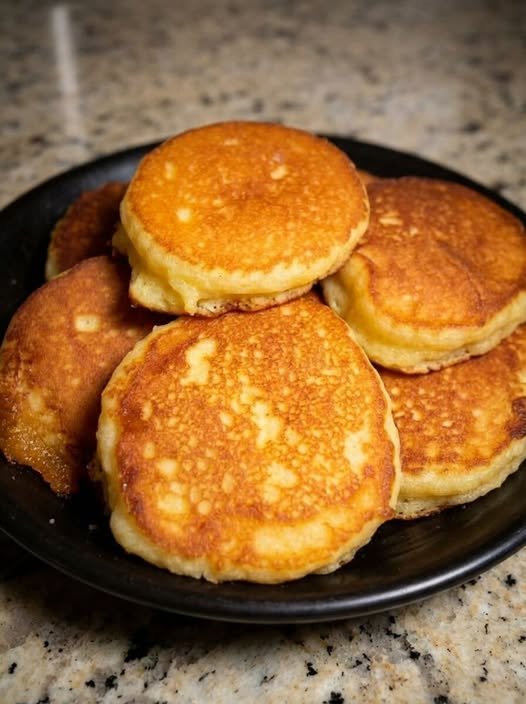
Classic Southern Fried Cornbread (Hoecakes)

Classic Southern Fried Cornbread (Hoecakes)

Crispy on the outside, tender on the inside, and perfect for soaking up pot liquor.


Ingredients

  • 1 cup Yellow cornmeal (fine or medium-ground)

  • ½ cup All-purpose flour (optional, for a softer structure)

  • 1 tsp Baking powder

  • ½ tsp Salt

  • 1 tbsp Sugar (optional, for those who prefer a hint of sweetness)

  • 1 large Egg

  • ¾ cup Buttermilk (provides the classic tang and tenderness)

  • 2 tbsp Melted butter or vegetable oil (for the batter)

  • Vegetable oil or bacon grease (for frying)


Instructions

  1. Prep the Dry Mix: In a medium mixing bowl, whisk together the cornmeal, flour, baking powder, salt, and sugar.

  2. Mix the Wet Ingredients: In a separate small bowl, beat the egg, then stir in the buttermilk and the 2 tablespoons of melted butter or oil.

  3. Combine: Pour the wet ingredients into the dry ingredients. Stir until just combined into a thick, spoonable batter. Do not overmix.

  4. Heat the Skillet: Place a cast-iron skillet over medium heat. Add enough oil or bacon grease to cover the bottom (about 1/4 inch deep). Heat until the oil is shimmering and a tiny drop of batter sizzles immediately upon contact.

  5. Fry: Carefully spoon the batter into the hot oil to form small rounds (about 2–3 inches wide). Do not overcrowd the pan; work in batches if necessary.

  6. Flip: Fry for 2–3 minutes until the edges are dark golden brown and bubbles appear on the surface. Flip carefully and fry the other side for another 2 minutes.

  7. Drain: Transfer the hot cornbread to a plate lined with paper towels to remove any excess grease.


Top Tips for Success

  • The Sizzle Factor: If the cornbread is coming out greasy, your oil isn’t hot enough. Make sure it’s shimmering before the first drop of batter hits the pan.

  • The Fat: For the most “authentic” grandma-style flavor, use bacon grease for frying. It adds a smoky depth that vegetable oil can’t match.

  • Serving: These are best served piping hot alongside a bowl of pinto beans, collard greens, or beef stew.

Cheesy Spinach & Chicken Casserole

(High Protein • Low Carb • Diabetic-Friendly)

📋 Ingredients

  • 1 cup cooked shredded chicken breast
  • 1 cup spinach leaves (fresh or frozen, squeezed dry)
  • ¼ cup chopped bell peppers (optional for color)
  • 2 tbsp cottage cheese or Greek yogurt
  • ¼ cup shredded mozzarella
  • 1 tbsp grated parmesan
  • ½ tsp garlic powder
  • Pinch of Italian seasoning
  • Salt & pepper to taste

👩‍🍳 Instructions

1️⃣ Preheat

Preheat oven or air fryer to 375°F (190°C).


2️⃣ Mix the Filling

In a bowl, combine:

  • Shredded chicken
  • Spinach
  • Bell peppers
  • Cottage cheese or Greek yogurt
  • Half of the mozzarella
  • Parmesan
  • Garlic powder
  • Italian seasoning
  • Salt & pepper

Mix until creamy and well combined.


3️⃣ Transfer to Baking Dish

Spread mixture into a small greased baking dish or ramekin (perfect for 1–2 servings).


4️⃣ Add Cheese on Top

Sprinkle remaining mozzarella over the top for that melty, golden finish.


5️⃣ Bake

Bake 12–15 minutes, or until:

  • Cheese is melted
  • Edges are bubbly
  • Top is lightly golden

(Air fryer: 8–10 minutes at 375°F.)


🍽 Serve

Enjoy on its own or pair with:

  • A side salad
  • Roasted veggies
  • Cauliflower rice (low carb!)

💡 Optional Add-Ins (Still Low Carb!)

  • 1 tbsp cream cheese for extra creaminess
  • Red pepper flakes for heat
  • Mushrooms or broccoli
  • A sprinkle of paprika on top

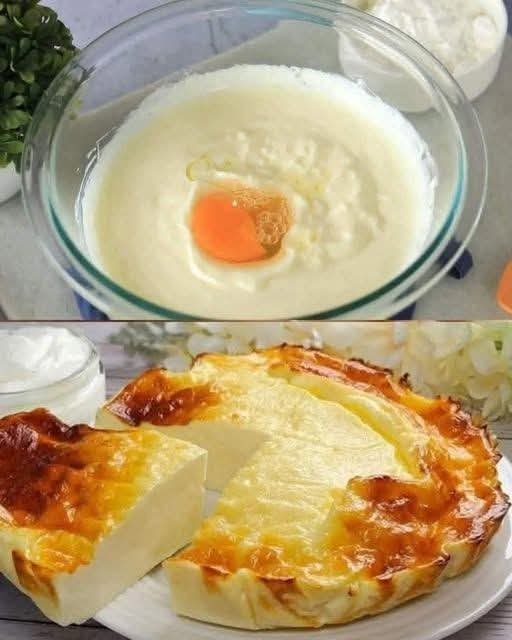
3-Ingredient Keto Yogurt Cake: No Sugar and No Flour

Servings: 8

Total Time: 50 minutes

Difficulty: Easy

Calories per Serving: 115 kcal

Macros: Protein 6 g / Net Carbs 6 g / Fat 7 g / Fiber 0 g


When you are following a keto or low-carb lifestyle, finding a dessert that feels light, airy, and truly indulgent can be a challenge. Most traditional cakes rely on heavy almond flour or coconut flour, which can sometimes feel dense. This Keto Yogurt Cake is a total game-changer. It uses just three simple ingredients to create a custard-like, soufflé-style treat that melts in your mouth without the carb heavy-lifting.

This recipe is the ultimate solution for those busy weeknights when you want something sweet but want to stay on track with your macros. Because it contains no added sugar and no flour, it’s a gentle way to satisfy a dessert craving while keeping your blood sugar stable. It is naturally high in protein thanks to the eggs and yogurt, making it a functional snack as much as a dessert.

The beauty of this dish lies in its simplicity. By whisking together these three basic staples, you transform humble ingredients into a sophisticated, elegant cake that looks like it came from a French bakery. It’s clean eating at its finest—nourishing, wholesome, and incredibly easy to whip up.


Look at the recipe.

  • Sensory Appeal: A silky, smooth, custard-like interior with a lightly golden, delicate top.
  • Flavor Highlight: Bright, tangy notes from the yogurt balanced by the rich, creamy essence of the eggs.
  • Key Keto Benefit: A flourless, low-calorie treat that provides a high-protein punch with minimal impact on daily carb counts.

Ingredients Needed

  • 400 g Plain Greek Yogurt: Ensure you use a full-fat, keto-friendly variety. If using “sweetened” versions, look for those sweetened with stevia or monk fruit to keep it low carb.
  • 4 Large Eggs: Room temperature eggs will incorporate more smoothly into the batter.
  • 40 g Cornstarch: Sifted to ensure a lump-free, velvety texture. (Note: While cornstarch is used sparingly here for structure, for strict keto, you may substitute with arrowroot powder).

How to Make Our Keto Yogurt Cake

Whisk the Base: Preheat your oven to 340°F (170°C) and line a 6-inch cake pan with parchment paper. In a large mixing bowl, combine the 400 g of yogurt and the 4 eggs. Whisk vigorously until the mixture is completely smooth and the eggs are fully integrated.

Sift and Fold: Add the 40 g of sifted cornstarch to the wet mixture. Fold gently with a spatula or whisk until no white streaks remain. This ensures your keto yogurt cake remains light and doesn’t become gummy.

Bake to Perfection: Pour the batter into your prepared pan. Bake for 35 to 45 minutes. The cake should be set on the edges but still have a slight, delicate jiggle in the center. Remove from the oven and allow it to cool completely in the pan; this is a crucial step as the cake sets and develops its creamy texture while cooling. For the best experience, chill in the fridge for at least 2 hours before serving.


Storage & Serving Suggestions

Storing: Keep this cake in an airtight container in the refrigerator. It stays fresh and delicious for up to 4 days. In fact, many find the flavor improves after a night in the fridge.

Reheating: This cake is best served cold or at room temperature. We do not recommend reheating it in the microwave, as the high heat can change the delicate protein structure of the eggs and yogurt.

Serving Pairings: Serve a slice with a handful of fresh raspberries or a dollop of sugar-free whipped cream. It also pairs beautifully with a hot cup of keto-friendly coffee or herbal tea for a light afternoon snack.


Tips & FAQs

Can I use flavored yogurt? Yes! You can use keto-friendly vanilla or lemon-flavored yogurt to add extra depth to the cake without needing extra extracts. Just ensure there are no added sugars in the ingredient list.

Why did my cake sink in the middle? Like a soufflé, this cake rises in the oven and will naturally settle as it cools. This is normal! The result is a dense, creamy, fudge-like consistency that is absolutely delicious.

Is cornstarch keto-friendly? In this small amount spread across 8 servings, the carb count remains low (approx. 5-6 g net carbs per slice). However, if you are strictly avoiding corn, you can experiment with 20 g of coconut flour, though the texture will be slightly more “cake-like” and less “custard-like.”

How do I get a golden top? If your cake is cooked through but looks pale, you can turn on the broiler for the last 1–2 minutes of baking. Watch it closely to avoid burning!
Burn Belly Fat Like Crazy

INGREDIENTS
A small piece of ginger washed and diced into thin stripes
A cup of water
Freshly squeezed juice of half a lemon
Roasted jeera (cumin) powder

INSTRUCTIONS
Add the ginger and water in a blender and mix it well till it forms a smooth mixture.
Now pour this out into a glass and add the lemon juice.
Mix this well.
Add a pinch of roasted jeera powder and mix it well again.
Your ginger lemon water is ready to drink.

ASimple”RiceMethod”ThatLiquifiesFatEvery24Hours


It’s true… I sank from 207 to a lean 135… And I’ll never forget the look on my doctor’s face when I walked into his office for my annual exam.

He stuttered out, “Are you doing that Exotic Rice Hack I told you about?”

So I told him I’d been doing it for a few months now, and it completely changed my life and health.

The best part? People are noticing and asking what I’m doing differently.

This is the first time in a very long time I’ve felt this good about myself.

So maybe this can help you too?

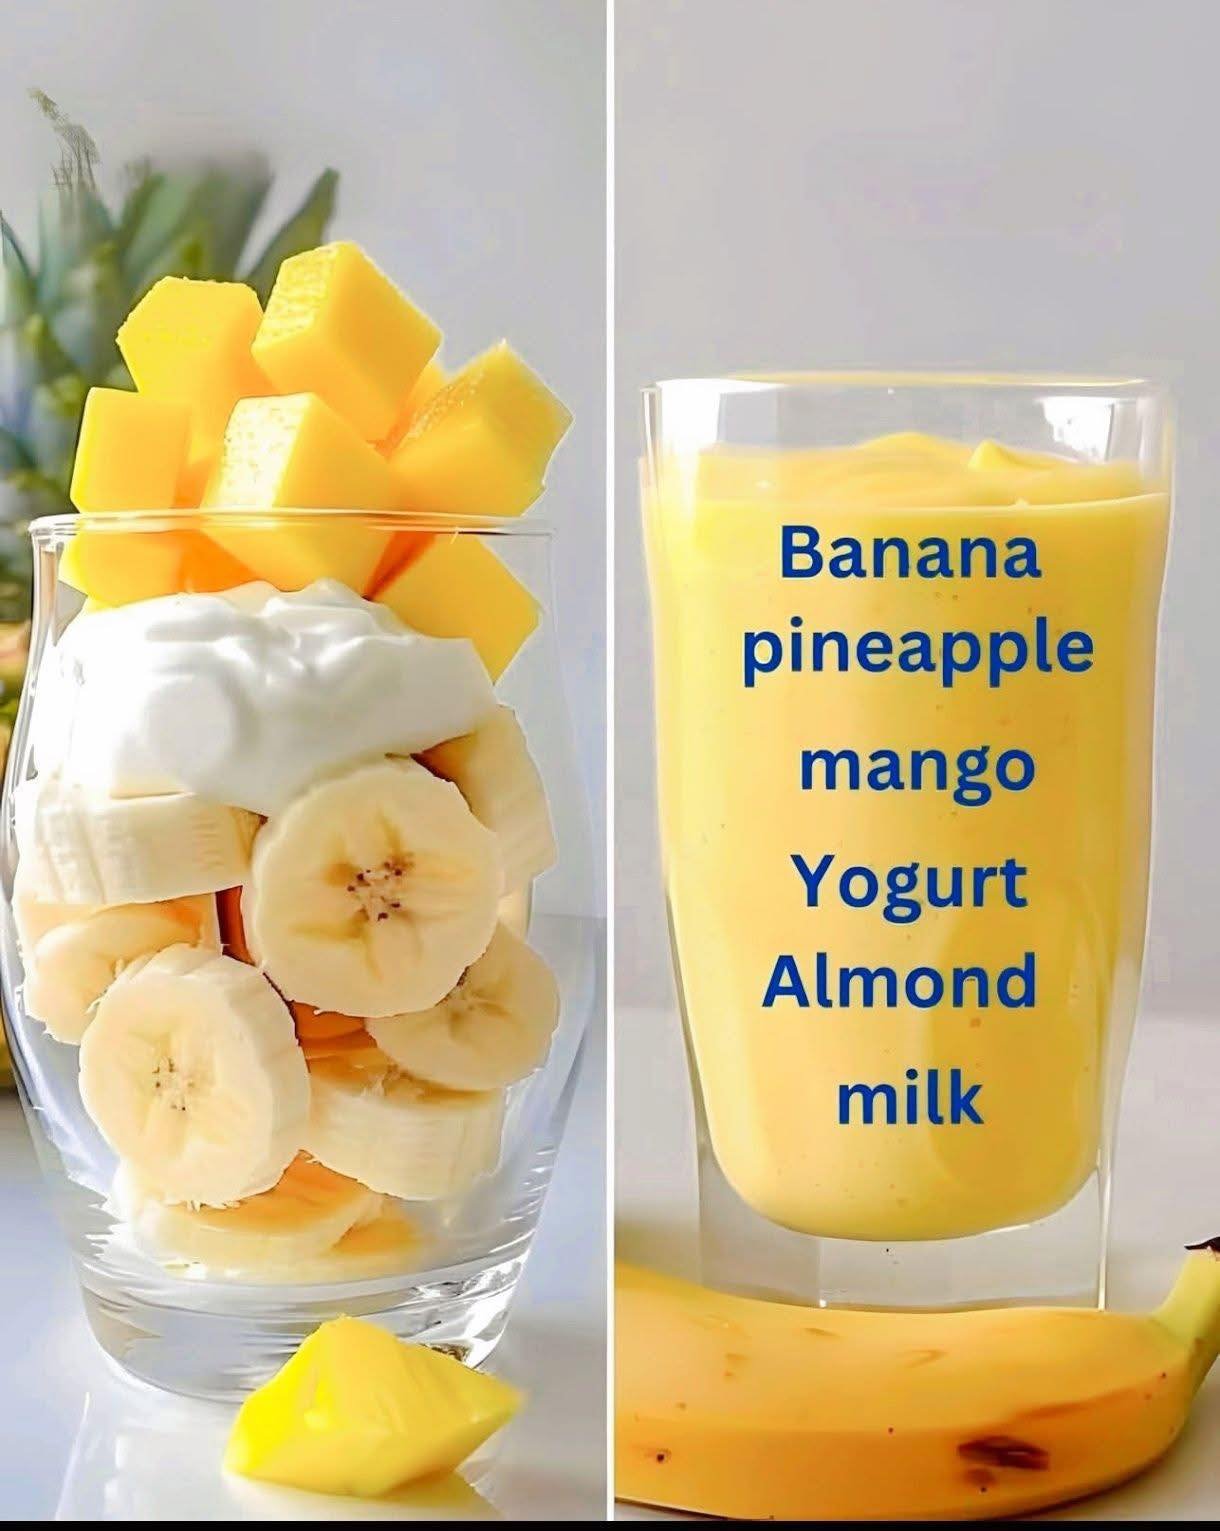
Tropical Sunshine Smoothie

Ingredients

  • 1 medium banana (frozen slices work best for a thicker texture)

  • 1/2 cup fresh or frozen mango chunks

  • 1/2 cup fresh or frozen pineapple chunks

  • 1/2 cup Greek yogurt (plain or vanilla)

  • 1 cup unsweetened almond milk (adjust for your preferred thickness)

  • Optional: A drizzle of honey or maple syrup if you prefer extra sweetness.


Instructions

  1. Prep the Fruit: If you aren’t using pre-frozen fruit, slice the banana and chop the mango and pineapple into small cubes.

  2. Layer the Blender: Add the liquid (almond milk) first to help the blades move easily. Then, add the yogurt, followed by the banana, mango, and pineapple.

  3. Blend: Start on a low speed and gradually increase to high. Blend for about 45–60 seconds or until the mixture is completely smooth and creamy.

  4. Adjust Consistency: If the smoothie is too thick, add a splash more almond milk. If it’s too thin, add a few more pieces of frozen fruit or a couple of ice cubes.

  5. Serve: Pour into a tall glass and enjoy immediately.

Quick Tips for the Best Result

  • Natural Sweetness: Use a very ripe banana (with a few brown spots) to get the most natural sweetness without needing added sugar.

  • Texture: Using at least one frozen fruit (like the banana or mango) gives the smoothie a “soft-serve” consistency similar to the one in your photo.