Classic Soft Bread Rolls (Pide-Style)

Classic Soft Bread Rolls (Pide-Style)

Light • Soft • Beautifully Layered

These bread rolls are wonderfully soft with delicate layers and a tender crumb. They are perfect for breakfast, alongside soups, or served warm at the table for any meal.


Ingredients

Liquid Base

  • 1½ cups (300 ml) warm water
    (Comfortably warm to the touch, not hot)

  • 1 tea glass vegetable oil (about 90 g / 100 ml)

  • 1 tea glass plain yogurt (about 100 ml, room temperature)

Dry Ingredients

  • 1 packet active dry yeast (7 g or 2¼ teaspoons)

  • 1 tablespoon granulated sugar

  • 1 teaspoon salt

  • 4½–5 cups all-purpose flour, added gradually

For Layering & Finishing

  • 50 g butter, melted (for brushing between layers)

  • 1 egg yolk (for brushing the tops)


Step-by-Step Instructions

1. Prepare the Yeast Mixture

  • In a large mixing bowl, add the warm water, sugar, and yeast

  • Stir gently until combined

  • Let the mixture rest for 5–10 minutes until it becomes foamy and active

This step ensures the dough rises beautifully.


2. Combine the Dough Ingredients

  • Add the vegetable oil and yogurt to the yeast mixture

  • Whisk until smooth and well blended

  • Gradually add flour and salt, mixing with a spoon or spatula

  • Continue until a soft dough forms


3. Knead and First Rise

  • Transfer the dough to a lightly floured surface

  • Knead gently for 8–10 minutes until smooth, elastic, and soft

  • Place the dough in a lightly oiled bowl

  • Cover with a clean cloth

  • Let it rest in a warm place for about 1 hour, or until it has expanded noticeably


4. Form the Layers

  • Gently press the dough to release excess air

  • Divide it into 4 equal portions

For each portion:

  • Roll into a thin rectangle

  • Brush evenly with melted butter

Once all pieces are brushed:

  • Stack them neatly on top of each other

  • Roll the stack into a firm log, starting from the long side


5. Shape the Rolls

  • Using a sharp knife or dough scraper, cut the log into triangle shapes by slicing in a gentle zig-zag pattern

  • This shaping helps create the beautiful layered texture once baked


6. Rest and Prepare for Baking

  • Place the shaped rolls on a baking tray lined with parchment paper

  • Leave a little space between each piece

  • Cover lightly and allow them to rest for 20 minutes

Meanwhile:

  • Preheat the oven to 190°C (375°F)


7. Bake to a Golden Finish

  • Brush the tops of the rolls with egg yolk for a glossy, golden surface

  • Bake for 20–25 minutes, until evenly golden and beautifully risen

The rolls should feel light and sound crisp on the outside while remaining soft inside.


Serving Suggestions

  • Serve warm with butter, honey, or jam

  • Pair with cheese, eggs, or soup

  • Excellent for sandwiches or as a dinner side


Helpful Tips

  • Yogurt Temperature: Use room-temperature yogurt to keep the dough comfortable for rising

  • Flour Amount: Add flour gradually; the dough should feel soft and slightly elastic

  • Extra Flavor: Sprinkle sesame or nigella seeds on top before baking if desired
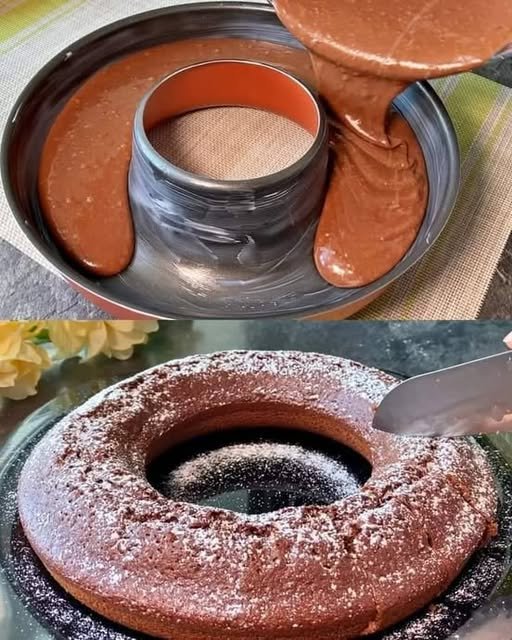
Simple & Moist 5-Minute Chocolate Cake

Simple & Moist 5-Minute Chocolate Cake

Soft • Fluffy • Comforting Homemade Cake

This easy chocolate cake comes together quickly using everyday ingredients. It bakes into a tender, moist sponge with a rich cocoa taste and a smooth crumb, making it ideal for casual gatherings or a relaxed homemade treat.


Ingredients

Cake Batter

  • 2 large eggs, at room temperature

  • 160 g granulated sugar (about ¾ cup)

  • 10 g vanilla sugar (or 1 teaspoon pure vanilla extract)

  • 2 tablespoons unsweetened cocoa powder

  • 160 ml milk (⅔ cup)

  • 100 ml vegetable oil (about 7 tablespoons; any neutral oil works)

  • A small pinch of salt

  • 170 g all-purpose flour (about 1⅓ cups, sifted)

  • 1 teaspoon baking powder

Optional Add-Ins & Finish

  • Chocolate chips or chunks (for extra texture)

  • Powdered sugar for a light decorative dusting


Step-by-Step Instructions

1. Prepare the Oven and Baking Dish

  • Heat your oven to 180°C (360°F)

  • Lightly coat a 24 cm (9–10 inch) round, casserole, or bundt pan with oil or butter

  • If desired, lightly dust with flour and tap out the excess to help with easy release


2. Combine the Eggs and Sugar

  • In a large mixing bowl, add the eggs, granulated sugar, and vanilla sugar

  • Whisk for 1–2 minutes until the mixture becomes slightly lighter in color and looks smooth and glossy

    • This step helps create a soft, airy texture


3. Add the Liquid Ingredients

  • Pour in the milk and vegetable oil

  • Add the pinch of salt

  • Whisk gently until everything is fully blended and uniform


4. Incorporate the Dry Ingredients

  • Place a sieve over the bowl and add:

    • Flour

    • Cocoa powder

    • Baking powder

  • Sift directly into the wet mixture

  • Whisk gently just until the batter is smooth and lump-free

    • Avoid over-mixing to keep the cake tender

If using chocolate chips, fold them in gently at this stage.


5. Bake the Cake

  • Pour the batter evenly into the prepared baking dish

  • Smooth the top lightly with a spatula

  • Place in the center of the oven

  • Bake for 38–42 minutes

Doneness Check:
Insert a toothpick into the center. It should come out clean or with a few soft crumbs.


6. Cool and Finish

  • Remove from the oven and let the cake rest in the pan for 10 minutes

  • Carefully turn it out onto a serving plate or cooling rack

  • Once completely cooled, dust lightly with powdered sugar if desired


Serving Suggestions

  • Enjoy as is with tea or coffee

  • Serve with fresh fruit

  • Pair with yogurt, cream, or a light dessert topping for special occasions


Helpful Tips

  • Extra Moist Texture: Replace 2 tablespoons of milk with yogurt

  • Flavor Boost: Add a pinch of cinnamon or instant coffee powder

  • Smaller Pan: If using a loaf pan, bake slightly longer and check near the end

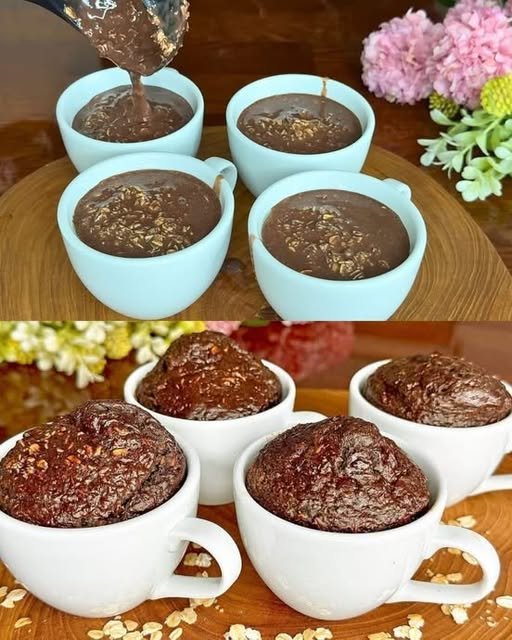
Healthy Chocolate Lava Baked Oats

Healthy Chocolate Lava Baked Oats

Naturally Sweet • Wholesome • Comforting
Serves: 2 generous portions (easily doubled)

This recipe turns simple pantry staples into a warm, chocolatey breakfast or dessert with a naturally soft center. It’s filling, balanced, and made with everyday ingredients.


Ingredients

Oat Base

  • 1 cup rolled oats (old-fashioned oats for best texture)

  • 1 medium ripe banana (naturally sweet and creamy)

  • ½ cup milk of choice (almond, oat, soy, or dairy)

  • 2 tablespoons unsweetened cocoa powder

  • 1–2 tablespoons natural liquid sweetener (maple syrup or honey, to taste)

  • 1 teaspoon baking powder

  • ½ teaspoon pure vanilla extract

  • A small pinch of sea salt (balances the chocolate flavor)

Soft Chocolate Center (Optional but Recommended)

  • 2 small pieces dark chocolate (70% cocoa or higher)
    or

  • 1 tablespoon dark chocolate chips


Step-by-Step Instructions

1. Prepare the Oven

  • Heat your oven to 180°C (350°F)

  • Lightly coat two oven-safe ramekins or ceramic mugs with a little oil or butter to prevent sticking

  • Place them on a baking tray for easy handling


2. Blend the Batter

Add the following to a blender:

  • Rolled oats

  • Banana

  • Milk

  • Cocoa powder

  • Natural sweetener

  • Baking powder

  • Vanilla extract

  • Sea salt

Blend for 30–45 seconds until the mixture is:

  • Completely smooth

  • Thick but pourable

  • Similar to cake or pancake batter

If the batter seems too thick, add 1–2 tablespoons of milk.


3. Fill the Cups

  • Pour the batter into the prepared mugs

  • Fill each about ¾ full to allow gentle rising


4. Add the Chocolate Center

  • Gently press one piece of dark chocolate into the center of each mug

  • Make sure it is fully covered with batter so it stays soft inside


5. Bake

  • Place the tray in the oven

  • Bake for 18–25 minutes, depending on your preferred texture:

    • 18–20 minutes: softer, richer texture

    • 22–25 minutes: more set and cake-like


6. Rest & Enjoy

  • Remove from the oven

  • Let sit for 5 minutes to settle

  • Enjoy warm, straight from the mug or turned out onto a plate


Optional Toppings (Wholesome Add-Ons)

  • Fresh berries or sliced banana

  • A spoon of yogurt or coconut yogurt

  • Chopped nuts or seeds

  • Light drizzle of nut butter


Helpful Notes

Air Fryer Method

  • Cook at 160°C (320°F) for 12–15 minutes

  • Check at 12 minutes and adjust as needed

No Blender Option

  • Use 1 cup oat flour instead of whole oats

  • Mash the banana very smoothly with a fork

  • Whisk all ingredients until well combined

Diet-Friendly

  • Naturally sweetened

  • Made with whole grains

  • Easily adaptable for dairy-free or gluten-free needs (use certified oats)

Anti-Inflammatory Chicken Soup – Cozy, nourishing and loaded with protein

A soothing, golden chicken soup loaded with anti-inflammatory ingredients like turmeric, ginger, and leafy greens. Perfect for immunity, cold days, or when your body needs a reset.


Recipe Card

Anti-Inflammatory Chicken Soup

A warm, healing, and nutrient-packed chicken soup designed to reduce inflammation and support gut + immune health.

Servings: 4
Prep Time: 10 minutes
Cook Time: 30 minutes
Total Time: 40 minutes
Dietary Badges:• High-Protein • Anti-Inflammatory

Ingredients

  • ▢ 1 tablespoon extra-virgin olive oil
  • ▢ 1 medium yellow onion, diced
  • ▢ 2–3 garlic cloves, minced
  • ▢ 2–3 large carrots, sliced
  • ▢ 2 celery stalks, chopped
  • ▢ 1–2 cups kale or spinach, chopped
  • ▢ 2 medium potatoes, diced (optional)
  • ▢ 1 lb boneless chicken breast or thighs (cut into chunks or shredded)
  • ▢ 6 cups chicken broth (low-sodium preferred)
  • ▢ 1 teaspoon turmeric
  • ▢ 1 teaspoon ground ginger (or 1 tbsp fresh grated)
  • ▢ ½ teaspoon black pepper
  • ▢ ½ teaspoon sea salt (or to taste)
  • ▢ 1 teaspoon dried thyme or rosemary
  • ▢ Juice of ½ lemon (optional, boosts anti-inflammatory benefits)

Instructions

  1. Sauté the aromatics
    Heat oil in a large pot over medium heat. Add onion, garlic, carrots, and celery. Cook 5–7 minutes until softened.
  2. Add spices
    Stir in turmeric, ginger, thyme/rosemary, salt, and pepper. Let spices bloom for 30 seconds.
  3. Add chicken + broth
    Add chicken pieces and pour in chicken broth. Bring to a boil, then reduce to simmer.
  4. Add potatoes
    Stir in potatoes and cook 20–25 minutes until chicken is cooked and potatoes are tender.
  5. Add greens
    Add kale or spinach and cook 5 minutes until wilted.
  6. Finish
    Taste, adjust seasoning, and squeeze in lemon juice if desired.

Quick Notes

  • Use fresh ginger if possible — stronger anti-inflammatory benefits.
  • Swap potatoes for cauliflower for a low-carb version.
  • Soup is naturally gluten-free and dairy-free.

Introduction / Hero Section

There’s nothing more comforting than a bowl of warm, golden chicken soup — especially one packed with powerful anti-inflammatory ingredients. This recipe was inspired by my go-to “feel better soup,” created on a cold day when I needed something nourishing, soothing, and ready fast. With healing spices like turmeric and ginger, leafy greens, and tender chicken, this soup delivers both flavor and wellness in one pot.


Step-by-Step Cooking Guide (With Detailed Process)

1. Build the Flavor Base

Start by gently sautéing onion, garlic, carrots, and celery in olive oil.
Tip: Cook until onions are translucent and edges lightly golden — that means you’ve locked in maximum flavor.

2. Bloom the Spices

Add turmeric, ginger, thyme/rosemary, salt, and black pepper.
Tip: If the pot looks dry, add 1–2 teaspoons broth so the spices don’t burn.

3. Add Chicken & Broth

Pour in the broth and nestle chicken pieces into the pot.
Tip: Thighs create a richer, more forgiving soup if you tend to overcook.

4. Add Potatoes

Let potatoes simmer until fork-tender.
Tip: Cut potatoes evenly so they cook at the same rate.

5. Wilt the Greens

Stir in chopped kale or spinach.
Tip: Kale needs 4–5 minutes; spinach only needs 1–2 minutes.

6. Final Touches

Finish with fresh lemon juice to brighten the broth and boost anti-inflammatory effects.
Ingredient Details & Substitutions

Ingredient Highlights

  • Turmeric: Key anti-inflammatory spice. Adds golden color.
  • Ginger: Supports digestion + immunity. Use fresh for best results.
  • Leafy Greens: Kale gives texture; spinach makes it softer and mild.
  • Chicken: Breast = lean protein, Thighs = richer flavor.

Substitutions

Herbs: Replace thyme/rosemary with Italian seasoning.

Chicken: Replace with turkey, tofu, or chickpeas for vegetarian version.

Potatoes: Swap with sweet potatoes, cauliflower, or quinoa.

Broth: Use veggie broth for vegetarian/vegan.

Equipment Alternatives

  • No Dutch oven? Use any heavy-bottomed pot.
  • No knife skills? Use pre-chopped veggies or frozen mirepoix.

Variations & Serving Ideas

Flavor Variations

  • Spicy Boost: Add ¼ tsp chili flakes.
  • Coconut Turmeric Soup: Stir in ½ cup light coconut milk.
  • Immune-Boost Version: Add 1 tbsp apple cider vinegar.

Dietary Modifications

  • Low-Carb: Omit potatoes; add cauliflower.
  • Vegan: Use chickpeas or tofu + vegetable broth.
  • Kids-Friendly: Reduce ginger & pepper; use spinach instead of kale.

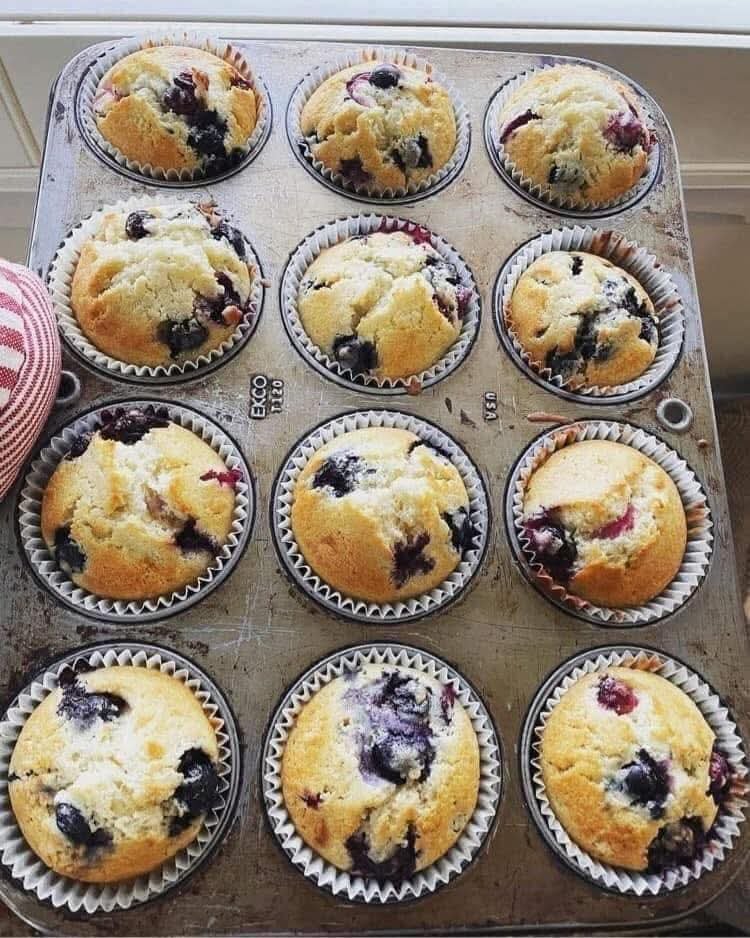
Classic Bakery-Style Blueberry Muffins

Classic Bakery-Style Blueberry Muffins

Ingredients

The Dry Mix:

  • 1 ½ cups All-purpose flour

  • ¾ cup Granulated sugar

  • 2 tsp Baking powder

  • ½ tsp Salt

The Wet Mix:

  • 1/3 cup Vegetable oil (or melted butter for extra flavor)

  • 1 Large egg

  • 1/3 cup Milk (Whole milk or buttermilk works best)

  • 1 tsp Vanilla extract

The Star Ingredient:

  • 1 cup Fresh blueberries (if using frozen, do not thaw them first to prevent the batter from turning purple)


Instructions

  1. Preheat and Prep: Preheat your oven to 400°F (200°C). Line a 12-cup muffin tin with paper liners, just like the ones in your photo.

  2. Mix Dry Ingredients: In a large bowl, whisk together the flour, sugar, baking powder, and salt.

  3. Mix Wet Ingredients: In a separate measuring cup or small bowl, whisk the oil, egg, milk, and vanilla until well combined.

  4. Combine: Pour the wet ingredients into the dry ingredients. Fold gently with a spatula just until combined. Do not overmix; the batter should be thick and slightly lumpy.

  5. Fold in Berries: Gently fold in the blueberries.

  6. Fill the Tin: Divide the batter evenly among the 12 muffin cups. They should be about 3/4 full.

  7. Bake: Bake for 20 to 25 minutes, or until a toothpick inserted into the center comes out clean and the tops are golden brown.

  8. Cool: Let them cool in the pan for about 5 minutes before transferring them to a wire rack.


Tips for Success

  • Toss the Berries: To prevent the blueberries from sinking to the bottom, toss them in a teaspoon of flour before adding them to the batter.

  • High Heat: Starting the oven at 400°F helps create that “domed” top seen in your image by giving the leavening agents a quick boost.

Cheesy Garlic Chicken Wraps Recipe

Ingredients

  • 2 large chicken breasts (diced)
  • 1 tbsp olive oil
  • 2 tsp garlic powder
  • 1 tsp onion powder
  • 1 tsp paprika
  • Salt and pepper (to taste)
  • 1 cup shredded cheddar cheese
  • ½ cup shredded mozzarella cheese
  • 4 large flour tortillas
  • ½ cup creamy garlic sauce (store-bought or homemade)
  • Fresh parsley (optional for garnish)

How to Make Cheesy Garlic Chicken Wraps:

Step-by-Step Instructions:

Step 1: Prepare the Chicken Start by dicing your chicken breasts into bite-sized pieces, approximately ¾-inch cubes. This ensures even cooking and makes the wraps easier to eat. Pat the chicken dry with paper towels and season generously with garlic powder, onion powder, paprika, salt, and pepper.

Step 2: Cook the Chicken Heat olive oil in a large skillet over medium-high heat. Once the oil is shimmering, add the seasoned chicken pieces in a single layer. Cook for 6-8 minutes, stirring occasionally, until the chicken is golden brown on all sides and cooked through (internal temperature should reach 165°F).

Step 3: Warm the Tortillas While the chicken is cooking, warm your flour tortillas. You can do this by wrapping them in a damp paper towel and microwaving for 30 seconds, or by heating them individually in a dry skillet for 30 seconds per side.

Step 4: Assemble the Wraps Place each warm tortilla on a clean surface. Spread 2 tablespoons of creamy garlic sauce down the center of each tortilla, leaving about 2 inches from the edges. Divide the cooked chicken evenly among the tortillas, then top with the cheddar and mozzarella cheese blend.

Step 5: Wrap and Serve Fold the bottom edge of each tortilla up over the filling, then fold in the sides and roll tightly from bottom to top. Cut each wrap in half diagonally and serve immediately while the cheese is still melted and the chicken is warm.