Easy Recipes
“Baked Cottage Cheese Eggs: High-Protein Breakfast Perfection”
| Servings | 4 servings (2 egg cups each) |
| Total Time | 25 minutes |
| Difficulty | Easy |
| Calories per Serving | Approx. 150 Calories |
| Macros | P: 18g / C: 5g / F: 7g / Fiber: 0g |
Why This ZeroPoint Breakfast Is Your WW Secret Weapon
Breakfast is the most crucial meal for successful weight loss meals, and starting your day with pure protein is the best strategy for staying satisfied and on track. Most of us reach for scrambled eggs, but these Baked Cottage Cheese Egg Cups offer something even better: massive protein content and incredible satiety for minimal (or ZeroPoint) contribution!
This recipe transforms simple ingredients—eggs and cottage cheese—into a fluffy, savory, muffin-tin masterpiece. The cottage cheese melts and stabilizes the eggs, creating a custard-like texture that is miles better than a plain baked egg. It’s an easy meal prep idea you can make ahead, grab, and go. This is a quick, wholesome, macro-friendly breakfast designed to fuel your busy day while keeping your SmartPoints (or PersonalPoints) budget safely in check.
Look at the Recipe (WW Focus)
- Sensory Appeal: A light, airy, and fluffy texture with a rich, savory, slightly tangy flavor, thanks to the baked cottage cheese.
- Flavor Highlight: Savory herbs (chives, parsley) and a touch of black pepper elevate the simple egg and cheese base into a genuinely satisfying dish.
- Key WW Benefit: Utilizes two ZeroPoint foods (eggs and nonfat cottage cheese) as the base, making it extremely high in protein for maximum fullness and adherence to the Weight Watchers plan.
Ingredients Needed
For the Baked Egg Cups
- 1 cup nonfat cottage cheese (ZeroPoint on many plans)
- 8 large eggs (ZeroPoint on many plans)
- 2 Tbsp finely chopped fresh chives
- 1 Tbble chopped fresh parsley
- $1/4$ tsp garlic powder
- Salt and freshly ground black pepper to taste
- Optional: Nonstick cooking spray or silicone liners for the muffin tin
Optional ZeroPoint Add-ins (Add $1/4$ cup total)
- Diced bell peppers
- Chopped spinach (squeeze out excess water)
- Diced mushrooms
How to Make Our SmartPoints Egg Cups
- Prep the Batter: Preheat your oven to 375°F (190°C). Lightly spray a standard 12-cup muffin tin with nonstick spray, or line with silicone baking cups.
- Blend the Cottage Cheese: In a medium bowl, use an immersion blender, stand blender, or food processor to blend the nonfat cottage cheese until it is completely smooth and creamy. This prevents a chunky texture in the final product.
- Mix the Batter: Pour the blended cottage cheese into a large bowl. Whisk the 8 eggs lightly and add them to the cheese. Add the chives, parsley, garlic powder, salt, and pepper. Gently stir until just combined. You now have a macro-friendly meal batter!
- Fold in Fillings: If using optional ZeroPoint vegetables (like spinach or peppers), gently fold them into the mixture. Be careful not to over-mix.
- Bake: Pour the mixture evenly into the 8 or 10 prepared muffin cups (filling them about $3/4$ full).
- Cook: Bake for 18 to 22 minutes, or until the egg cups are set in the center and lightly golden around the edges. This is an excellent clean eating breakfast.
- Cool & Serve: Let the cups cool in the tin for 5 minutes before carefully removing them. They may deflate slightly upon cooling.
Storage & Serving Suggestions
- Storing: Once completely cooled, the egg cups can be stored in an airtight container in the refrigerator for up to 4 days. This is the perfect easy meal prep idea.
- Reheating: Reheat in the microwave for 30–60 seconds, or in a toaster oven for a few minutes until warm.
- Freezing: Do not freeze. The cottage cheese can become rubbery and separate upon thawing.
- Serving Pairings (WW-Approved): Serve with a side of fresh fruit (like berries or melon—ZeroPoint) and a slice of whole-wheat toast (points calculated separately) for a complete and filling weight loss meal.
Tips & FAQs
Q: What is the best way to keep these ZeroPoint/low-point?
A: Always use nonfat cottage cheese and whole eggs. Avoid adding cheese (like cheddar or mozzarella), meat, or heavy cream to the recipe, as these will significantly increase the SmartPoints.
Q: How can I spice this recipe up?
A: Add a dash of hot sauce (ZeroPoint) before serving, or fold in a pinch of chili powder or smoked paprika before baking. You can also mix in some finely diced jalapeño for a healthy twist.
Q: My cottage cheese mixture looks chunky before baking. What did I do wrong?
A: If you skip the blending step, the large curds of cottage cheese will remain chunky. The secret to the super-fluffy texture is blending the cottage cheese until it is liquid smooth before mixing in the eggs.
Q: Are these suitable for meal prep for a whole week?
A: Yes! Making a batch of 8 to 12 of these makes for a simple, macro-friendly breakfast every morning. Store them in the fridge and reheat as needed.
Bay Leaf & Clove Herbal Tea
A warm, aromatic, caffeine-free beverage
Bay Leaf and Clove Herbal Tea is a simple, comforting drink made by gently simmering dried bay leaves and whole cloves in water. The result is a lightly golden infusion with a warm, earthy aroma and subtle spice. This tea is appreciated for its soothing character, pleasant fragrance, and ease of preparation.
Bay leaves bring a mild herbal depth with hints of eucalyptus and mint, while cloves add a gentle warmth and soft spice. Together, they create a balanced cup that can be enjoyed plain or customized with natural flavor additions like lemon, honey, ginger, or cinnamon.
This herbal tea contains no caffeine and can be enjoyed at any time of day. It is especially comforting during cool weather or quiet moments when a warm, aromatic drink is desired.
Ingredients
Base Ingredients
-
3 dried bay leaves (whole)
-
5–6 whole cloves
-
2 cups water
Optional Flavor Add-Ins (choose as desired)
-
1 teaspoon honey (for gentle sweetness)
-
1 slice fresh ginger
-
1 small cinnamon stick
-
1 teaspoon lemon juice or a lemon wedge
-
1 mint leaf
Instructions
Step 1: Prepare Ingredients
Ensure the bay leaves and cloves are clean and free of dust.
If using ginger or cinnamon, prepare them by slicing or breaking them into small pieces.
Step 2: Heat the Water
Pour 2 cups of water into a small saucepan.
Place over medium heat and bring to a gentle boil.
Step 3: Add Spices
Once the water begins to boil, add the bay leaves and cloves.
Add any optional ingredients at this stage if using.
Step 4: Simmer
Reduce the heat to low and allow the mixture to simmer gently for 7–10 minutes.
The liquid will gradually take on a light golden color and release a pleasant aroma.
Step 5: Strain
Remove the saucepan from heat and let it rest for 1–2 minutes.
Strain the tea into a cup using a fine mesh strainer, removing all solids.
Step 6: Serve
Serve warm. Stir in honey or lemon juice if desired.
Garnish with a mint leaf or lemon slice for presentation.
Servings
Makes 1 large mug or 2 small cups.
The recipe can be doubled or tripled as needed.
Helpful Notes
-
Bay Leaves: Dried whole bay leaves are best. Avoid crushed or powdered leaves, which are difficult to strain.
-
Cloves: Use whole, aromatic cloves for best flavor.
-
Simmering: Gentle simmering preserves aroma and prevents bitterness.
-
Flavor Strength: Adjust steeping time to taste—shorter for mild, longer for stronger flavor.
-
Sweeteners: Honey complements the spice naturally without overpowering.
-
Serving: Best enjoyed warm, but may also be served chilled.
-
Storage: Prepared tea can be refrigerated for up to 24 hours and reheated gently.
Serving Ideas
-
Enjoy on its own as a calming beverage
-
Pair with light snacks or fruit
-
Serve in a clear glass mug to highlight the golden color
-
Add cinnamon and ginger for a richer, spiced version
Bay Leaf and Clove Herbal Tea is a simple drink made with care and intention. Its warm aroma, gentle flavor, and minimal ingredients make it a pleasant addition to any daily routine. Whether enjoyed alone or shared, this tea celebrates simplicity, tradition, and mindful preparation.
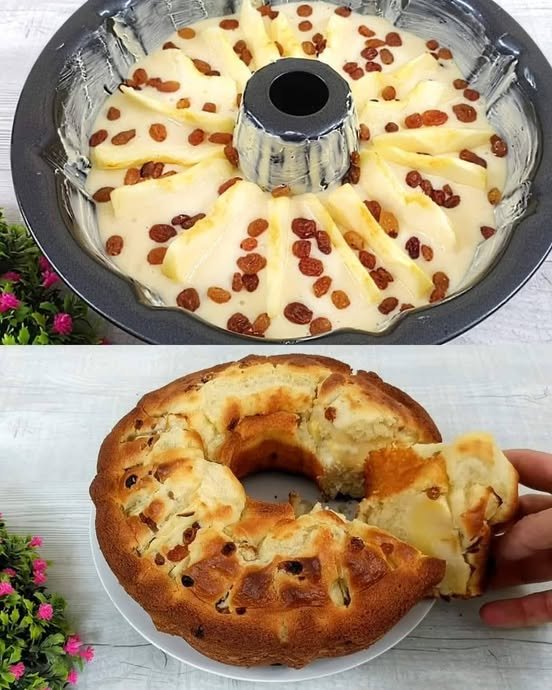
Grandmother’s Italian Apple & Lemon Cake
Prep Time: 15 minutes
Bake Time: 35–40 minutes
Cooling Time: 10–15 minutes
Servings: 8–10
Ingredients
-
3 large eggs
-
150 g (¾ cup) granulated sugar
-
200 ml (¾ cup + 1 tbsp) milk
-
370 g (3 cups) all-purpose flour
-
20 g (4 tsp) baking powder
-
1 large apple, peeled and sliced into thin wedges
-
1 lemon, juiced (zest optional for extra flavor)
-
50 g (¼ cup) raisins
-
Butter (for greasing the cake mold)
-
Optional: Powdered sugar for dusting
Instructions
1. Prepare the Fruit
-
Peel and slice the apple into thin wedges.
-
Place the slices in a small bowl and toss them with the lemon juice.
-
Tip: The lemon juice prevents the apples from browning and adds a gentle, fresh citrus flavor.
-
-
If using raisins that seem dry, soak them in warm water or a bit of lemon juice for 5 minutes to plump them up. Drain before using.
2. Mix the Batter
-
In a large mixing bowl, whisk the eggs and sugar together using a hand whisk or electric mixer until the mixture is pale and frothy.
-
This step traps air in the batter, making the cake light.
-
-
Gradually stir in the milk until fully combined.
3. Sift and Combine Dry Ingredients
-
Sift together the all-purpose flour and baking powder.
-
Gently fold the dry ingredients into the wet mixture using a spatula or whisk.
-
Tip: Fold carefully to avoid overmixing, which can make the cake dense. The batter should be smooth, slightly thick, and airy.
-
-
Optional: Grate the lemon zest into the batter for an extra layer of citrus aroma.
4. Assemble the Cake
-
Preheat your oven to 180°C (350°F).
-
Generously grease a bundt or ring cake mold with butter, making sure to coat the inner crevices.
-
Pour the prepared batter into the mold, spreading it evenly.
-
Arrange the apple wedges in a circular or spiral pattern on top of the batter. Press them lightly so they stay partially embedded during baking.
-
Sprinkle the raisins evenly over the top.
5. Bake the Cake
-
Place the cake in the center of the preheated oven.
-
Bake for 35–40 minutes, or until the top is golden brown and a toothpick inserted in the thickest part comes out clean.
-
Tip: If the top browns too quickly, cover loosely with aluminum foil for the last 5–10 minutes.
-
6. Cool and Serve
-
Let the cake cool in the pan for 10 minutes.
-
Carefully turn it out onto a plate or cooling rack.
-
Once fully cooled, dust generously with powdered sugar for a classic Italian finish.
Helpful Tips
-
Apple Texture: Use a firm variety like Granny Smith or Gala to hold their shape while baking.
-
Even Baking: Make sure the apple wedges are similar in size so they bake evenly.
-
Flavor Boost: Adding ½ tsp cinnamon or a pinch of nutmeg to the batter pairs beautifully with apple and lemon.
-
Storage: Keep the cake covered at room temperature for 2 days or in the fridge for up to 5 days.
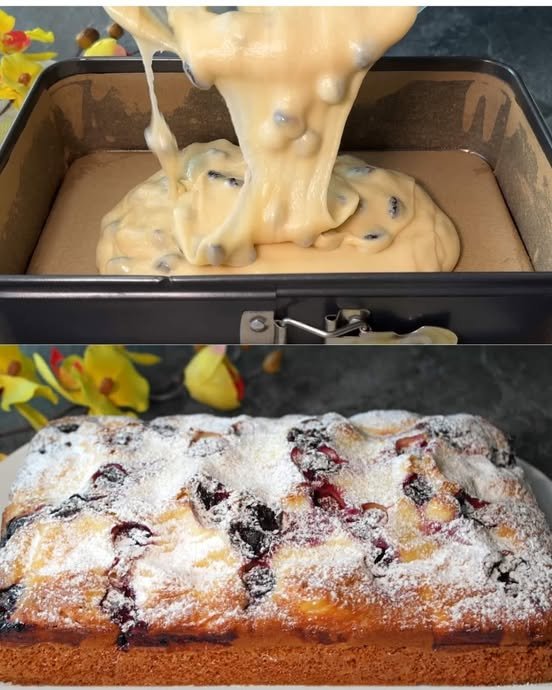
Fluffy Cherry Yogurt Cake
Prep Time: 15 minutes
Bake Time: 35–40 minutes
Cooling Time: 15–20 minutes
Servings: 8–10
Ingredients
The Batter
-
3 large eggs
-
150 g (4/5 cup) granulated sugar
-
A pinch of salt
-
200 g plain Greek yogurt (full-fat preferred for extra moisture)
-
100 ml neutral vegetable oil (sunflower, canola, or light olive oil)
-
250 g (2 cups) all-purpose flour
-
12 g (2 ½ tsp) baking powder
-
1 tsp vanilla extract
The Fruit
-
300 g fresh or frozen pitted cherries (if using frozen, do not thaw)
Optional
-
Powdered sugar, for dusting
Instructions
1. Prepare for Success
-
Preheat the oven to 180°C (350°F).
-
Grease a 20×30 cm (8×12 inch) rectangular or square baking pan with butter or oil.
-
Line the bottom with parchment paper to make removing the cake easier and prevent sticking.
2. Whisk the Base
-
In a large mixing bowl, combine the eggs, sugar, vanilla extract, and salt.
-
Using a hand whisk or electric mixer on high speed, whisk for 3–5 minutes until the mixture becomes pale, thick, and slightly frothy.
-
Tip: This step helps trap air in the batter, making the cake light and fluffy.
-
3. Add Wet and Dry Ingredients
-
Reduce the whisk speed to low.
-
Stir in the Greek yogurt and vegetable oil until just combined. Avoid overmixing.
-
Sift together the flour and baking powder.
-
Gently fold the dry ingredients into the wet mixture with a spatula, using a “cut-and-fold” motion to keep the batter airy.
-
Tip: Folding gently prevents the batter from losing air and keeps the crumb tender.
-
4. Incorporate the Cherries
-
Reserve about one-third of the cherries for the top.
-
Gently fold the remaining two-thirds of the cherries into the batter, ensuring even distribution.
-
Tip: If using frozen cherries, fold them directly into the batter without thawing to prevent extra moisture from making the cake soggy.
-
5. Assemble and Bake
-
Pour the batter into the prepared pan and spread it evenly.
-
Scatter the remaining cherries over the top and press them lightly into the surface.
-
Bake in the preheated oven for 35–40 minutes, or until:
-
The top is golden brown
-
A toothpick inserted into the center comes out clean
-
-
Pro-Tip: If the top starts browning too quickly, cover loosely with aluminum foil for the last 5–10 minutes.
6. Cooling and Serving
-
Let the cake cool in the pan for 15 minutes before transferring it to a wire rack.
-
Once completely cooled, dust the top with powdered sugar for a pretty, snowy finish.
-
Slice into squares or rectangles and serve.
Why This Cake Works
-
Yogurt Magic: The acidity in the Greek yogurt reacts with the baking powder to create a soft, moist, and tender crumb that lasts for days.
-
Light and Fluffy: Whisking the eggs and sugar well traps air in the batter, giving the cake a delicate, cloud-like texture.
-
Versatile Fruit Base: You can replace cherries with blueberries, raspberries, or sliced peaches for seasonal variations.
-
Easy Storage: Keep covered at room temperature for 2 days or refrigerate for up to 5 days.
Optional Enhancements
-
Add 1 tsp lemon zest to the batter for a bright, citrusy flavor.
-
Drizzle a simple glaze made from powdered sugar and milk over the cooled cake.
Quick Nutty Chocolate Mini Cakes
Soft • Chocolate-Rich • Perfectly Portioned
Preparation Time
-
Prep: 5–7 minutes
-
Bake: 12–15 minutes
-
Yield: 8–10 mini cakes or muffins
Ingredients
For the Chocolate Batter
-
1 large egg (room temperature)
-
80 g granulated sugar
-
8 g vanilla sugar (or 1 teaspoon vanilla extract)
-
A small pinch of salt
-
50 ml vegetable oil
-
100 ml milk
-
20 g cocoa powder (unsweetened)
-
120 g all-purpose flour
-
8 g baking powder (about 2 teaspoons)
For the Nut & Chocolate Topping
-
A handful of sliced almonds
-
A handful of raisins
-
A handful of crushed walnuts
-
20 g dark chocolate chunks or chips
Step-by-Step Instructions
1. Prepare the Baking Molds
Preheat your oven to 180°C (350°F).
Lightly grease 8–10 mini tart molds or a standard muffin pan with a little oil or butter.
2. Mix the Egg Base
In a medium mixing bowl, add:
-
Egg
-
Granulated sugar
-
Vanilla sugar
-
Salt
Whisk for 1–2 minutes until the mixture looks pale, smooth, and slightly fluffy.
3. Add Liquid Ingredients
Pour in the vegetable oil and milk.
Whisk gently until fully blended and smooth.
4. Add Dry Ingredients
Sift together:
-
Flour
-
Cocoa powder
-
Baking powder
Add them to the bowl and whisk just until the batter is smooth and glossy.
Avoid overmixing.
5. Fill the Molds
Pour the batter into the prepared molds, filling each about halfway to allow room for rising.
6. Add the Topping
Sprinkle the tops evenly with:
-
Almond slices
-
Raisins
-
Crushed walnuts
-
Dark chocolate pieces
Press them very lightly into the batter.
7. Bake
Place the molds on a baking tray and bake for 12–15 minutes, or until:
-
The tops are set
-
A toothpick inserted in the center comes out clean or with a few soft crumbs
8. Cool & Serve
Let the mini cakes cool in the pan for 5 minutes, then gently remove and place on a rack to cool slightly before serving.
Serving Tips
-
Enjoy warm or at room temperature
-
Perfect with tea, coffee, or milk
-
Store in an airtight container for up to 2 days at room temperature or 4 days refrigerated
Why This Recipe Is a Favorite
-
Balanced texture: Soft chocolate cake with lightly toasted nuts
-
Quick preparation: Simple steps, no mixer needed
-
Portion-friendly: Ideal for small treats or sharing