Chocolate Banana Oat Cookies

Chocolate Banana Oat Cookies

Soft baked cookies made with oats, banana, cocoa, and nuts

Yield

Approximately 10–12 cookies

Oven Temperature

180°C (350°F)


Ingredients

  • 1 ripe banana, mashed until smooth

  • 1 cup oatmeal (quick or rolled oats)

  • 30 g oat flakes (additional, for texture)

  • 160 ml water

  • 1 tablespoon unsweetened cocoa powder

  • 30 g walnuts, finely chopped

  • 30 g ground almonds

Optional Flavor Additions

  • A small pinch of ground cinnamon

  • A small amount of sugar-free chocolate chips


Instructions


1. Prepare the Oat Base

  1. Place the oatmeal and water into a mixing bowl.

  2. Stir to combine, then allow the mixture to stand for 5–10 minutes, until the oats absorb the liquid and soften.


2. Prepare the Banana

  1. Peel the banana and place it in a separate bowl.

  2. Mash thoroughly with a fork until smooth and evenly textured.


3. Combine the Ingredients

  1. Add the mashed banana to the softened oats and mix until evenly combined.

  2. Stir in the cocoa powder until the mixture takes on a uniform color.

  3. Add the ground almonds, chopped walnuts, and the additional oat flakes.

  4. Mix with a spatula until a thick, cohesive dough forms.

    • If the mixture is too loose, add a small amount of oats or ground almonds until the dough holds its shape.


4. Shape the Cookies

  1. Preheat the oven to 180°C (350°F).

  2. Line a baking tray with parchment paper.

  3. Portion the dough using approximately 2 tablespoons per cookie.

  4. Shape each portion into a ball, then gently flatten into a thick round shape.

  5. Arrange the cookies on the prepared baking tray, leaving space between them.


5. Bake

  1. Place the tray in the preheated oven.

  2. Bake for 15–20 minutes, until the cookies are set on the outside and hold their shape.

  3. Remove from the oven and allow the cookies to rest on the tray for 10 minutes before transferring.


6. Finish and Serve

  • Allow the cookies to cool further before serving.

  • If desired, lightly dust the tops with a small amount of coconut flour or powdered sweetener for decoration.


Storage

  • Store in an airtight container in the refrigerator

  • Best consumed within 5 days

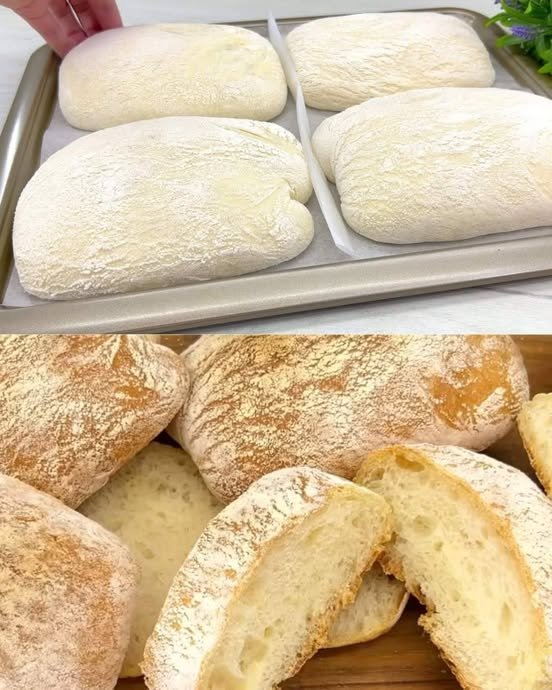
No-Knead Italian High-Hydration Bread

No-Knead Italian High-Hydration Bread

A rustic Italian-style bread with an open crumb and crisp, lightly floured crust

Yield

2 large loaves or 4–6 small loaves

Total Time

Approximately 60–70 minutes (excluding cooling)

Oven Temperature

220°C (430°F)


Ingredients

Yeast Starter

  • 100 ml water, lukewarm

  • 1 teaspoon granulated sugar

  • 8 g dry yeast

  • 3 tablespoons wheat flour (all-purpose or bread flour)

Main Dough

  • 500 g wheat flour, sifted

  • 1½ teaspoons salt

  • 350 ml water, lukewarm

  • 30 ml vegetable oil


Instructions


1. Prepare the Yeast Starter

  1. In a small bowl, combine the lukewarm water, sugar, and dry yeast.

  2. Add the flour and whisk until a smooth mixture forms.

  3. Cover the bowl and allow it to stand at room temperature for 10–15 minutes, until the mixture becomes foamy and visibly active.


2. Mix the Dough

  1. Place the sifted flour and salt into a large mixing bowl and stir to distribute evenly.

  2. Create a well in the center of the flour.

  3. Pour in the prepared yeast starter, the remaining lukewarm water, and the vegetable oil.

  4. Mix using a sturdy spoon or spatula until all ingredients are combined and a very soft, sticky dough forms.

  5. The dough should be fluid and elastic rather than firm; this high moisture content is essential for an open internal structure.

  6. Cover the bowl and allow the dough to rise in a warm, draft-free environment for 30–40 minutes, until it has doubled in volume and shows visible air bubbles on the surface.


3. Shape the Bread

  1. Generously flour a clean work surface.

  2. Carefully transfer the risen dough onto the floured surface, handling it gently to preserve the air inside.

  3. Lightly dust the top of the dough with additional flour.

  4. Using a dough scraper or lightly floured hands, divide the dough into 2 large portions or 4–6 smaller rectangular portions.

  5. Place the shaped pieces onto a baking tray lined with parchment paper, leaving space between each loaf to allow for expansion.


4. Bake

  1. Preheat the oven to 220°C (430°F).

  2. Place the baking tray on the center rack of the oven.

  3. Bake for 20–25 minutes, until the bread is evenly golden and the crust is firm.

  4. Remove from the oven and transfer the loaves to a wire rack.

  5. Allow the bread to cool for at least 15 minutes before slicing to allow the crumb to stabilize.


Storage

  • Best consumed on the day of baking

  • Can be stored at room temperature for up to 24 hours

  • Freeze once fully cooled for longer storage

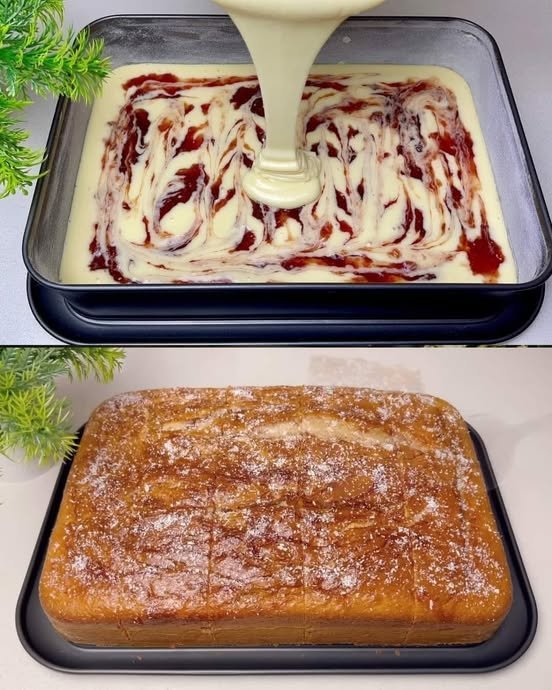
Strawberry Jam Swirl Yogurt Cake

Strawberry Jam Swirl Yogurt Cake

A soft, moist cake with a delicate strawberry swirl and coconut topping

Yield

1 rectangular cake (20 × 30 cm)
Serves 10–12

Oven Temperature

180°C (350°F)


Ingredients

  • 3 medium eggs, at room temperature

  • 150 g granulated sugar

  • 8 g vanilla sugar (or 1 teaspoon vanilla extract)

  • 150 g vanilla yogurt

  • 120 ml sunflower oil

  • 290 g all-purpose flour (or type 00)

  • 15 g baking powder

  • 1 small pinch of salt

  • Approximately 120 g (½ cup) strawberry jam

  • Grated coconut, for topping


Instructions


1. Prepare the Batter

  1. Place the eggs, granulated sugar, vanilla sugar, and salt in a large mixing bowl.

  2. Whisk using a hand mixer or balloon whisk for 3–5 minutes, until the mixture becomes pale, slightly thickened, and airy.

  3. Add the sunflower oil and vanilla yogurt. Mix gently until fully blended.

  4. Sift the flour and baking powder into the bowl.

  5. Fold the dry ingredients into the batter using a spatula or whisk, mixing just until smooth and free of lumps. Avoid overmixing.


2. Prepare the Baking Pan

  1. Lightly grease a rectangular baking pan measuring approximately 20 × 30 cm.

  2. Dust the pan lightly with flour and remove any excess.


3. Create the Strawberry Swirl

  1. Pour approximately two-thirds of the batter into the prepared pan and spread it evenly.

  2. Spoon the strawberry jam over the surface in small portions.

  3. Using a knife or skewer, gently draw through the batter to distribute the jam and create a marbled pattern.

  4. Carefully pour the remaining batter over the top and spread gently to cover the jam layer.


4. Bake the Cake

  1. Place the pan in the preheated oven.

  2. Bake at 180°C (350°F) for 30–35 minutes, until the cake is fully baked and a skewer inserted into the center comes out clean.

  3. Remove from the oven and allow the cake to rest in the pan for 10 minutes.

  4. Transfer to a wire rack to cool further.


5. Finish and Serve

  1. While the cake is still slightly warm, lightly brush the surface with a small amount of warmed strawberry jam or honey, if desired.

  2. Sprinkle grated coconut evenly over the top.

  3. Allow the cake to cool completely before slicing.


Storage

  • Store in an airtight container at room temperature for up to 3 days

  • Refrigerate for longer storage if preferred


Serving Notes

This cake is well suited for serving at room temperature alongside tea or coffee. The yogurt contributes to a soft texture that remains moist over time.

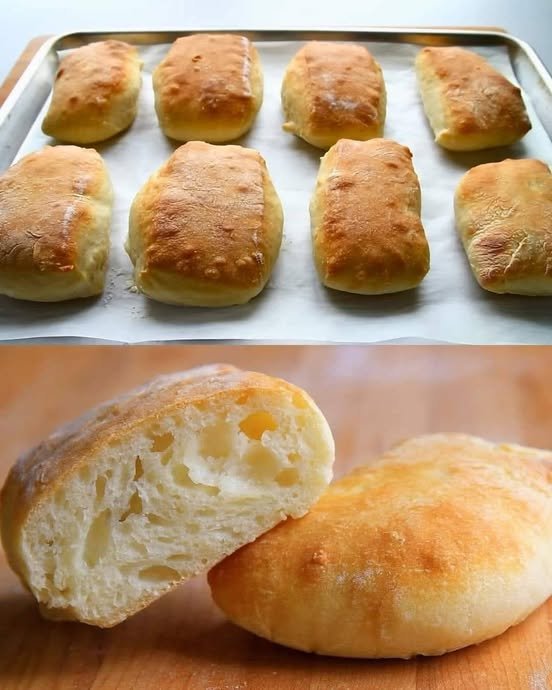
Homemade Ciabatta Bread

Homemade Ciabatta Bread

A high-hydration Italian bread with an open crumb and crisp crust

Yield

Makes approximately 8 small ciabatta rolls

Oven Temperature

220°C (430°F)


Ingredients

  • 500 g bread flour (approximately 3⅓ cups)

  • 375–400 ml water, lukewarm

  • 5 g active dry yeast (about 2 teaspoons)

  • 5 g salt (about 1 teaspoon)

  • Olive oil, for lightly coating the bowl (optional)


Instructions


1. Prepare the Dough

  1. In a large mixing bowl, combine the bread flour, yeast, and salt. Mix evenly.

  2. Gradually add 375 ml of the water while mixing with a spatula or wooden spoon.

  3. Continue mixing until all the flour is hydrated and a soft, highly elastic dough forms.

    • If dry flour remains, add the remaining water a small amount at a time.

  4. The dough should be very soft and elastic, which is essential for developing the characteristic open structure of ciabatta.

  5. Lightly coat the bowl with olive oil if desired, place the dough inside, and cover with a clean cloth or food-safe cover.


2. Resting and Dough Development

  1. Allow the dough to rest at room temperature for 30 minutes.

  2. To strengthen the dough structure, perform a series of folds:

    • Lightly moisten your hands.

    • Lift one side of the dough upward and fold it toward the center.

    • Rotate the bowl and repeat until all sides have been folded inward.

  3. Cover the dough and allow it to rest for another 30 minutes.

  4. Repeat this folding process 3 to 4 times over a total period of about 2 hours.

    • This gradual method replaces traditional kneading and helps maintain air within the dough.


3. Shape the Ciabatta

  1. Generously dust the work surface with flour.

  2. Carefully transfer the dough onto the floured surface, handling it gently to preserve internal air pockets.

  3. Lightly dust the surface of the dough with flour and shape it into a loose rectangle without pressing firmly.

  4. Using a sharp knife or dough scraper, divide the dough into 8 rectangular portions.

  5. Place the pieces onto a baking tray lined with parchment paper, spacing them slightly apart.

  6. Cover lightly and allow the dough to rest and rise for 30–45 minutes, until slightly expanded.


4. Bake the Bread

  1. Preheat the oven to 220°C (430°F).

  2. For improved crust development, place a shallow oven-safe pan with water on the lower rack to create steam during baking.

  3. Bake the ciabatta for 18–22 minutes, until evenly golden and firm on the outside.

  4. Remove from the oven and transfer the bread to a wire rack.

  5. Allow the bread to cool completely before slicing to ensure the interior crumb sets properly.


Storage

  • Best enjoyed on the day of baking

  • Can be stored at room temperature for 24 hours

  • Freeze once cooled for longer storage

Apricot Custard Napoleon Cake

Apricot Custard Napoleon Cake

A layered dessert made with crisp puff pastry, smooth vanilla custard, and apricot fruit filling

Yield

1 cake (20–22 cm / 8–9 inches)
Serves 8–10

Oven Temperature

200°C (400°F)


Ingredients

Puff Pastry Layers

  • 250 g ready-to-use puff pastry, thawed if frozen

  • Water, for light brushing

  • 2 teaspoons granulated sugar


Apricot Layer

  • 300 g apricot jam or apricot fruit spread

  • 1 tablespoon water (optional, for adjusting consistency)


Vanilla Custard Cream

  • 400 ml whole milk

  • 80 g granulated sugar

  • 30 g cornstarch

  • 2 large egg yolks

  • 10 g vanilla sugar (or 1 teaspoon vanilla extract)

  • 50 g unsalted butter, softened


Finishing

  • Powdered sugar, for dusting

  • 50 g almond flakes or finely crushed baked pastry crumbs


Instructions


1. Prepare and Bake the Pastry

  1. Preheat the oven to 200°C (400°F).

  2. Roll out the puff pastry if needed and divide it into two equal circles (20–22 cm).

  3. Place both circles on a parchment-lined baking tray.

  4. Lightly brush the surface of each pastry with water and sprinkle evenly with sugar.

  5. Using a sharp knife, gently mark the top pastry circle into 8–10 equal wedges without cutting fully through. This will help maintain clean portions after assembly.

  6. Bake for 15–20 minutes, until the pastry is fully puffed and evenly golden.

  7. Remove from the oven and allow both layers to cool completely before assembly.


2. Prepare the Custard Cream

  1. In a saucepan, combine the egg yolks, sugar, vanilla sugar, and cornstarch.

  2. Add a small portion of the milk and whisk until smooth and free of lumps.

  3. Gradually pour in the remaining milk while whisking continuously.

  4. Place the saucepan over medium heat and cook, stirring constantly, until the mixture thickens into a smooth, stable custard.

  5. Remove from heat and stir in the butter until fully incorporated.

  6. Transfer the custard to a bowl and cover the surface directly with parchment paper or a food-safe cover to prevent drying.

  7. Allow the custard to cool to room temperature before assembling the cake.


3. Assemble the Cake

  1. Place a pastry ring or the rim of a springform pan on a serving plate.

  2. Position the unscored pastry layer at the base.

  3. If the apricot jam is very thick, warm it slightly with the water and stir until smooth.

  4. Spread the apricot layer evenly over the pastry base.

  5. Spoon the cooled custard cream over the apricot layer and smooth the surface.

  6. Arrange the pre-marked pastry wedges on top, aligning them to form a complete circle.


4. Chill and Finish

  1. Refrigerate the assembled cake for at least 4 hours, preferably overnight, to allow the custard to fully set.

  2. Carefully remove the pastry ring.

  3. Gently press almond flakes or pastry crumbs onto the sides of the cake.

  4. Dust the top evenly with powdered sugar.

  5. For decoration, place a small amount of apricot jam at the center if desired.


Storage

  • Keep refrigerated

  • Best enjoyed within 24–48 hours

Cheesy Baked Cauliflower

Cheesy Baked Cauliflower

A creamy oven-baked cauliflower dish with a golden cheese topping

Yield

Serves 4–6

Oven Temperature

200°C (400°F)


Ingredients

Cauliflower

  • 1 large head cauliflower

  • 3 lemon slices

  • Fresh dill sprigs

  • Salt, to taste

Cheese Sauce

  • 2 cups shredded cheese (mozzarella or a blend of cheddar and Monterey Jack)

  • 1½ cups heavy cream or prepared thick béchamel sauce

  • 2 garlic cloves, finely minced

  • ½ teaspoon dried oregano or thyme

  • Black pepper, to taste


Instructions

1. Prepare the Cauliflower

  1. Remove the outer leaves from the cauliflower and trim the stem.

  2. Cut the cauliflower into evenly sized florets to ensure uniform cooking.


2. Cook the Cauliflower

  1. Fill a large pot with water and add the lemon slices, dill sprigs, and salt.

  2. Bring the water to a steady boil.

  3. Add the cauliflower florets and cook for 5–7 minutes, until just tender when pierced with a fork. The cauliflower should remain firm and not soft.

  4. Drain thoroughly and allow excess moisture to evaporate.


3. Arrange for Baking

  1. Transfer the drained cauliflower to a lightly greased oven-safe baking dish.

  2. Spread the florets evenly in a single layer.


4. Prepare the Sauce

  1. In a mixing bowl, combine the heavy cream, minced garlic, dried herbs, and black pepper.

  2. Stir until evenly blended.


5. Assemble the Dish

  1. Pour the cream mixture evenly over the cauliflower.

  2. Sprinkle the shredded cheese evenly across the surface, fully covering the cauliflower.


6. Bake

  1. Place the dish in the preheated oven.

  2. Bake for 15–20 minutes, until the cheese has melted completely and developed a lightly browned surface.


7. Serve

  • Garnish with fresh dill if desired.

  • Serve warm as a side dish or light main course.


Storage

  • Refrigerate leftovers in a covered container for up to 2 days

  • Reheat gently in the oven until warmed through