Classic Apple Pie with Lemon Cream Filling

Classic Apple Pie with Lemon Cream Filling

Yield: 1 round pie (8–10 slices)
Prep Time: 25 minutes
Bake Time: 40–45 minutes

This apple pie features a soft buttery crust, a smooth lemon cream layer, and tender apple slices on top. It is lightly sweet, gently citrusy, and perfect for tea time or dessert.


🧾 Ingredients

For the Dough

  • 2 large eggs

  • 5 tablespoons sugar (100 g)

  • 1 packet vanilla sugar (8 g) or 1 teaspoon vanilla extract

  • 5 tablespoons butter (100 g), softened

  • 3 cups all-purpose flour (360 g)

  • 2 teaspoons baking powder (8 g)


For the Lemon Cream Filling

  • 2 cups milk (500 ml)

  • 2 egg yolks

  • 4 tablespoons sugar

  • 3 tablespoons cornstarch

  • Zest of 1 lemon

  • 2 tablespoons lemon juice

  • 1 teaspoon vanilla extract


For the Apple Layer

  • 3–4 medium apples, peeled and sliced

  • 2 tablespoons sugar

  • 1 teaspoon cinnamon (optional)

  • 1 tablespoon lemon juice


For Topping

  • Powdered sugar, for dusting

  • Sliced almonds or walnuts (optional)


👩‍🍳 Instructions

1. Prepare the Dough

In a bowl, whisk eggs, sugar, and vanilla until smooth.
Add softened butter and mix until creamy.
Add flour and baking powder gradually and mix until a soft dough forms.

Divide the dough into two parts:
✔ One larger portion (for base)
✔ One smaller portion (for top)

Wrap and refrigerate for 20 minutes.


2. Make the Lemon Cream

In a saucepan, whisk milk, egg yolks, sugar, and cornstarch until smooth.
Cook over medium heat, stirring constantly, until thick and creamy.
Remove from heat and stir in lemon zest, lemon juice, and vanilla.
Set aside to cool slightly.


3. Prepare the Apples

In a bowl, mix apple slices with sugar, lemon juice, and cinnamon.
Set aside for 5 minutes to soften slightly.


4. Assemble the Pie

Preheat oven to 180°C (350°F).
Grease a round baking pan.

Roll out the larger dough portion and press into the pan, forming a base and sides.
Spread lemon cream evenly over the dough.
Arrange apple slices on top of the cream.

Roll out the remaining dough and place over apples in strips or decorative pattern.


5. Bake

Bake for 40–45 minutes, until golden and set.
Let cool completely before slicing so layers stay neat.


6. Finish and Serve

Dust with powdered sugar and sprinkle nuts if desired.
Serve plain or with tea, coffee, or vanilla sauce.


🌟 Helpful Tips

  • Use firm apples (Granny Smith, Fuji, or Golden).

  • Chill dough for easier handling.

  • For extra shine, brush top with a little milk before baking.

  • Store in refrigerator up to 3 days.

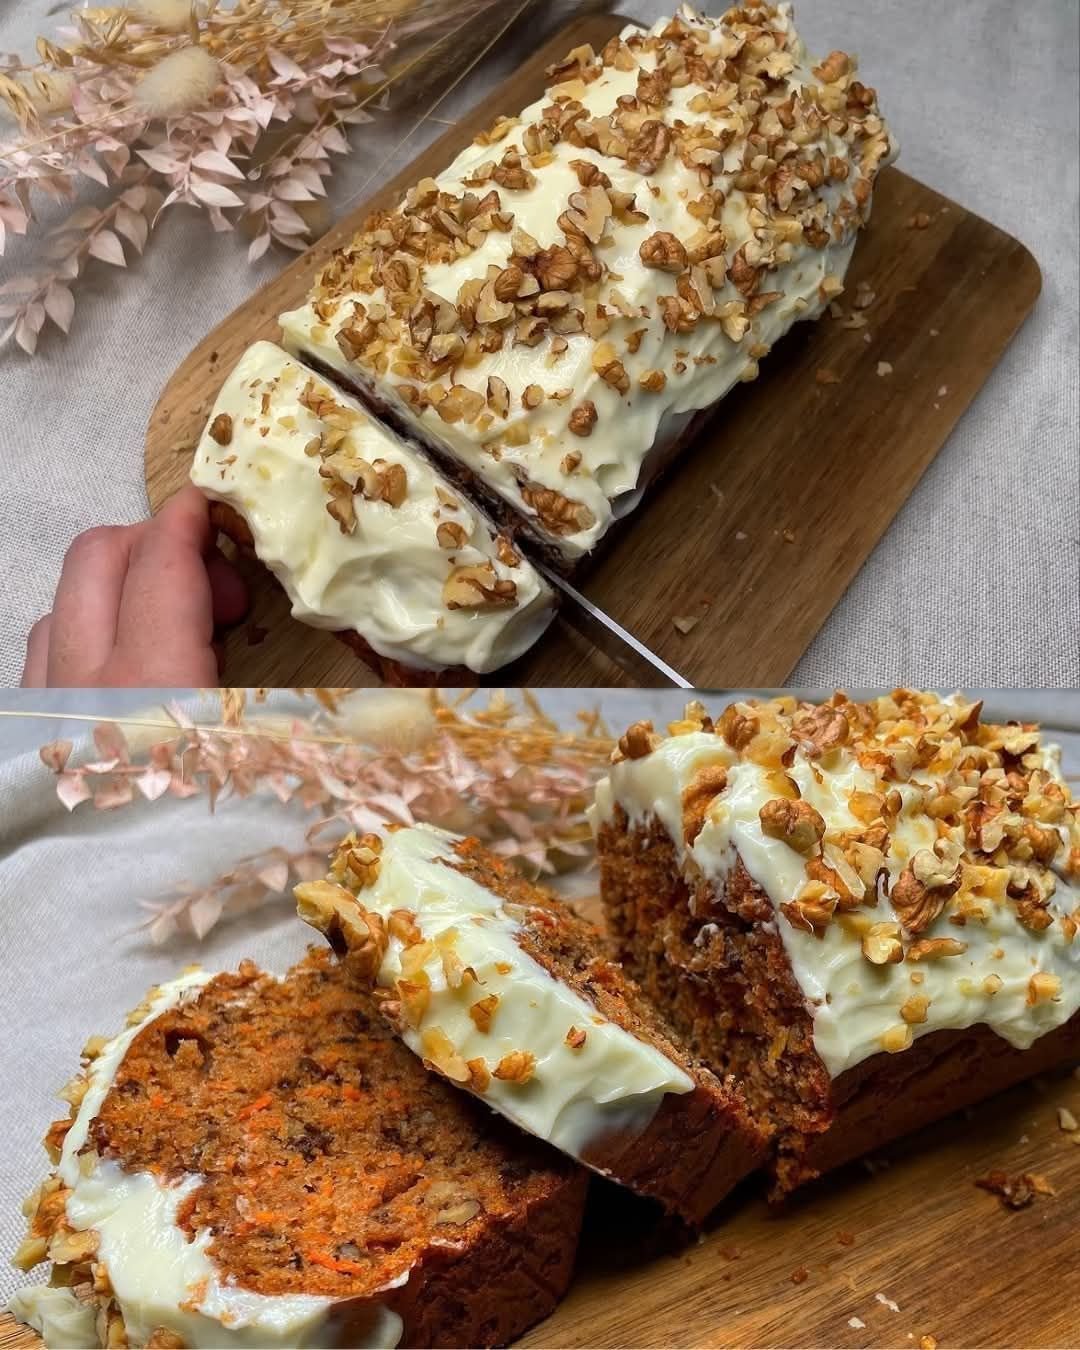
Orange–Carrot Cake with Coconut Cream

Orange–Carrot Cake with Coconut Cream

Yield: 1 loaf (8–10 slices)
Prep Time: 20 minutes
Bake Time: 45–55 minutes

This moist carrot cake is gently flavored with fresh orange zest, crunchy walnuts, coconut flakes, and sesame seeds. It is finished with a light, dairy-free coconut cream topping for a naturally rich and fragrant dessert.


🧾 Ingredients

For the Cake

  • 4 medium carrots, finely grated

  • 4 tablespoons unsweetened coconut flakes

  • 2 tablespoons sesame seeds

  • ½ cup walnuts, chopped (plus extra for topping)

  • 1½ cups all-purpose flour

  • 1 teaspoon baking soda

  • 1 teaspoon baking powder

  • 1 teaspoon ground cinnamon

  • ½ teaspoon salt

  • 3 large eggs, at room temperature

  • ¾ cup granulated sugar or brown sugar

  • ½ cup vegetable oil or melted coconut oil

  • Zest of 1 orange

  • 2 tablespoons fresh orange juice

For the Coconut Cream Topping

  • 1 can (14 oz / 400 ml) full-fat coconut milk, chilled overnight

  • 2 tablespoons maple syrup or powdered sugar

  • ½ teaspoon vanilla extract


👩‍🍳 Instructions

1. Prepare the Pan and Oven

Preheat the oven to 350°F (175°C).
Lightly grease a loaf pan and line it with parchment paper so the cake can be lifted out easily after baking.


2. Mix the Dry Ingredients

In a medium bowl, whisk together:

  • flour

  • baking soda

  • baking powder

  • cinnamon

  • salt

Stir in the coconut flakes, sesame seeds, and chopped walnuts until evenly combined.


3. Prepare the Wet Ingredients

In a large bowl, whisk the eggs and sugar until pale and slightly thick.
Slowly add the oil while whisking continuously.
Mix in the orange zest and orange juice.
Fold in the grated carrots until well distributed.


4. Combine the Batter

Add the dry ingredients to the wet mixture in two parts.
Gently fold with a spatula just until no dry flour is visible.
Do not mix too much—this helps keep the cake soft and tender.


5. Bake

Pour the batter into the prepared pan and smooth the top.
Bake for 45–55 minutes, or until a skewer or toothpick inserted in the center comes out clean.

Let the cake cool in the pan for 15 minutes, then lift it out and allow it to cool completely on a rack.


🥥 Coconut Cream Topping

6. Prepare the Coconut Cream

Open the chilled coconut milk can carefully.
Scoop out only the thick cream from the top into a bowl (reserve the liquid for drinks or smoothies).

Add the maple syrup (or powdered sugar) and vanilla extract.
Whisk or beat until smooth and creamy.


7. Decorate

Spread the coconut cream evenly over the cooled cake.
Sprinkle with extra chopped walnuts and a few sesame seeds if desired.


🌟 Helpful Tips

  • Orange Flavor: The zest gives the strongest orange taste, so use fresh orange peel for best results.

  • Cold Coconut Milk: Chilling is essential for thick, spreadable cream.

  • Storage: Keep the cake in the refrigerator for up to 3 days because of the coconut topping.

  • Serving: Best served slightly cool or at room temperature.

Savory Pumpkin & Cheese Patties

Savory Pumpkin & Cheese Patties

Yields: 4–6 patties
Prep Time: 15 minutes
Cook Time: 10–12 minutes

These pumpkin patties are soft inside, lightly crisp outside, and full of fresh herb flavor. They are perfect as a snack, side dish, or light meal. The cheese adds richness and helps with structure, while dill and green onions give freshness.


🧾 Ingredients

  • 200 g pumpkin, finely grated

  • 1 cup mozzarella or cheddar cheese, shredded (optional but recommended for better texture)

  • 1 small bunch fresh dill, finely chopped

  • 1 small bunch green onions, finely chopped

  • 1 clove garlic, finely minced

  • 1 large egg, lightly beaten

  • 3–4 tablespoons all-purpose flour or breadcrumbs, added gradually

  • Salt, to taste

  • Black pepper, to taste

  • 2 tablespoons olive oil or butter, for cooking


👩‍🍳 Instructions

1. Prepare the Pumpkin

Grate the pumpkin using the large holes of a grater.
If the pumpkin releases a lot of liquid, place it in a clean kitchen towel and gently press to remove excess moisture.
This helps the patties hold together better and improves their texture.


2. Combine the Vegetables

Place the grated pumpkin in a mixing bowl.
Add the chopped dill, green onions, and minced garlic.
If using cheese, add it now and mix gently until evenly distributed.


3. Bind the Mixture

Pour in the beaten egg.
Season with salt and black pepper.
Mix until everything is well combined.

Gradually add the flour or breadcrumbs, one tablespoon at a time.
Mix after each addition until the mixture becomes thick enough to shape without falling apart.
The mixture should be moist but not watery.


4. Shape the Patties

Divide the mixture into 4–6 equal portions.
Gently shape each portion into a round patty about 2–3 cm (1 inch) thick.
Place them on a plate while you heat the pan.


5. Cook the Patties

Heat olive oil or butter in a non-stick skillet over medium heat.
Carefully place the patties into the pan, leaving space between them.

Cook for 4–5 minutes on each side, turning once, until they are golden and cooked through.


6. Serve

Transfer the patties to a plate lined with paper towel to absorb any excess oil.
Serve warm with:

  • Greek yogurt

  • Sour cream

  • Garlic yogurt sauce

  • Or a fresh salad


🌟 Helpful Tips

  • You can bake these at 180°C (350°F) for 20–25 minutes for a lighter option.

  • Add paprika or cumin for extra flavor.

  • These patties freeze well after cooking.

No kneading, No eggs, No butter! The easiest and cheapest bread recipe

Ingredients


(Simple pantry staples)


3 cups all-purpose flour


1 teaspoon salt


1 tablespoon sugar


1 tablespoon instant yeast


1 cup warm water (about 110°F / 43°C)


2 tablespoons vegetable oil


👩‍🍳 Instructions


Mix the dough

In a large bowl, combine flour, salt, sugar, and yeast.

Add warm water and oil. Mix with a spoon until a sticky dough forms.


Rest (no kneading!)

Cover the bowl with a towel. Let rest for 30–45 minutes, until doubled in size.


Shape

Lightly flour your hands and surface.

Divide dough into 8–10 equal pieces.

Gently flatten each into a round (about ¼–½ inch thick).


Cook

Heat a non-stick or cast-iron pan over medium heat (no oil needed).

Cook each bread for 2–3 minutes per side, until puffed and golden brown.


Cool slightly & enjoy

Stack them in a towel to keep soft.

CRAB RANGOON EGG ROLLS

Crab Rangoon Egg Rolls are a fun, flavorful twist on two popular favorites. They combine the creamy, savory filling of classic Crab Rangoon with the crispy, handheld shape of an egg roll. Inside, you’ll usually find a smooth mixture of cream cheese, crab (or imitation crab), green onions, and mild seasonings. When wrapped in an egg roll wrapper and cooked, the outside turns golden and crunchy while the inside stays rich and creamy.


What makes Crab Rangoon Egg Rolls so appealing is the contrast in textures. The crisp shell cracks when you bite into it, giving way to a warm, soft filling that’s slightly sweet and savory at the same time. They’re often served with dipping sauces like sweet chili sauce, duck sauce, or even soy sauce, which adds another layer of flavor.

These egg rolls are popular as appetizers or party snacks because they’re easy to share and feel a little special. They also show how different food traditions can blend together—taking inspiration from Chinese-American takeout classics and presenting them in a new, creative way. Whether served at a restaurant or made at home, Crab Rangoon Egg Rolls are a crowd-pleasing comfort food that stands out for its bold taste and satisfying crunch.

Crab Rangoon Egg Rolls are filled with fresh crab meat, cream cheese, and a perfect blend of spices. They are fried to golden perfection and are the ultimate party appetizer.


INGREDIENTS

2 (8 ounce) boxes cream cheese softened

1 –2 tablespoons Worcestershire sauce (see notes)

1 teaspoon garlic powder

1/2 teaspoon onion powder

3 green onions chopped

1/2 lb fresh white cooked crabmeat flaked or diced

8–10 egg roll wrappers

Vegetable oil for frying

How To Make Crab Rangoon Egg Rolls

  1. In a food processor, pulse cream cheese, Worcestershire sauce, garlic powder, onion powder, and green onions several times until mixed. Stir in crab meat.
  2. Lay one egg roll wrapper out with a corner pointing towards you. Place about three rounded tablespoons in the center of each wrapper, making a short horizontal lump. Bring the corner that is closest to you up and over and gently tuck it in. Fold in the sides and roll the wrapper tightly. Use a small amount of water to secure the tip of the wrapper. (If you don’t know how to roll an egg roll, it usually shows on the package with pictures).
  3. Heat oil in a heavy stockpot or saucepan to 375 degrees. Fry them 2-3 at a time (depending on the size of your pan) for 1-2 minutes or until lightly browned. Allow the heat to charge back up in between batches. Place on paper towels to drain. Serve warm

NOTES

  • If at all possible, use fresh crab. I used King Crab, which I find to be the best for these. You can also use Snow Crab, Dungeness Crab, Blue Crab, and Stone Crab.
  • In a pinch, substitute canned or imitation crab meat. If using imitation, be sure to chop it up fine.
  • Egg roll wrappers can be found in most grocery stores in the refrigerator cases next to the fresh produce.
  • Soften the cream cheese to room temperature.
  • Like your crab rangoon a little sweet? Add 1/2 tablespoon of sugar or 1/2 tablespoon of mirin.
  • Use oil with a high smoking point like vegetable, canola, or peanut.
  • A candy thermometer attached to the side of the Dutch oven will help you keep your oil at a consistent 375 degrees. When you add the egg rolls, the temperature will drop, so turn it up slightly. When you remove the egg rolls from the oil, the temperature will rise, so turn it down a bit

Healing Turmeric Vegetable Soup with Cauliflower, Carrots & Celery

This Healing Turmeric Vegetable Soup is a soothing, anti-inflammatory bowl of comfort that’s perfect for boosting immunity, calming digestion, and warming the body from the inside out. Made with simple vegetables, fragrant spices, and fresh lemon, this soup is light yet deeply satisfying. Turmeric and cumin bring earthy warmth, while cauliflower and carrots add gentle sweetness and texture. It’s ideal for detox days, cold evenings, or whenever you need a nourishing reset.

Ingredients

  • 1 tablespoon olive oil
  • 1 yellow onion, finely chopped
  • 3 garlic cloves, minced
  • 2 celery stalks, finely chopped
  • 2 large carrots, peeled and sliced into rounds
  • 2 cups cauliflower florets
  • 1 teaspoon ground turmeric
  • ½ teaspoon ground cumin
  • Salt and black pepper, to taste
  • 4 cups low-sodium vegetable broth
  • 1 cup water
  • Juice of ½ lemon
  • ¼ cup chopped fresh parsley, plus extra for garnish

Instructions

  1. Sauté the aromatics
    Heat the olive oil in a large pot or Dutch oven over medium heat. Add the chopped onion and cook for 3–4 minutes, stirring occasionally, until soft and translucent. This step builds the soup’s flavor base.
  2. Add garlic and vegetables
    Stir in the minced garlic and cook for 30 seconds until fragrant. Add the chopped celery and sliced carrots. Sauté for another 3–4 minutes, allowing the vegetables to soften slightly and release their natural sweetness.
  3. Incorporate the spices
    Sprinkle in the turmeric and ground cumin. Stir well to coat the vegetables evenly. Cooking the spices briefly in oil helps awaken their aroma and enhances their healing properties. Season lightly with salt and black pepper.
  4. Simmer the soup
    Add the cauliflower florets, vegetable broth, and water. Stir to combine, then bring the soup to a gentle boil. Reduce the heat to low, cover partially, and let it simmer for 20–25 minutes, or until the vegetables are tender but not mushy.
  5. Finish with brightness
    Once the soup is cooked, turn off the heat. Stir in the fresh lemon juice and chopped parsley. Taste and adjust seasoning with more salt, pepper, or lemon juice if needed.
  6. Serve and enjoy
    Ladle the soup into bowls and garnish with extra fresh parsley. Serve warm on its own or with whole-grain toast or a simple side salad.

Tips & Variations

  • For a creamier texture, blend half the soup and return it to the pot.
  • Add a pinch of red pepper flakes or fresh ginger for extra warmth.
  • This soup stores well in the refrigerator for up to 4 days and tastes even better the next day.

This golden, healing soup is gentle, flavorful, and deeply nourishing—perfect for restoring balance and comfort with every spoonful. 🌿✨