Butterfinger Balls (No-Bake Candy Bites)

Butterfinger Balls (No-Bake Candy Bites)

Yield: 20 balls
Prep Time: 15 minutes
Chill Time: 30 minutes
Total Time: About 45 minutes
Course: Dessert
Cuisine: American

These no-bake Butterfinger Balls combine creamy peanut butter, crunchy graham cracker crumbs, and crushed Butterfinger candy, all coated in smooth chocolate. They’re easy to make, freezer-friendly, and perfect for parties or gifting.


🧾 Ingredients

For the filling:

  • 4 tablespoons (56 g) unsalted butter, softened

  • 1 cup (240 g) creamy peanut butter (use regular creamy peanut butter, not natural)

  • 1 teaspoon vanilla extract

  • 1 cup (120 g) powdered (confectioners’) sugar, sifted

  • ¾ cup (75 g) graham cracker crumbs (about 6 full crackers, crushed)

  • ½ cup (about 50 g) Butterfinger bars, crushed (2–3 regular bars)

For coating:

  • 8 ounces (225 g) chocolate chips, melting wafers, or chocolate bark

Optional toppings:

  • Extra crushed Butterfinger

  • Sprinkles

  • Pinch of coarse sea salt


👩‍🍳 Instructions

1️⃣ Mix the base

In a medium bowl, beat together:

  • Softened butter

  • Peanut butter

Mix until smooth and fully blended.


2️⃣ Add sugar and vanilla

  • Stir in vanilla extract.

  • Gradually add powdered sugar (in 2–3 parts), mixing well after each addition.
    You should get a soft, moldable dough that holds together.


3️⃣ Add crumbs and candy

  • Fold in graham cracker crumbs.

  • Gently mix in crushed Butterfinger pieces.
    (Reserve 1 tablespoon of candy for topping, if desired.)


4️⃣ Shape the balls

  • Scoop about 1 to 1½ tablespoons of mixture.

  • Roll into smooth balls using your palms.

  • Place on a parchment-lined tray.


5️⃣ Chill

Refrigerate or freeze for 30 minutes until firm.
(Cold balls are much easier to dip in chocolate.)


6️⃣ Melt the chocolate

Melt chocolate:

  • In the microwave: 20–30 second bursts, stirring each time
    OR

  • Over a double boiler until smooth


7️⃣ Dip the balls

  • Dip each chilled ball into melted chocolate using a fork.

  • Tap gently to remove excess chocolate.

  • Place back on parchment paper.

Optional: sprinkle crushed Butterfinger, sprinkles, or sea salt on top before chocolate sets.


8️⃣ Set the coating

Chill for 10–20 minutes until chocolate hardens.


🧠 Troubleshooting

Too sticky?
➜ Add 1–2 tablespoons powdered sugar or graham crumbs.

Too dry?
➜ Add 1 teaspoon peanut butter or softened butter.

Chocolate too thick?
➜ Stir in 1 teaspoon vegetable oil or coconut oil.

Candy lost crunch?
➜ Do not over-crush Butterfinger; leave some small chunks.


❄️ Storage

Refrigerator:
Store in airtight container for up to 7 days

Freezer:
Freeze up to 5–6 months
Thaw overnight in fridge before serving.


💡 Expert Tips

✔ Use cookie scoop for equal sizes
✔ Let balls sit 5 minutes before dipping to prevent cracking
✔ For extra crunch, press candy on top after dipping
✔ Add espresso powder to chocolate for mocha flavor
✔ For nut-free: use sunflower seed butter and nut-free candy


🧮 Nutrition (Approximate per ball)

  • Calories: ~140

  • Fat: 9–10 g

  • Carbohydrates: 12–14 g

  • Protein: 3–4 g


📌 Important Note

Use regular creamy peanut butter.
Natural peanut butter can make the mixture too oily and soft.
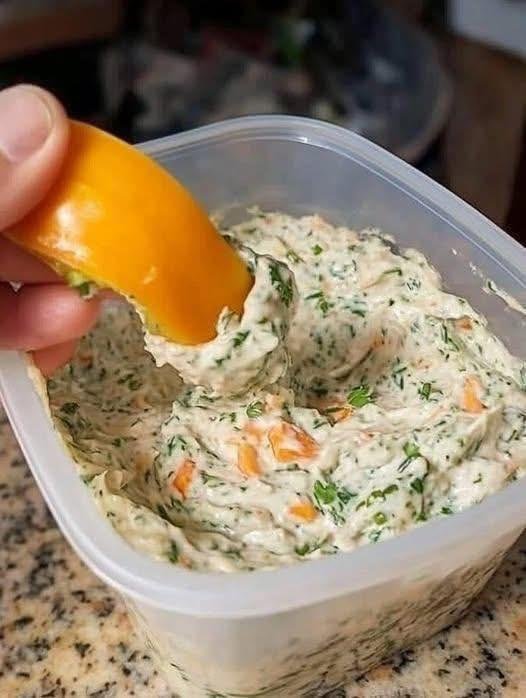
Creamy High-Protein Herb Dip Fresh, flavorful, and packed with lean protein in every scoop.

Servings: 6
Total Time: 10 minutes
Difficulty: Easy
Calories per Serving: ~95
Macros (per serving): 12g Protein / 3g Net Carbs / 4g Fat / 1g Fiber

Intro

This Creamy High-Protein Herb Dip is the kind of snack that feels indulgent but fits perfectly into a keto, low-carb, and Weight Watchers–friendly lifestyle. It’s thick, cool, and packed with fresh herbs—like a cross between ranch dip and whipped Greek yogurt—yet made with clean, macro-balanced ingredients.

If you’re trying to stay low carb while keeping your protein intake high, this dip is a game changer. It pairs beautifully with crisp veggies, high-protein crackers, or grilled meats, making it a go-to for meal prep, parties, or everyday snacking.

The best part? It takes just 10 minutes to make and stays unbelievably creamy for days.


Look at the Recipe

• Thick, smooth, ultra-creamy texture that holds up on any veggie or cracker
• Fresh herb flavor with garlic, lemon, and cooling yogurt notes
• High-protein, low-carb ingredients that boost fullness and support clean eating goals


Ingredients Needed

Base

  • 1 ½ cups plain nonfat Greek yogurt
  • ½ cup low-fat cottage cheese
  • 1 scoop unflavored or savory whey protein powder

Herbs & Seasoning

  • 2 tbsp fresh parsley, finely chopped
  • 1 tbsp fresh dill, finely chopped
  • 1 tbsp fresh chives, minced
  • 1 clove garlic, grated
  • 1 tsp lemon zest
  • 1 tbsp lemon juice
  • ½ tsp onion powder
  • ½ tsp salt (adjust to taste)
  • ¼ tsp black pepper

Optional Add-Ins

  • 1–2 tsp olive oil for richness (optional for keto; skip for very low WW points)
  • Red pepper flakes for a little heat
  • Extra herbs for garnish

How to Make Our Creamy High-Protein Herb Dip

  1. Blend the base. Add Greek yogurt, cottage cheese, and protein powder to a blender or food processor. Blend until silky smooth and thick.
  2. Fold in flavor. Transfer the blended mixture to a bowl. Stir in the parsley, dill, chives, garlic, lemon zest, and lemon juice until evenly combined.
  3. Season to taste. Add salt, pepper, and onion powder. Mix well and adjust lemon or herbs if needed.
  4. Chill before serving. Let the dip rest for at least 20 minutes in the fridge so the flavors can bloom and the texture can firm up.
  5. Serve and enjoy. Pair with cucumbers, bell peppers, celery, or keto crackers for a high-protein, low-carb snack that satisfies every craving.

Storage & Serving Suggestions

  • Refrigeration: Keeps well for 3–4 days in an airtight container.
  • Meal Prep: Portion into small containers for easy grab-and-go protein snacks.
  • Freezing: Not ideal—dairy separates after thawing.
  • Serving Pairings: Veggie sticks, grilled chicken skewers, salmon bites, keto almond crackers.

Tips & FAQs

Can I use only yogurt (no cottage cheese)?
Yes, but cottage cheese adds thickness and extra protein. If skipping it, use a bit more protein powder.

Can this be made dairy-free?
Use a dairy-free Greek-style yogurt and a plant-based protein powder. Texture will be slightly looser.

What herbs work best?
Parsley, dill, and chives are classic, but basil or cilantro work too.

How do I make it richer for keto?
Add 1–2 teaspoons of olive oil or a spoonful of cream cheese.

Is this Weight Watchers friendly?
Absolutely—use nonfat Greek yogurt and skip added oil for minimal points.

Homemade Lemon Water

Homemade Lemon Water

Ingredients

  • 2 Large Lemons: Choose firm, bright yellow lemons.

  • 4–6 Cups Water: Filtered or spring water works best.

  • Ice: Optional, for serving.

  • Optional Sweetener: A small amount of honey or stevia if you find it too tart.


Instructions

  1. Wash the Lemons: Since you are putting the slices directly into the water, scrub the skin thoroughly to remove any wax or residue.

  2. Slice: Cut one lemon into thin rounds.

  3. Juice: Squeeze the juice of the second lemon into your pitcher.

  4. Combine: Add the lemon slices to the pitcher and fill with water.

  5. Infuse: Let the pitcher sit in the refrigerator for at least 30 minutes before drinking. This allows the lemon oils and juice to blend with the water.


Healthy Tips for Use

  • Protect Your Teeth: The acid in lemons can soften tooth enamel. It is best to drink this through a straw or rinse your mouth with plain water afterward.

  • Temperature: Many people prefer drinking this warm in the morning to help wake up their digestive system, or ice-cold for refreshment.

  • Manage Expectations: While staying hydrated can reduce bloating and help you feel better, sustainable body changes come from a balanced diet and regular physical activity.

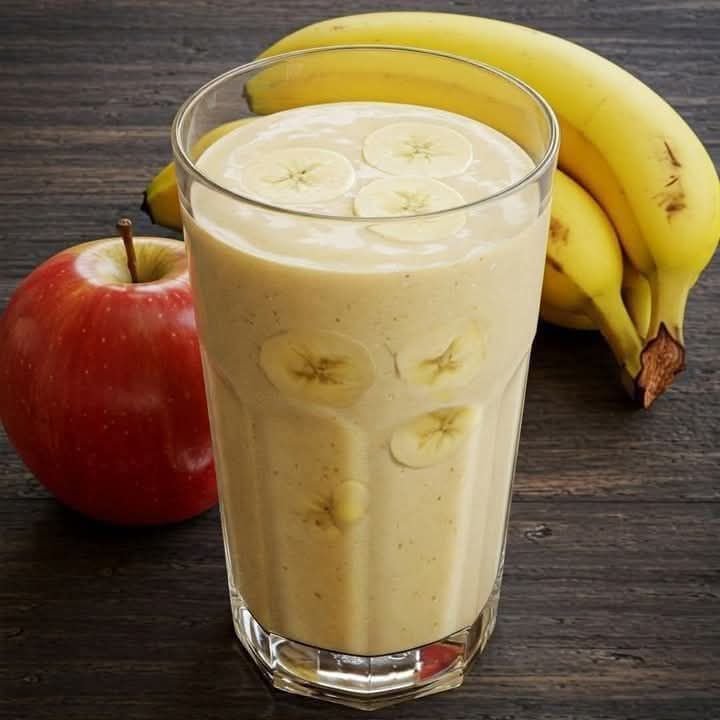
🥤 Banana & Apple Silk Smoothie

🥤 Banana & Apple Silk Smoothie

Prep time: 5 minutes | Servings: 1 large glass

Ingredients

Category Ingredient Quantity
Fruit Ripe Banana (frozen is best for thickness) 1 large
Fruit Red Apple (peeled and chopped) ½ large
Base Greek Yogurt or Skyr (Plain or Vanilla) ½ cup
Liquid Milk of choice (Oat, Almond, or Dairy) ½ to ¾ cup
Sweetener Honey or Maple Syrup (Optional) 1 tsp
Spice Ground Cinnamon A tiny pinch
Garnish Extra Banana 3-4 thin slices


Instructions

  1. Prepare the Fruit: * Peel and slice the banana. (Pro tip: use a frozen banana to get that thick, soft-serve consistency seen in the image).

    • Peel the apple and remove the core. Chopping it into small chunks helps it blend smoothly without leaving grainy bits of skin.

  2. Layer the Blender: * Add the liquid first, followed by the yogurt, then the fruit. This helps the blender blades catch the liquid and prevents “air pockets.”

  3. Blend: * Start on a low speed and gradually increase to high. Blend for about 45–60 seconds until perfectly silky.

    • If it’s too thick: Add a splash more milk.

    • If it’s too thin: Add a few ice cubes or more frozen banana.

  4. The “Visual” Touch: * To get the look in the photo, slice 3-4 very thin rounds of banana.

    • Press a few against the inside glass wall before pouring (the suction will hold them there).

    • Pour the smoothie in carefully, then float the remaining slices on top.


Quick Tips for the Best Result

  • The Apple: Since apples are fibrous, using a high-powered blender is key. If you don’t have one, you can use unsweetened applesauce (about 1/3 cup) instead of a fresh apple for an even smoother texture.

  • The Color: To keep the smoothie that bright, creamy beige color, add a tiny squeeze of lemon juice. This prevents the apple and banana from oxidizing (turning brown) if you don’t drink it immediately.

CAKE MIX ITALIAN CREAM CAKE

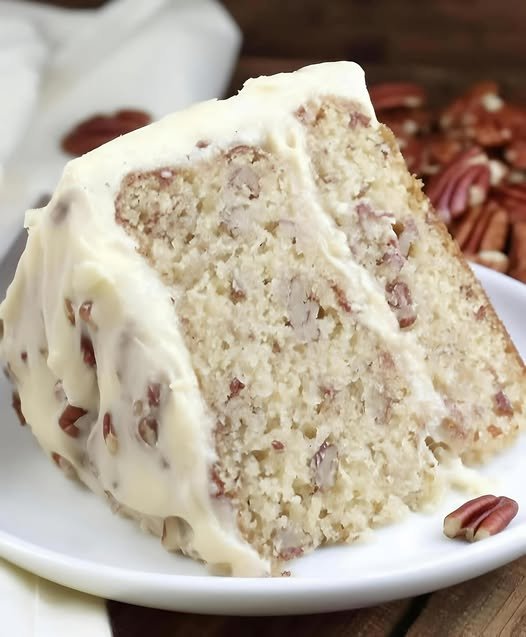
on the menu: easy CAKE MIX ITALIAN CREAM CAKE This recipe may be cheating a little because it involves a boxed cake mix but I promise after you bake this cake that will not matter. This is easily my favorite cake I have ever made (and I have baked some great ones like this Chocolate Fudge Cake with Peanut Butter Frosting and Chocolate Ganache). I have baked this Easy Italian Cream Cake so many times including several times to give away as gifts. Try this cake soon and let me know what you think.

Ingredients:

  • CAKE:
  • 1 (16.25-OUNCE) PACKAGE WHITE CAKE MIX
  • 3 LARGE EGGS
  • 1 1/4 CUPS BUTTERMILK
  • 1/4 CUP VEGETABLE OIL
  • 1 (3.5-OUNCE) CAN FLAKED COCONUT
  • 2/3 CUP CHOPPED PECANS, TOASTED
  • 3 TABLESPOON RUM (OPTIONAL)
  • CREAM CHEESE FROSTING:
  • 1 (8-OUNCE) PACKAGE CREAM CHEESE, SOFTENED
  • 1/2 CUP BUTTER OR MARGARINE, SOFTENED
  • 1 (16-OUNCE) PACKAGE POWDERED SUGAR
  • 2 TEASPOONS VANILLA EXTRACT
  • 1 CUP CHOPPED PECANS, TOASTED

HOW TO MAKE CAKE MIX ITALIAN CREAM CAKE:

  • BEAT THE FIRST 4 INGREDIENTS AT MEDIUM SPEED WITH AN ELECTRIC MIXER 2 MINUTES. STIR IN COCONUT AND PECANS.
  • POUR INTO 3 GREASED AND FLOURED 9-INCH ROUND CAKE PANS. BAKE AT 350°F FOR 15 TO 17 MINUTES OR UNTIL A WOODEN PICK INSERTED IN CENTER COMES OUT CLEAN.
  • COOL IN PANS ON WIRE RACKS 10 MINUTES. REMOVE FROM PANS, AND COOL COMPLETELY ON WIRE RACKS.
  • SPRINKLE EACH CAKE LAYER EVENLY WITH RUM, IF DESIRED; LET STAND 10 MINUTES.
  • SPREAD CREAM CHEESE FROSTING BETWEEN LAYERS AND ON TOP AND SIDES OF CAKE. CHILL 2 HOURS BEFORE SLICING.
  • BEAT CREAM CHEESE AND BUTTER AT MEDIUM SPEED WITH AN ELECTRIC MIXER UNTIL SMOOTH. GRADUALLY ADD POWDERED SUGAR, BEATING UNTIL LIGHT AND FLUFFY. STIR IN VANILLA AND PECANS. FROST CAKE WHEN COMPLETELY COOLED.

Mexican Street Corn Coleslaw

Prep time: 20 mins | Chill time: 2 hours | Serves: 6–8

​Ingredients

​The Base

  • ​8 cups Green cabbage, shredded

  • ​2 cups Red cabbage, shredded

  • ​2 cups Sweet corn, canned (drained) or fresh grilled
  • ​1 large Jalapeño, finely diced (remove seeds for less heat)
  • ​½ cup Green onions, thinly sliced

  • ​¼ cup Fresh cilantro or parsley, chopped
  • ​½ cup Cotija cheese (or Feta), crumbled

​The Dressing

  • ​1 cup Mayonnaise
  • ​1 tbsp Fresh lime juice (approx. ½ a lime)
  • ​½ tsp Chili powder
  • ​½ tsp Ground black pepper
  • ​¼ tsp Salt

​Instructions

​1. Prepare the Dressing

​In a small bowl, whisk together the mayonnaise, lime juice, chili powder, salt, and black pepper until smooth. Set this aside for a few minutes; allowing the dressing to sit helps the chili powder bloom and the flavors meld.

​2. Prep the Veggies

​Shred both the green and red cabbage into thin strips using a sharp knife or a food processor. Place them into a large mixing bowl. Add the diced jalapeño and sliced green onions.

​3. Combine

​Add the drained corn and the crumbled Cotija cheese to the cabbage mixture. If you are using fresh corn, grilling it beforehand adds a fantastic smoky “street food” authenticity to the dish.

​4. Dress and Toss

​Pour the dressing over the vegetables. Use tongs or large spoons to toss thoroughly, ensuring every shred of cabbage is lightly coated.

​5. Chill (Crucial Step)

​Cover the bowl and refrigerate for at least 2 hours. This allows the cabbage to soften slightly and the flavors to penetrate the vegetables. Give it one final toss just before serving to redistribute the dressing.

​Tips for Success

  • ​Cheese Subs: If you can’t find Cotija, Feta is the best substitute due to its saltiness and dry texture. Queso Fresco also works but is much milder.
  • ​Lighten it Up: You can swap half of the mayonnaise for Greek yogurt or Mexican Crema for a tangier, slightly lighter profile.
  • ​Smoke it: A pinch of smoked paprika or using chipotle powder instead of standard chili powder adds a lovely campfire depth.