Creamy Banana Nut Milkshake Delight


Creamy Banana Nut Milkshake Delight

This Creamy Banana Nut Milkshake Delight is a classic, joyful treat that brings together smooth bananas, rich ice cream, crunchy nuts, and festive toppings. It is perfect for warm afternoons, special gatherings, or anytime you want something comforting and refreshing. The texture is thick and creamy, while the flavors are naturally sweet and balanced. This recipe is simple to prepare at home and looks beautiful when served in tall glasses like the ones shown in the image.


Ingredients (Serves 2 large shakes)

2 ripe bananas, peeled and sliced


2½ cups vanilla ice cream, well chilled


1½ cups cold milk (full cream or low-fat, as preferred)


2 tablespoons chopped nuts (walnuts or pecans work very well)


1 tablespoon honey or sugar (optional, depending on sweetness preference)


½ teaspoon vanilla essence


Toppings

Whipped cream


Extra chopped nuts


Colorful sugar sprinkles


2 maraschino cherries


Banana slices for garnish


Step-by-Step Instructions

Prepare the bananas

Slice the bananas and place them in the freezer for 20–30 minutes. Slightly chilled bananas help create a thicker, creamier shake.


Blend the base

Add the chilled banana slices, vanilla ice cream, cold milk, honey or sugar (if using), and vanilla essence to a blender. Blend on medium speed until the mixture becomes smooth and creamy with no lumps.


Add texture

Add the chopped nuts to the blender and pulse briefly. This keeps small crunchy bits in the shake, giving it a pleasant texture without overpowering the creaminess.


Serve immediately

Pour the milkshake evenly into two tall serving glasses. The shake should be thick enough to hold toppings beautifully.


Decorate generously

Top each glass with a swirl of whipped cream. Sprinkle extra chopped nuts and colorful sugar sprinkles over the top. Place a banana slice on the side of each glass and finish with a cherry on top for a classic look.


Serving Tips

Serve immediately with long spoons or wide straws.


For extra richness, replace half the milk with chilled cream.


For a lighter version, use frozen yogurt instead of ice cream.


This Creamy Banana Nut Milkshake Delight is comforting, visually appealing, and full of flavor. It is easy to make, loved by all ages, and perfect for turning an ordinary moment into something special.

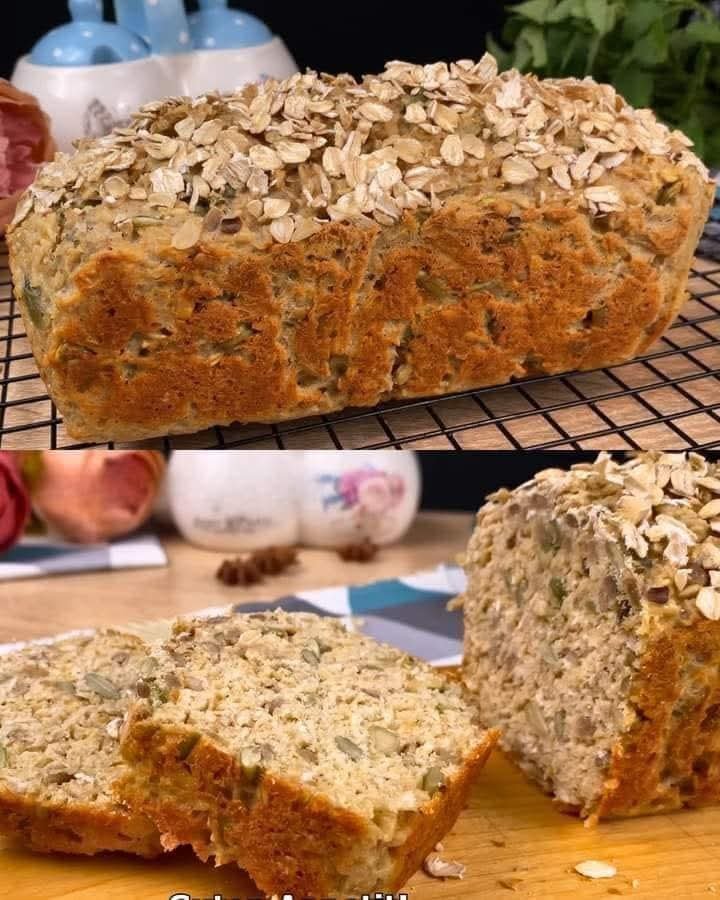
Simple Oat & Seed Bread (No Yeast, No Flour)

Simple Oat & Seed Bread (No Yeast, No Flour)

Prep Time: 10 minutes

Bake Time: 40–50 minutes

Total Time: About 1 hour

Yield: 1 small loaf


This bread is dense, hearty, and made with oats and seeds instead of flour. It is best sliced and toasted before serving.


📝 Ingredients

Base

280 g rolled oats (regular oats, not instant)


2 large eggs


200–250 ml plain yogurt


10 g baking powder


Texture & Flavor

50 g pumpkin seeds


50 g sunflower seeds


Salt, to taste


Black pepper, to taste

For Baking

Olive oil (for greasing the pan)


Extra rolled oats (for topping)


👩‍🍳 Instructions

Step 1: Prepare the Pan and Oven

Preheat the oven to 350°F (180°C).

Lightly grease a loaf pan or small baking dish with olive oil.

You may line the base with parchment paper for easier removal.


Step 2: Mix the Wet Ingredients

In a large bowl:


Whisk the eggs until smooth.


Add the yogurt and mix until creamy and fully combined.


Step 3: Add Oats, Seeds, and Seasoning

Add to the bowl:


Rolled oats


Pumpkin seeds


Sunflower seeds

Baking powder


Salt and black pepper


Mix with a spoon or spatula until all oats are evenly coated.


Tip: Let the mixture rest for 5 minutes so the oats absorb moisture and the texture improves.


Step 4: Transfer and Top

Pour the thick batter into the prepared pan.

Smooth the top with a spatula.

Sprinkle extra rolled oats over the surface for texture.


Step 5: Bake

Bake for 40–50 minutes, until:


The top is golden brown


The loaf feels firm when pressed


A knife inserted in the center comes out mostly clean


Step 6: Cool

Let the bread cool in the pan for 15 minutes.

Remove and place on a wire rack to cool completely before slicing.

Cooling helps the loaf hold its shape and slice neatly.


🌟 Tips for Best Results

Oats: Use rolled oats, not quick or steel-cut oats.


Texture: This bread is naturally dense and works best toasted.


Flavor options: Add herbs (oregano or rosemary) or a little garlic powder if desired.


Serving ideas: Toast and top with avocado, cheese, or serve alongside soups and salads.


📦 Storage

Store in an airtight container in the refrigerator for up to 5 days.


Slice and freeze for up to 3 months.


Best enjoyed toasted after storing.

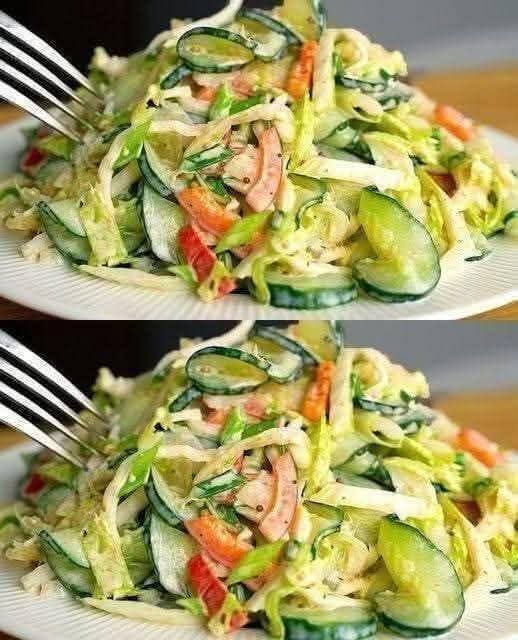
Cucumber and Cabbage Salad

Cucumber and Cabbage Salad

Yields: 2-3 servings

Prep time: 15 minutes

Ingredients:

Salad:

2 cups shredded cabbage (green or Napa), about 1/4 of a medium head

1/2 cucumber, thinly sliced (English cucumbers work well)

1/2 red bell pepper, thinly sliced

2 green onions, thinly sliced

2 tablespoons fresh dill or parsley, chopped (or a mix of both) – optional

Dressing:

2 tablespoons mayonnaise (or Greek yogurt for a lighter version)

1 tablespoon olive oil

1 tablespoon apple cider vinegar or lemon juice (adjust to taste)

1 teaspoon Dijon mustard

1/2 teaspoon garlic powder

1/2 teaspoon salt (or to taste)

1/4 teaspoon black pepper (or to taste)

Optional: 1/2 teaspoon honey or maple syrup (for a touch of sweetness)

Instructions:

Prepare the Vegetables:

Cabbage: If using a whole head of cabbage, remove any damaged outer leaves. Cut the cabbage in half and then shred it thinly using a sharp knife or a mandoline slicer.

Cucumber: Wash the cucumber and slice it thinly. If you’re using a regular cucumber, you can peel it partially or entirely if you prefer. English cucumbers have thinner skin and don’t need peeling.

Red Bell Pepper: Wash the bell pepper, remove the stem and seeds, and slice it thinly.

Green Onions: Trim the root ends and thinly slice the green onions, including both the white and green parts.

Herbs: Wash and chop the fresh dill and/or parsley.

Make the Dressing:

In a small bowl, whisk together the mayonnaise (or Greek yogurt), olive oil, apple cider vinegar or lemon juice, Dijon mustard, garlic powder, salt, and pepper.

Taste and adjust the seasonings as needed. Add a touch of honey or maple syrup if you prefer a slightly sweeter dressing.

Assemble the Salad:

In a large bowl, combine the shredded cabbage, cucumber slices, red bell pepper slices, and green onions.

Add the chopped dill and/or parsley, if using.

Pour the dressing over the salad and toss gently to coat all the ingredients. Be careful not to bruise the vegetables.

Chill (Optional): The salad can be served immediately, but it’s often more refreshing if chilled for 15-30 minutes to allow the flavors to meld.

Serve: Serve the salad as a side dish or light meal.

Zucchini, Potato & Carrot Cheese Muffins

Zucchini, Potato & Carrot Cheese Muffins

Soft, savory vegetable muffins with melted cheese – perfect for breakfast, lunchboxes, or a healthy snack.

Prep Time: 15 minutes
Bake Time: 20–25 minutes
Yield: 10–12 muffins


Ingredients

  • 1 medium zucchini, grated

  • 1 medium potato, grated

  • 1 medium carrot, grated

  • 2 large eggs

  • 1 cup shredded cheese (mozzarella or parmesan)

  • 1 cup all-purpose flour

  • ½ cup vegetable oil

  • 1 tablespoon baking powder

  • Salt, to taste

  • Black pepper, to taste

  • Fine herbs (oregano, parsley, or Italian herbs), optional


Instructions

1. Prepare the Vegetables

  1. Grate the zucchini, potato, and carrot using a coarse grater.

  2. Place the grated vegetables in a clean kitchen towel and gently squeeze out excess moisture. This prevents soggy muffins.


2. Mix the Wet Ingredients

  1. In a large bowl, whisk the eggs until smooth.

  2. Add the vegetable oil and mix well.

  3. Stir in the grated zucchini, potato, and carrot until evenly combined.


3. Add the Dry Ingredients

  1. Add the shredded cheese to the vegetable mixture and mix well.

  2. Add the flour, baking powder, salt, black pepper, and herbs (if using).

  3. Stir until a thick batter forms. Do not overmix.


4. Fill the Muffin Pan

  1. Preheat the oven to 180°C (350°F).

  2. Grease a muffin tin or line with paper cups.

  3. Spoon the batter into the muffin cups, filling each about ⅔ full.


5. Bake

  1. Bake for 20–25 minutes, or until the tops are golden and a toothpick inserted in the center comes out clean.

  2. Remove from the oven and allow muffins to cool in the pan for 5 minutes before transferring to a rack.


Serving Suggestions

  • Serve warm or at room temperature.

  • Delicious with yogurt, soup, or salad.

  • Store in an airtight container in the refrigerator for up to 3 days.


Tips for Best Results

✔ Squeeze moisture from vegetables for firm muffins
✔ Add garlic powder or paprika for extra flavor
✔ Use cheddar for a richer taste
✔ Can be baked in a loaf pan (bake 35–40 minutes)

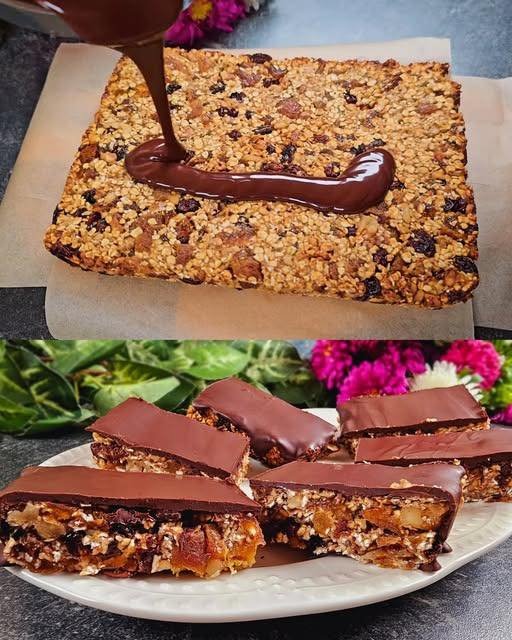
No-Sugar-Added Oat & Fruit Energy Bars

No-Sugar-Added Oat & Fruit Energy Bars

  • Prep time: 5 minutes

  • Setting time: 30–60 minutes (fridge)

  • Yields: 8–10 bars


Ingredients

  • 1 cup (80g) Rolled oats

  • 3/4 cup (100g) Raisins

  • 3/4 cup (80g) Walnuts, roughly chopped

  • 100g (3.5 oz) Dried apricots, chopped

  • 1 medium Ripe banana, mashed

  • 100g (3.5 oz) Dark chocolate (sugar-free), chopped

  • 1 tsp Coconut oil (for the chocolate glaze)


Instructions

  1. Prepare the Base: In a large mixing bowl, combine the rolled oats, chopped walnuts, chopped apricots, and raisins. Mix well to distribute the fruit.

  2. Bind: Add the mashed banana to the dry ingredients. Stir thoroughly until everything is evenly coated and the mixture sticks together. If it feels too dry, add another tablespoon of mashed banana.

  3. Shape: Line a small rectangular container or baking dish with parchment paper. Transfer the mixture into the dish and press down firmly with the back of a spoon or a spatula to create an even, compact layer.

  4. Melt Chocolate: Place the chopped dark chocolate and coconut oil in a microwave-safe bowl. Microwave in 20-second intervals, stirring in between, until completely smooth.

  5. Glaze: Pour the melted chocolate over the oat base and spread it evenly to the edges.

  6. Chill & Cut: Place the dish in the refrigerator for at least 30–60 minutes until the chocolate has hardened and the bars are firm. Lift the parchment paper out of the dish and slice into bars using a sharp knife.

Moist Turkey Dinner Loaf

Moist Turkey Dinner Loaf

Oh, the meatloaf. It’s one of those classic comfort foods, isn’t it? But if I’m being honest, the traditional recipe can sometimes feel a little… heavy. And let’s not even talk about the grease puddle you sometimes find in the pan! Since switching to lighter ground turkey for our meals, I’ve been on a mission to create a Moist Turkey Dinner Loaf that tastes just as amazing as the classic, but without all the fat. And friends, after many attempts (some of which were a little dry, oops!), I finally nailed it.


This recipe is seriously the answer to the classic “what’s for dinner?” slump, especially on a Sunday night, even though it’s easy enough to make any day. It’s got all those savory, homey flavors we associate with meatloaf, but because we use ground turkey and just the right binders, it stays incredibly tender and juicy. My kids, who are usually experts at detecting when I swap out beef for turkey, actually clean their plates when I make this one. It’s a miracle!


The best part about this dinner loaf is the glaze. That sweet, tangy topping is what sets it apart and keeps the moisture sealed in beautifully. It takes less than 10 minutes to mix up the ingredients for the loaf, and the total time from start to finish is under an hour, meaning you have plenty of time left to conquer that mountain of laundry or hide from your children for five minutes. Trust me, if you need a delicious, lean, and simple main dish, this is the one!

Why You’ll Love This Recipe

Lighter Comfort: Enjoy a classic dish that uses leaner protein without sacrificing any flavor or moisture.

Rapid Prep Time: Comes together in just 10 minutes of active mixing.

Family Favorite: This dish is a massive hit with both kids and adults (even the picky ones!).

Simple Seasoning: Uses pantry spices you likely have already, creating bold, savory flavor.

Fantastic Leftovers: Slices perfectly for sandwiches or can be repurposed into an entirely new meal.

Ingredients You’ll Need

The Protein: Two pounds of finely ground poultry that forms the lean base of the loaf.

Aromatics: A little bit of oil and dehydrated onion and garlic bits to infuse the mixture with a savory base aroma.

Key Seasonings: A blend of dried herbs and spices, including paprika, thyme, and cumin, to build a warm, complex flavor.

Savory Depth: A splash of a fermented condiment that adds essential umami and tanginess to the meat.

Moisture & Binding: Large room-temperature eggs and a bit of non-fat dairy liquid to help hold the loaf together and keep it tender.

The Binder: Finely ground, Italian-seasoned dry bread pieces to soak up moisture and give the loaf structure.

Glaze Base: A thick, sweet tomato condiment paired with packed dark brown sugar, a splash of tangy vinegar, and a bit of sharp mustard to create a shiny topping.

How It’s Made

The dish is incredibly easy and starts in a large bowl where the ground poultry is blended with all the dry spices and seasonings. Once the binding agents are added, the mixture is pressed into a prepared loaf pan. It bakes partially, giving you time to whisk together a simple, sweet-and-sour glaze. The loaf is then pulled out, topped generously with the sauce, and returned to the oven to finish baking until it’s perfectly set and deeply glazed.


Tips, Variations & Storage

Tip for Success: Be careful not to overmix the ingredients! Use your hands and mix just until everything is combined to avoid a tough meatloaf texture.

Protein Substitution: You can easily swap the turkey for ground beef, pork, or a beef/pork/veal mix if you prefer a traditional flavor.

Add-in Idea: Sauté half a cup of finely diced celery and carrots and mix them into the meat along with the onions and garlic for hidden veggies.

Dietary Swap: If you are gluten-sensitive, simply swap the breadcrumbs for gluten-free oats or certified gluten-free breadcrumbs.

Storage: Allow the loaf to cool completely, then store it covered in an airtight container in the refrigerator for 3 to 4 days.

Freezer Notes: The fully cooked and cooled loaf freezes wonderfully! Wrap it tightly in plastic and foil; it will keep for up to three months. Thaw overnight before reheating.

FAQ Section

Q: Why does turkey meatloaf need to reach a higher temperature than beef? A: Due to food safety guidelines, ground poultry (like turkey) requires a minimum internal temperature of 165°F to be safe, which is slightly higher than ground beef, so always check with a thermometer!


Q: Can I turn this into individual mini meatloaves? A: Yes, you can! Use a muffin tin or small loaf pans for individual portions. Just reduce the initial bake time since they will cook much faster than one large loaf.

Q: I don’t have fresh garlic. Can I use powder? A: Definitely. You can swap the fresh garlic for about ½ teaspoon of garlic powder. The flavor profile will still be great.


Q: Is it okay to make this without the glaze? A: You can, but the glaze adds a crucial layer of flavor and moisture retention on top. If you skip it, the loaf might not be as moist or flavorful, so I recommend adding something, even just a layer of extra ketchup.


Q: What is the best way to reheat leftovers? A: Sliced leftovers reheat well in the microwave. For the best quality, heat them in a covered oven-safe dish at 350°F until warmed through, around 10 to 15 minutes.