3-Ingredient Chocolate Cloud Bites

3-Ingredient Chocolate Cloud Bites

Soft, glossy chocolate bites with a texture between mousse and panna cotta.
Light, simple, and portion-controlled.

Prep Time: 10 minutes
Chill Time: 3–4 hours
Yield: 6–8 small bites


📝 Ingredients

1½ cups milk of choice
(Use skim milk, unsweetened almond milk, or oat milk for a lighter version)

1 packet (about 40 g / 1.4 oz) sugar-free chocolate instant pudding mix
OR
3 tablespoons cocoa powder + sweetener to taste (stevia, monk fruit, etc.)

1 packet (7 g / 2¼ tsp) unflavored gelatin

Optional:
Cooking spray or a few drops of oil (for molds)


👩‍🍳 Instructions

1️⃣ Bloom the Gelatin

Pour ¼ cup cold milk into a small bowl.
Sprinkle the gelatin evenly over the surface.
Let it sit 5 minutes until it becomes thick and spongy.


2️⃣ Heat the Chocolate Base

In a saucepan over medium heat, add:
• Remaining milk
• Chocolate pudding mix (or cocoa + sweetener)

Whisk continuously so it does not stick or burn.
Heat until steaming, not boiling.


3️⃣ Add the Gelatin

Add the bloomed gelatin into the warm chocolate mixture.
Whisk for 1–2 minutes until fully dissolved and smooth.


4️⃣ Pour into Molds

Lightly grease silicone molds or small cups.
Pour mixture evenly into molds.

Tap gently on the counter to remove air bubbles.


5️⃣ Chill

Refrigerate for 3 to 4 hours, or until fully set and firm.


6️⃣ Serve

Carefully remove from molds.
They should be:
• Smooth and shiny outside
• Soft and airy inside


💡 Optional Variations

Mousse-Style Texture:
Let mixture cool slightly, then gently fold in
½ cup whipped topping (sugar-free or regular) before molding.

Flavor Ideas:
• Add ½ tsp vanilla
• Add a pinch of salt
• Add espresso powder for mocha flavor


🧊 Storage

Store in an airtight container in the refrigerator.
Best consumed within 3–4 days.

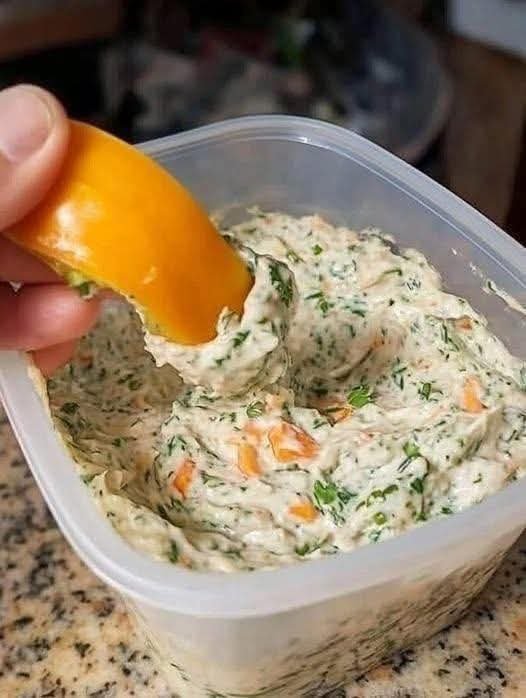
Creamy High-Protein Herb Dip Fresh, flavorful, and packed with lean protein in every scoop.

Servings: 6

Total Time: 10 minutes

Difficulty: Easy

Calories per Serving: ~95

Macros (per serving): 12g Protein / 3g Net Carbs / 4g Fat / 1g Fiber

This Creamy High-Protein Herb Dip is the kind of snack that feels indulgent but fits perfectly into a keto, low-carb, and Weight Watchers–friendly lifestyle. It’s thick, cool, and packed with fresh herbs—like a cross between ranch dip and whipped Greek yogurt—yet made with clean, macro-balanced ingredients.


If you’re trying to stay low carb while keeping your protein intake high, this dip is a game changer. It pairs beautifully with crisp veggies, high-protein crackers, or grilled meats, making it a go-to for meal prep, parties, or everyday snacking.

The best part? It takes just 10 minutes to make and stays unbelievably creamy for days.


Look at the Recipe

• Thick, smooth, ultra-creamy texture that holds up on any veggie or cracker

• Fresh herb flavor with garlic, lemon, and cooling yogurt notes

• High-protein, low-carb ingredients that boost fullness and support clean eating goals

Ingredients Needed

Base

1 ½ cups plain nonfat Greek yogurt

½ cup low-fat cottage cheese

1 scoop unflavored or savory whey protein powder

Herbs & Seasoning

2 tbsp fresh parsley, finely chopped

1 tbsp fresh dill, finely chopped

1 tbsp fresh chives, minced

1 clove garlic, grated

1 tsp lemon zest

1 tbsp lemon juice

½ tsp onion powder

½ tsp salt (adjust to taste)

¼ tsp black pepper

Optional Add-Ins

1–2 tsp olive oil for richness (optional for keto; skip for very low WW points)

Red pepper flakes for a little heat

Extra herbs for garnish

How to Make Our Creamy High-Protein Herb Dip

Blend the base. Add Greek yogurt, cottage cheese, and protein powder to a blender or food processor. Blend until silky smooth and thick.

Fold in flavor. Transfer the blended mixture to a bowl. Stir in the parsley, dill, chives, garlic, lemon zest, and lemon juice until evenly combined.

Season to taste. Add salt, pepper, and onion powder. Mix well and adjust lemon or herbs if needed.

Chill before serving. Let the dip rest for at least 20 minutes in the fridge so the flavors can bloom and the texture can firm up.

Serve and enjoy. Pair with cucumbers, bell peppers, celery, or keto crackers for a high-protein, low-carb snack that satisfies every craving.

Storage & Serving Suggestions

Refrigeration: Keeps well for 3–4 days in an airtight container.

Meal Prep: Portion into small containers for easy grab-and-go protein snacks.

Freezing: Not ideal—dairy separates after thawing.

Serving Pairings: Veggie sticks, grilled chicken skewers, salmon bites, keto almond crackers.

Tips & FAQs

Can I use only yogurt (no cottage cheese)?

Yes, but cottage cheese adds thickness and extra protein. If skipping it, use a bit more protein powder.Groceries


Can this be made dairy-free?

Use a dairy-free Greek-style yogurt and a plant-based protein powder. Texture will be slightly looser.

What herbs work best?

Parsley, dill, and chives are classic, but basil or cilantro work too.

How do I make it richer for keto?

Add 1–2 teaspoons of olive oil or a spoonful of cream cheese.


Is this Weight Watchers friendly?

Absolutely—use nonfat Greek yogurt and skip added oil for minimal points.

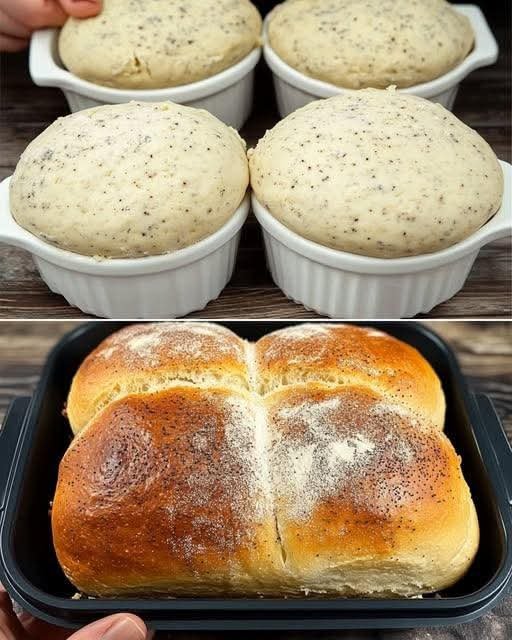
Grandma’s Secret Soft Poppy Seed Bread

Grandma’s Secret Soft Poppy Seed Bread

Adding a small amount of vinegar to yeast dough acts as a natural dough conditioner, making the bread incredibly soft, helping it rise higher, and extending its freshness.


Ingredients:


Flour: 3 ½ cups (approx. 500g) All-purpose or Bread flour


Milk: 1 cup (250ml) warm milk


Yeast: 2 ¼ tsp (1 packet) active dry yeast


Sugar: 2 tbsp


Salt: 1 tsp


Vinegar: 1 tbsp white distilled vinegar (The “Secret Ingredient”)


Butter: 4 tbsp (60g) unsalted, softened


Egg: 1 large egg (at room temperature)


Poppy Seeds: 2 tbsp

Instructions:


Activate Yeast: In a large bowl, combine warm milk, sugar, and yeast. Let it sit for 5–10 minutes until foamy.


Mix: Add the egg, softened butter, and the vinegar. Stir in the poppy seeds.


Knead: Gradually add the flour and salt. Knead by hand or with a mixer for 8–10 minutes until the dough is smooth and elastic.


First Rise: Place dough in a greased bowl, cover with a damp cloth, and let rise in a warm spot for 1 hour (or until doubled).


Shape: Punch down the dough. Divide into 4 equal balls and place them in a greased baking pan (as seen in your image).


Second Rise: Cover and let rise for another 30–45 minutes.


Bake: Preheat oven to 350°F (175°C). Brush the top with a little milk or egg wash. Bake for 25–30 minutes until the top is golden brown.


Cool: Let the bread cool in the pan for 10 minutes before transferring to a wire rack.

Lemon, Ginger & Turmeric Water

This warming drink is designed for hydration and comfort.


Ingredients:

Lemon: 3 fresh slices


Ginger: 2–3 slices of raw root


Turmeric: A pinch of ground turmeric or a small piece of fresh root


Black Pepper: A dash (helps with turmeric absorption)


Water: 1 cup of warm water


Instructions:


Place the lemon, ginger, and turmeric into a mug.


Add a dash of black pepper if desired.


Pour warm water over the ingredients and let it infuse for 5 minutes.


Sip slowly.


Simple Clove Infusion

A traditional, aromatic drink made with whole cloves.

Ingredients:


Whole Cloves: 3–5 pieces


Water: 1 cup


Instructions:


Hot Method: Add cloves to boiling water, remove from heat, and steep for 10 minutes.


Overnight Method: Place cloves in room temperature water and let soak overnight for a milder flavor.


Strain the cloves out before drinking.

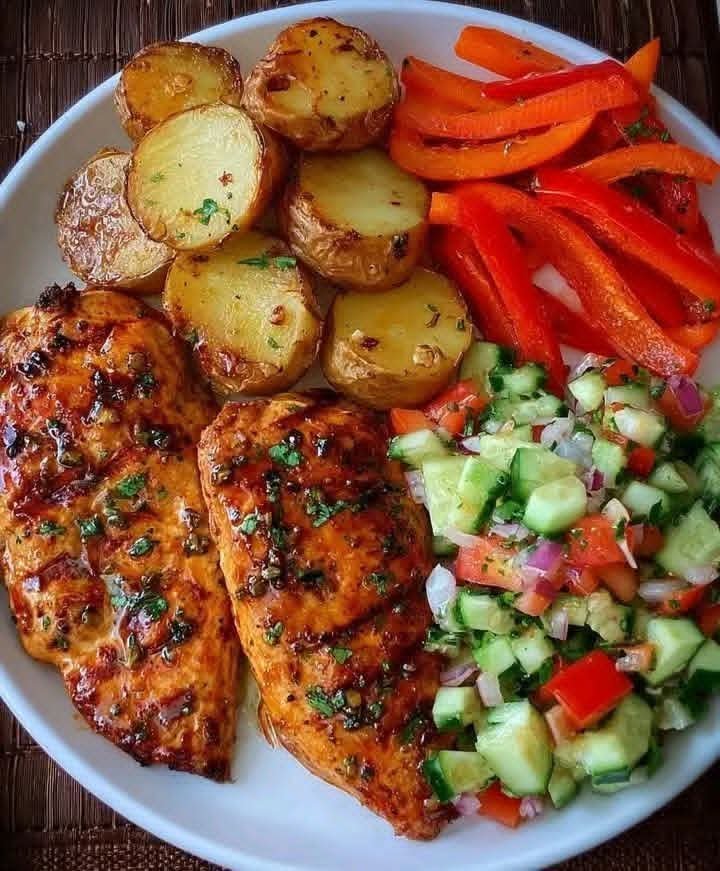
Garlic Herb Chicken with Roasted Veggies & Chopped Cucumber Salad 🥒🍗

Garlic Herb Chicken with Roasted Veggies & Chopped Cucumber Salad 🥒🍗


This bright and hearty meal hits every craving — juicy marinated chicken, oven-roasted potatoes and carrots, and a fresh cucumber salad loaded with herbs and crunchy veggies. Clean, vibrant, and totally meal-prep worthy!


𝐈𝐧𝐠𝐫𝐞𝐝𝐢𝐞𝐧𝐭𝐬


For the Chicken:


2 boneless skinless chicken breasts


1 tbsp olive oil


2 garlic cloves, minced


1 tsp smoked paprika


½ tsp dried oregano


Salt & black pepper to taste


Juice of ½ lemon or 1 tbsp vinegar


For the Roasted Veggies:


1 cup potato slices (thin, skin-on)


½ cup carrot slices


½ red bell pepper, sliced


1 tbsp olive oil


½ tsp dried thyme or rosemary


Salt & pepper


For the Cucumber Salad:


½ cucumber, diced


1 medium tomato, diced


½ small onion, finely chopped


½ green bell pepper, chopped


½ red bell pepper, sliced into thin strips


1 tbsp olive oil


1 tbsp vinegar or lemon juice


½ tsp dried parsley or oregano


Salt & black pepper to taste


𝐃𝐢𝐫𝐞𝐜𝐭𝐢𝐨𝐧𝐬


Marinate the Chicken:

Mix olive oil, garlic, paprika, oregano, lemon juice, salt, and pepper. Rub it all over the chicken breasts and let it sit for at least 15 mins (or overnight for max flavor).


Roast the Veggies:

Preheat oven to 400°F (200°C). On a baking sheet, toss potatoes, carrots, and red pepper with olive oil, thyme, salt, and pepper. Roast for 25–30 mins, flipping halfway, until golden and tender.


Grill or Pan-Sear Chicken:

Heat a grill pan or skillet over medium-high. Cook chicken 5–6 minutes per side, or until cooked through and nicely browned. Let rest 2 minutes, then slice.


Make the Salad:

In a bowl, mix cucumber, tomato, onion, green bell pepper, and red pepper. Drizzle with olive oil and vinegar, season with herbs, salt, and pepper. Toss well.


Assemble the Plate:

Arrange sliced grilled chicken, roasted veggies, and chopped salad on a large plate. Serve warm or room temp.


Prep Time: 15 mins

Cooking Time: 25 mins

Total Time: 40 mins

Servings: 2

Kcal per serving: ~480 kcal

Crispy Golden Pan-Fried Crustaceans

Crispy Golden Pan-Fried Crustaceans

Oh my goodness, if you are a seafood lover, you know there is nothing better than perfectly cooked, crispy, golden crustaceans! This recipe for Crispy Golden Pan-Fried Crustaceans is my absolute favorite, especially when I’m craving that amazing restaurant flavor but need dinner on the table in, like, twenty minutes flat.


Sometimes, dining out just isn’t an option when that seafood craving hits, but you definitely don’t have to struggle at home. This recipe is for beginners! It’s ridiculously easy, requiring only a handful of ingredients and minimal prep. The simple seasoning mix and the deep-sided skillet are the secrets to achieving that undeniable, satisfying crunch without any fancy equipment.


The entire process—from coating the little pink beauties to frying them up golden brown—takes less than fifteen minutes of active time. It’s truly a 30-minute meal hero and a huge hit with all my picky eaters, who love dipping them in everything from tartar sauce to simple garlic butter. Trust me, once you master this simple technique, you’ll never settle for takeout crustaceans again!

Why You’ll Love This Recipe

Super Quick: Ready from start to finish in about 15 minutes.

Family Favorite: The crunchy texture is approved by both kids and adults.

Simple Ingredients: Requires only three main components plus oil and pepper.

Perfect Crunch: Frying guarantees a crispy, golden, non-soggy exterior.

Versatile Base: Easily customized with different savory spice blends.

Ingredients You’ll Need

Pink, shelled, and cleansed crustaceans that serve as the delicate, quick-cooking protein.

Universal refined grain powder that creates the base for the crisp breading.

Specialized seasoned crystalline minerals and coarse ground peppercorns that provide the necessary salty, savory flavor profile.

Neutral liquid oil used for deep frying to achieve the golden, crunchy exterior.

How It’s Made

This preparation is a simple two-stage process. First, the dry ingredients are placed into a container and vigorously shaken to ensure the powders are completely blended. The raw, shelled crustaceans are then added to the dry blend and thoroughly coated. A neutral liquid oil is heated in a deep skillet, and the coated crustaceans are carefully dropped in and fried in batches until they turn golden brown. The finished pieces are placed on absorbent material to drain before serving hot.


Tips, Variations & Storage

Tip: Always pat the raw crustaceans completely dry before coating them in the dry mixture. This ensures the breading sticks evenly and remains light, rather than becoming chunky or too thick.

Substitution: If you need a different flavor profile, swap the specialized seasoned crystalline minerals for Cajun seasoning, lemon pepper, or a simple mix of pungent bulb powders and salt.

Add-ins: For a healthier crunch without frying, the coated crustaceans can be lightly spritzed with oil and air-fried until golden and crispy.

Dietary Swap: If avoiding wheat, substitute the universal refined grain powder with a mixture of almond and coconut flour for a lighter, grain-free coating.

Storage: Store any cooled leftovers in an airtight container in the refrigerator for up to 3 days.

Reheating Note: To restore the crispy texture, reheat thawed leftovers in an oven at 350 degrees or an air fryer until hot and crunchy.

FAQ Section

1. How much oil should I use for frying? You need enough neutral liquid oil to heat approximately three inches deep in your skillet. This ensures the crustaceans are evenly submerged and cook consistently.


2. How do I know when the crustaceans are fully cooked? They cook very quickly! When they are finished, they will turn opaque pink and form a loose “C” shape. Overcooking will make them curl tightly and become rubbery.

3. Why do I need to combine the dry ingredients first? Mixing the grain powder and seasonings separately ensures the flavor is perfectly distributed throughout the coating. If you add them individually to the main bowl, the flavor can settle and leave some crustaceans unsavory.


4. What is the best dipping sauce for these? Classic options like tangy tartar sauce or bright cocktail sauce are always winners. For something decadent, melt some clarified dairy fat with minced pungent cloves for a simple garlic butter dip.


5. Can I prepare and bread the crustaceans ahead of time? You can mix the dry coating ahead of time, but it’s best to coat the crustaceans just before frying. If you coat them too early, the moisture from the seafood will seep into the breading and make it soggy.

Recipes

Crustacean Base

1 Lb.: Pink shelled, and cleansed crustaceans (Shrimp)

Coating

2 C.: Universal refined grain powder Flour

⅛ C.: Specialized seasoned crystalline minerals Lawry’s Season Salt

Coarse ground peppercorns Pepper to taste

Frying

Neutral liquid oil for deep-sided skillet frying

Instructions

Place the universal refined grain powder, specialized seasoned crystalline minerals, and coarse ground peppercorns into a secure food storage bag or mixing vessel. Agitate or shake vigorously to ensure all dry components are thoroughly blended.

Introduce the pink, cleansed crustaceans into the bag. Shake or toss gently until every piece is completely coated in the dry breading mixture.

Heat approximately 3 inches of neutral liquid oil in a deep skillet over medium-high heat on the stovetop.

Carefully add the breaded crustaceans to the hot oil, working in small batches if necessary. Fry for 3 to 5 minutes per batch, turning occasionally, until they achieve a deep golden-brown color.

Extract the cooked crustaceans and place them on a tray or plate lined with absorbent paper towels to drain residual oil.

Serve the crispy crustaceans immediately alongside your favorite accompaniment sauce for dipping.

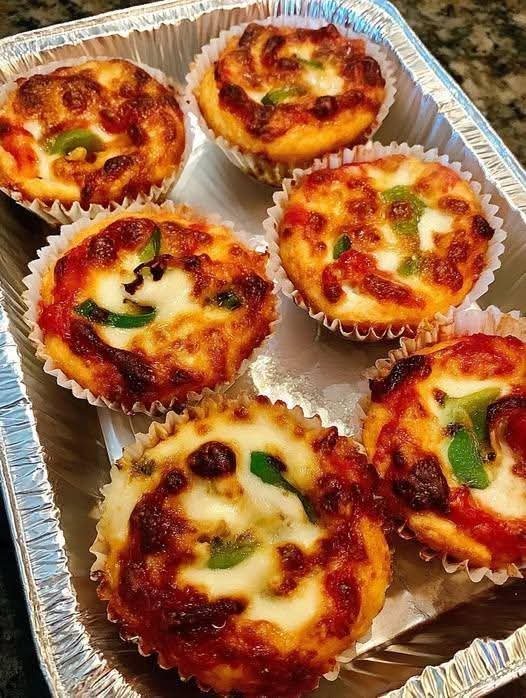
Mediterranean Mini Bread Rolls with Tomato, Cheese & Peppers (Bakery-Style Bites)

Mediterranean Mini Bread Rolls with Tomato, Cheese & Peppers (Bakery-Style Bites)


Ingredients (makes about 10–12 pieces)


For the dough


3 cups all-purpose flour


1 teaspoon salt


1 teaspoon sugar


7 g dry yeast


1 cup warm water


3 tablespoons extra-virgin olive oil


For the filling


¾ cup thick tomato sauce


1½ cups grated melting cheese (mozzarella, scamorza, or kasseri)


1 small green pepper, finely chopped


A pinch of dried oregano


Freshly ground black pepper


Method


Prepare the dough


In a bowl, mix the warm water, sugar, and yeast. Let sit for 10 minutes until lightly foamy. Add olive oil and salt, then gradually work in the flour. Knead until smooth and elastic, about 8 minutes. Cover and let rise until doubled, about 1 hour.


Shape


Roll the dough out into a rectangle on a lightly floured surface, about ½ cm thick. Spread a thin layer of tomato sauce evenly over the dough. Sprinkle with cheese, chopped green pepper, oregano, and a little black pepper.


Roll and slice


Roll the dough tightly from the long side into a log. Slice into thick rounds and place them cut-side up in paper liners or a lightly oiled baking dish.


Bake


Bake in a preheated oven at 190°C (375°F) for 20–25 minutes, until golden and bubbling, with crisp edges and soft centers.


Rest briefly


Let cool for 5 minutes before serving.


To serve


Serve warm or at room temperature. These small rolls are common in Mediterranean bakeries and home kitchens—simple dough, familiar flavors, and easy to share. They’re usually eaten by hand, one after another, with no ceremony, just good ingredients and good company.