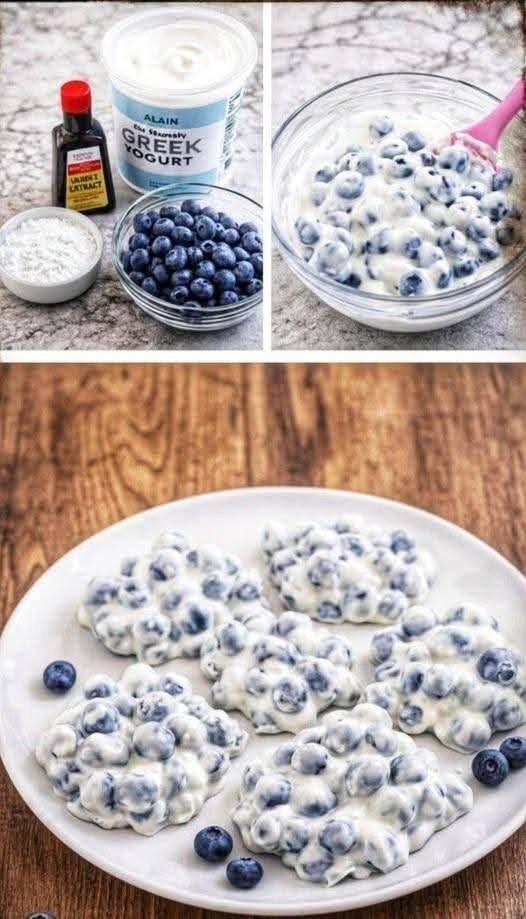
Frozen Blueberry Greek Yogurt Clusters

Frozen Blueberry Greek Yogurt Clusters
Creamy, naturally sweet, bite-sized frozen treats made with Greek yogurt and juicy blueberries. Perfect as a healthy snack or light dessert.
Servings
10–12 clusters
Prep Time
10 minutes
Freeze Time
1–2 hours
Ingredients
1½ cups fresh blueberries
1 cup plain Greek yogurt (full-fat or low-fat)
1–2 tbsp honey or maple syrup (optional, to taste)
½ tsp vanilla extract
Optional pinch of salt
Instructions
Mix the yogurt
In a bowl, stir together Greek yogurt, honey (if using), vanilla extract, and salt until smooth.
Add blueberries
Gently fold blueberries into the yogurt mixture until evenly coated.
Form clusters
Line a baking sheet with parchment paper.
Spoon small clusters (about 1–2 tbsp each) onto the sheet.
Freeze
Place in the freezer for 1–2 hours, or until completely firm.
Serve or store
Remove from freezer and enjoy immediately—or transfer to an airtight container.
Storage
Freezer: Up to 2 weeks
Let sit at room temperature 1–2 minutes before eating for best texture
Variations & Tips
🍓 Swap blueberries for strawberries or raspberries
🍫 Drizzle with melted dark chocolate after freezing
🥥 Add shredded coconut or crushed nuts
🍯 No sweetener needed if berries are very ripe
💪 Extra protein: Use high-protein Greek yogurt
5-Minute “Melt-in-Your-Mouth” Cupcake

5-Minute “Melt-in-Your-Mouth” Cupcake

Quick, Simple, and Perfectly Portioned

Ingredients

  • 4 tbsp All-Purpose Flour: (Or almond flour for a lower-carb version).

  • 2 tbsp Sugar-Free Sweetener: (Like Monk Fruit or Erythritol).

  • 1 tbsp Unsweetened Cocoa Powder: For a chocolate version (or omit for vanilla).

  • 1/4 tsp Baking Powder: For that essential lift.

  • 3 tbsp Milk: (Dairy or almond milk both work great).

  • 1 tbsp Melted Butter or Coconut Oil: Adds the “melt-in-your-mouth” richness.

  • 1/4 tsp Vanilla Extract: To enhance the sweetness.

Instructions

  1. Mix Dry Ingredients: In a standard microwave-safe mug, whisk together the flour, sweetener, cocoa powder, and baking powder using a small fork. Ensure there are no lumps.

  2. Add Wet Ingredients: Pour in the milk, melted butter (or oil), and vanilla extract.

  3. Stir until Smooth: Mix everything together until the batter is smooth and glossy. Be sure to scrape the bottom of the mug to incorporate all the flour.

  4. Microwave: Place the mug in the center of the microwave. Cook on high for 90 seconds to 2 minutes.

    • Note: Every microwave is different. Start with 90 seconds; if the top still looks “wet,” add 15-second increments until it is firm.

  5. Rest and Enjoy: Let the cupcake sit for 2 minutes before eating. This is the “magic” step where the steam finishes cooking the center and the texture becomes soft and fluffy.


Why this works for your “No-Sweet” streak:

  • Portion Control: Since it only makes one, you don’t have to worry about a whole tray of leftovers calling your name.

  • Customizable: You can drop a few of your fresh raspberries (from your cheesecake fluff) into the center before microwaving for a fruity surprise.

  • Speed: It satisfies the “need something now” feeling in under 5 minutes, preventing you from reaching for processed snacks.

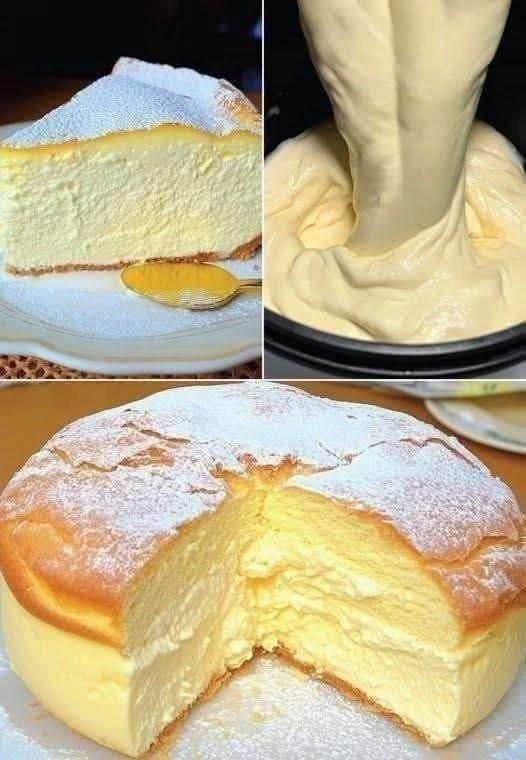
The Perfect Blender Cloud Cake

The Perfect Blender Cloud Cake

Fluffy, Airy, and Light

Ingredients

  • 200g (7 oz) Cream Cheese: Softened to room temperature.

  • 50g (3 tbsp) Unsalted Butter: Softened.

  • 100ml (7 tbsp) Milk: Any variety works.

  • 4 Large Eggs: Carefully separated into yolks and whites.

  • 70g (1/3 cup) Granulated Sugar: (Or your preferred keto-friendly powdered sweetener).

  • 40g (1/3 cup) Cake Flour: Sifted.

  • 10g (1 tbsp) Cornstarch: Helps stabilize the “cloud” structure.

  • 1 tsp Vanilla Extract: For that classic bakery aroma.

Instructions

  1. Prep the Oven & Pan: Preheat your oven to 320°F (160°C). Grease a 6-inch round cake pan and line the bottom and sides with parchment paper (make the paper taller than the pan, as this cake rises high!).

  2. The Blender Base: Put the cream cheese, butter, milk, egg yolks, and vanilla extract into the blender. Blend until completely smooth and pale.

  3. Incorporate Dry Ingredients: Add the cake flour and cornstarch to the blender. Pulse just a few times until the flour disappears—do not over-blend at this stage! Pour this mixture into a large bowl.

  4. The Meringue: In a separate clean bowl, whisk the egg whites. Gradually add the sugar as you whisk until you reach “soft peaks” (the whites should be shiny and hold their shape but still look a bit floppy at the tips).

  5. The Gentle Fold: Use a spatula to gently fold the egg whites into the blender mixture in three batches. Be very light-handed to keep the air bubbles intact.

  6. The Water Bath: Pour the batter into your prepared pan. Place that pan inside a larger baking dish filled with about an inch of hot water.

  7. Bake: Bake for 20 minutes at 320°F (160°C), then lower the heat to 285°F (140°C) and bake for another 40–50 minutes until the top is golden and firm to the touch.

  8. Cooling: Turn off the oven and leave the door slightly ajar for 10 minutes before removing the cake. This prevents it from collapsing too quickly.


Why this is a great addition to your rotation:

  • Texture: It satisfies that craving for something “bready” or “cakey” while remaining much lighter than traditional desserts.

  • Simplicity: Using the blender for the base ensures there are zero lumps in your cream cheese, which is the secret to that professional finish.

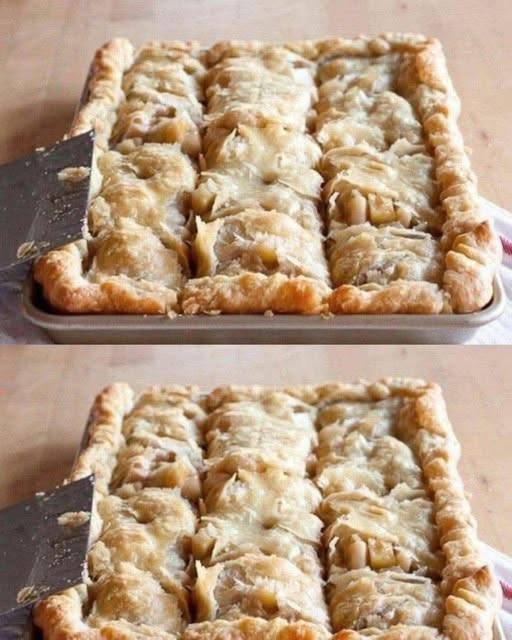
Grandma’s Apple Puff Pastry Bars

Grandma’s Apple Puff Pastry Bars

A simple baked dessert made with tender apples and flaky pastry.

⏱ Prep Time: 15 minutes

🔥 Bake Time: 30–35 minutes

🍽 Serves: 9–12 pieces


📝 Ingredients

Filling:

  • 4 medium apples (peeled and diced)

  • ⅓ cup granulated sugar

  • 1 tsp cinnamon

  • ¼ tsp nutmeg (optional)

  • 1 tbsp lemon juice

  • 1 tbsp cornstarch

Pastry:

  • 2 sheets puff pastry (thawed)

  • 1 egg (beaten, for brushing)

Glaze:

  • 1 cup powdered sugar

  • 2–3 tbsp milk

  • ½ tsp vanilla extract


👩‍🍳 Instructions

  1. Preheat oven to 180°C (350°F). Grease or line a rectangular baking pan.

  2. In a bowl, mix:

    • diced apples

    • sugar

    • cinnamon

    • nutmeg

    • lemon juice

    • cornstarch
      Stir until apples are coated.

  3. Roll out one sheet of puff pastry and place it in the bottom of the pan.

  4. Spread the apple mixture evenly over the pastry.

  5. Roll out the second puff pastry sheet and place it on top.
    Seal the edges and lightly score the top into squares.

  6. Brush the top with beaten egg.

  7. Bake for 30–35 minutes or until golden brown and bubbling.

  8. Let cool for 15 minutes.

  9. Mix glaze ingredients and drizzle over the warm pastry.

  10. Slice into squares and serve.


🍽 Storage

  • Store covered at room temperature for 1 day

  • Refrigerate up to 4 days

  • Reheat lightly before serving

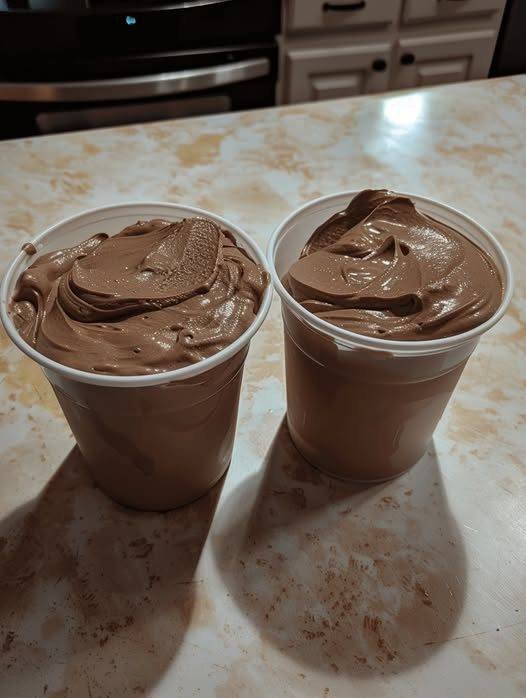
The Ultimate 3-Ingredient Keto Chocolate Mousse

The Ultimate 3-Ingredient Keto Chocolate Mousse

Gluten-Free, Sugar-Free, and Budget-Friendly

Ingredients

  • 2 cups Heavy Whipping Cream: Ensure it is very cold for the best volume.

  • 1/4 cup Unsweetened Cocoa Powder: Sifted to avoid lumps.

  • 1/3 cup Powdered Monk Fruit or Erythritol: Adjust based on your preference for sweetness.

  • Optional: 1 teaspoon Vanilla Extract and a pinch of salt (to enhance the chocolate flavor).

Instructions

  1. Chill Your Tools: For the fastest results, place your mixing bowl and beaters in the freezer for 5–10 minutes before starting.

  2. Combine Ingredients: Pour the cold heavy cream, cocoa powder, and sweetener into the chilled bowl.

  3. Whip to Perfection: Start your hand mixer on low speed to incorporate the cocoa powder (so it doesn’t puff up into the air). Gradually increase to high speed.

  4. Watch for Peaks: Beat for approximately 2–3 minutes until the mixture forms stiff peaks. You’ll know it’s ready when you lift the beaters and the mousse stands up straight without drooping.

  5. Serve or Store: You can eat this immediately, but it sets into a denser, “fudgy” texture if chilled in the fridge for 1 hour.


Why this works for your morning routine:

  • High Satiety: The healthy fats from the heavy cream help keep you feeling full until lunch, which explains why it’s been such a helpful tool for your progress.

  • Energy Stability: By using a sugar-free sweetener, you avoid the insulin spikes that usually lead to mid-morning crashes.

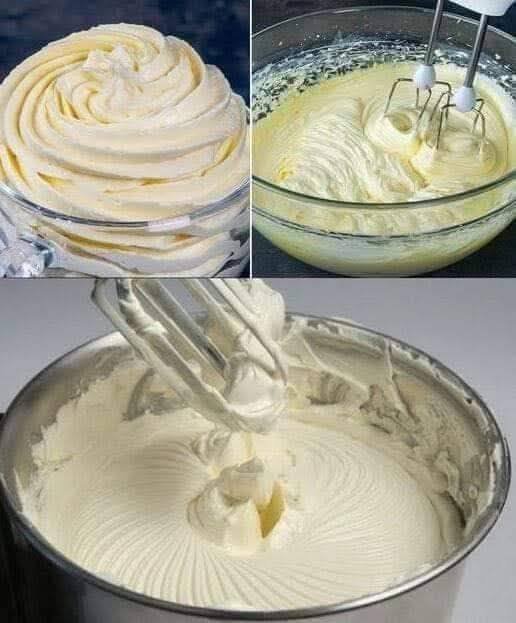
3-Ingredient Cheesecake Fluff

3-Ingredient Cheesecake Fluff

This is the “base” recipe that stays stable in the fridge for a few days. It’s rich, creamy, and keeps you in that “no-sweet” mindset without feeling deprived.

Ingredients

  • 8 oz (1 block) Cream Cheese: Softened to room temperature (this is crucial for no lumps!).

  • 1/2 cup Heavy Whipping Cream: Cold.

  • Sweetener of choice: 2–3 tablespoons of powdered Erythritol or Stevia (to taste).

    • Note: If you are doing “no sweets” in a strict sense, some people use a dash of vanilla extract instead of sweetener to trick the brain.

Instructions

  1. Prep the Cream Cheese: In a medium bowl, beat the softened cream cheese until it is completely smooth and airy.

  2. Add the Cream: Slowly pour in the heavy whipping cream and your sweetener.

  3. Whip it: Use a hand mixer on medium-high speed. Beat the mixture for about 2–3 minutes. You are looking for it to thicken up and hold “stiff peaks” (like whipped cream).

  4. The Raspberry Finish: Gently fold in a handful of fresh raspberries. Breaking a few of them while folding creates those beautiful pink swirls and adds that tartness you loved!


Pro-Tips for your 22-Day Streak:

  • Don’t Over-Whip: If you go too long, the heavy cream can turn into butter. Stop as soon as it’s thick and fluffy.

  • The “Salt” Secret: Add a tiny pinch of sea salt. It cuts the richness of the cream and makes the raspberry flavor pop.

  • Chill Time: While you can eat it immediately, letting it sit in the fridge for 30 minutes makes it taste exactly like the inside of a high-end cheesecake.