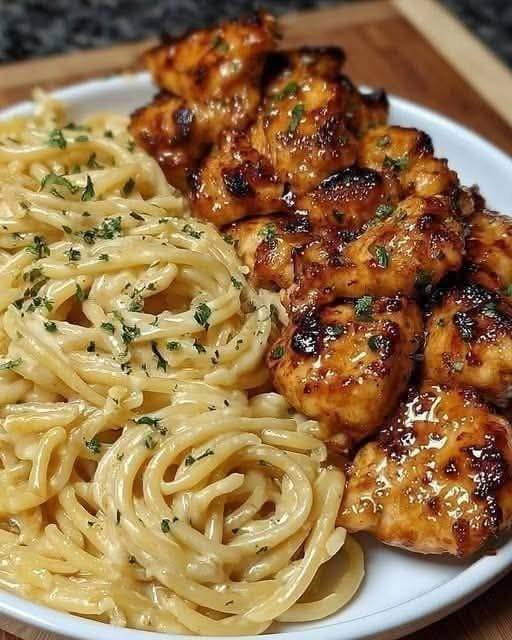
Lemon Garlic Butter Chicken & Creamy Parmesan Pasta

Lemon Garlic Butter Chicken & Creamy Parmesan Pasta

  • Prep time: 10 minutes

  • Cook time: 20 minutes

  • Servings: 2–3


Ingredients

For the Chicken:

  • Chicken: 2 boneless, skinless chicken breasts (sliced into bite-sized pieces)

  • Oil & Butter: 1 tbsp olive oil and 2 tbsp unsalted butter

  • Seasoning: 1 tsp paprika, ½ tsp garlic powder, salt, and black pepper to taste

  • Lemon: Juice of half a lemon

For the Creamy Pasta:

  • Pasta: 250g spaghetti or linguine

  • Cream: 1 cup heavy cream

  • Cheese: ½ cup freshly grated Parmesan cheese

  • Garlic: 3 cloves, minced

  • Garnish: Fresh chopped parsley


Step-by-Step Instructions

  1. Cook the Pasta: Bring a large pot of salted water to a boil. Cook the pasta according to package directions until al dente. Reserve ½ cup of pasta water before draining.

  2. Sear the Chicken: While the pasta cooks, season the chicken pieces with paprika, garlic powder, salt, and pepper. Heat the olive oil and 1 tbsp of butter in a large skillet over medium-high heat. Add the chicken and cook for 5–7 minutes until golden brown and cooked through. Remove the chicken from the pan and set aside.

  3. Make the Sauce: In the same skillet, lower the heat to medium and add the remaining tablespoon of butter and minced garlic. Sauté for 1 minute until fragrant. Pour in the heavy cream and lemon juice. Let it simmer for 2–3 minutes until it starts to thicken slightly.

  4. Combine: Stir the grated Parmesan cheese into the sauce until melted and smooth. If the sauce is too thick, add a splash of the reserved pasta water.

  5. Toss and Serve: Add the cooked pasta and the seared chicken back into the skillet. Toss everything together until the pasta is well-coated in the creamy lemon-garlic sauce.

  6. Garnish: Sprinkle with fresh parsley and an extra squeeze of lemon if desired. Serve immediately while hot.


Recipe Tips

  • Extra Flavor: For an even deeper flavor, add a pinch of red chili flakes or some lemon zest to the cream sauce.

  • Veggie Add-in: This dish goes great with a side of steamed broccoli or sautéed spinach mixed right into the pasta.

Cheesy Garlic Roasted Potato Disks

Cheesy Garlic Roasted Potato Disks

  • Prep time: 10 minutes

  • Cook time: 25-30 minutes

  • Servings: 4


Ingredients

  • Potatoes: 3-4 large Yukon Gold potatoes (sliced into 1-inch thick rounds)

  • Butter: 3 tbsp melted unsalted butter

  • Olive Oil: 1 tbsp

  • Garlic: 3 cloves, minced (or 1 tsp garlic powder)

  • Cheese: 1 cup shredded Parmesan or Mozzarella (or a mix)

  • Seasoning: ½ tsp salt, ¼ tsp black pepper, ½ tsp dried oregano

  • Garnish: Fresh chopped parsley


Step-by-Step Instructions

  1. Prep the Oven and Potatoes: Preheat your oven to 200°C (400°F). Line a large baking sheet with parchment paper or lightly grease it with oil. Wash the potatoes thoroughly and slice them into thick rounds (about 1 inch thick).

  2. Season the Base: In a small bowl, whisk together the melted butter, olive oil, minced garlic, salt, pepper, and oregano.

  3. The First Roast: Arrange the potato disks on the baking sheet. Brush both sides of each potato generously with the garlic butter mixture. Roast in the oven for 15-20 minutes, flipping halfway through, until the potatoes are tender when pierced with a fork and starting to turn golden.

  4. Add the “Melting” Cheese: Remove the tray from the oven. Using the back of a spoon or a small glass, gently press down on the center of each potato to create a slight indentation. Spoon a generous amount of shredded cheese into the center of each disk.

  5. Final Broil: Place the potatoes back into the oven for another 5-8 minutes, or until the cheese is bubbling and has formed a crispy, golden-brown crust around the edges.

  6. Garnish and Serve: Remove from the oven and sprinkle immediately with fresh parsley. Let them sit for 2 minutes so the cheese sets before serving.


Pro-Tips for Your Page

  • Flavor Variation: For a kick, add a pinch of red chili flakes to the butter mixture.

  • Air Fryer Version: You can make these in the air fryer at 200°C for about 12-15 minutes, adding the cheese in the last 3 minutes.

Slow Cooker Cabbage & Potato Comfort Dish

Slow Cooker Cabbage & Potato Comfort Dish

 Servings

4 servings

 Cooking Time

  • Prep Time: 10 minutes

  • Cook Time: 4–5 hours (Low) or 2–3 hours (High)

 Ingredients

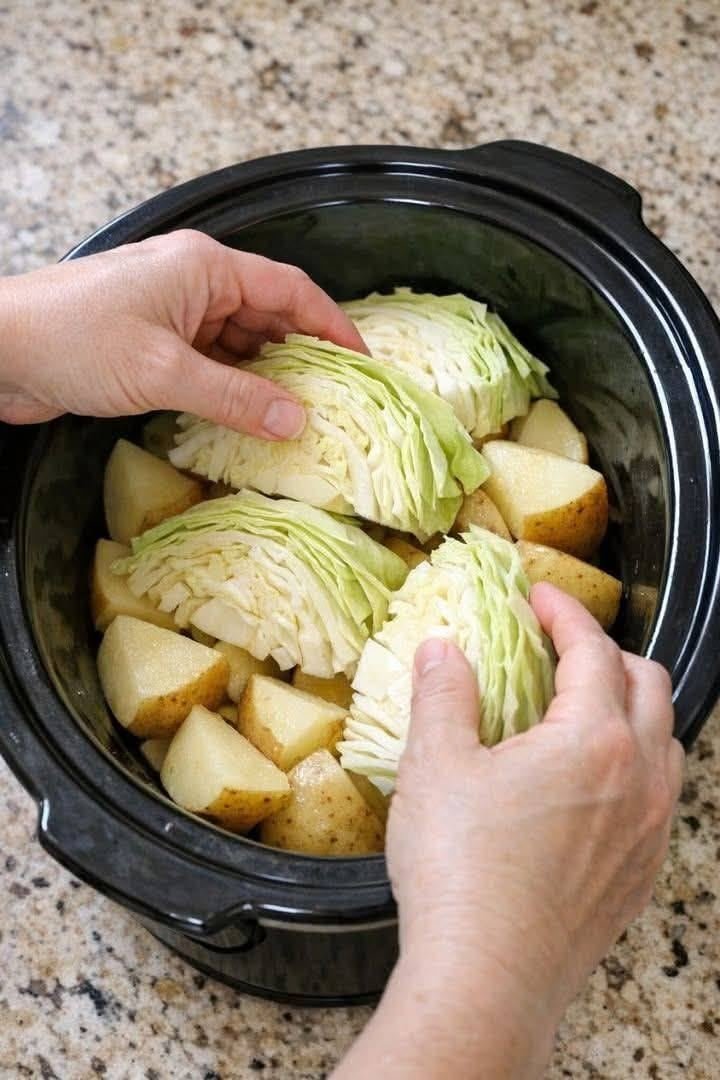
  • 1 medium green cabbage (cut into wedges)

  • 3–4 medium potatoes (quartered)

  • 1 small onion (optional, sliced)

  • 2 cloves garlic (minced)

  • 1 cup vegetable broth

  • 1 tbsp olive oil

  • ½ tsp salt

  • ½ tsp black pepper

  • ½ tsp paprika (optional)

 Instructions

1️⃣ Place the quartered potatoes in the bottom of the slow cooker.
2️⃣ Add sliced onion and garlic on top of the potatoes.
3️⃣ Stack cabbage wedges over the potatoes.
4️⃣ Drizzle olive oil and pour vegetable broth into the cooker.
5️⃣ Sprinkle salt, pepper, and paprika.
6️⃣ Cover and cook on LOW for 4–5 hours or HIGH for 2–3 hours until vegetables are tender.

 Recipe Notes

  • Use red cabbage if you want a stronger flavor.

  • You can add carrots or celery for extra nutrition.

  • For more protein add beans or tofu.

 Tips

✔ Cut cabbage into large wedges so it doesn’t become mushy.
✔ Place potatoes at the bottom because they take longer to cook.
✔ Add a little butter or lemon juice before serving for extra flavor.

 Nutritional Information (Approx per serving)

  • Calories: 140

  • Carbohydrates: 28g

  • Fiber: 6g

  • Protein: 4g

  • Fat: 3g

 Health Benefits

✅ Cabbage

  • Rich in antioxidants

  • Supports digestion

  • May help reduce inflammation

✅ Potatoes

  • Good source of potassium

  • Provide natural energy

  • High in fiber when skin is included

Q & A

Q: Is this recipe good for diabetics?
Yes, in moderate portions. Cabbage is low-glycemic and fiber helps control blood sugar.

Q: Can I cook it without a slow cooker?
Yes. You can cook it in a covered pot for about 30–40 minutes on low heat.

Q: Can I add meat?
Yes. Chicken sausage, turkey, or bacon can be added for more flavor.

Q: Can I store leftovers?
Yes, store in the refrigerator for 3–4 days in an airtight container.

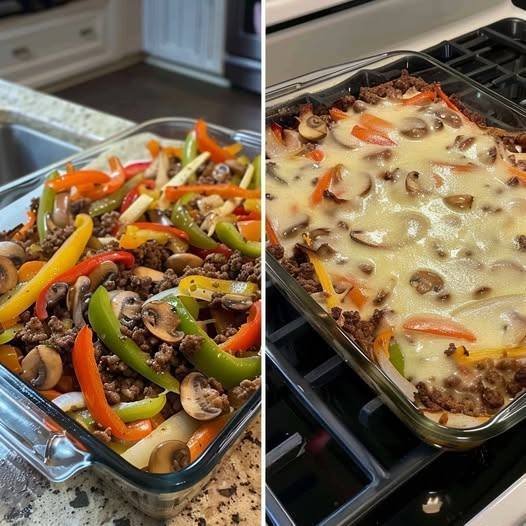
Keto Philly Cheesesteak Casserole

Keto Philly Cheesesteak Casserole

This flavorful, high-protein casserole captures all the classic tastes of a Philly cheesesteak while remaining mindful of your nutritional goals. It is a practical and satisfying meal that fits perfectly into a structured plan, especially for those focusing on low-carb or point-based systems.

Ingredients

  • 1 ½ lbs Ground beef (or thinly sliced steak)

  • 1 tbsp Olive oil or butter

  • 3 Bell peppers (1 green, 1 red, and 1 yellow), sliced

  • 1 Small onion, sliced

  • 1 cup Mushrooms, sliced

  • 2 Cloves garlic, minced

  • 4 oz Cream cheese, softened

  • ½ cup Beef broth

  • 1 tbsp Worcestershire sauce

  • 1 tsp Italian seasoning

  • To taste: Salt and pepper

  • 1 ½ cups Shredded provolone or mozzarella cheese

  • ½ cup Shredded cheddar cheese (optional)


Step-by-Step Instructions

  1. Prepare the Oven: Preheat your oven to 190°C and lightly grease a 9×13-inch baking dish.

  2. Brown the Protein: Heat the olive oil or butter in a large skillet over medium heat. Add the beef and cook until it is thoroughly browned. Season with salt and pepper, then drain any excess grease from the pan.

  3. Sauté the Vegetables: Add the sliced onions, peppers, mushrooms, and minced garlic to the skillet with the beef. Cook for 4–5 minutes until the vegetables have slightly softened but still retain some texture.

  4. Create the Creamy Base: Stir in the softened cream cheese, beef broth, Worcestershire sauce, and Italian seasoning. Continue to mix over the heat until the cream cheese is completely melted and the ingredients are well combined into a smooth sauce.

  5. Assemble the Casserole: Transfer the beef and vegetable mixture into your prepared baking dish. Spread it out evenly and sprinkle the shredded provolone (and cheddar, if using) across the top.

  6. Bake to Perfection: Place the dish in the oven and bake for 15–20 minutes. The casserole is ready when the cheese is melted, bubbly, and slightly golden.

  7. Rest and Serve: Allow the casserole to cool for about 5 minutes before serving. This helps the sauce set slightly for better portioning.


Cooking Tip

If you are using thinly sliced steak instead of ground beef, sear the steak quickly over high heat first to lock in the juices before adding the vegetables. This keeps the meat tender during the baking process.

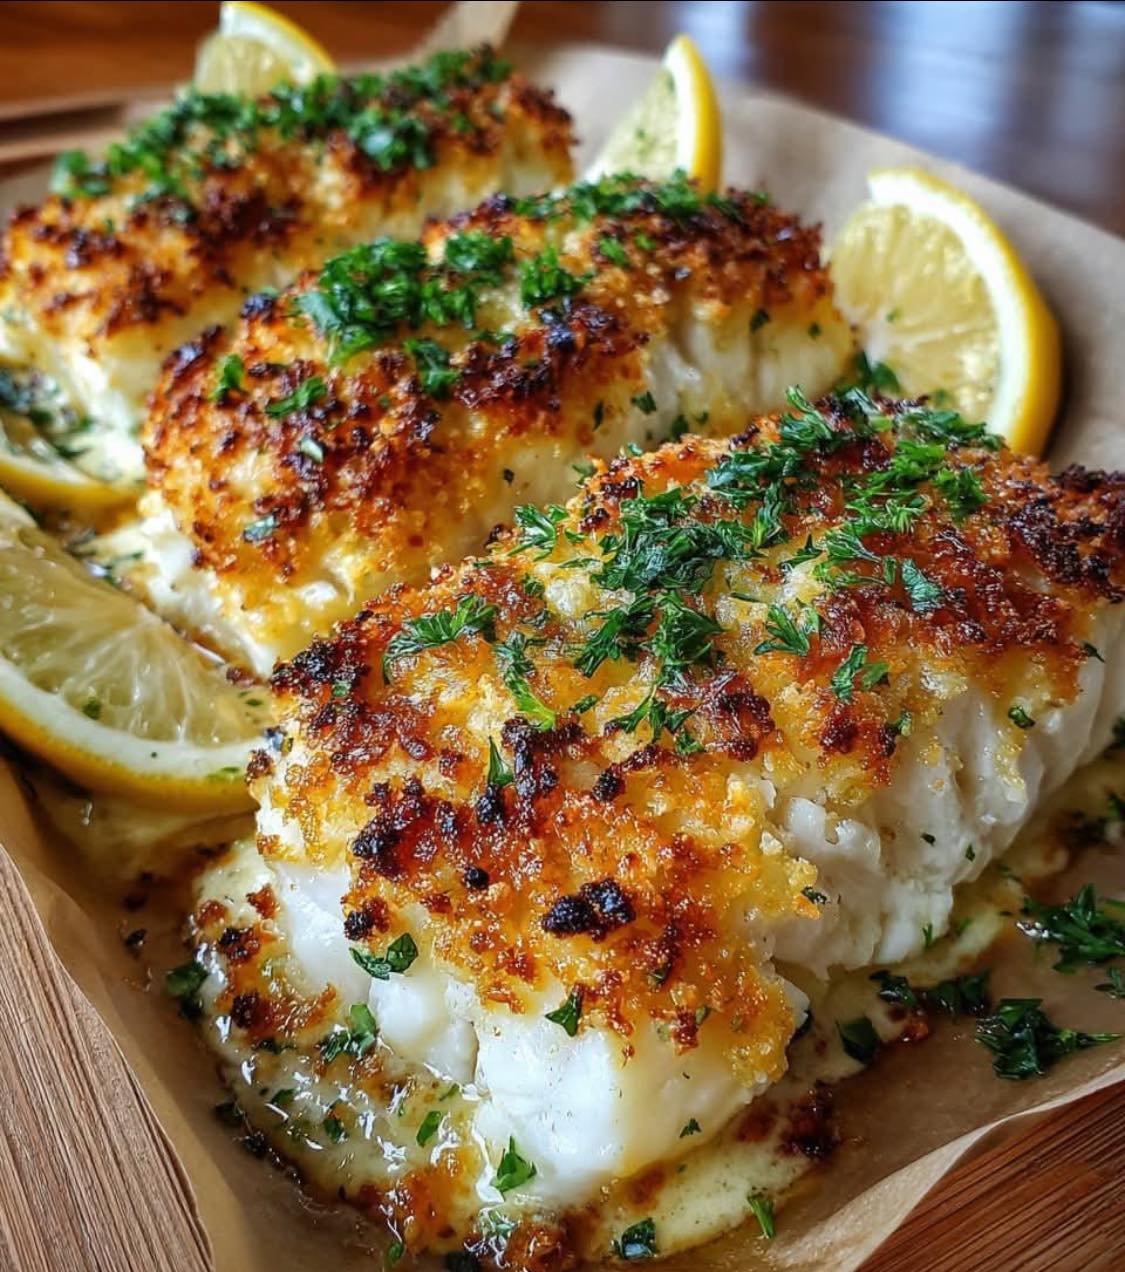
Baked Halibut with Lemon Garlic Mayo Crust

Baked Halibut with Lemon Garlic Mayo Crust

Description

This dish features tender, flaky halibut fillets baked under a zesty, garlicky mayonnaise crust. The crust locks in moisture while adding a bright, tangy flavor from fresh lemon and garlic. It’s perfect for a quick weeknight dinner yet elegant enough for entertaining. Serve it with roasted vegetables or a simple salad for a light, satisfying meal.

Prep & Cook Time

Preparation: 10 minutes

Cooking: 15–20 minutes

Total: 25–30 minutes

Ingredients (Serves 2–4)

For the Fish:

2 halibut fillets (6–8 oz each)

2 tablespoons mayonnaise

1 teaspoon Dijon mustard (optional, adds depth)

2 garlic cloves, minced

Zest of 1 lemon

1 tablespoon fresh lemon juice

Salt and pepper, to taste

1 teaspoon fresh thyme leaves or parsley, chopped (optional garnish)

Optional Serving Suggestions:

Steamed asparagus, roasted potatoes, or mixed greens

Directions

Step 1: Preheat & Prep

Preheat your oven to 400°F (200°C).

Line a baking sheet with parchment paper or lightly grease it.

Step 2: Make the Lemon Garlic Mayo Mixture

In a small bowl, mix together mayonnaise, minced garlic, lemon zest, lemon juice, Dijon mustard (if using), salt, and pepper until smooth.

Step 3: Coat the Halibut

Pat halibut fillets dry with paper towels.

Spread the mayo mixture evenly over the top of each fillet, covering fully.

Step 4: Bake the Halibut

Place the fillets on the prepared baking sheet.

Bake in the preheated oven for 12–18 minutes, depending on thickness, until the fish flakes easily with a fork and the crust is lightly golden.

Step 5: Garnish & Serve

Sprinkle with fresh herbs like thyme or parsley before serving.

Serve immediately with your favorite sides.

Tips & Tricks

Don’t overbake: Halibut cooks quickly, so check at 12 minutes for thinner fillets.

Optional crunch: For extra texture, sprinkle panko breadcrumbs over the mayo mixture before baking.

Make it zesty: Add a pinch of smoked paprika or chili flakes for a flavor twist.

Common Questions

Q1: Can I use another fish instead of halibut?

A: Yes! Cod, haddock, or sea bass work well with this topping. Adjust baking time based on thickness.

Q2: Can I prepare this ahead of time?

A: You can mix the mayo topping a few hours in advance and refrigerate. Apply to fish right before baking.

Q3: Can this recipe be made gluten-free?

A: Yes! The base recipe is already gluten-free. If adding breadcrumbs, use gluten-free panko.

Q4: What sides pair best with this dish?

A: Light, fresh sides like roasted asparagus, green beans, quinoa, or a crisp salad complement the rich crust.

Serving Suggestion: Serve immediately for best flavor and texture.

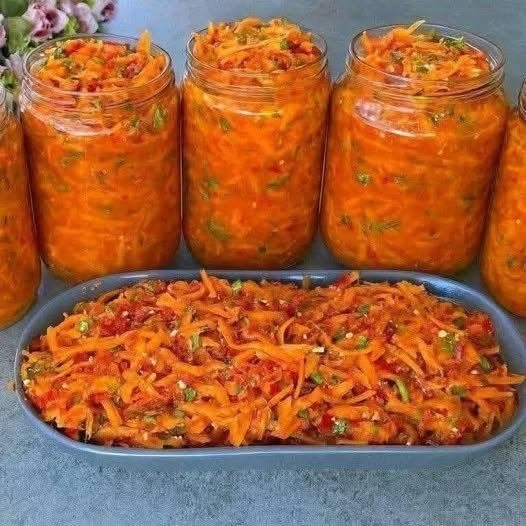
Spicy Carrot & Vegetable Salad for Jars

Spicy Carrot & Vegetable Salad for Jars

Table of Contents

This Spicy Carrot & Vegetable Salad is a vibrant, tangy, and lightly sweet preserve that’s perfect for storing in jars and enjoying year-round. Inspired by Eastern European-style vegetable salads, it combines tender carrots, peppers, onions, and tomatoes with warm spices and vinegar for a bold, balanced flavor. Serve it as a side dish, sandwich topping, or quick appetizer straight from the jar.

INGREDIENTS (Makes 4–5 jars, 500 ml each)

  • 2 kg carrots, grated or julienned

  • 500 g onions, thinly sliced

  • 500 g bell peppers, thinly sliced

  • 1 kg tomatoes, grated or finely chopped (or 700 ml tomato purée)

  • 2–3 heads garlic, minced

  • 250 ml vegetable oil

  • 150 g sugar

  • 2 tablespoons salt (adjust to taste)

  • 80–100 ml vinegar (9%)

  • 1 teaspoon ground black pepper

  • 1–2 teaspoons chili flakes or hot pepper (optional)

  • 1 tablespoon paprika

  • 1 bunch fresh parsley or dill, finely chopped

INSTRUCTIONS

1. Prepare the Vegetables

Wash and peel the carrots, then grate them using a coarse or julienne grater. Slice the onions and bell peppers thinly so they soften evenly while cooking. Grate or finely chop the tomatoes and mince the garlic. Keep everything ready before cooking.

2. Cook the Base

In a large, heavy-bottomed pot, heat the vegetable oil over medium heat. Add the sliced onions and sauté until soft and lightly golden. Stir in the bell peppers and cook for about 5 minutes, allowing them to soften. Add the tomatoes and simmer for 10 minutes until the mixture thickens slightly and becomes fragrant.

See also  Garlic Herb Compound Butter

3. Add the Carrots

Stir in the grated carrots along with salt, sugar, black pepper, paprika, and chili flakes if using. Reduce heat to medium-low and cook for 25–30 minutes, stirring frequently to prevent sticking. The vegetables should become tender but not mushy.

4. Finish the Salad

Add the minced garlic and vinegar, then cook for an additional 5 minutes. Stir in the fresh herbs and remove from heat.

5. Jar and Store

Pack the hot salad into sterilized jars and seal tightly. For longer storage, sterilize the filled jars in boiling water for 10–15 minutes. Allow to cool completely and store in a cool, dark place. The salad is ready after 3–5 days and tastes even better after one week.