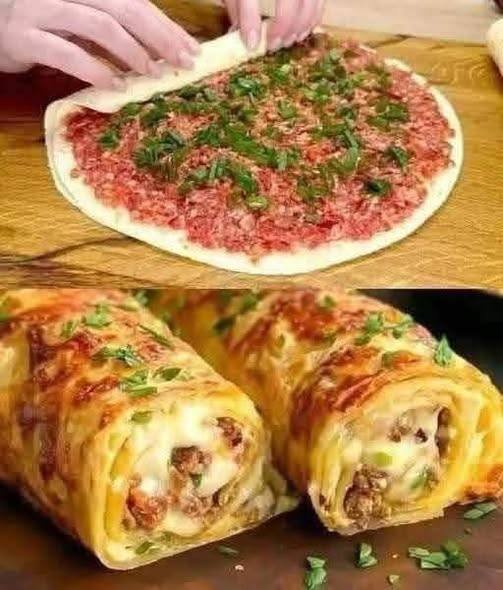
Cheesy Ground Beef Tortilla Rolls

Cheesy Ground Beef Tortilla Rolls

Savory, oven-baked tortilla rolls filled with creamy seasoned beef and melted cheese. Perfect for family meals or casual gatherings.

Prep Time: 15 minutes
Cook Time: 20 minutes
Servings: 4–6 people


📝 Ingredients

  • 6–8 large flour tortillas – soft and flexible

  • 1 lb (450 g) lean ground beef – or ground chicken/turkey

  • 1 cup shredded cheese – mozzarella, cheddar, or a blend

  • 1/2 cup cream cheese, softened

  • 1/4 cup green onions, finely chopped

  • 1/2 cup tomato sauce or mild salsa

  • Seasonings:

    • 1 tsp garlic powder

    • 1 tsp onion powder

    • 1/2 tsp cumin

    • Salt and black pepper to taste

  • Fresh parsley, chopped (for garnish)


👩‍🍳 Instructions

1. Cook the beef

  • Heat a large skillet over medium heat.

  • Add the ground beef and cook until fully browned, breaking it up with a spoon.

  • Drain excess fat from the pan for a cleaner flavor.


2. Make the filling creamy

  • Reduce heat to low.

  • Add tomato sauce (or salsa), garlic powder, onion powder, cumin, salt, and pepper.

  • Stir well to combine.

  • Add softened cream cheese and half of the chopped green onions.

  • Stir continuously until the mixture becomes smooth and creamy.


3. Assemble the rolls

  • Place one tortilla flat on a clean surface.

  • Spread a thin, even layer of beef mixture across the tortilla.

  • Sprinkle a small handful of shredded cheese over the beef.

  • Roll the tortilla tightly into a log shape.

Repeat with remaining tortillas.


4. Arrange and bake

  • Preheat oven to 190°C (375°F).

  • Lightly grease a baking dish.

  • Place tortilla rolls seam-side down in the dish.

  • Sprinkle remaining shredded cheese over the top.


5. Bake

  • Bake for 15–20 minutes, until cheese is fully melted and lightly golden.


6. Finish and serve

  • Remove from oven and let rest for 5 minutes.

  • Garnish with remaining green onions and fresh parsley.

  • Slice into rounds or serve whole.


🍽 Serving Suggestions

  • Serve with sour cream, Greek yogurt, or extra salsa for dipping.

  • Pair with a simple salad or roasted vegetables for a balanced meal.


⭐ Variations

  • Spicy version: Add chili flakes or chopped jalapeño

  • Vegetarian: Replace beef with mushrooms or lentils

  • Extra cheesy: Mix cheese directly into filling

  • Low-carb: Use low-carb tortillas

Keto Air-Fried Crispy Cauliflower Bites

Keto Air-Fried Crispy Cauliflower Bites

Crispy, savory, and the perfect low-carb alternative to tater tots.

Prep time: 10 mins | Cook time: 15–20 mins | Servings: 3–4

Ingredients

  • 1 large Head of Cauliflower: Cut into bite-sized florets.

  • 2 Large Eggs: Beaten (this helps the “breading” stick).

  • 1 ½ cups Shredded Parmesan Cheese: (The canned grated kind works too for a finer crust).

  • 1 tsp Garlic Powder

  • 1 tsp Smoked Paprika: For that deep golden color and smoky flavor.

  • ½ tsp Onion Powder

  • Salt and Black Pepper: To taste.

  • Optional: Fresh parsley for garnish and your favorite spicy mayo or ranch for dipping.


Instructions

  1. Prep the Cauliflower: Wash the cauliflower and pat it completely dry. If the florets are damp, the coating won’t stick and they won’t get crispy.

  2. The Coating Station: * In one medium bowl, whisk the eggs.

    • In a second medium bowl, combine the Parmesan cheese, garlic powder, smoked paprika, onion powder, salt, and pepper.

  3. Bread the Florets: * Dip each floret into the egg wash, ensuring it’s fully coated.

    • Toss the floret in the Parmesan mixture, pressing gently so the cheese sticks to all the nooks and crannies.

  4. Air Fry: * Arrange the florets in a single layer in the air fryer basket. Do not overcrowd them; work in batches if necessary to ensure air can circulate.

    • Lightly spray the tops with a bit of olive oil or avocado oil spray for extra crunch.

    • Air fry at 200°C (400°F) for 15–20 minutes.

    • Shake the basket halfway through to ensure even browning.

  5. Serve: Once they are deep golden brown and crispy, remove from the air fryer. Sprinkle with fresh parsley and serve immediately while hot with a side of dipping sauce.


Success Tips

  • Extra Crunch: If you aren’t strictly Keto, you can mix in 1/4 cup of crushed pork rinds or Panko breadcrumbs into the cheese mixture for an even heavier “crunch.”

  • Oven Method: If you don’t have an air fryer, bake them on a parchment-lined sheet at 220°C (425°F) for 25–30 minutes, flipping halfway.

  • The Dip: To make the sauce shown in the photo, mix 1/4 cup Mayonnaise with 1 tsp Sriracha and a squeeze of lime juice.

4-Ingredient Savory Breakfast Muffins

4-Ingredient Savory Breakfast Muffins

Fluffy, golden, and perfect for a quick, healthy morning meal.

Prep time: 10 mins | Cook time: 20 mins | Yield: 12 muffins


Ingredients

  • 8 large eggs – the base for fluffy muffins.

  • 1 cup cooked ham or bacon, finely diced – or substitute with cooked turkey, chicken, or a plant-based alternative.

  • 1 cup shredded cheese – cheddar, mozzarella, or a mild Mexican blend works beautifully.

  • 1/2 cup finely diced red bell peppers – you can also use spinach, onions, or zucchini.

Optional seasoning:

  • A pinch of salt

  • A pinch of black pepper

  • Fresh herbs like parsley, chives, or oregano for garnish


Instructions

1. Preheat and prepare

  • Preheat your oven to 190°C (375°F).

  • Grease a 12-cup muffin tin with cooking spray or line it with silicone muffin liners to prevent sticking.

2. Mix the eggs

  • In a large bowl, whisk the eggs until smooth and slightly frothy.

  • If using, add a pinch of salt and black pepper and whisk lightly to combine.

3. Add the fillings

  • Evenly distribute the diced ham (or alternative protein), shredded cheese, and diced bell peppers into the bottom of each muffin cup.

Tip: Adding the solids first ensures each muffin gets a balanced mix of ingredients.

4. Pour the eggs

  • Carefully pour the whisked eggs over the fillings in each muffin cup, filling about 3/4 full.

The muffins will rise slightly while baking, so don’t fill them to the top.

5. Bake

  • Place the muffin tin on the center oven rack.

  • Bake for 18–22 minutes, or until the tops are set and lightly golden brown.

  • Test with a toothpick in the center—if it comes out clean, the muffins are ready.

6. Cool and serve

  • Let the muffins cool for about 5 minutes in the tin.

  • Gently loosen the edges with a plastic knife or spatula and remove the muffins.

  • Garnish with fresh parsley or chives if desired.


Pro Tips

  • Storage: Once cooled, store muffins in an airtight container in the fridge for up to 4 days.

  • Freezing: Freeze for up to 2 months; thaw overnight in the fridge or reheat directly from frozen.

  • Reheating: Microwave a muffin for 30–45 seconds for a quick breakfast.

  • Optional variation: For a slightly breadier texture, whisk in 1/4 cup of flour or 1/4 cup milk/almond milk into the egg mixture before pouring.


Variations to Try

  1. Veggie-packed: Add spinach, mushrooms, zucchini, or cherry tomatoes.

  2. Spicy: Include finely diced jalapeño or a dash of paprika.

  3. Cheese swap: Try feta, goat cheese, or pepper jack for different flavors.

  4. Meat-free: Skip the ham/bacon and add extra vegetables for a vegetarian version.


These muffins are nutritious, protein-rich, and incredibly versatile—perfect for breakfast, snack, or even a light lunch.

Golden Beef and Cheese Tortilla Folds

Golden Beef and Cheese Tortilla Folds

Crispy tortillas filled with seasoned beef and melted cheese.

Prep Time: 10 minutes
Cook Time: 15 minutes
Yield: 4–6 wraps


📝 Ingredients

  • 6 medium or large flour tortillas

  • 450 g (1 lb) lean ground beef
    (or ground chicken or turkey)

  • 1 small onion, finely diced

  • 2 cups shredded cheese
    (cheddar, mozzarella, or a blend)

  • ½ cup sour cream or plain Greek yogurt

  • ½ cup salsa (mild or medium)

  • 1 teaspoon garlic powder

  • 1 teaspoon onion powder

  • 1 teaspoon smoked paprika

  • Salt and black pepper, to taste

  • 1–2 tablespoons oil or butter (for cooking)

  • Fresh parsley or cilantro, chopped (optional)


👩‍🍳 Instructions

1️⃣ Cook the Beef

Heat a large skillet over medium heat.
Add ground beef and diced onion.
Cook until beef is fully browned and onion is soft.
Drain excess fat if needed.


2️⃣ Season the Filling

Reduce heat to low.
Add:

  • Garlic powder

  • Onion powder

  • Smoked paprika

  • Salsa

  • Sour cream (or yogurt)

Stir until the mixture is evenly combined and creamy.
Remove from heat and set aside.


3️⃣ Assemble the Wraps

Lay one tortilla flat.

  1. Sprinkle shredded cheese in the center.

  2. Add a generous spoonful of beef mixture.

  3. Sprinkle a small amount of cheese on top (helps seal the wrap).


4️⃣ Fold into Pockets

Fold the bottom of the tortilla up over the filling.
Fold the sides inward.
Fold the top down to form a sealed rectangular pocket.


5️⃣ Toast Until Golden

Stovetop Method:
Heat a lightly oiled pan over medium heat.
Place wraps seam-side down.
Cook 2–3 minutes per side until golden and cheese is melted.

Oven Method:
Preheat oven to 200°C (400°F).
Place wraps on a lined baking tray.
Bake for 10 minutes, flipping halfway through.


6️⃣ Serve

Remove from heat and let rest for 1–2 minutes.
Sprinkle with chopped parsley or cilantro if desired.
Serve warm.


🧊 Storage

Store cooked wraps in an airtight container in the refrigerator for up to 3 days.
Reheat in a pan or oven until warm and crisp.

Crispy Crab Rangoon Bombs

Crispy Crab Rangoon Bombs

Savory, creamy crab filling tucked into golden, crunchy wonton shells.

Prep time: 15 mins | Cook time: 10–12 mins | Yields: 10–12 Bombs

Ingredients

  • 8 oz Cream Cheese: Softened to room temperature.

  • 1/2 cup Crab Meat: Cooked real crab or imitation crab, finely chopped.

  • 12 Wonton Wrappers: Square wrappers work best.

  • 2 tbsp Green Onions: Finely chopped.

  • 1 tbsp Soy Sauce

  • 1 tsp Garlic Powder

  • 1 tsp Worcestershire Sauce

  • Cooking Oil Spray: (Or 1 egg beaten with 1 tsp water for an egg wash).


Instructions

  1. Prepare the Filling: In a medium mixing bowl, combine the softened cream cheese, chopped crab meat, green onions, soy sauce, garlic powder, and Worcestershire sauce. Mix until thoroughly combined and creamy.

  2. Prep the Muffin Tin: Lightly grease a standard muffin tin with cooking spray. This helps the wontons hold their “bomb” shape and prevents sticking.

  3. Assemble the Bombs: * Press one wonton wrapper into each muffin cup, allowing the corners to point upward and flare out.

    • Spoon approximately 1.5 to 2 tablespoons of the crab mixture into the center of each wrapper.

  4. The “Crisp” Factor: Lightly spray the edges of the wonton wrappers with cooking oil or brush them with a little egg wash. This ensures they turn a beautiful golden brown rather than just drying out.

  5. Bake: Place in a preheated oven at 190°C (375°F). Bake for 10 to 12 minutes, or until the tips of the wontons are golden brown and the filling is hot and bubbly.

  6. Serve: Let them cool in the pan for 2–3 minutes so the shells firm up. Serve warm with sweet chili sauce or extra soy sauce for dipping.


Air Fryer Option

If you want them even crispier, you can place the filled wontons directly into an air fryer basket (ensure they aren’t touching). Air fry at 180°C (350°F) for 6–8 minutes.

Storage Tip

These are best eaten fresh, but if you have leftovers, reheat them in the oven or air fryer at 175°C for 3 minutes to regain that signature crunch. Avoiding the microwave will prevent the wrappers from becoming soggy.

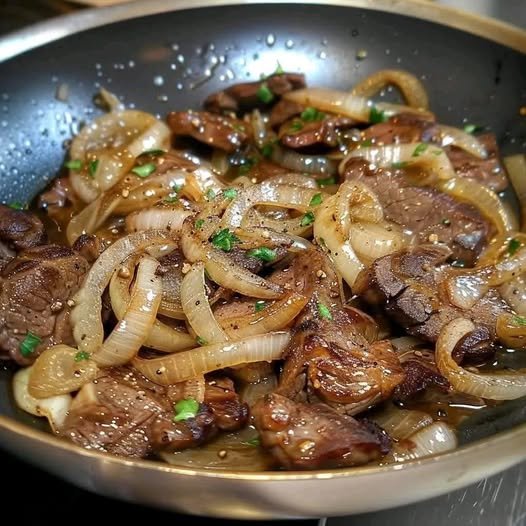
Beef Liver and Onions

A tender, savory dish with a rich white wine reduction.

  • Prep time: 15 minutes

  • Cook time: 20 minutes

  • Servings: 2–4

Ingredients

  • 1 lb Beef liver, sliced thin (approx. 1/2 inch)

  • 2 cups Onions, thinly sliced

  • ¼ cup All-purpose flour

  • ½ tsp Salt (plus more for seasoning)

  • ⅛ tsp Black pepper (plus more for seasoning)

  • ¼ – ½ cup Unsalted butter (divided)

  • 1–2 tbsp Extra virgin olive oil

  • 1–2 tbsp Fresh sage, minced

  • 1 tbsp Fresh Italian parsley, minced

  • ½ cup Beef stock

  • ¼ cup Dry white wine (Pinot Grigio or Sauvignon Blanc)


Instructions

  1. Dredge the Liver: In a large plastic bag or shallow bowl, combine the flour, salt, and pepper. Cut the liver into bite-sized strips or 1/2-inch thick pieces. Toss the liver in the flour mixture until evenly coated. Shake off any excess flour—you want a very thin coating.

  2. Caramelize the Onions: In a large skillet, heat 3 tbsp of butter and a splash of olive oil over medium-high heat. Add the sliced onions and sauté until they are soft, glossy, and beginning to turn a golden caramel color (about 8–10 minutes). Remove the onions from the skillet, place them in a dish, and season lightly with extra salt and pepper.

  3. Sear the Liver: In the same skillet, add 4 tbsp of butter and another dash of oil. Once the butter is foaming, add the liver pieces and the minced sage. Cook for about 2 minutes per side.

    • Critical Step: Do not exceed 5 minutes total! The liver should be browned on the outside but still pink and tender (medium-rare) on the inside.

  4. Combine: Return the onions to the skillet with the liver. Toss together for 30 seconds just to marry the flavors and ensure the onions are hot.

  5. Plate: Transfer the liver and onions to a warmed serving platter, leaving the juices in the pan.

  6. Create the Sauce: Pour the white wine and beef stock into the hot skillet. Turn the heat to high and scrape the bottom of the pan (deglazing) to loosen the browned bits. Let the liquid boil and reduce by half until it thickens into a glossy sauce.

  7. Finish & Serve: Pour the reduced sauce over the liver and onions. Garnish with fresh Italian parsley and serve immediately.


Chef’s Tips for Success

  • The Soak: For the mildest flavor, soak the liver in whole milk or lemon water for 30 minutes before patting dry and dredging in flour. This removes any metallic tang.

  • Don’t Crowd the Pan: If your skillet is small, sear the liver in two batches. If you crowd the pan, the liver will steam instead of browning, making it tough.