Homemade Chocolate Cake

🎉 Classic Nut Chocolate Birthday Cake with Silky Ganache

This is a truly special cake—rich, tender, and deeply comforting. Made every year for a loved one’s birthday, it’s one of those recipes that becomes part of family history. The cake is softly spiced with cinnamon, gently chocolatey, and wonderfully moist thanks to crème fraîche and finely ground nuts. Finished with a smooth chocolate ganache and simple decorations, it’s elegant without being complicated.

⏱ Time & Yield

  • Prep Time: 20 minutes

  • Bake Time: 50 minutes

  • Cooling & Setting: 1 hour

  • Total Time: 2 hours 10 minutes

  • Servings: 12


🧾 Ingredients

Cake

  • 1⅛ cups unsalted butter, room temperature

  • 1 ¼ cups white sugar

  • 5 large eggs, room temperature

  • 1 cup finely ground nuts (hazelnuts, walnuts, or almonds)

  • 2 teaspoons ground cinnamon

  • 2 tablespoons unsweetened cocoa powder

  • 5 ½ oz crème fraîche (or full-fat sour cream)

  • 2 cups all-purpose flour

  • 3 teaspoons baking powder

Chocolate Ganache

  • 2 cups semisweet chocolate chips

  • 2 cups heavy cream

  • 2 teaspoons vanilla extract

Decoration

  • ½ cup strawberries or mixed berries
    (Candy, chocolate shavings, or sprinkles also work beautifully.)


🥣 Instructions

1️⃣ Prepare the Pan

Preheat your oven to 350°F (175°C).
Grease a heart-shaped pan or fluted tube (Bundt) pan thoroughly.


2️⃣ Make the Batter

In a large bowl, beat the butter until smooth and creamy.
Gradually add the sugar (about ¼ cup at a time), mixing well after each addition.

Add the eggs one at a time, beating well after each.

Mix in:

  • Groundnuts

  • Cinnamon

  • Cocoa powder

  • Crème fraîche

Blend until smooth and well combined.


3️⃣ Add Dry Ingredients

Sift together the flour and baking powder.
Gently fold into the batter until just combined—do not overmix.

Pour the batter into the prepared pan and smooth the top.


4️⃣ Bake

Bake for about 50 minutes, or until a toothpick inserted in the center comes out clean.

Cool in the pan for 5 minutes, then carefully loosen the edges and invert onto a wire rack.
Allow the cake to cool completely before adding ganache.


🍫 Chocolate Ganache

Place chocolate chips in a heat-safe bowl.

Heat the cream in a saucepan until it just reaches a boil.
Immediately pour the hot cream over the chocolate.

Let sit for 1–2 minutes, then whisk gently until smooth and glossy.
Stir in the vanilla extract.

Cover the surface of the ganache directly with plastic wrap and let it cool slightly until pourable.


🎂 Assemble & Decorate

Pour the ganache evenly over the cooled cake, allowing it to drip naturally down the sides.

Let it set for a few minutes, then decorate with berries, candy, or anything festive you love.


💡 Helpful Tips

  • Any finely ground nut works beautifully—use what you have.

  • This cake tastes even better the next day as the flavors deepen.

  • Store covered at room temperature for 1 day, or refrigerate up to 4 days.

Easy One-Bowl Chocolate Cake

Easy One-Bowl Chocolate Cake

A soft, moist chocolate cake made with yogurt

This one-bowl chocolate cake is simple to prepare and uses everyday ingredients. Yogurt helps create a tender texture, while a small amount of coffee powder (optional) deepens the chocolate flavor without tasting like coffee.


Ingredients

  • All-purpose flour — 1 cup (120 g)

  • Baking powder — 2 teaspoons

  • Unsweetened cocoa powder — ¾ cup

  • Coffee powder — 1 teaspoon (optional)

  • Granulated sugar — 1 cup

  • Plain yogurt (or Greek yogurt) — 1 cup

  • Vegetable oil — ½ cup

  • Vanilla extract — 1 teaspoon

  • Eggs — 3 large, at room temperature


Step-by-Step Instructions

1. Prepare the Pan and Oven

  • Preheat the oven to 175°C (350°F).

  • Grease a 9-inch round cake pan or a standard loaf pan.

  • Line the base with parchment paper for easy removal.


2. Mix the Wet Ingredients

  • In a large mixing bowl, add:

    • Eggs

    • Sugar

    • Yogurt

    • Vegetable oil

    • Vanilla extract

  • Whisk until the mixture is smooth and well combined.


3. Add the Dry Ingredients

  • Place a sieve over the bowl.

  • Sift in:

    • Flour

    • Cocoa powder

    • Baking powder

    • Coffee powder (if using)

Sifting helps remove cocoa lumps and creates a smoother batter.


4. Combine Gently

  • Fold or whisk gently until no dry flour remains.

  • Stop mixing as soon as the batter is smooth.

    • Overmixing can make the cake dense.


5. Bake

  • Pour the batter into the prepared pan.

  • Smooth the top evenly.

  • Bake:

    • 30–35 minutes for a round pan

    • 40–45 minutes for a loaf pan

Doneness Test:
Insert a toothpick into the center. It should come out clean or with a few moist crumbs.


6. Cool

  • Let the cake rest in the pan for 10 minutes.

  • Run a knife around the edges.

  • Turn out onto a wire rack and allow to cool completely before slicing or frosting.


Helpful Tips

  • Room-temperature eggs blend more easily into the batter

  • Coffee powder is optional and does not create a coffee flavor

  • For a lighter finish, dust with powdered sugar

  • For a richer dessert, serve with chocolate sauce or fresh fruit


Storage

  • Store at room temperature for 2 days in an airtight container

  • Refrigerate for up to 5 days

  • Can be frozen (wrapped well) for up to 1 month

Quick Coconut Loaf Cake

Quick Coconut Loaf Cake

A soft, buttery loaf with a rich coconut flavor

This coconut loaf cake comes together quickly using simple pantry ingredients. It has a tender, slightly dense crumb and a gentle coconut aroma, making it a lovely choice for tea time, breakfast, or a light dessert.


Ingredients

Cake Batter

  • Granulated sugar — 175 g (¾ cup + 2 tablespoons)

  • Unsalted butter — 110 g (½ cup), softened to room temperature

  • Vegetable oil — 30 ml (2 tablespoons)

  • Eggs — 2 large, room temperature

  • All-purpose flour — 190 g (1½ cups)

  • Baking powder — 1 teaspoon

  • Desiccated coconut — ½ cup

  • Milk or coconut milk — 60 ml (¼ cup)

  • Vanilla extract — 1 teaspoon


For the Pan

  • Butter or oil for greasing

  • Extra desiccated coconut for coating the pan


Step-by-Step Instructions

1. Prepare the Oven and Pan

  • Preheat the oven to 175°C (350°F).

  • Grease a standard loaf pan with butter or oil.

  • Sprinkle desiccated coconut evenly over the greased pan, tilting and tapping to coat the bottom and sides.

    • This adds texture and a lightly toasted coconut layer on the outside of the cake.


2. Cream the Butter and Sugar

  • In a large mixing bowl, add the softened butter and sugar.

  • Beat together for 2–3 minutes until the mixture looks pale and creamy.

  • Add the vegetable oil and vanilla extract.

  • Mix until fully combined.


3. Add the Eggs

  • Add the eggs one at a time, mixing well after each addition.

  • The batter should look smooth and well blended.


4. Combine Dry Ingredients

  • In a separate bowl, whisk together:

    • Flour

    • Baking powder


5. Make the Batter

  • Add half of the dry ingredients to the butter mixture and mix gently.

  • Pour in the milk or coconut milk and mix until incorporated.

  • Add the remaining dry ingredients and the ½ cup desiccated coconut.

  • Fold gently with a spatula until just combined.

    • Avoid overmixing to keep the loaf soft.


6. Bake

  • Pour the batter into the prepared loaf pan.

  • Smooth the top evenly.

  • Bake for 40–45 minutes, or until a toothpick inserted in the center comes out clean.


7. Cool

  • Remove the cake from the oven.

  • Let it cool in the pan for 10 minutes.

  • Transfer to a wire rack to cool completely before slicing.


Optional Finishing Touch

  • While the cake is still warm, lightly brush the top with a small amount of milk or coconut milk for added softness and shine.


Helpful Tips

  • Room-temperature ingredients help create a smooth batter

  • Coconut milk gives a deeper coconut flavor, while regular milk keeps it lighter

  • If the top browns too quickly, loosely cover with foil during the last 10 minutes


Storage

  • Store at room temperature for 2–3 days in an airtight container

  • Refrigerate for up to 5 days

  • Can be frozen (wrapped well) for up to 1 month

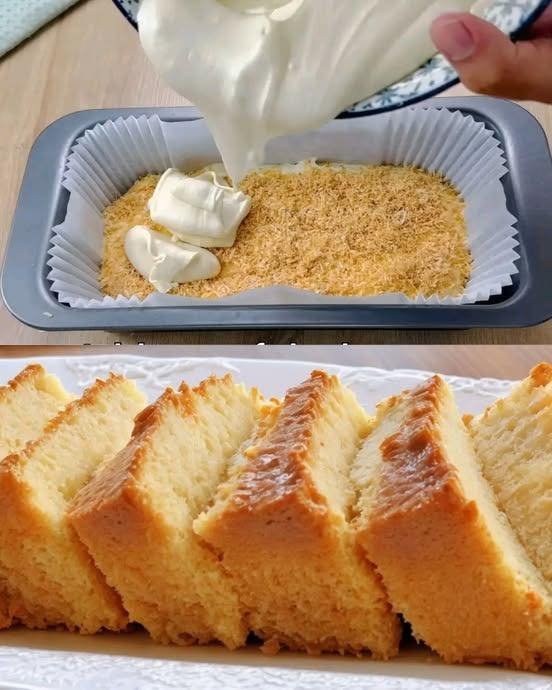
Butter Castella Cake Recipe

🍰 Butter Castella Cake Recipe

Ingredients (for one 8-inch loaf pan or a small square pan)

  • 1 cup (120 g) cake flour
    (You can use all-purpose flour sifted 2–3 times for extra lightness.)
  • 6 large eggs, at room temperature
  • ¾ cup (150 g) granulated sugar
  • 3 tbsp (45 ml) honey (or golden syrup)
  • 4 tbsp (60 g) unsalted butter, melted
  • 3 tbsp (45 ml) whole milk, warmed
  • 1 tsp vanilla extract

Instructions

1. Prepare the Pan and Oven

  • Preheat oven to 325°F (160°C).
  • Line your baking pan with parchment paper, leaving some extra on the sides so the cake can be lifted out easily after baking.
  • In a small bowl, mix the warm milk, melted butter, and honey. Set aside.

2. Beat Eggs and Sugar

  • In a heatproof bowl, combine eggs and sugar.
  • Place the bowl over a pot of simmering water (double boiler style).
  • Whisk constantly until the mixture is warm to the touch and the sugar granules have dissolved.
  • Remove from heat and beat using an electric mixer on high speed for about 5–7 minutes, until the mixture becomes pale, thick, and tripled in volume.

3. Fold in the Flour

  • Sift the cake flour in 2–3 additions into the whipped egg mixture.
  • Gently fold with a spatula each time, being careful not to deflate the airy batter.

4. Add Flavoring

  • Pour in the butter-milk-honey mixture and vanilla extract.
  • Fold gently until just combined. Avoid overmixing — this keeps the cake soft and fluffy.

5. Bake the Cake

  • Pour the batter into the prepared pan and tap lightly to remove large air bubbles.
  • Bake for 35–45 minutes, or until the top is golden brown and a skewer inserted in the center comes out clean.

6. Cool and Set

  • Remove the cake from the oven and, while still warm, cover the top with plastic wrap to retain moisture.
  • Once completely cooled, wrap the entire cake in plastic wrap and refrigerate overnight.
    This resting time gives the Castella its signature moist, dense, and slightly sticky texture.
  • Slice into thick pieces and serve at room temperature.

Tips & Variations

  • For a chewier texture, substitute bread flour for cake flour.
  • For a different flavor, replace honey with maple syrup or golden syrup.
  • For Matcha Castella, add 1–2 tsp of matcha powder when sifting the flour.
  • To ensure even baking, place the pan on the middle rack and avoid opening the oven during the first 30 minutes.

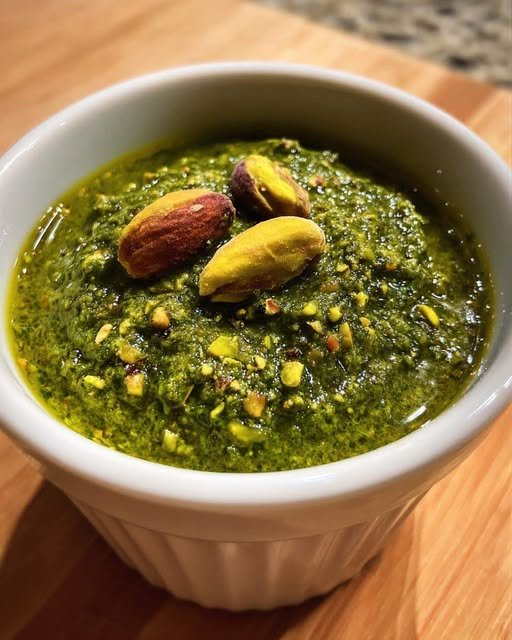
Pistachio Pesto

Pistachio Pesto

A creamy, nut-forward pesto that clings perfectly to pasta and doubles as a luxurious spread for sandwiches or grilled meats.

  • Prep time: 10 minutes

  • Cook time: 3 minutes (for toasting)

  • Total time: 13 minutes

  • Yield: Approximately 1 ½ cups

Ingredients

  • 1 cup shelled pistachios (no shells)

  • 2 cups fresh basil leaves, firmly packed

  • ½ cup extra virgin olive oil (high quality is best)

  • ½ cup grated Parmesan cheese (freshly grated is preferred)

  • 2 cloves garlic, peeled

  • ½ tsp salt (adjust to taste)

  • ¼ tsp black pepper (freshly cracked)

Instructions

  1. Toast the Nuts: Toss the shelled pistachios in a dry pan over medium heat for 2–3 minutes. Stir constantly until they are fragrant and smell heavenly; be careful as they can burn quickly.

  2. Combine the Base: In a food processor, combine the toasted pistachios, fresh basil, grated Parmesan, and garlic cloves.

  3. Pulse: Pulse the mixture until it reaches the consistency of coarse sand. Use a spatula to scrape down the sides of the bowl to ensure everything is evenly incorporated.

  4. Emulsify with Oil: Turn the processor back on and slowly drizzle the olive oil through the feed tube while it is running. This slow process helps create a smooth emulsion.

  5. Season: Add the salt and black pepper. Pulse a few more times to blend and achieve your desired texture—leave it slightly chunky for a rustic feel or process longer for a smooth paste.

  6. Taste Test: Try a spoonful and adjust the salt or oil if needed until it reaches your preference.


Pro-Tips & Substitutions

  • The Golden Rule: Never skip toasting the nuts; it is essential for unlocking the warm, buttery flavor.

  • Fixing Texture: If the pesto is too thick, drizzle in more olive oil. If it starts to separate, stir in a teaspoon of ice water to help it emulsify and “come back together”.

  • Swaps: If you run out of basil, you can use half baby spinach or arugula, though the color may be less vibrant. For a vegan version, substitute nutritional yeast for the Parmesan.

Storage Guidelines

  • Refrigerate: Keep in an airtight container for up to 5 days. To maintain the bright green color, pour a thin layer of olive oil over the top before sealing.

  • Freeze: Freeze in ice cube trays for up to 3 months. These “pesto cubes” can be tossed directly into hot pasta for a quick meal.

Knead Garlic Herb Bread

No-Knead Garlic Herb Dutch Oven Bread

A rustic, artisan-style loaf with a crackling crust and a soft, pillowy interior infused with fresh garlic.

  • Prep time: 10 minutes

  • Rise time: 8–12 hours (overnight)

  • Cook time: 45–50 minutes

  • Total time: ~13 hours

Ingredients

  • 500 g (approx. 4 cups) All-purpose flour

  • 1 packet (7 g) Dry active yeast

  • 2 tsp Salt

  • 3 cloves Fresh garlic, finely chopped

  • 1 tsp Dried rosemary or thyme (optional, for extra aroma)

  • 350 ml Warm water (approx. 105°F–110°F; not hot to the touch)

  • 2 tbsp Olive oil

Instructions

1. Mix the Dough

In a large mixing bowl, whisk together the flour, yeast, salt, chopped garlic, and optional herbs. Pour in the warm water and olive oil. Using a wooden spoon or spatula, mix until a shaggy, sticky dough forms and no dry flour remains. Do not be tempted to add more flour; the stickiness is what creates the airy crumb!

2. The Long Rise

Cover the bowl tightly with plastic wrap or a damp kitchen towel. Leave it on your counter at room temperature for 8 to 12 hours. The dough is ready when it has doubled in size and the surface is dotted with tiny bubbles.

3. Shape and Second Proof

Lightly flour a work surface and your hands. Gently turn the dough out. Do not knead. Simply fold the edges toward the center a few times to create a rough ball shape. Place the dough onto a sheet of parchment paper, cover loosely, and let it rest for 30–45 minutes.

4. Preheat the “Bakery.”

While the dough rests, place a Dutch oven (or a heavy-lidded pot) into the oven. Preheat the oven to 220°C (425°F) with the pot inside. Heating the pot is essential for creating the steam needed for a golden, crispy crust.

5. Bake

Carefully remove the hot pot from the oven. Using the parchment paper as a sling, lift the dough and drop it (paper and all) into the pot.

  • Step A: Cover with the lid and bake for 30 minutes.

  • Step B: Remove the lid and bake for another 15–20 minutes until the crust is a deep, burnished gold.

6. The Cool Down

Lift the bread out of the pot and transfer it to a wire rack. Wait at least 20 minutes before slicing. If you cut it too soon, the steam escapes and the bread can become gummy!


Flavor Variations to Try

  • The Cheesy Garlic: Fold in ½ cup of grated sharp cheddar or Gruyère during the initial mixing phase.

  • The Mediterranean: Swap the garlic for ¼ cup of chopped sun-dried tomatoes and a tablespoon of dried oregano.

  • The Spicy Kick: Add 1 teaspoon of red pepper flakes to the dry ingredients for a subtle heat that pairs perfectly with the garlic.

Storage Tip

Store leftovers in a paper bag at room temperature for up to 2 days for the best crust. If you need to store it longer, slice it and freeze it in a zip-top bag; it toasts up beautifully straight from the freezer!