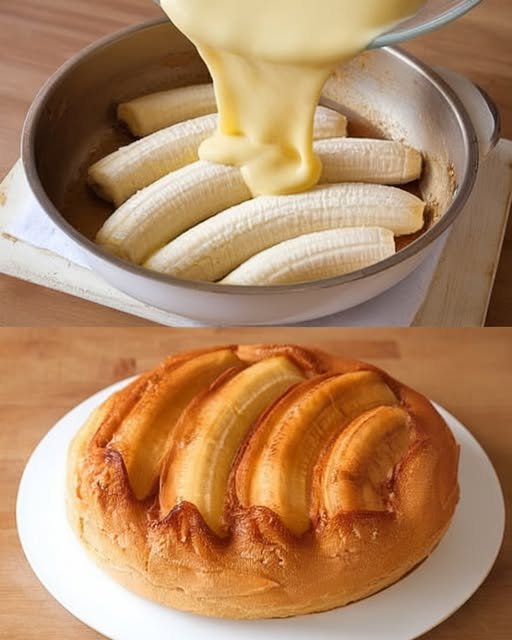
๐ŸŒ Upside-Down Banana Cake

๐ŸŒ Upside-Down Banana Cake

A fluffy, golden sponge with a caramelized banana topping, made entirely in one pan.

  • Prep time: 10 minutes

  • Cook time: 30โ€“35 minutes

  • Yields: 6โ€“8 servings

Ingredients

For the Caramelized Topping:

  • 10 g Unsalted butter

  • 15 g (1 1/2 tbsp) Raw or regular sugar

  • 2 Ripe bananas, halved lengthwise

For the Cake Batter:

  • 1 Egg

  • 60 g (6 tbsp) Sugar

  • 130 ml Milk

  • 2 g (1/2 tsp) Salt

  • 1 tsp Vanilla extract

  • 150 g (1 1/4 cups) Cake flour or all-purpose flour

  • 5 g (2/3 tbsp) Baking powder

  • 50 ml vegetable oil


Instructions

  1. Prepare the Pan: In a non-stick skillet over low heat, melt the 10 gย of butter. Sprinkle the 15 gย of sugar evenly over the butter. Arrange the halved bananas cut-side down in the pan. Turn off the heat and set aside.

  2. Mix the Wet Ingredients: In a medium mixing bowl, whisk the egg and 60 gย of sugar together until well combined. Stir in the milk, salt, and vanilla extract.

  3. Incorporate the Dry Ingredients: Sift the flour and baking powder into the wet mixture. Whisk until the batter is smooth.

  4. Add the Oil: Pour in the vegetable oil and whisk gently until fully incorporated and the batter is glossy.

  5. Pour and Cook: Pour the batter over the bananas in the skillet, spreading it evenly to the edges.

  6. The Stovetop Bake: Cover the pan with a lid. Cook over very low heat for about 15โ€“20 minutes. The top of the cake should be set and not sticky to the touch.

  7. Flip: Carefully flip the cake (you can use a plate to help) and cook the other side for an additional 5 minutes until golden brown.

  8. Serve: Transfer to a plate, caramelized banana side up. Serve warm.


๐Ÿ’ก Why This Recipe Works

  • The Skillet Method: By cooking this on the stove, you create a direct caramelization on the bananas that is harder to achieve in a traditional oven without extra steps.

  • Low Sugar: Similar to your Sugar-Free Strawberry Cheesecake, this recipe uses a relatively small amount of added sugar, relying on the natural sweetness of the ripe bananas.
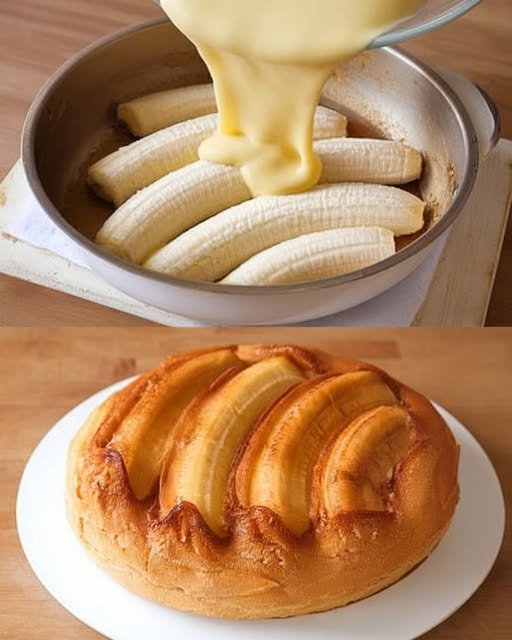
๐ŸŒ Upside-Down Banana Cake

๐ŸŒ Upside-Down Banana Cake

A fluffy, golden sponge with a caramelized banana topping, made entirely in one pan.

  • Prep time: 10 minutes

  • Cook time: 30โ€“35 minutes

  • Yields: 6โ€“8 servings

Ingredients

For the Caramelized Topping:

  • 10 g Unsalted butter

  • 15 g (1 1/2 tbsp) Raw or regular sugar

  • 2 Ripe bananas, halved lengthwise

For the Cake Batter:

  • 1 Egg

  • 60 g (6 tbsp) Sugar

  • 130 ml Milk

  • 2 g (1/2 tsp) Salt

  • 1 tsp Vanilla extract

  • 150 g (1 1/4 cups) Cake flour or all-purpose flour

  • 5 g (2/3 tbsp) Baking powder

  • 50 ml vegetable oil


Instructions

  1. Prepare the Pan: In a non-stick skillet over low heat, melt the 10 gย of butter. Sprinkle the 15 gย of sugar evenly over the butter. Arrange the halved bananas cut-side down in the pan. Turn off the heat and set aside.

  2. Mix the Wet Ingredients: In a medium mixing bowl, whisk the egg and 60 gย of sugar together until well combined. Stir in the milk, salt, and vanilla extract.

  3. Incorporate the Dry Ingredients: Sift the flour and baking powder into the wet mixture. Whisk until the batter is smooth.

  4. Add the Oil: Pour in the vegetable oil and whisk gently until fully incorporated and the batter is glossy.

  5. Pour and Cook: Pour the batter over the bananas in the skillet, spreading it evenly to the edges.

  6. The Stovetop Bake: Cover the pan with a lid. Cook over very low heat for about 15โ€“20 minutes. The top of the cake should be set and not sticky to the touch.

  7. Flip: Carefully flip the cake (you can use a plate to help) and cook the other side for an additional 5 minutes until golden brown.

  8. Serve: Transfer to a plate, caramelized banana side up. Serve warm.


๐Ÿ’ก Why This Recipe Works

  • The Skillet Method: By cooking this on the stove, you create a direct caramelization on the bananas that is harder to achieve in a traditional oven without extra steps.

  • Low Sugar: Similar to your Sugar-Free Strawberry Cheesecake, this recipe uses a relatively small amount of added sugar, relying on the natural sweetness of the ripe bananas.
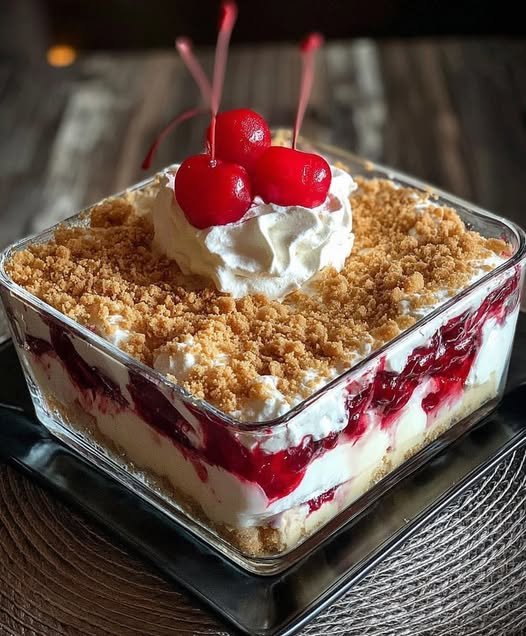
๐Ÿ’ Cherry Cheesecake Lush

๐Ÿ’ Cherry Cheesecake Lush

A decadent, layered “no-stress” dessert featuring a nutty crust, creamy cheesecake pudding, and vibrant cherry topping.

  • Prep time: 20 minutes

  • Bake time: 15 minutes

  • Chill time: 4+ hours

  • Yields: 12โ€“15 servings

Ingredients

The Nutty Crust:

  • 1 cup Vanilla Wafer crumbs

  • 1 cup Pecans, finely chopped

  • 1 stick (1/2 cup) Butter, melted

The Creamy Layers:

  • 8 oz Cream Cheese, softened

  • 1 cup Powdered sugar

  • 16 oz Whipped topping (like Cool Whip), divided

  • 2 boxes (small) Cheesecake-flavored instant pudding

  • 3 cups Milk

The Topping:

  • 1 can (21 oz) Cherry pie filling

  • 1/2 cup Pecans, chopped (for garnish)


Instructions

  1. Prepare the Base: Preheat your oven to 350ยฐF. In a medium bowl, combine the vanilla wafer crumbs, finely chopped pecans, and melted butter. Press the mixture firmly into the bottom of a 9×13 inch baking pan.

  2. Bake and Cool: Bake the crust for 15 minutes. Remove from the oven and let it cool completely. This is crucial to prevent your layers from melting!

  3. The Cheesecake Layer: In a separate bowl, beat the softened cream cheese and powdered sugar until smooth. Fold in 1 ยฝ cups of the whipped topping. Spread this evenly over the cooled crust.

  4. The Pudding Layer: In another bowl, whisk together the two boxes of cheesecake pudding mix, the milk, and 1 cup of whipped topping until thickened and smooth. Layer this carefully over the cream cheese mixture.

  5. The Cherry Finish: Gently spread the cherry pie filling over the pudding layer.

  6. Final Flourish: Top the cherries with the remaining whipped topping and sprinkle the 1/2 cup of chopped pecans over the top.

  7. The Big Chill: Refrigerate for at least 4 hours, though overnight is best to let the layers set firmly for those perfect, clean slices.


Pro-Tips for Success

  • Soften the Cheese: Ensure your cream cheese is truly at room temperature to avoid tiny white lumps in your “lush” layer.

  • Clean Slices: Wipe your knife with a warm, damp cloth between each cut to keep the layers looking sharp and professional.

  • Twist it up: As you mentioned, you can easily swap the cherries for blueberries or even lemon curd for a citrusy version!

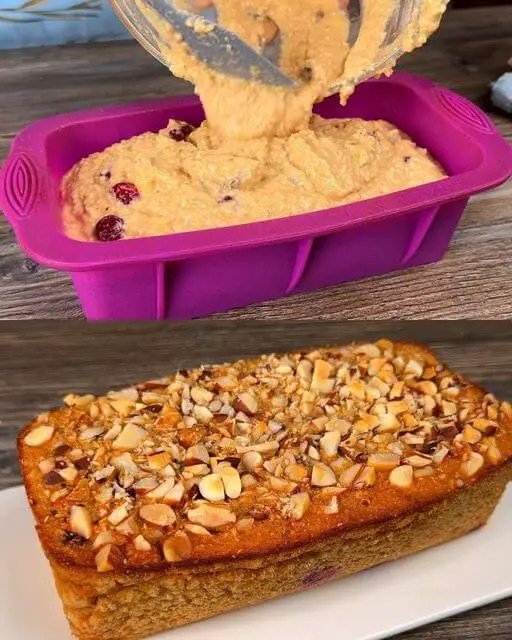
Apple & Banana Oatmeal Breakfast Loaf

Apple & Banana Oatmeal Breakfast Loaf

A moist, naturally sweet loaf perfect for breakfast or a snack

This wholesome breakfast loaf combines the fiber of oats with the natural sweetness of apples and banana. Raisins, cherries, and a crunchy nut topping make it a satisfying treat for mornings or anytime you want a nutritious snack.


Recipe Overview

  • Prep Time:ย 15 minutes

  • Bake Time:ย 45โ€“50 minutes

  • Total Time:ย About 1 hour 5 minutes

  • Yield:ย 1 loaf


Ingredients

  • 1 cup (100 g) rolled oats or oatmeal

  • 2 medium apples, peeled and grated

  • 1 ripe banana, mashed

  • 2 large eggs

  • 100โ€“120 ml water

  • 100 g raisins (or sultanas)

  • 100 g pitted cherries

  • 1 teaspoon baking powder

  • 50 g Brazil nuts, chopped (for topping)

  • Vegetable oil (for greasing the pan)


Step-by-Step Instructions

1. Hydrate the Oats

  • In a large mixing bowl, combine the oats with 100โ€“120 ml of water.

  • Let the mixture sit forย about 10 minutesย so the oats soften and absorb moisture.


2. Prepare the Fruit

  • Peel and grate the apples.

  • In a small bowl, mash the banana with a fork until smooth.


3. Mix the Batter

  • Add the mashed banana and eggs to the soaked oatmeal. Whisk together until fully incorporated.

  • Stir in the grated apples, raisins, and cherries. Mix gently to combine.


4. Add Baking Powder

  • Sprinkle the baking powder over the mixture.

  • Fold everything together carefully with a spatula until evenly distributed. Avoid overmixing, which can make the loaf dense.


5. Prepare the Pan

  • Preheat your oven toย 350ยฐF (180ยฐC).

  • Grease aย loaf panย with vegetable oil.

  • Optional: Line a standard metal pan with parchment paper for easier removal.


6. Top and Bake

  • Pour the batter into the prepared pan and smooth the surface.

  • Evenly sprinkle the chopped Brazil nuts on top.

  • Bake forย 45โ€“50 minutes, or until the loaf is golden brown and a toothpick inserted into the center comes out clean.


7. Cool and Serve

  • Allow the loaf to cool in the pan forย at least 10 minutes.

  • Remove from the pan and slice.

  • Serve warm or at room temperature.


Tips for Success

  • Smoother texture:ย Pulse the oats in a blender for a few seconds before hydrating to create a finer, cake-like crumb.

  • Storage:ย Store leftovers in an airtight container in the refrigerator forย 3โ€“4 days.

  • Nut swaps:ย Use walnuts, almonds, or pecans instead of Brazil nuts for a different flavor.

  • Optional additions:ย Add a pinch of cinnamon or nutmeg for extra warmth, or a handful of sunflower seeds for extra texture.

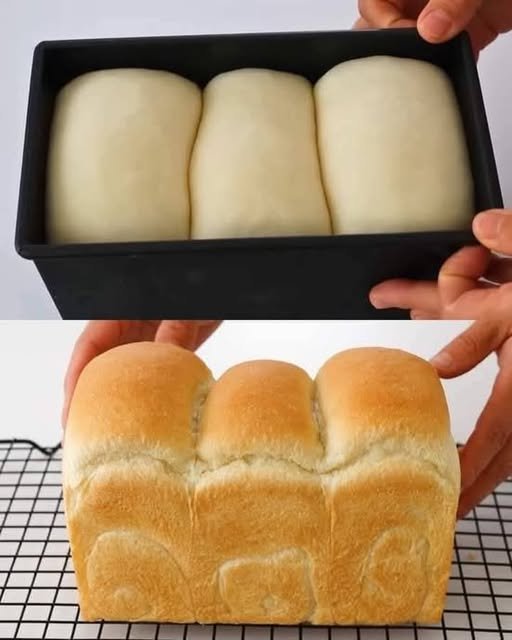
Simple No-Knead Homemade Bread

Simple No-Knead Homemade Bread

A soft, everyday loaf made with basic pantry ingredients and minimal handling.


Preparation Overview

  • Preparation time: 10 minutes

  • First resting time: 1ยฝโ€“2 hours

  • Second resting time: 30โ€“45 minutes

  • Baking time: 25โ€“30 minutes

  • Cooling time: 20 minutes

  • Total time: About 3 hours

Yield

  • Makes 1 standard loaf


Ingredients

  • 200 ml warm water (comfortably warm, not hot)

  • 25 g sugar (about 2 tablespoons)

  • 3 g active dry yeast (about 1 teaspoon)

  • 300 g bread flour or all-purpose wheat flour (about 2 cups)

  • 3 g salt (about ยฝ teaspoon)

  • 20 g olive oil (about 2 tablespoons)


Step-by-Step Instructions

1. Prepare the Yeast Mixture

Pour the warm water into a large mixing bowl. Add the sugar and yeast, then stir gently until dissolved.

Let the mixture stand for about 5 minutes. A light foam on the surface indicates the yeast is ready to use.


2. Mix the Dough

Add the olive oil and salt to the yeast mixture and stir briefly.

Gradually add the flour, mixing with a spoon or spatula until all the flour is evenly moistened.

The dough will look soft and sticky, which is expected. Ensure there are no dry patches of flour.


3. First Resting Period

Cover the bowl with a clean kitchen towel or lid.

Place it in a warm, draft-free area and let the dough rest for 1ยฝ to 2 hours, or until it has noticeably increased in volume.


4. Shape the Dough

Lightly coat your hands with a small amount of oil.

Gently press down the dough to release excess air.

Divide the dough into three equal portions and shape each portion into a smooth ball or short log.

Place the pieces side by side into a lightly greased loaf pan.


5. Second Resting Period

Cover the loaf pan and let the dough rest for 30โ€“45 minutes.

During this time, the dough should rise and fill the pan evenly.


6. Bake

Preheat the oven to 180ยฐC (350ยฐF).

If desired, lightly brush the surface of the dough with a little milk or water for an even finish.

Bake for 25โ€“30 minutes, until the top is lightly browned and the loaf is fully baked.


7. Cool

Remove the bread from the pan and place it on a wire rack.

For a softer surface, you may lightly brush the top with a small amount of olive oil while the bread is warm.

Allow the bread to cool for at least 20 minutes before slicing. This helps maintain the structure of the loaf.


Serving Suggestions

  • Slice and serve with butter, jam, or cheese

  • Suitable for sandwiches or toast

  • Enjoy warm or at room temperature


Storage

  • Store wrapped at room temperature for up to 2 days

  • Refrigeration is not recommended, as it may affect texture

  • Can be frozen once cooled and sliced


Helpful Notes

  • Longer resting times help improve texture

  • Avoid adding extra flour, as the dough should remain soft

  • Suitable for loaf pans or free-form shaping

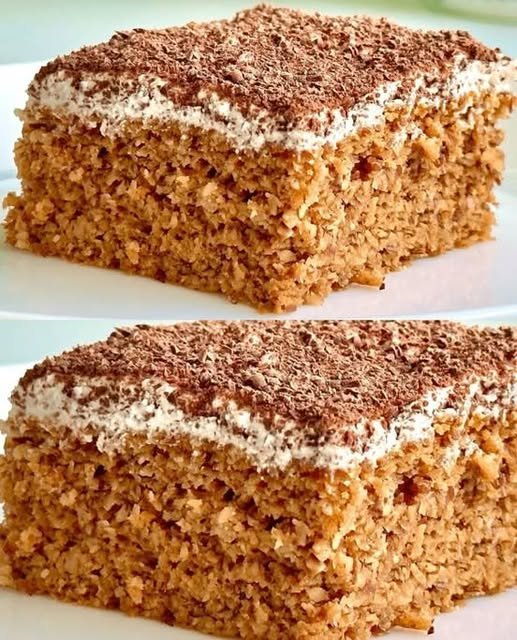
Flourless Almond Carrot Cake (Low-Carb Style)

Flourless Almond Carrot Cake (Low-Carb Style)

A naturally sweetened cake made without wheat flour, using ground almonds and fresh carrots for a moist, gently textured result.


Preparation Overview

  • Preparation time: 15 minutes

  • Baking time: 30โ€“35 minutes

  • Cooling time: 30 minutes

  • Total time: About 1 hour 20 minutes

Yield

  • Makes 8โ€“10 small slices


Ingredients

Base Ingredients

  • 200 g carrots, peeled and finely grated

  • 200 g ground almonds (almond flour)

Wet Ingredients

  • 2 large eggs (room temperature)

  • 2โ€“3 tablespoons honey (adjust to taste)

Leavening & Flavoring

  • 1 teaspoon baking soda

  • 2โ€“3 drops mild vinegar (such as wine or apple vinegar)

  • A small pinch of ground cinnamon

  • A small pinch of salt

Optional Topping

  • Low-fat Greek yogurt or cream cheese, lightly sweetened with honey

  • A light dusting of cocoa powder or finely grated dark chocolate


Step-by-Step Instructions

1. Prepare the Carrots

Peel and finely grate the carrots using a fine grater.

If the carrots release a lot of liquid, gently press them with a paper towel or clean cloth to remove excess moisture. This helps maintain a balanced texture in the finished cake.

Set aside.


2. Mix the Wet Ingredients

In a large mixing bowl, crack in the eggs. Add the honey and salt.

Whisk until the mixture looks smooth and slightly airy. This helps distribute the sweetness evenly throughout the batter.


3. Prepare the Leavening

In a small spoon or cup, combine the baking soda with the vinegar. The mixture will foam briefly.

Immediately add this mixture to the egg mixture and stir gently until combined.


4. Combine All Ingredients

Add the grated carrots and cinnamon to the bowl with the egg mixture. Stir gently.

Gradually fold in the ground almonds, mixing slowly until everything is evenly combined.

The batter should be thick but spreadable. The almonds will absorb moisture as the mixture rests.


5. Prepare for Baking

Preheat the oven to 180ยฐC (350ยฐF).

Line a small square or rectangular baking dish with parchment paper, or lightly grease it.

Transfer the batter into the prepared dish and smooth the surface with a spatula.


6. Bake

Place the dish on the middle rack of the oven.

Bake for 30โ€“35 minutes, or until:

  • The top looks lightly golden

  • A wooden skewer inserted into the center comes out clean

If the top browns too quickly, loosely cover with parchment paper for the remaining baking time.


7. Cooling and Finishing

Remove the cake from the oven and allow it to cool completely in the pan.

Once cooled, spread a thin layer of sweetened Greek yogurt or cream cheese on top, if desired.

Finish with a light sprinkle of cocoa powder, cinnamon, or finely grated dark chocolate.


Serving Suggestions

  • Slice and serve at room temperature or chilled

  • Pairs well with herbal tea, coffee, or almond milk

  • Suitable as a light dessert or afternoon snack


Storage

  • Store covered in the refrigerator for up to 3 days

  • Bring to room temperature before serving for best texture


Optional Notes

  • Honey can be adjusted based on preference

  • Cinnamon may be replaced or combined with nutmeg

  • The cake has a naturally dense texture due to the almond base