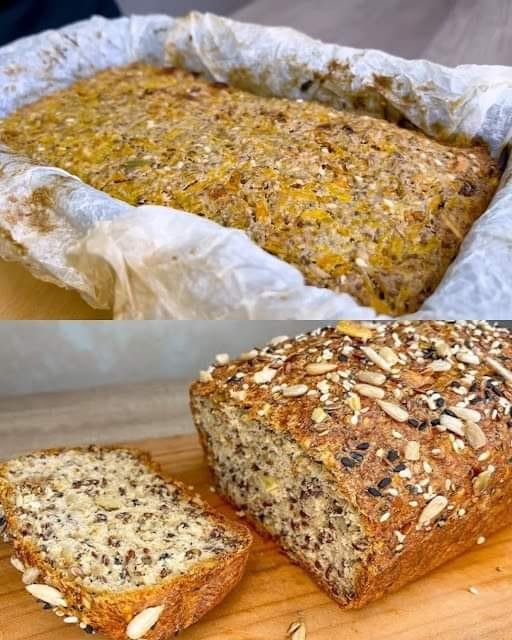
Quick Oatmeal Breakfast Bread with Pumpkin & Nuts

Quick Oatmeal Breakfast Bread with Pumpkin & Nuts

Soft • Nourishing • Naturally Flavorful

Preparation Time

  • Prep: 15 minutes

  • Bake: 40–45 minutes

  • Servings: 1 medium loaf (8–10 slices)


Ingredients

  • 1 cup oatmeal (rolled oats or quick oats)

  • 1 glass warm water (200–250 ml)

  • ½ pumpkin (about 400 g), peeled and grated or finely chopped

  • 1 tablespoon sweetener (optional, to taste)

  • 1 teaspoon cinnamon (optional)

  • A pinch of salt

  • 3 tablespoons vegetable oil (optional, for extra softness)

  • 1 tablespoon sesame seeds

  • 5–6 dried apricots, rinsed and soaked in hot water, then finely chopped

  • 1 tablespoon chia seeds

  • 1–2 tablespoons finely chopped nuts (walnuts, almonds, or pecans)

  • 2 tablespoons mixed nuts, seeds, and dried fruits (for topping or inside)

  • 1 teaspoon baking powder

  • Parchment paper for lining the pan


Step-by-Step Instructions

1. Prepare the Oats

Place the oatmeal in a mixing bowl.
Pour the warm water over the oats, stir well, and let them soak for 10 minutes until soft and slightly thick.


2. Prepare the Pumpkin

Grate or finely chop the pumpkin.
If it contains excess moisture, gently squeeze it with your hands to remove extra liquid.


3. Combine the Base

Add the pumpkin to the soaked oats.
Mix in:

  • Sweetener (if using)

  • Cinnamon (if using)

  • Salt

  • Vegetable oil (optional)

Stir until evenly combined.


4. Add Fruits, Nuts & Seeds

Fold in:

  • Chopped dried apricots

  • Chia seeds

  • Chopped nuts

  • Mixed nuts, seeds, and dried fruits

Mix gently so everything is evenly distributed.


5. Add the Leavening

Sprinkle in the baking powder and stir just until combined.
Do not overmix.


6. Prepare for Baking

Preheat oven to 180°C (350°F).
Line a loaf pan with parchment paper.

Pour the batter into the pan and smooth the top.
Sprinkle sesame seeds evenly over the surface.


7. Bake

Bake for 40–45 minutes, or until:

  • The top is golden

  • A toothpick inserted in the center comes out clean


8. Cool & Serve

Remove from oven and allow the bread to cool in the pan for 10–15 minutes.
Lift out using the parchment paper and cool completely before slicing.


Serving Suggestions

  • Enjoy warm with yogurt, honey, or nut butter

  • Perfect for breakfast, snack time, or lunchbox slices

  • Stores well in the refrigerator for up to 4 days
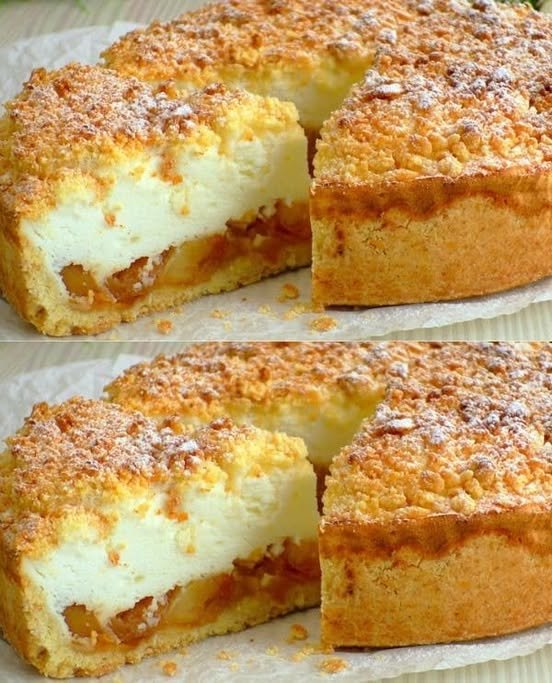
Apple Pie with Light Vanilla Cream

Apple Pie with Light Vanilla Cream

Tender Pastry • Fruity Layers • Smooth Creamy Finish

This delightful apple pie combines a soft, buttery pastry base, gently spiced apples, and a light vanilla cream topping that bakes into a beautifully set, airy layer. It’s a comforting dessert that’s perfect for sharing.


Ingredients

Pastry Dough

  • 250 g all-purpose flour

  • 1 teaspoon baking powder

  • 90 g butter, chilled and cut into small cubes

  • A small pinch of salt

  • 2 egg yolks

  • 40 g granulated sugar


Apple Layer

  • 3–4 large apples, peeled and thinly sliced

  • 1 teaspoon ground cinnamon

  • 1 tablespoon fresh lemon juice


Vanilla Cream Filling

  • 400 g sour cream or Greek yogurt

  • 2 egg whites (from the separated eggs)

  • 80 g granulated sugar

  • 1 packet vanilla pudding mix (about 40 g)
    or

  • 40 g cornstarch


Step-by-Step Instructions


1. Prepare the Pastry Dough

  • In a large bowl, mix the flour, baking powder, sugar, and salt

  • Add the chilled butter and gently rub it into the flour using your fingertips or a pastry cutter until the mixture looks crumbly

  • Add the egg yolks and mix until a soft dough forms

  • Divide the dough into two portions:

    • About ⅔ for the base

    • About ⅓ for the topping

  • Wrap both portions and place the smaller piece in the freezer for 30 minutes to make shaping easier later


2. Prepare the Base

  • Heat the oven to 180°C (350°F)

  • Lightly grease a 20 cm (8-inch) springform pan

  • Take the larger dough portion and gently press it into the bottom of the pan

  • Extend it slightly up the sides to form a neat border


3. Add the Apple Layer

  • In a bowl, combine the apple slices, cinnamon, and lemon juice

  • Arrange the apples evenly over the pastry base


4. Make the Vanilla Cream Filling

  • In a clean bowl, whisk the egg whites until they become light and foamy

  • Gradually add the sugar, whisking until soft, glossy peaks form

  • In another bowl, mix the sour cream (or yogurt) with the vanilla pudding mix or cornstarch until smooth

  • Gently fold the whipped egg whites into the cream mixture in batches, keeping the texture light

  • Pour the cream evenly over the apple layer


5. Add the Crumb Topping

  • Remove the smaller dough portion from the freezer

  • Using a coarse grater, grate the dough evenly over the cream layer until fully covered


6. Bake

  • Place the pie in the center of the oven

  • Bake for 40–45 minutes, until the top is lightly golden and the filling looks set


7. Cool and Serve

  • Let the pie cool completely in the pan

  • This resting time allows the layers to settle beautifully

  • Once cooled, remove from the pan

  • Lightly dust the top with powdered sugar before slicing


Helpful Notes

  • Texture Harmony: The combination of tender pastry, soft apples, and smooth cream creates a lovely balance

  • Best Serving: Chill slightly before slicing for clean, neat portions

  • Storage: Keeps well refrigerated for up to 3 days

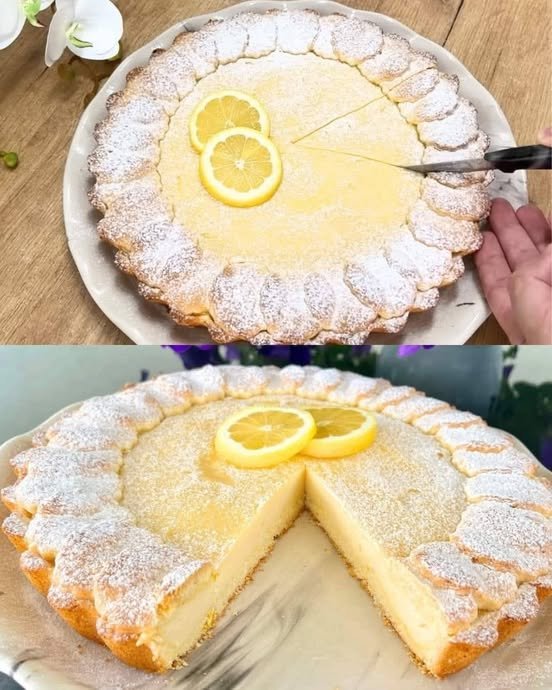
Classic Italian Creamy Lemon Cake

Classic Italian Creamy Lemon Cake

Smooth • Bright • Delicately Sweet

This traditional Italian-style lemon cake combines a tender pastry with a silky lemon cream filling. The fresh citrus flavor and soft texture make it perfect for serving chilled as a light dessert.


Ingredients

Silky Lemon Cream Filling

  • 500 ml milk (about 2 cups)

  • 2 large eggs, at room temperature

  • 6 tablespoons granulated sugar

  • 4 tablespoons cornstarch

  • 80 g mascarpone or cream cheese, softened

  • Zest of 1 lemon

  • Fresh juice of 1 lemon


Soft Shortcrust Pastry

  • 2 large eggs, at room temperature

  • 100 g granulated sugar (½ cup)

  • 100 ml vegetable oil or melted butter

  • 1 teaspoon vanilla extract

  • 350–380 g all-purpose flour, added gradually

  • 1 teaspoon baking powder


Step-by-Step Instructions


1. Prepare the Lemon Cream

  • In a medium saucepan, whisk together the eggs and sugar until smooth and pale

  • Add the cornstarch and whisk until fully blended

  • Slowly pour in the milk, whisking continuously to keep the mixture smooth

  • Place the saucepan over medium heat and stir gently until the cream thickens and becomes velvety

Once thickened:

  • Remove from heat

  • Stir in the mascarpone, lemon zest, and lemon juice until fully incorporated

  • Transfer the cream to a bowl

  • Cover the surface directly with wrap to maintain its smooth texture

  • Allow it to cool completely


2. Make the Pastry Dough

  • In a large bowl, whisk the eggs, sugar, oil (or butter), and vanilla until well combined

  • Add the flour and baking powder gradually

  • Mix gently until a soft, smooth dough forms

  • Divide the dough into two portions:

    • 2/3 for the base

    • 1/3 for the top decoration


3. Prepare the Base

  • Heat the oven to 180°C (350°F)

  • Lightly grease a tart pan or springform pan

  • Roll out the larger dough portion

  • Press it evenly into the base and up the sides of the pan

  • Pour the cooled lemon cream into the shell

  • Smooth the surface gently


4. Create the Decorative Top

  • Roll out the remaining dough

  • Cut small circles using a cookie cutter or glass rim

  • Arrange the circles slightly overlapping around the edges to form a decorative border

  • Leave the center open to showcase the lemon cream


5. Bake the Cake

  • Place the cake in the oven

  • Bake for 30–35 minutes, until the pastry turns lightly golden

  • Remove from the oven and allow it to cool at room temperature


6. Chill and Finish

  • Refrigerate the cake for at least 2 hours to allow the filling to set fully

  • Before serving, dust lightly with powdered sugar

  • Garnish with lemon slices or zest if desired


Serving Suggestions

  • Serve chilled for clean slices and best flavor

  • Pair with tea, espresso, or fresh berries

  • Ideal for special gatherings or relaxed family desserts


Helpful Notes

  • Smooth Filling: Mixing cornstarch thoroughly before heating keeps the cream silky

  • Flavor Balance: Fresh lemon zest enhances the aroma without overpowering

  • Storage: Keeps well refrigerated for up to 3 days

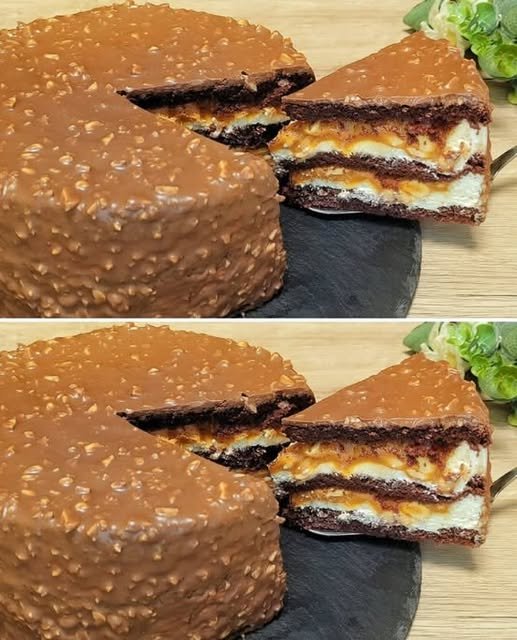
Chocolate Caramel Peanut Layer Cake

Chocolate Caramel Peanut Layer Cake

Soft • Creamy • Richly Flavored

This layered chocolate cake features tender cocoa sponge, a smooth caramel-peanut cream, and a glossy chocolate coating. The combination creates a balanced dessert with contrasting textures and deep, comforting flavors.


Ingredients

Chocolate Sponge Layers

  • 3 large eggs, at room temperature

  • 80 g granulated sugar (about ⅓ cup + 1 tbsp)

  • A small pinch of salt

  • 30 ml vegetable oil (2 tablespoons)

  • 50 ml milk (about 3½ tablespoons)

  • 80 g all-purpose flour (about ⅔ cup, sifted)

  • 20 g cocoa powder (about 2 tablespoons, sifted)

  • 1 teaspoon baking powder


Caramel Peanut Cream

  • 220 g granulated sugar (about 1 cup + 2 tbsp)

  • 100 g butter, cut into pieces

  • 160 g cream (30–36% fat, warmed slightly)

  • ½ teaspoon salt

  • 150 g roasted peanuts, roughly chopped


Optional Chocolate Coating (Recommended for Finish)

  • 200 g milk or semi-sweet chocolate

  • 1 tablespoon vegetable oil or butter

  • Optional: 2–3 tablespoons finely chopped peanuts


Step-by-Step Instructions


1. Prepare the Chocolate Sponge

Preheat & Prepare

  • Heat the oven to 170°C (340°F)

  • Line a 20–22 cm (8–9 inch) round pan with parchment paper

  • Lightly grease the sides


Mix the Batter

  • In a bowl, whisk the eggs, sugar, and salt for 3–4 minutes until pale and slightly fluffy

  • Add the oil and milk, whisking gently until smooth

In a separate bowl:

  • Combine flour, cocoa powder, and baking powder

  • Sift the dry ingredients into the egg mixture

  • Fold gently until just combined and smooth


Bake

  • Pour batter into the prepared pan

  • Smooth the top

  • Bake for 20–25 minutes, until the sponge springs back lightly when touched

  • Let cool completely, then slice horizontally into 2 or 3 even layers


2. Prepare the Caramel Peanut Cream

Make the Caramel

  • Place the sugar in a saucepan over medium heat

  • Allow it to melt gradually, swirling the pan gently until amber in color

Finish the Cream

  • Add the butter and stir until fully melted

  • Slowly pour in the warm cream, stirring continuously

  • Add the salt

  • Cook for 2–3 minutes until smooth and slightly thick

  • Remove from heat and stir in the roasted peanuts

Allow the caramel to cool until spreadable.


3. Assemble the Cake

  • Place one sponge layer on a serving plate

  • Spread an even layer of caramel peanut cream

  • Repeat with remaining layers

  • Lightly press to level the cake

  • Chill for 20–30 minutes to help it set


4. Add the Chocolate Coating (Optional)

  • Melt the chocolate and oil gently until smooth

  • Pour over the chilled cake

  • Smooth the sides and top

  • Sprinkle chopped peanuts if desired

  • Chill until the coating sets


5. Serve

  • Slice with a warm knife for clean layers

  • Serve slightly chilled or at room temperature

  • Enjoy with tea, coffee, or as a special dessert


Helpful Notes

  • Smooth Layers: Chill between steps for neat assembly

  • Flavor Balance: Salt enhances the caramel and chocolate beautifully

  • Storage: Keeps well refrigerated for up to 3 days

  • Texture Tip: Let the cake rest 10 minutes before slicing

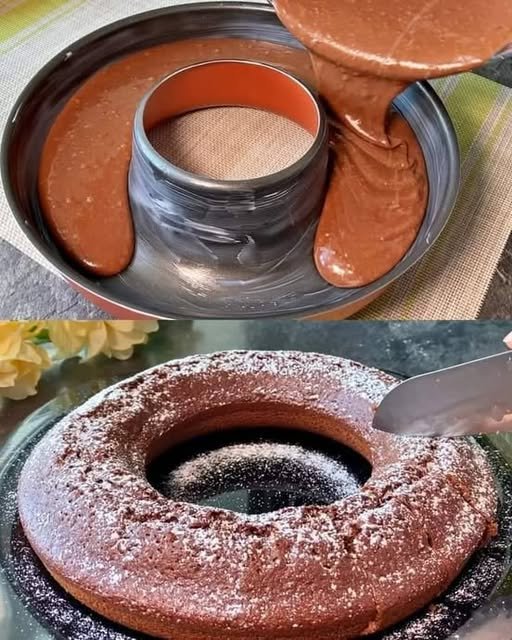
Simple & Moist 5-Minute Chocolate Cake

Simple & Moist 5-Minute Chocolate Cake

Soft • Fluffy • Comforting Homemade Cake

This easy chocolate cake comes together quickly using everyday ingredients. It bakes into a tender, moist sponge with a rich cocoa taste and a smooth crumb, making it ideal for casual gatherings or a relaxed homemade treat.


Ingredients

Cake Batter

  • 2 large eggs, at room temperature

  • 160 g granulated sugar (about ¾ cup)

  • 10 g vanilla sugar (or 1 teaspoon pure vanilla extract)

  • 2 tablespoons unsweetened cocoa powder

  • 160 ml milk (⅔ cup)

  • 100 ml vegetable oil (about 7 tablespoons; any neutral oil works)

  • A small pinch of salt

  • 170 g all-purpose flour (about 1⅓ cups, sifted)

  • 1 teaspoon baking powder

Optional Add-Ins & Finish

  • Chocolate chips or chunks (for extra texture)

  • Powdered sugar for a light decorative dusting


Step-by-Step Instructions

1. Prepare the Oven and Baking Dish

  • Heat your oven to 180°C (360°F)

  • Lightly coat a 24 cm (9–10 inch) round, casserole, or bundt pan with oil or butter

  • If desired, lightly dust with flour and tap out the excess to help with easy release


2. Combine the Eggs and Sugar

  • In a large mixing bowl, add the eggs, granulated sugar, and vanilla sugar

  • Whisk for 1–2 minutes until the mixture becomes slightly lighter in color and looks smooth and glossy

    • This step helps create a soft, airy texture


3. Add the Liquid Ingredients

  • Pour in the milk and vegetable oil

  • Add the pinch of salt

  • Whisk gently until everything is fully blended and uniform


4. Incorporate the Dry Ingredients

  • Place a sieve over the bowl and add:

    • Flour

    • Cocoa powder

    • Baking powder

  • Sift directly into the wet mixture

  • Whisk gently just until the batter is smooth and lump-free

    • Avoid over-mixing to keep the cake tender

If using chocolate chips, fold them in gently at this stage.


5. Bake the Cake

  • Pour the batter evenly into the prepared baking dish

  • Smooth the top lightly with a spatula

  • Place in the center of the oven

  • Bake for 38–42 minutes

Doneness Check:
Insert a toothpick into the center. It should come out clean or with a few soft crumbs.


6. Cool and Finish

  • Remove from the oven and let the cake rest in the pan for 10 minutes

  • Carefully turn it out onto a serving plate or cooling rack

  • Once completely cooled, dust lightly with powdered sugar if desired


Serving Suggestions

  • Enjoy as is with tea or coffee

  • Serve with fresh fruit

  • Pair with yogurt, cream, or a light dessert topping for special occasions


Helpful Tips

  • Extra Moist Texture: Replace 2 tablespoons of milk with yogurt

  • Flavor Boost: Add a pinch of cinnamon or instant coffee powder

  • Smaller Pan: If using a loaf pan, bake slightly longer and check near the end

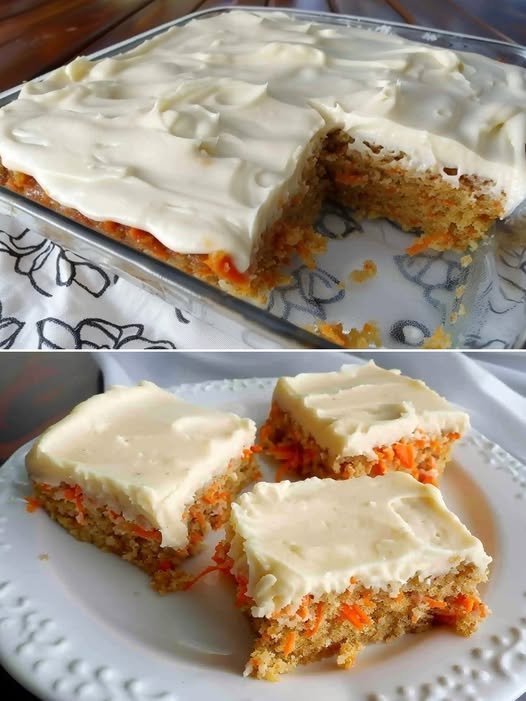
🥕 Keto Carrot Cake Bars with Cream Cheese Frosting

🥕 Keto Carrot Cake Bars with Cream Cheese Frosting

A rich, spiced dessert that is low-carb, gluten-free, and perfectly “mix-and-bake” simple.

  • Prep time: 15 minutes

  • Cook time: 25 minutes

  • Yields: 12 bars

  • Net Carbs: 7g per bar

Ingredients

The Spiced Cake Base:

  • 1 ½ cups Almond flour

  • ½ cup Coconut flour

  • ¾ cup Erythritol (granulated)

  • 1 tsp Ground cinnamon

  • ¼ tsp Ground nutmeg

  • ¼ tsp Ground ginger

  • 1 tsp Baking powder

  • ¼ tsp Salt

  • 3 Large eggs

  • ½ cup Almond milk (unsweetened)

  • ½ cup Liquid coconut oil

  • 1 tsp Vanilla extract

  • 1 ½ cups Grated carrot (finely grated is best)

  • ½ cup Walnuts or pecans, chopped

The Tangy Frosting:

  • 8 oz Cream cheese, softened

  • ¼ cup Unsalted butter, softened

  • ⅓ cup Erythritol (powdered works best for smooth frosting)

  • 1 tsp Vanilla extract

  • A pinch of Salt


Instructions

  1. Prep Work: Preheat your oven to 350°F (175°C). Line an 8×8 or 9×9 inch baking pan with parchment paper, leaving a slight overhang for easy removal.

  2. Mix Dry Ingredients: In a large bowl, whisk together the almond flour, coconut flour, erythritol, cinnamon, nutmeg, ginger, baking powder, and salt.

  3. Mix Wet Ingredients: In a separate bowl, whisk the eggs, almond milk, liquid coconut oil, and vanilla extract until smooth.

  4. Combine: Pour the wet ingredients into the dry ingredients. Mix until a smooth batter forms. Fold in the finely grated carrots and chopped nuts.

  5. Bake: Spread the batter evenly into your prepared pan. Bake for 22–25 minutes. Tip: Do not overbake! The bars should be set but still moist. 6. Cool: Allow the cake to cool completely in the pan. If the cake is even slightly warm, the frosting will melt.

  6. Make the Frosting: In a medium bowl, use a hand beater to cream together the softened cream cheese and butter. Add the powdered Erythritol, vanilla, and salt. Beat until fluffy and smooth.

  7. Frost and Chill: Spread the icing over the cooled cake. For the best texture and clean slices, place the pan in the fridge for at least 30 minutes before cutting into 12 bars.


💡 Pro-Tips for Success

  • Fine Texture: Finely grate your carrots. Large shreds can release too much moisture and make the bars “soggy”.

  • Clean Slices: Use a sharp knife dipped in warm water (and wiped dry) to get those perfect, bakery-style squares.

  • Storage: These stay delicious in the fridge for up to 5 days or can be frozen for up to 2 months.


Nutritional Profile (Per Bar)

  • Calories: 215 kcal

  • Fat: 19g

  • Net Carbs: 7g

  • Protein: 5g