Walnut Cream Pie 🥧

Every family has that one dessert everyone secretly hopes will appear at the table — and this rich, creamy Walnut Cream Pie is exactly that kind of recipe. With a silky vanilla custard, toasted walnuts, fluffy whipped cream, and a buttery graham cracker crust, this pie feels nostalgic, cozy, and perfect for holidays or Sunday dinners.


Why You’ll Love This Pie ❤️

  • Ultra creamy and smooth texture
  • Toasted walnuts add buttery crunch 🌰
  • Simple pantry-friendly ingredients
  • Easy enough for beginners
  • Perfect make-ahead dessert
  • Even better the next day

Ingredients 🛒

For the Crust

  • 1½ cups graham cracker crumbs
  • 6 tbsp unsalted butter, melted
  • 2 tbsp granulated sugar

For the Walnut Filling

  • 1 cup finely chopped walnuts
  • ¾ cup granulated sugar
  • ¼ cup cornstarch
  • ¼ tsp salt
  • 2 cups whole milk
  • 3 egg yolks
  • 2 tbsp unsalted butter
  • 1 tsp vanilla extract

For the Whipped Cream Topping

  • 1 cup heavy whipping cream
  • 3 tbsp powdered sugar
  • ½ tsp vanilla extract
  • ¼ cup chopped walnuts for garnish

Step-by-Step Instructions 👩‍🍳

1️⃣ Prepare the Crust

➡️ In a bowl, combine graham cracker crumbs, melted butter, and sugar.
➡️ Mix until the texture resembles wet sand.
➡️ Firmly press into the bottom and sides of a 9-inch pie pan.
➡️ Refrigerate while preparing the filling.


2️⃣ Toast the Walnuts 🌰

➡️ Place walnuts in a dry skillet over medium heat.
➡️ Stir constantly for about 4–5 minutes until fragrant and lightly golden.
➡️ Let cool slightly.


3️⃣ Make the Walnut Cream Filling

➡️ In a medium saucepan, whisk together sugar, cornstarch, and salt.
➡️ Slowly pour in the milk while whisking until smooth.
➡️ Add egg yolks and whisk again.

➡️ Place over medium heat and cook while stirring constantly.
➡️ Continue stirring for 6–8 minutes until thick and pudding-like.

➡️ Remove from heat.
➡️ Stir in butter and vanilla extract until glossy and smooth.
➡️ Fold in the toasted walnuts.


4️⃣ Fill the Pie

➡️ Pour the warm walnut filling into the chilled crust.
➡️ Smooth the top with a spatula.
➡️ Let cool at room temperature for 20 minutes.

➡️ Refrigerate for at least 2 hours (overnight is even better) ❄️


5️⃣ Make the Whipped Cream

➡️ In a chilled bowl, beat heavy cream, powdered sugar, and vanilla.
➡️ Beat until soft peaks form.


6️⃣ Decorate & Serve ✨

➡️ Spread or pipe whipped cream over the chilled pie.
➡️ Sprinkle extra chopped walnuts on top.
➡️ Slice and serve cold for the creamiest texture.


Tips for the Best Walnut Cream Pie 💡

  • Toasting walnuts boosts flavor dramatically 🌰
  • Chill overnight for cleaner slices
  • Use whole milk for the richest custard
  • Don’t stop stirring the filling while cooking

Variations 🍫

Chocolate Walnut Cream Pie

Add melted dark chocolate to the filling.

Maple Walnut Cream Pie

Replace some sugar with maple syrup 🍁

Banana Walnut Cream Pie

Layer sliced bananas under the filling 🍌

Espresso Walnut Cream Pie

Add 1 tsp espresso powder for deeper flavor ☕


Storage Tips ❄️

  • Refrigerate covered for up to 4 days
  • Freeze without whipped topping for up to 2 months
  • Best served chilled

FAQ ❓

Can I make this pie ahead of time?

Yes! It tastes even better after chilling overnight.

Can I use a store-bought crust?

Absolutely — it saves time and works perfectly.

Can I freeze Walnut Cream Pie?

Yes, freeze before adding whipped cream.

Why is my filling not thickening?

Keep cooking while stirring constantly; cornstarch thickens fully once heated properly.


Perfect Pairings ☕

  • Coffee or cappuccino
  • Hot tea
  • Berry compote 🍓
  • Holiday dinners 🍽️

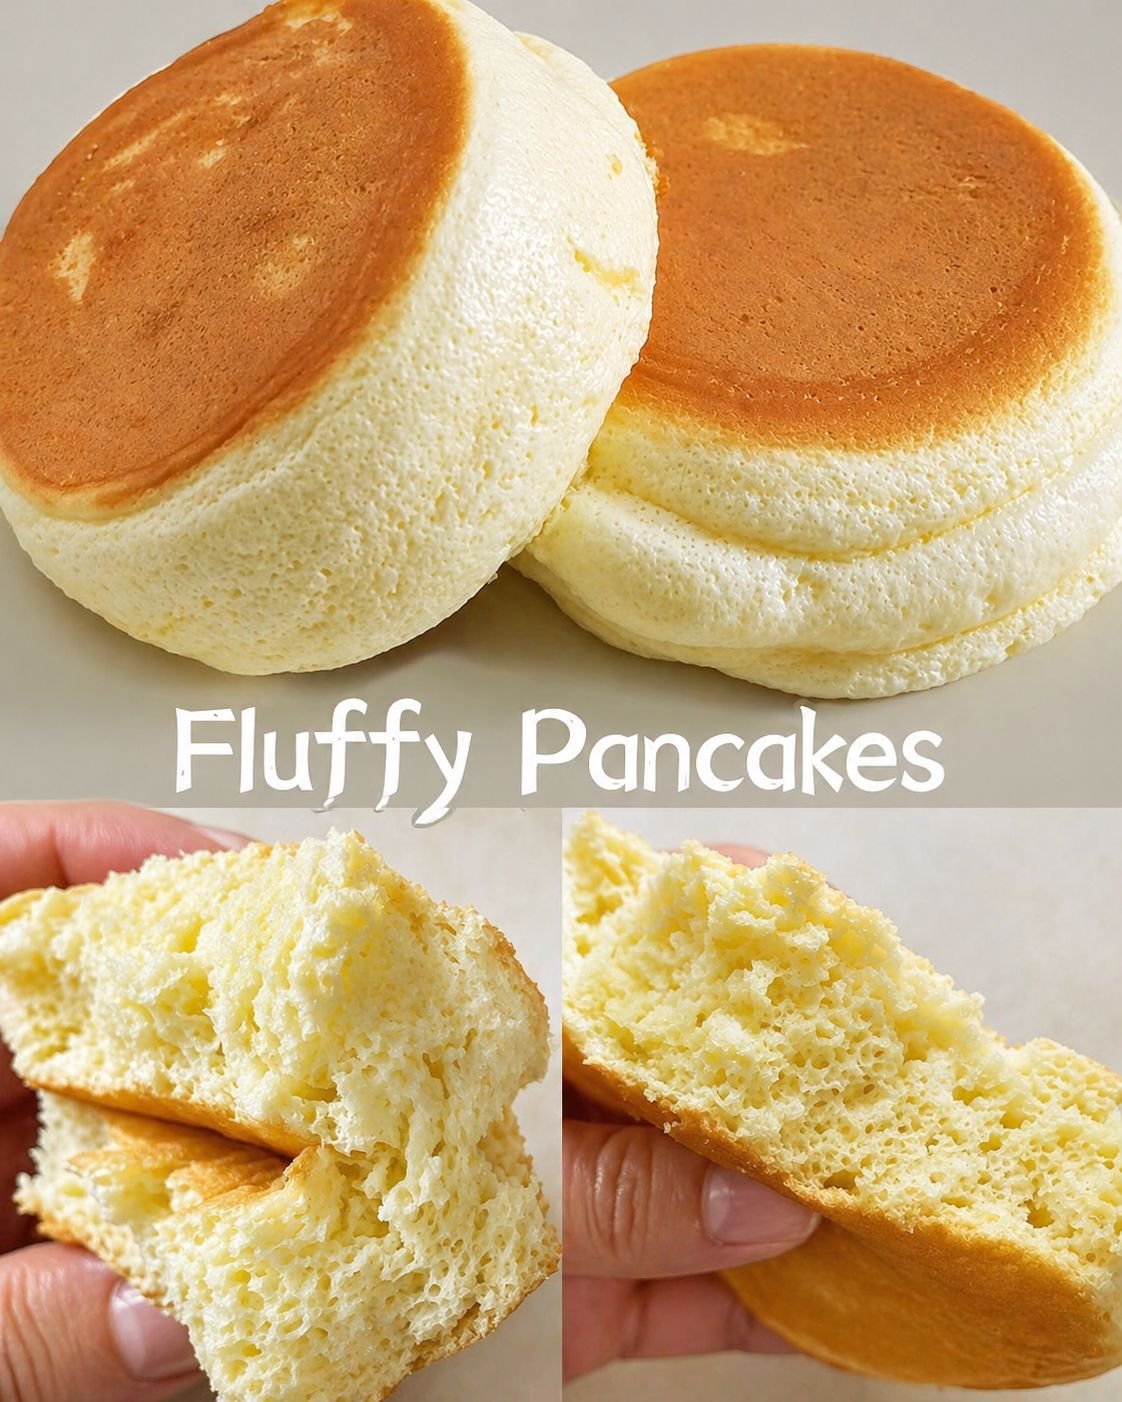
Ultra-Fluffy Soufflé Pancakes

Ultra-Fluffy Soufflé Pancakes

These are tall, jiggly, and melt in your mouth. The secret is in the meringue!

🛒 Ingredients

  • 2 Large eggs (separated)

  • 2 tbsp Whole milk

  • ½ tsp Vanilla extract

  • ¼ cup All-purpose flour

  • ½ tsp Baking powder

  • 2 tbsp Sugar

  • 1 tbsp Water (for steaming)

👩‍🍳 Step-by-Step Instructions

  • 🥚 Separate Eggs: Place egg whites in a large metal or glass bowl and yolks in a smaller bowl.

  • 🥣 Mix Yolks: Add milk and vanilla to the yolks. Whisk until creamy ⮕ Sift in the flour and baking powder ⮕ Whisk until smooth with no lumps.

  • 🌪️ Beat Whites: Use an electric mixer on the egg whites. Once frothy, add sugar gradually ⮕ Beat until stiff peaks form (the foam should stand straight up when you lift the beaters).

  • ☁️ Combine: Gently fold 1/3 of the whites into the yolk mixture ⮕ Pour that back into the remaining whites ⮕ Fold very gently with a spatula so you don’t pop the air bubbles.

  • 🔥 Cook: Heat a non-stick pan on the lowest setting. Lightly oil the surface.

  • 🥄 Scoop: Pile 2-3 scoops of batter on top of each other to create height ⮕ Add 1 tsp of water to the empty spaces in the pan.

  • 🥘 Steam: Cover with a lid and cook for 4–5 minutes ⮕ Flip very carefully ⮕ Add another tsp of water ⮕ Cover and cook for 3 more minutes.

  • ✅ Serve: Plate immediately and top with butter or honey.

Blackberry Cream Cheese Icebox Dessert Bars

Blackberry Cream Cheese Icebox Dessert Bars

Ingredients

Crust

2 cups graham cracker crumbs

1/2 cup unsalted butter, melted

2 tablespoons sugar

Pinch of salt

Cream Cheese Layer

16 oz cream cheese, softened

1 cup powdered sugar

1 teaspoon vanilla extract

1 tablespoon lime juice or lemon juice

1 1/2 cups heavy whipping cream, cold

Vanilla Custard Layer

1 box instant vanilla pudding mix, 3.4 oz

1 3/4 cups cold milk

1/2 cup sweetened condensed milk

1 cup fresh blackberries

Blackberry Sauce

2 1/2 cups fresh or frozen blackberries

1/3 cup sugar

1 tablespoon lemon or lime juice

1 tablespoon cornstarch

2 tablespoons water

Topping

1 1/2 cups whipped topping or freshly whipped cream

Fresh blackberries

Lime zest or lemon zest

Crushed graham crackers or chopped nuts

Fresh mint, optional

Instructions

1. Make the crust

Grease a 9×13-inch baking dish or line it with parchment paper.

In a bowl, mix graham cracker crumbs, melted butter, sugar, and salt until the crumbs look like wet sand. Press firmly into the bottom of the dish.

Chill for 20 minutes while preparing the filling.

2. Make the blackberry sauce

Add blackberries, sugar, and lemon or lime juice to a saucepan over medium heat.

Cook for 5 to 7 minutes, stirring often, until the berries release their juices and soften.

In a small bowl, mix cornstarch with water. Stir it into the berry mixture and cook for 1 to 2 minutes, until thickened.

Remove from heat and let cool completely.

3. Make the cream cheese layer

Beat softened cream cheese until smooth.

Add powdered sugar, vanilla, and lime juice. Beat until creamy.

In a separate bowl, whip the cold heavy cream until stiff peaks form.

Fold the whipped cream into the cream cheese mixture until fluffy and smooth.

Spread half of this mixture over the chilled crust.

4. Add the custard layer

In a bowl, whisk vanilla pudding mix with cold milk until thickened.

Add sweetened condensed milk and whisk until smooth.

Fold in fresh blackberries.

Spread the custard layer over the cream cheese layer.

5. Add blackberry sauce

Spoon the cooled blackberry sauce over the custard layer.

Gently swirl it with a knife or spatula, leaving thick ribbons of berry sauce.

6. Add the top layer

Spread the remaining cream cheese mixture over the blackberry layer.

Top with whipped cream or whipped topping.

Sprinkle with lime zest, crushed graham crackers, chopped nuts, and fresh blackberries.

7. Chill

Cover and refrigerate for at least 6 hours, preferably overnight.

For cleaner slices, freeze for 30 to 45 minutes before cutting.

Serving

Slice into squares and serve cold. Add a fresh blackberry, mint leaf, and extra lime zest on top for a bakery-style finish.

Storage

Keep covered in the refrigerator for up to 4 days.

  1. You can also freeze the bars for up to 1 month. Thaw in the refrigerator before serving.

Air Fryer Poached Eggs

These air fryer poached eggs have delicate whites, jammy or runny yolks, and no stovetop drama. They are surprisingly simple to prepare and turn out beautifully set.

Prep: 2 minutes

Cook: 6–8 minutes

Total: ~10 minutes

Ingredients

1 large egg (very fresh works best)

¼ cup hot water

Cooking spray or a few drops of oil

Salt & black pepper, to taste

Optional toppings: chopped chives, parsley, chili flakes

Equipment

Air fryer

Oven-safe ramekin or small heatproof bowl

Instructions

Preheat air fryer to 375°F / 190°C for 2–3 minutes.

Lightly grease a ramekin.

Add ¼ cup hot water to the ramekin.

Crack the egg gently into the water (keep the yolk intact).

Carefully place the ramekin into the air fryer basket.

Air fry for 6–8 minutes:

6 min → runny yolk

7 min → jammy

8 min → fully set

Remove carefully (it’s hot!), lift egg out with a slotted spoon.

Season and serve immediately.

Chef’s Notes

The water creates steam, mimicking classic poaching.

Whites firm up beautifully without vinegar.

Results may vary slightly depending on air fryer model.

Pro Tips

Use fresh eggs for tighter whites.

Don’t overfill the ramekin — shallow water works best.

For toast: drain egg briefly on paper towel before plating.

Making multiples? Cook each egg in its own ramekin.

Serving Ideas

On sourdough or whole-grain toast

Over avocado toast

With smoked salmon

On grain bowls or breakfast salads

Topped with hollandaise for easy eggs Benedict

Nutritional Info (per egg, approx.)

Calories: 70

Protein: 6g

Fat: 5g

Carbs: 0g

Cholesterol: 185mg

(Without toast or toppings)

Health Benefits

High-quality protein for muscle repair

Rich in choline (brain health)

Supports eye health (lutein + zeaxanthin)

Naturally low-carb and gluten-free

No-Bake Lemon Dazzling Blueberry Cream Cake

No-Bake Lemon Dazzling Blueberry Cream Cake

This No-Bake Lemon Dazzling Blueberry Cream Cake is a light, refreshing dessert that combines tangy lemon flavor with sweet, juicy blueberries. With its creamy texture and beautiful layers, it’s perfect for warm days when you want something impressive without turning on the oven.

Ingredients

For the Base:

  • 2 cups crushed digestive biscuits or graham crackers
  • ½ cup melted butter

For the Lemon Cream Layer:

  • 1½ cups heavy cream
  • ½ cup powdered sugar
  • 1 cup cream cheese (softened)
  • ¼ cup fresh lemon juice
  • 1 tbsp lemon zest
  • 1 tsp vanilla extract

For the Blueberry Layer:

  • 1½ cups fresh or frozen blueberries
  • 3 tbsp sugar
  • 1 tbsp lemon juice
  • 1 tbsp cornstarch + 2 tbsp water

For Garnish:

  • Whipped cream
  • Lemon slices or zest
  • Fresh blueberries

Instructions

Start by preparing the base. In a bowl, mix crushed biscuits with melted butter until the texture resembles wet sand. Press this mixture firmly into the bottom of a springform pan or serving dish. Use the back of a spoon to make it even and compact. Place it in the refrigerator for 20–30 minutes to set.

Next, prepare the blueberry layer. In a saucepan over medium heat, add blueberries, sugar, and lemon juice. Cook until the berries start to break down and release their juices. Stir in the cornstarch mixture and cook for another 2–3 minutes until thickened. Remove from heat and let it cool completely.

Now make the lemon cream filling. In a large bowl, beat the softened cream cheese until smooth. Add powdered sugar, lemon juice, lemon zest, and vanilla extract, and mix until creamy. In a separate bowl, whip the heavy cream until soft peaks form. Gently fold the whipped cream into the lemon mixture until light and fluffy.

Take the chilled base from the fridge. Spread half of the lemon cream mixture evenly over the biscuit base. Then add a layer of the cooled blueberry mixture, spreading it gently. Add the remaining lemon cream on top and smooth the surface.

Cover the cake and refrigerate for at least 6 hours, or preferably overnight, so it sets properly and the flavors blend beautifully.

Before serving, decorate with whipped cream, fresh blueberries, and a little lemon zest or slices for a bright, elegant look.

Serving

Slice carefully using a sharp knife for clean layers. Serve chilled for the best taste and texture.

Tips

  • Make sure the blueberry layer is fully cooled before assembling
  • Chill long enough for clean slices
  • You can use store-bought blueberry sauce if short on time
  • Adjust lemon juice to your taste for more or less tanginess

This no-bake cake is creamy, fresh, and bursting with flavor—perfect for family desserts, parties, or anytime you want something sweet yet refreshing without baking!

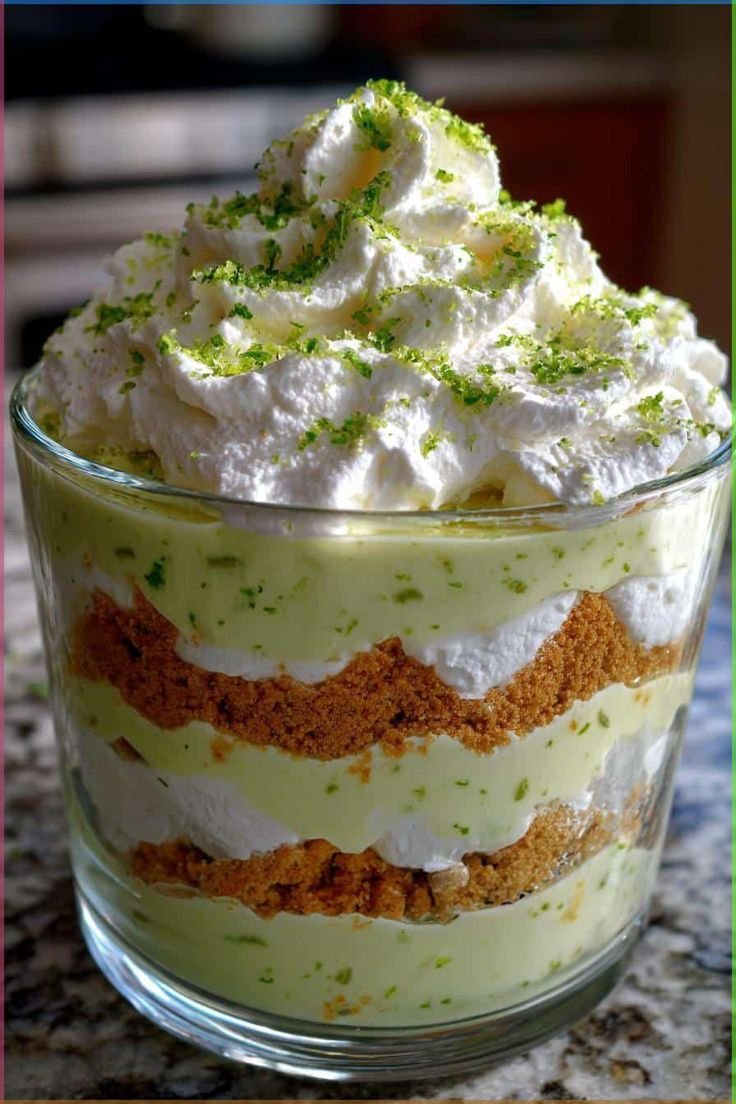
Dreamy Key Lime Pie Trifle 🍋✨

Ingredients

For the base

  • 2 cups graham cracker crumbs (or crushed biscuits)
  • 1/3 cup melted butter
  • 2 tablespoons sugar

For the key lime filling

  • 1 can (400g) sweetened condensed milk
  • 1/2 cup fresh key lime juice (or regular lime juice)
  • 1 teaspoon lime zest
  • 1 package instant vanilla pudding mix
  • 1 cup cold milk

For the creamy layer

  • 2 cups whipped cream (or whipped topping)
  • 2 tablespoons powdered sugar (if using fresh cream)
  • 1/2 teaspoon vanilla extract

Optional toppings

  • Extra whipped cream
  • Lime slices
  • Crushed graham crackers
  • White chocolate shavings

Steps

  1. Make the crust
    Mix graham cracker crumbs, melted butter, and sugar. Press lightly into the bottom of a trifle dish or serving cups.
  2. Prepare the filling
    Whisk sweetened condensed milk, lime juice, and lime zest in a bowl. In another bowl, whisk pudding mix with cold milk until thick. Combine both mixtures until smooth.
  3. Make whipped cream
    Whip cream with powdered sugar and vanilla until soft peaks form (skip if using ready-made topping).
  4. Assemble layers
    Layer in this order: graham cracker base → key lime filling → whipped cream. Repeat layers until full.
  5. Chill
    Refrigerate for at least 2 hours (longer for better results).
  6. Garnish & serve
    Top with whipped cream, lime zest, or crushed crackers before serving.