Weight Watchers Chocolate Lava Cake Recipe

This Slow Cooker Skinny Chocolate Lava Cake is every chocolate lovers dream-made with three chocolate layers! A decadent dessert everyone will love-perfect for potlucks, weekend brunch, or any family gathering!

Summer vacation is coming to an end-school is starting for my three kiddos. It’s definitely bitter sweet-so we are ending this amazing summer by making my Slow Cooker Skinny Chocolate Lava Cake!

PREP TIME: 10 minutes

COOK TIME: 2 hours 30 minutes

ADDITIONAL TIME: 30 minutes

TOTAL TIME: 3 hours 10 minutes

INGREDIENTS:

  • 1 package Pillsbury Moist Supreme Sugar Free Devil’s Food Cake Mix
  • 3 eggs or 3/4 cup liquid eggs
  • 1/2 cup unsweetened applesauce sauce
  • 1 1/4 cup water
  • 1 (1 oz.) sugar free chocolate fudge Jell-O instant pudding mix
  • 1 (11 oz.) carton premier protein shake (any flavor) or 11 oz. skim milk for an additional point per serving (I use 11 oz. Caramel or Chocolate Flavor Premier Protein)
  • 5 oz. sugar free chocolate chips ( I recommend Lily’s no sugar added milk or dark chocolate chips or Lakanto Monkfruit sugar free Chocolate Chips)

INSTRUCTIONS:

  1. Spray a 4- quart slow cooker with nonstick cooking spray
  2. In a large mixing bowl combine, cake mix, unsweetened applesauce sauce, water and eggs.
  3. Mix until well combined. Pour cake batter into prepared slow cooker.
  4. In a separate small bowl combine pudding mix and premier protein. Whisk for 2 minutes. Let it sit until pudding sets. ( about 2 minutes)
  5. Pour pudding mix over the cake mix batter.
  6. Cook on low for 2 1/2 to 3 hours or until toothpick inserted in the cake portion comes out with clean.
  7. Using a food scale or a measuring cup-measure out 5 oz. or 1/3 cup no sugar chocolate chips.
  8. Sprinkle the top of the warm cake with chocolate chips. Turn off slow cooker.
  9. Remove the slow cooker ceramic insert. Let it sit uncovered for 10-15 minutes or until chocolate chips are soft.
  10. Serve warm with fat free Reddi Whip or with some light vanilla ice cream.

Notes:

Store leftovers in an airtight container in the refrigerator for up to week. Reheat in the microwave.

Smartpoints: GREEN: 3 Smartpoints without chocolate chips or 4 SmartPoints per serving with chocolate chip if using 3/4 cup liquid egg substitute or 5 SmartPoints per serving with chocolate chips if using 3 whole eggs BLUE/PURPLE: 3 Smartpoints without chocolate chips or 4 SmartPoints per serving with chocolate chips

NUTRITIONAL INFO:

YIELD: 16 SERVING SIZE: 1

Amount Per Serving: CALORIES: 155TOTAL FAT: 5gSATURATED FAT: 2gTRANS FAT: 0gUNSATURATED FAT: 2gCHOLESTEROL: 36mgSODIUM: 333mgCARBOHYDRATES: 36gNET CARBOHYDRATES: 34gFIBER: 2gSUGAR: 0gPROTEIN: 8g

Beef and Chicken Chimichangas

Beef and cheese chimichangas are large tortillas filled with savory beef, beans, and cheese, then fried to a golden perfection. The perfect quick and easy dinner solution, and even great to make ahead and freeze.

While you are here, you gotta check out these Cheesy Bacon Loaded Breakfast Burritos. Also, be sure to drizzle them with some of this Creamy Jalapeno Salsa, or this amazing Chipotle Salsa.

WHAT IS A CHIMICHANGA?

A chimichanga is a large tortillas, stuffed with various proteins and starches, and deep fried until they are golden brown. You will usually find them in the “Tex-mex” style dishes versus traditional Mexican food dishes.

WHAT IS THE DIFFERENCE BETWEEN A BURRITO AND A CHIMICHANGA?

In essence, both of these are made the same. Use a large tortilla, and roll different fillings inside of it. The biggest difference however, is that the chimichanga is fried! Even more, often times a burrito will be served wrapped in foil or parchment paper, and eaten by hand.

YIELD: 6 CHIMICHANGAS

Beef and cheese chimichangas are made with large tortillas, and filled with savory beef, beans, and cheese, then fried to a golden perfection. The perfect quick and easy dinner solution, and even great to make ahead and freeze.

PREP TIME: 10 minutes

COOK TIME: 20 minutes

TOTAL TIME: 30 minutes

INGREDIENTS:

  • 6 large Flour tortillas
  • 1 pound Ground beef
  • 1 cup Water (to add to cooked and seasoned beef)
  • 2 cups Cheese, shredded
  • 1 can Refried pinto beans
  • 2 cups Vegetable oil (to fry chimichangas)
  • Seasoning for ground beef
  • 1 tablespoon Chili powder
  • 1/2 tablespoon Seasoned salt
  • 1/2 tablespoon Ground cumin
  • 1 teaspoon Black pepper
  • 1 teaspoon Garlic salt (or garlic powder)
  • 1/2 teaspoon dried Oregano
  • 1/2-1 cup Water
Topping Ideas
  • Sour cream
  • Shredded lettuce
  • Salsa
  • Chopped tomatoes

INSTRUCTIONS:

  1. Brown the ground beef in a skillet over medium heat. The meat is fully cooked when there is no longer any pink visible. Use a strainer to drain any excess grease from the skillet.
  2. Put the meat back into the skillet over medium heat. Add all of the seasonings, and water and mix it together thoroughly. Continue to simmer until the water is absorbed.
  3. Heat the vegetable oil in a separate skillet over medium heat. While the oil is heating up, begin assembling the burritos.
  4. Place about one tablespoon of beans on one side of the tortilla and smear it across, somewhat close to the edge. Next place one to two tablespoons of the meat mixture, then a sprinkle of cheese (a generous sprinkle)!
  5. Begin to roll the tortilla up over the mixture, once half way rolled, fold in the sides towards the middle, then continue rolling all the way until it is closed. Roll as tight as possible so that the mixture does not ooze out.
  6. Continue rolling until all of the burritos are made or you run out of mixture.
  7. Place the burritos into the hot oil SEAM SIDE DOWN. Fry on each side for one to two minutes, or until they turn golden brown. Be sure to flip, and fry the sides of the burritos as well,
  8. Remove from the oil and drain on a baking sheet or a bed of paper towels. Top with your favorite garnishes and salsas. Enjoy!

NUTRITION INFO:

YIELD: 6 SERVING SIZE: 1

Amount Per Serving: CALORIES: 419TOTAL FAT: 53gSATURATED FAT: 9gTRANS FAT: 3gUNSATURATED FAT: 37gCHOLESTEROL: 86mgSODIUM: 379mgCARBOHYDRATES: 29gFIBER: 5gSUGAR: 1gPROTEIN: 37g

Maxican Chicken Doritos Casserole Recipe

A chicken casserole makes for a convenient dish. Chicken is a great base for every meal and its neutral taste means it works well with a variety of flavorings.

With a casserole, home cooks can get creative adding any ingredients that may be lying around the kitchen.

If you like your chicken casserole with a kick, read on to find out more about our Mexican chicken casserole and other variations you can make for your family.

Mexican Chicken with Doritos and Velveeta

When we think of Mexican food, we think of ingredients like salsa, beans, and guacamole. This dish takes Mexican in a slightly different direction with the addition of Doritos and Velveeta. This makes for a meal that is a well-deserved guilty pleasure for your hard-working family

Total Time: 50 minutes

Get Mexican flair on the table with this easy Mexican Chicken Casserole. With only 6 ingredients, it comes together in no time. Filled with creamy cheese and layered with Doritos, this will easily satisfy even picky eaters.

INGREDIENTS:

  • 6 chicken breasts, boneless
  • 10 oz. Velveeta cheese
  • 1 can cream of mushroom soup mixed with 1 cup milk
  • 1 can Rotel tomatoes
  • 1 bag Doritos tortilla chips

INSTRUCTIONS:

  1. Boil chicken until cooked throught.Cut into bite sized pieces.
  2. Combine Velveeta, soup mixture and tomatoes; bring to a boil.
  3. Add chicken and simmer 5-10 minutes, stirring often.
  4. Place a layer of Doritos in long casserole dish, then add a layer of the chicken mixture.
  5. Add another layer of chips, another layer of the chicken mixture, ending with chips on top.
  6. Bake at 350 degrees F for 30 minutes.

Puff Pastry Recipe

Leave those frozen sheets on the store shelf! This is the best-tasting, easiest homemade puff pastry recipe ever! Plus, it comes together in just 15 minutes.

Puff pastry: It’s the kind of thing that makes things feel like a special occasion. All those light, flaky layers and that rich buttery flavor!

Prep Time: 15mins

Cook Time: 25mins

Chill Time: 3hrs

Total Time: 3 hrs 40mins

Course: Breakfast, Brunch, Dessert Cuisine: American

Keyword: Homemade Puff Pastry, puff pastry, puff pastry desserts, puff pastry recipe easy, puff pastry recipes, puff pastry sheets

Servings: 8 

Ingredients:

  • 2 cups all-purpose flour
  • 1 teaspoon salt
  • 1 1/4 cups unsalted butter (2 1/2 sticks), cold
  • 1/2 cup cold water

Instructions:

  1. Place the flour and salt in a large bowl and whisk to combine.
  2. Cut the cold butter into 1/4-inch slices and add to the flour mixture, tossing to coat.
  3. Stir in the cold water until a thick dough forms.
  4. Gather the dough into a ball, flatten it into a disk-shape, and wrap in plastic wrap.
  5. Chill for 1 hour in the fridge, or 20 to 30 minutes in the freezer.
  6. Unwrap the dough, dust the work surface with flour, and roll the dough into a rough rectangle shape.
  7. Fold the dough in thirds, like a letter.
  8. Turn 90 degrees, roll and fold again.
  9. Repeat about 2 to 4 times, wrap the dough in plastic wrap, and chill for 2 hours or overnight.*

Notes:

Tips for Making Homemade Puff Pastry

Brush the pastry with an egg beaten with a couple of teaspoons of water before baking for a beautiful sheen.

When you’re ready to bake the pastry, make sure it is COLD and the oven is HOT.

Bake times will vary based on exactly what you are making, so follow your recipe!

The dough can also be frozen. It will keep for several weeks in the freezer, tightly wrapped. Thaw in the refrigerator.

This recipe makes approximately 24 ounces, or 685 grams, of dough.

Nutritional Info:

Serving: 1pastry | Calories: 418kcal | Carbohydrates: 23g | Protein: 3g | Fat: 34g | Saturated Fat: 21g | Cholesterol: 91mg | Sodium: 296mg | Potassium: 43mg | Vitamin A: 1065IU | Calcium: 15mg | Iron: 1.5mg

Potato Bread In Sarten

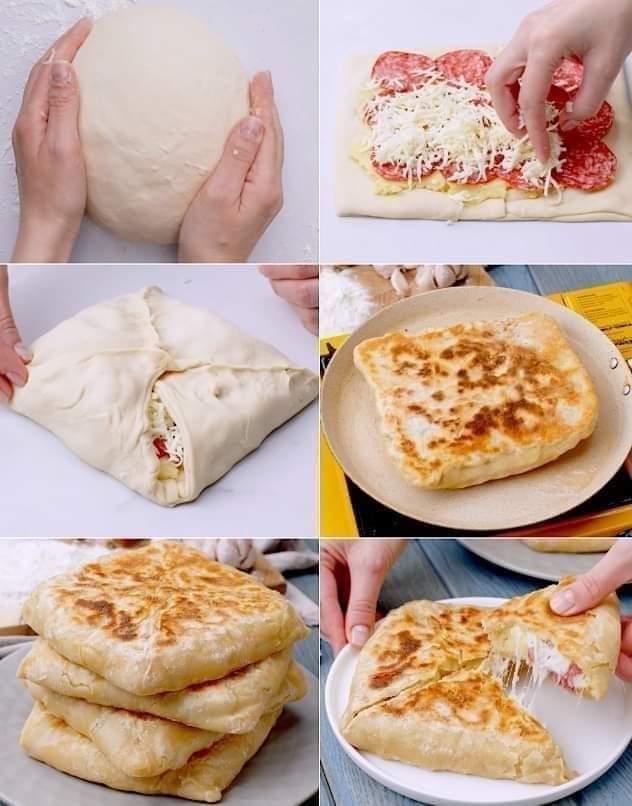
This Potato Bread recipe combines the best of pizza, flatbread, and calzones into one. The secret to the soft and fluffy bread is the potato. Adding potato to bread is a trick that artisan bread bakers have used for many years. It increases the dough’s starch content which helps with moisture retention. The result? Fluffy bread that doesn’t dry out easily. The bread is filled with typical pizza ingredients like salami and cheese, and then fried in a pan—no oven necessary! It will be a hit among the pickiest of eaters, and you can serve it as a light lunch or as a main meal with a side of fries.

What is Potato Bread

Adding potato to bread might sound strange, but it’s an age-old trick used by artisan bakers—a secret to light and fluffy bread.

Because of its ability to hold water, potato starches help to increase the moisture content in baked goods. It also prevents too much gluten formation, which means bread (and even pastries) is lighter and fluffier!

Potato Bread Ingredients

Potato – choose a high-starch potato (like the Russet variety)

Egg – the egg adds richness to the dough

Parsley – use fresh herbs for the best flavor

Cheese – for more flavor, use mature cheddar cheese

Salami – use a high-quality salami that is not too fatty

For added crunch, brush the bread with melted and sprinkle with sesame seeds, freshly ground salt, or everything bagel seasoning before serving.

Don’t like salami? Feel free to add other meats like crispy bacon, chopped ham, smoked chicken, or even smoked salmon.

You can also add other ingredients (the same as you would add on pizzas): olives, jalapenos, sun-dried tomatoes, or sauteed mushrooms will all work well. Be careful not to overfill, otherwise, the filling will spill out during baking.

You can add herbs like oregano, thyme, or basil.

Use cheddar cheese, mozzarella, cheese, or Swiss cheese.

How to Store Potato Bread

Leftovers can be stored in the fridge for up to 3 days. Reheat in the oven or Airfryer to make the surface crispy again. Microwaving it will make the bread soggy.

Can I Make Potato Bread in the Airfryer?

Yes, you can! Simply brush the bread with melted butter and air-fry for 15 minutes at 180°C/360°F, turning halfway.

Can I Make It Ahead of Time?

The dough can be made a day ahead and kept in the fridge. Roll out, fill, and cook the potato bread before serving.

Prep Time: 25min

Cook Time:20min

Total Time: 45min

Ingredients:

  • 1 egg
  • 500ml (2 cups) water
  • 800g (6 3/8 cups) flour
  • 2 tbsp olive oil
  • 1kg (2 lbs) boiled potatoes
  • 50g (4 tbsp) butter
  • 1/2 tsp salt
  • 1/2 tsp black pepper
  • 250g (2 heaped cups) cheese
  • 140g (5 oz) salami slice

Instructions:

  1. In a large mixing bowl, mix together the olive oil, water, and salt.
  2. Sift in the flour and mix gently with a spatula.
  3. Knead the dough until smooth and elastic. Let the dough rest for 10 minutes.
  4. In another bowl mix together boiled potatoes with butter, salt, and pepper.
  5. Divide the dough into four pieces.
  6. Flatten the dough slightly with your hands.
  7. Then roll out with a wooden rolling pin.
  8. Brush the flattened dough with oil.
  9. Fold the dough into thirds.
  10. Then fold the longer sides toward the center.
  11. Spread the mashed potato onto the folded dough.
  12. Place the salami on top of the mashed potato.
  13. Top with grated cheese.
  14. Bring the corners toward the center.
  15. Fry in the pan from both sides until golden brown, about 4-6 minutes.
  16. Enjoy!

Pineapple Cream-Cheese Pound Cake Recipe

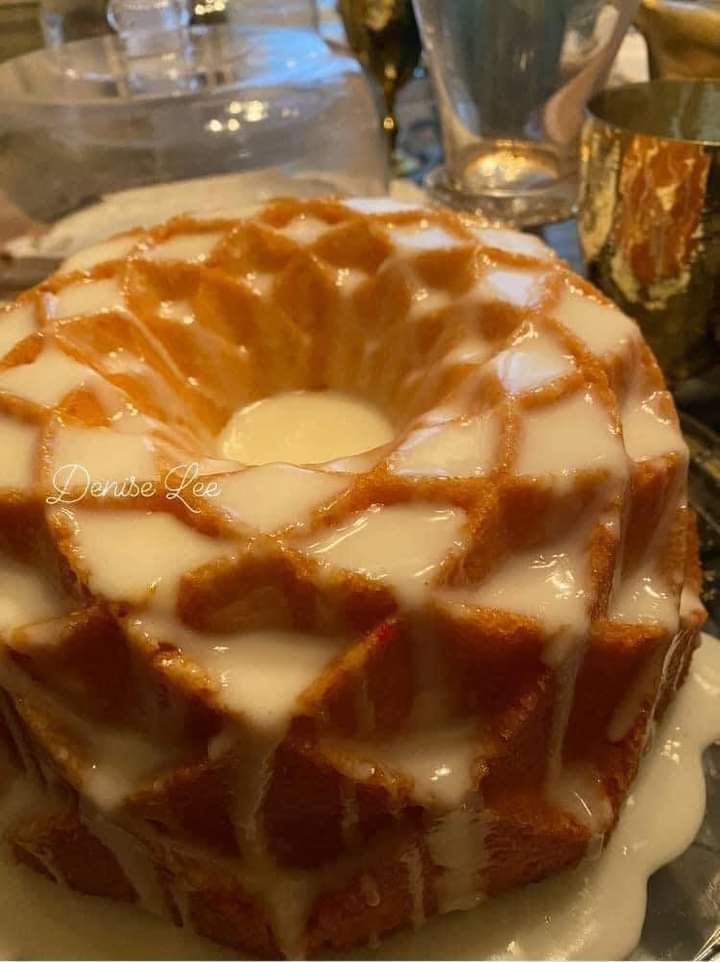
This pineapple pound cake is elevated with sweet tropical flavor, just enough to complement the richly dense pound cake base. Top with a delicate pineapple-vanilla glaze to take it even further.

Deliciously moist and dense pineapple pound cake is dressed with a sweet pineapple vanilla glaze. This supple pineapple cake has the perfect crumb and is great for breakfast, dessert, or as a snack.

Why this recipe works

This pineapple pound cake is elevated with sweet tropical flavor, just enough to complement the richly dense pound cake base. The texture of a good pound cake should be dense, moist, soft and tender – and that’s exactly what you’ll get with this recipe! Top with a delicate pineapple-vanilla glaze to take it even further.

Pound cakes are often made in bundt pans, after all, almost any kind of cake can be made in a bundt pan. Baking this pineapple quick bread in a bundt pan will yield an overall prettier presentation compared to a basic loaf. Let’s get started!


Prep Time: 20mins

Cook Time: 1hr 15mins

Total Time: 1hr 35mins

 Servings: 10 servings

Equipment
  • Stand mixer or hand mixer
  • Mixing bowls
  • 9 inch bundt pan
  • Whisk
  • Wire cooling rack

INGREDIENTS:

Cake
  • 3 cups all-purpose flour
  • 1 teaspoon baking powder
  • 1 cup unsalted Cream Cheese softened
  • 1/2 cup shortening
  • 2 3/4 cups granulated sugar
  • 4 eggs at room temperature*
  • 1/2 cup buttermilk at room temperature*
  • 1 cup crushed pineapple 1 – 8 ounce can drained, juices reserved
  • 1 teaspoon vanilla extract

Glaze

4 Tablespoons cream cheese

2 cups powdered sugar

1/2 teaspoon vanilla extract

1/4 cup reserved pineapple juice

INSTRUCTIONS:

  1. Preheat oven to 325°F. Spray a 9-inch bundt cake pan with nonstick baking spray (the kind with flour) and set aside.
  2. *We recommend a nonstick cooking spray with flour rather than greasing and flouring the bundt pan, but you can grease it well with butter or shortening and then lightly flour the pan.
  3. In a medium-sized bowl, combine the flour and the baking powder. Set aside.
  4. Cream together cream cheese, shortening, and sugar in the bowl of a standing mixer or large mixing bowl.
  5. Add eggs one at a time, beating on high speed for 30 seconds after each addition.
  6. Do not overbeat the eggs, this can cause the cake to be crumbly.
  7. Rotate between adding the flour mixture and the buttermilk, mixing only a little between each addition.
  8. Add in the pineapple and vanilla extract and beat just until the pineapple is evenly distributed.
  9. Pour batter into the prepared bundt pan and bake for 75-85 minutes, until a toothpick inserted in the center comes out with a few moist crumbs. Cool for 30 minutes, then turn out onto a wire rack to cool completely.
  10. Whisk together the glaze ingredients until smooth. Drizzle over the top of the cooled cake.

Notes:

  • Be sure to measure your flour using the scoop and sweep method. You never want to pack flour into a measuring cup. If you add too much flour, you’ll end up with a dry, crumbly cake.
  • The moisture comes from the buttermilk and the pineapple. Drain the pineapple before adding it to the cake batter, but it’s not necessary to really strain it; some of the juices can be added in. Because this cake is so dense and moist, it takes at least 75 minutes to cook. Test the center with a toothpick to make sure there is not still wet batter before removing from the oven.
  • Shortening has a higher melting point than butter, which provides and fluffier and moister cake. You can substitute a third stick of butter for the shortening if you wish.
  • Be sure the eggs and buttermilk are a room temperature and that you beat them well when adding to the batter – this is going to give you more volume in your bundt cake. Room temperature eggs hold more volume than cold eggs.
  • I recommend a nonstick cooking spray with flour rather than greasing and flouring the bundt pan, but you can grease it well with butter or shortening and then lightly flour the pan.
  • For removing the cake from the pan: Uneven baking temperatures in ovens can cause the cake to rise on one side more. If your cake is uneven, you can cut a thin layer off the bottom of the cake so it sits properly when turned out of the bundt pan. Uneven distribution of weight can cause pressure points which in turn can cause crumbling on the bottom in the areas that aren’t supported by an equal weight of cake.
NUTRITIONAL INFO:

Serving: 1slice | Calories: 767cal | Carbohydrates: 113g | Protein: 7g | Fat: 34g | Saturated Fat: 17g | Polyunsaturated Fat: 4g | Monounsaturated Fat: 10g | Trans Fat: 2g | Cholesterol: 122mg | Sodium: 43mg | Potassium: 167mg | Fiber: 1g | Sugar: 83g | Vitamin A: 764IU | Vitamin C: 3mg | Calcium: 58mg | Iron: 2mg