Moist Lemon Loaf Recipe

This moist Lemon Cake Recipe is fluffy, tangy and so easy to make from scratch! Every bite of this supremely moist pound cake is bursting with fresh lemon flavor and the easy lemon glaze on top will have you hooked after just one bite.

This homemade lemon pound cake tastes even better than the Starbucks Lemon Loaf!

If you like the Starbucks Lemon Loaf then you’ll love this delicious, moist lemon cake recipe that’s made completely from scratch in less than 10 minutes. It’s one of my favorite afternoon or breakfast treats and it always gets rave reviews, everyone loves it! It’s gone in minutes whenever I make it.

This batter is made with freshly grated lemon zest and fresh lemon juice. When it the cake comes out of the oven it is infused with a homemade lemon syrup to give it an extra lemon kick, and then after cooling down the pound cake is topped with the most delicious lemon glaze.

This easy lemon cake is not dry and not fudgy, it’s perfectly moist while still being fluffy and it keeps fresh for a few days! A perfect cake for every occasion. If you like lemon desserts, you have got to give this cake a try!

Tips and Tricks for Making This Easy Lemon Cake Recipe

You can also make this recipe in a bundt pan. It looks prettier than in a loaf pan but make sure to grease your bundt pan generously so that your cake will come out of the pan.

Don’t leave out the lemon zest, that is what gives it the wonderful lemony flavor! I always use organic lemons and my favorite grater that I’ll like below.

For the best flavor use freshly squeezed lemon juice! Don’t use the bottled stuff, trust me fresh lemon juice tastes so much better.

When you make the lemon glaze for this pound cake don’t add too much liquid. You want the glaze to be nice and thick not runny. Start with 1 tbsp lemon juice and 1 tbsp milk and add the remaining 1/2 tbsp as needed.

This cake keeps well covered at room temperature for up to 4 days.

This moist Lemon Cake Recipe is fluffy, tangy and so easy to make from scratch! Every bite of this supremely moist pound cake is bursting with lemon flavor. If you like the Starbucks Lemon Loaf then you’ll love this homemade lemon pound cake!

Prep Time: 15minutes

Cook Time: 45minutes

Total Time: 1hour 

INGREDIENTS:

For the lemon pound cake:
  • 1 1/2 cups all-purpose flour
  • 1 1/2 tsp baking powder
  • 1 Tbsp lemon zest
  • 1/2 tsp salt
  • 1/2 cup unsalted butter room temperature
  • 1 cup granulated sugar
  • 2 large eggs room temperature
  • 1 tsp vanilla extract
  • 2 Tbsp lemon juice about 1/2 lemon
  • 1/2 cup buttermilk see below for substitution
For the lemon syrup:
  • 1/4 cup lemon juice about 1 lemon
  • 3 Tbsp powdered sugar
For the lemon icing:
  • 1 cup powdered sugar sifted
  • 1.5 Tbsp lemon juice
  • 1 Tbsp milk

INSTRUCTIONS:

  1. Preheat oven to 350°F (177°C). Grease a 9×5-inch (or 8×4-inch) loaf pan (see note).
  2. In a medium bowl combine the flour, baking powder, lemon zest, and salt. Set aside.
  3. In the bowl of a stand mixer fitted with the paddle attachment (or using an electric mixer), cream the butter and sugar together at medium-high speed until pale and fluffy, about 4-6 minutes. Scrape the sides of the bowl as needed.
  4. With the mixer running on low-speed, add the eggs one at a time, then beat in the vanilla extract and lemon juice. Beat on medium-high speed until combined.
  5. With the mixer on low, add about one-third of the flour mixture and mix until almost combined, then add half the buttermilk and mix until just combined. Repeat with another third of flour mixture and then the last half of the buttermilk, ending with the last third of the flour. Beat until just incorporated.
  6. Scrape the batter into the prepared loaf pan and bake for 45-55 minutes until the cake is golden brown and a toothpick comes out mostly clean with only a couple moist crumbs. Baking times vary, so keep an eye on yours.
  7. Let the cake cool for about 15 minutes in the pan. Stir together the lemon juice and confectioners’ sugar for the lemon syrup. Carefully invert the loaf pan, and transfer the cake to a cooling rack, then brush the syrup on the cake while it’s still warm. Allow cake to cool completely.
  8. When the cake is cooled, combine all the icing ingredients, start with 1 tbsp lemon juice and milk and add the remaining lemon juice as needed. The icing should be thick and not runny. Pour icing over cake and let dry before serving.

NOTES:

If you don’t have buttermilk, you can make your own by combining 1/2 cup of milk with 1.5 tsp lemon juice or white vinegar. Let the mixture sit for a few minutes until it starts to curdle.

The longer you beat the sugar and butter, the better the result will be because this process incorporates air into the batter and makes the cake fluffy and tender

I recommend using fresh lemon juice but you can also bottled lemon juice

This cake would also taste great with lime juice or orange juice

NUTRITIONAL INFO:

Calories: 306kcal | Carbohydrates: 49g | Protein: 3g | Fat: 10g | Saturated Fat: 6g | Cholesterol: 58mg | Sodium: 144mg | Potassium: 98mg | Sugar: 34g | Vitamin A: 350IU | Vitamin C: 0.9mg | Calcium: 48mg | Iron: 1.1mg

Easy Layered Taco Bake Recipe

This layered Taco Bake is a simple and quick weeknight meal with layers of tortillas, ground beef and salsa con queso!

One food item I always seem to have in my pantry or in my fridge are flour tortillas. They are good for so many things. Tortillas can be made into so many different types of snacks for kids (and grownups). You can cut them up and fry them or bake them. You can make cinnamon chips, quesadillas, tortilla pizzas. The possibilities are endless and easy on the wallet too.

TIPS FOR MAKING LAYERED TACO BAKE:

Flour tortillas work best in this but if you absolutely must have corn tortillas, then you can certainly switch it out.

Ground turkey and chicken can be substituted for the ground beef.

Try making your own Taco Seasoning for this recipe!

If you like this recipe, you should give these Navajo Tacos a try!

A springform pan makes this easy to remove but an 8-inch round baking pan will work as well.

This meal is delicious served with Spanish style rice

If you are very sensitive to spices, you can certainly use a regular cheese dip instead of the salsa con queso.

Prep Time: 15minutes 

Cook Time: 30minutes 

Total Time: 45minutes

Servings: 6

Ingredients:

  • 1 pound ground beef
  • 1 packet taco seasoning
  • water as called for on back of seasoning packet (usually 3/4 cup water)
  • 1/2 cup salsa con queso
  • 3 (8-inch) flour tortillas (soft taco size)
  • 2 cups shredded Mexican cheese blend (divided use)

Instructions:

  1. Brown and crumble 1 pound ground beef. Drain excess grease.
  2. Add in 1 packet taco seasoning and water as called for on back of seasoning packet (usually 3/4 cup) following directions on back of seasoning packet.
  3. Once the taco meat is ready, turn off heat and add in 1/2 cup salsa con queso. Give it a good stir until thoroughly combined.
  4. Preheat oven to 350F degrees. Spray an 8-inch round baking pan with nonstick cooking spray.
  5. Layer the bottom of the pan with one of the 3 (8-inch) flour tortillas.
  6. Now add about 1/3 of the ground beef taco filling on the the first layer.
  7. Then add 1/3 of the 2 cups shredded Mexican cheese blend.
  8. Continue until you are done with all the layers: another tortilla, more taco mixture, more cheese.
  9. Bake at 350F degrees for about 15-20 minutes until cheese is melted and edges are slightly golden brown.
  10. Allow to cool for a couple of minutes. Slice and serve. Top with desired toppings.

Southern Fried Chicken Recipe

Southern Fried Chicken – One bite of this chicken’s crunchy, spicy outer layer followed by the tender, juicy meat inside, and you’ll understand why this is a true-blue Southern classic. Infused with spices for intense flavor and soaked in buttermilk tender juiciness, this is the perfect addition to your collection of chicken recipes!

Honestly, this is one of those recipes that is just plain irresistible. I never have leftovers, and everyone always goes back for seconds. Give this fried chicken a try, and you’ll understand what all the fuss is about. 😋

Besides being utterly tantalizing, this Southern-fried chick recipe is super affordable. Marinate simple chicken cuts in buttermilk, then coat them with seasoned flour, and voila!

Prep Time: 4hours 10minutes

Cook Time: 20minutes

Cooling Time: 10minutes

Total Time: 4hours 40minutes

Servings: 10

INGREDIENTS:

  • 1 whole chicken, cut into 10 pieces
  • 1½-2 teaspoons salt, adjust to preference
  • ½ -1 tablespoon hot sauce
  • 3-4 cloves garlic, crushed
  • 2-3 teaspoons Creole seasoning
  • 4 cups buttermilk (for both marinating and coating)
Chicken Coating
  • 3 cups all-purpose flour
  • 1 cup cornstarch
  • 2 teaspoons baking powder
  • 1 tablespoon paprika
  • 2 tablespoon garlic powder
  • 2 tablespoon onion powder
  • 1-1½ tablespoon dried herbs (thyme, oregano, parsley, etc.)
  • 1 teaspoon cayenne pepper
  • 1 teaspoon white pepper
  • 1 teaspoon salt, adjust to taste

INSTRUCTIONS:

Prepping the Chicken and Coating
  1. Place the chicken pieces in a large bowl. Then season it with salt, crushed garlic, hot sauce, and Creole seasoning.
  2. Pour some of the buttermilk over the marinated chicken, transfer the chicken to a gallon-sized zipper-lock freezer bag, and refrigerate for at least 4 hours (or overnight).
  3. Whisk together the flour, cornstarch, baking powder, paprika, garlic powder, onion powder, herbs, cayenne pepper, white pepper, and salt in a large bowl.
  4. Remove the marinated chicken from the buttermilk. Then dredge it in the flour mixture, shaking off any excess flour. You could use a Ziploc bag for this process, too.
  5. Double dip the chicken in the remaining buttermilk (add fresh buttermilk as needed), followed by the flour mixture – shake off any excess flour. Let the chicken rest for 10-15 minutes while preparing the oil. That will help the coating to stay on better.
Frying the Chicken
  1. Heat oil in a deep fryer or cast iron skillet to 375℉/190℃. The temperature will drop once you add chicken.
  2. Slowly and carefully place the chicken in the hot oil using a tong. Work in batches, and don’t overcrowd the skillet.
  3. Fry the chicken until golden brown, turning once every 10-15 minutes – depending on the size of the pieces. Chicken is done when it is no longer pink inside and its juices run clear, or your instant-read thermometer reads 165℉/75℃. You may do a test by piercing the chicken with a fork.
  4. Drain the chicken on paper towels and then transfer them to a wire rack.
  5. Repeat with remaining chicken pieces. Let them cool for at least 10 minutes before serving.

NOTES:

  • After you coat the chicken with the flour mixture and dip your chicken in buttermilk, let it rest first before frying it. That will allow your chicken to form a crust and warm to room temperature, which will help it cook evenly.
  • When frying, ensure your oil is at the right preheated temperature. If it’s too hot, the outside of your chicken will get burned; if it’s cold, the chicken will get soggy and greasy.
  • Don’t ever use extra virgin olive oil on fried chicken because it’ll result in bitter-tasting meat. Go for a neutral-tasting oil like canola, vegetable, or, preferably, peanut oil.
  • Don’t overcrowd your pan with chicken because it will lower the oil’s temperature and slow the cooking time (soggy chicken isn’t good). Do it in small batches instead.
  • A cast-iron pan is a must for a perfectly cooked fried chicken because it holds the temperature better and heats evenly, resulting in perfectly cooked chicken.
  • Rather than deep frying or submerging your chicken entirely into the pan or deep fryer, only ¾ of the chicken should be covered in hot oil. The weight of the chicken will cause it to sit just almost above the oil’s surface, creating a crispy crust without burning.
  • Don’t let anything fried sit on a paper towel too long because it’ll start to steam. Then your chicken might get soggy and stick to the paper towel. Instead, drain your chicken using a wire rack over a baking sheet, and they’ll cool crispy and dry all at once easily.
  • Please remember that the nutritional information is a rough estimate and can vary significantly based on the products used in the recipe.

NUTRITIONAL INFO:

Serving: 1piece | Calories: 242kcal | Carbohydrates: 49g | Protein: 8g | Fat: 2g | Saturated Fat: 1g | Polyunsaturated Fat: 0.3g | Monounsaturated Fat: 0.3g | Cholesterol: 4mg | Sodium: 764mg | Potassium: 338mg | Fiber: 2g | Sugar: 5g | Vitamin A: 665IU | Vitamin C: 3mg | Calcium: 175mg | Iron: 3mg

Peach Cobbler Recipe

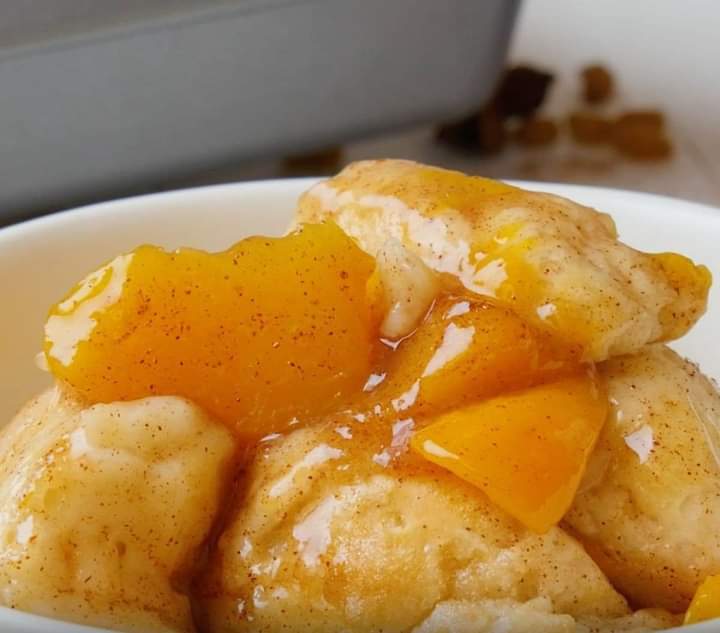
Mouth watering and easy, simple peach cobbler with self rising flour, sugar, butter and peaches.

Strike up the cobbler, because it’s fresh peach season. I have been waiting for July 1, so I can fresh peach bake, especially peach cobbler bake.

Best Peach Cobbler Recipe Baking Tips

Use ripe, fresh peaches for this easy cobbler recipe. Ripe peaches will deliver a sweet, juicy flavorful peach cobbler. See below for tips on how to ripen peaches more quickly.

I used around 5 cups of peaches for my four ingredient peach cobbler. That was 8 medium peaches.

Cut peaches in bite size pieces and all around the same size. Cutting your peaches all around the same size will allow even cooking and optimal texture in every bite.

Start checking your peach cobbler after it’s been in the over around 40 minutes. I have had it take up to an hour to cook. Make sure it is golden brown when you remove it from the oven.

You can substitute frozen peaches for fresh peaches. You will probably need 2.5 to 3.5 pounds of frozen peaches. See below for using frozen peaches in peach cobbler.

You can substitute canned peaches for fresh peaches. You will probably need 2.5 to 3 cans of canned peaches. See below for details.

This easy 4 ingredient peach cobbler is ridiculously delicious by itself, but friends you can always elevate your peach cobbler experience with a scoop of vanilla ice cream. Your taste buds will love that delicious, delightful dynamic duo.

Easy, tangy and delicious and only 4 ingredients.

Prep Time: 15mins

Cook Time: 45mins

Total Time: 1hr 

Servings: 16 servings 

Equipments

  • 9×13 baking dish
  • Dry Measuring Cups
  • Large Mixing Bowl
  • Spatula

INGREDIENTS:

  • 1¼ cups sugar
  • 1¼ cups butter
  • 1½ cups plus 2 TBS self rising flour
  • 4¼ to 5½ cups peaches cut in bite size pieces. I used around 5 cups (8 medium peaches).

INSTRUCTIONS:

  1. Preheat oven to 350°
  2. Place peaches, that have been cut into bite sized pieces, in 13×9 baking pan that has been greased or sprayed with baking spray. Set aside.
  3. 4¼ to 5½ cups peaches
  4. In large mixing bowl combine sugar, butter and self rising flour until crumbly.
  5. 1¼ cups sugar,1¼ cups butter,1½ cups plus 2 TBS self rising flour
  6. Sprinkle over peaches.
  7. Bake at 350° for 45 – 60 minutes or until golden brown.
  8. No need to cool. Eat up right away if you like.

Notes

  • Use ripe, fresh peaches for this easy cobbler recipe. Ripe peaches will deliver a sweet, juicy flavorful peach cobbler. See below for tips on how to ripen peaches more quickly.
  • Cut peaches in bite size pieces and all around the same size. Cutting your peaches all around the same size will allow even cooking and optimal texture in every bite.
  • Start checking your peach cobbler after it’s been in the over around 40 minutes. I have had it take up to an hour to cook. Make sure it is golden brown when you remove it from the oven.
  • You can substitute frozen peaches for fresh peaches. You will probably need 2.5 to 3.5 pounds of frozen peaches. See below on using frozen peaches in peach cobbler.
  • You can substitute canned peaches for fresh peaches. You will probably need 1.5 to 2 cans of canned peaches. See below for details.
  • This easy 4 ingredient peach cobbler is ridiculously delicious by itself, but friends you can always elevate your peach cobbler experience with a scoop of vanilla ice cream. Your taste buds will love that delicious, delightful dynamic duo.
Nutritional Info:

Calories: 252kcal

Stuffed Cabbage Rolls Recipe

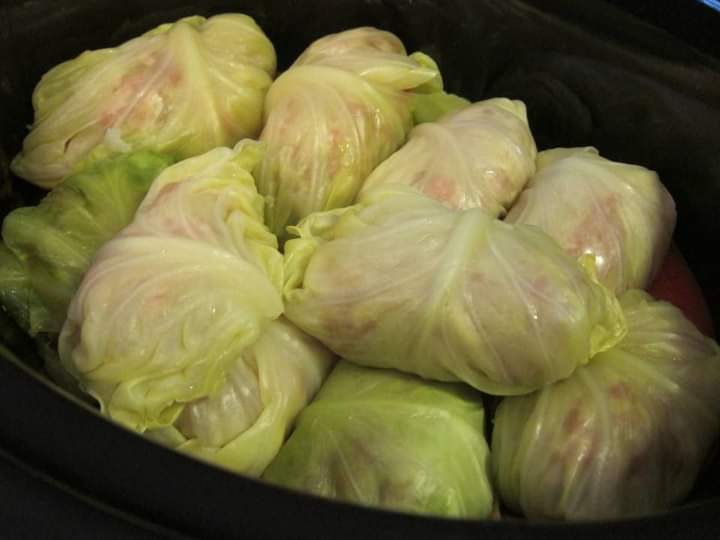
This cabbage rolls recipe is super easy to prep with cabbage leaves, ground beef, rice, and condensed tomato soup. I have been using this recipe for well over 20 years and still love it! To speed things up the rolls are cooked in a skillet on the stovetop but this recipe also works well in a slow cooker.

Prep Time: 15 mins

Cook Time: 1 hr

Total Time: 1 hr 15 mins

INGREDIENTS:

  • ⅔ cup water
  • ⅓ cup uncooked white rice
  • 8 cabbage leaves
  • 1 pound lean ground beef
  • ¼ cup chopped onion
  • 1 egg, slightly beaten
  • 1 (10.5 ounce) can condensed tomato soup, divided
  • 1 teaspoon salt
  • ¼ teaspoon ground black pepper

INSTRUCTIONS:

  1. Bring water and rice to a boil in a saucepan. Reduce heat to low, cover, and simmer until rice is tender and liquid has been absorbed, about 20 minutes.
  2. Meanwhile, bring a large, wide saucepan of lightly salted water to a boil. Add cabbage leaves and cook for 2 to 4 minutes or until softened; drain.
  3. Combine ground beef, 1 cup of cooked rice, onion, egg, 2 tablespoons of tomato soup, salt, and pepper in a large bowl; mix thoroughly.
  4. Spoon about 2 tablespoons of beef mixture onto each cabbage leaf; bring one end of the cabbage leaf over the mixture, rolling and tucking in the ends to prevent the filling from falling out.
  5. Place cabbage rolls in a large skillet over medium heat; pour remaining tomato soup on top. Cover and bring to a boil; reduce heat to low and simmer for about 40 minutes, stirring and basting with the liquid often.

NUTRITIONAL INFO:

CALORIES 223 Total Fat 13g Saturated Fat 5g Cholesterol 66mg Sodium 657mg Total Carbohydrates 13g Dietary Fiber 1g Total Sugars 3g Protein 13g Vitamin C 25mg Calcium 33mg Iron 2mg Potassium 338mg

Creamy Carrot Cake Recipe

This is the best carrot cake recipe I’ve ever used. We prefer to use a hand grater when preparing the carrots since it creates delicate carrot shreds that melt into the cake batter. Pre-shredded bags or shredding carrots using a food processor are also options, but the carrot shreds will be larger.

This recipe is forgiving. You can make this with or without the nuts or raisins. We love the combination of granulated and brown sugar, but if you only have one of them, use it, and the cake will still be delicious.

Frosting: Our creamy frosting recipe shared below is not a traditional cream cheese frosting. Thanks to whipped cream, it’s creamier and has soft peaks (you can see it in our video). We love it, but if you prefer a more traditional frosting, see the tips section below the recipe. We have provided instructions for a classic cream cheese frosting that works nicely with this cake.

PREP Time: 20 min

COOK TIME: 45 min

TOTAL TIME:  1hrs 5min

Makes 1 (9-inch) double layer cake (16 thin slices) or 22 to 24 cupcakes

INGREDIENTS:

FOR CARROT CAKE
  • 2 cups (260 grams) all-purpose flour
  • 2 teaspoons baking soda
  • 1/2 teaspoon fine sea salt
  • 1 ½ teaspoons ground cinnamon
  • 1 ¼ cups (295 ml) canola or other vegetable oil
  • 1 cup (200 grams) granulated sugar
  • 1 cup (190 grams) lightly packed brown sugar
  • 1 teaspoon vanilla extract
  • 4 large eggs, at room temperature
  • 3 cups (300 grams) grated peeled carrots, 5 to 6 medium carrots
  • 1 cup (100 grams) coarsely chopped pecans
  • 1/2 cup (65 grams) raisins
FOR CREAMY FROSTING
  • 8 ounces (225 grams) cream cheese, at room temperature
  • 1 ¼ cups (140 grams) powdered sugar
  • 1/3 cup (80 ml) cold heavy whipping cream
  • 1/2 cup (50 grams) coarsely chopped pecans, for topping cake

DIRECTIONS:

MAKE THE BATTER

  1. Position a rack in the middle of the oven. Grease two 9-inch round cake pans, line the bottom with parchment paper and then grease the top. Or grease and flour the bottom and sides of both pans.
  2. Heat the oven to 350 degrees Fahrenheit (176C).
  3. Whisk flour, baking soda, salt, and cinnamon in a medium bowl until very well blended.
  4. In a separate bowl, whisk the oil, granulated sugar, brown sugar, and vanilla.
  5. Add the eggs, one at a time, whisking after each one.
  6. Switch to a large rubber spatula. Scrape the sides and bottom of the bowl, then add the dry ingredients in three parts, gently stirring until they disappear and the batter is smooth.
  7. Stir in the carrots, nuts, and raisins.

BAKE CAKE

  1. Divide the cake batter between the prepared cake pans.
  2. Bake until the tops of the cake layers are springy when touched and when a toothpick inserted into the center of the cake comes out clean, 35 to 45 minutes.
  3. Cool cakes in the pans for 15 minutes, then carefully turn the cake layers out onto cooling racks. Remove the parchment paper and cool completely.
  4. If you find that a cake layer is sticking to the bottom of the pan, leave the cake pan upside down and allow gravity to do its thing.

TO FINISH

  1. In a large bowl, beat the cream cheese with a handheld mixer on medium speed until creamy, about 1 minute.
  2. Beat in the powdered sugar, a 1/4 cup at a time, until fluffy.
  3. Pour in the whipping cream. Beat on medium speed for 2 to 3 minutes, or until the frosting is whipped and creamy. This frosting resembles the texture of whipped cream. Chill covered until ready to frost the cake.
  4. When the cake layers are completely cool, frost the top of one cake layer, and place the second cake layer on top.
  5. Add the remaining frosting to the top of the carrot cake and use a butter knife or small spatula to swirl the frosting around. Leave the sides of the cake unfrosted. Finish with a handful of nuts on top.

Frosting Substitute — Traditional Cream Cheese Frosting: In a large bowl, beat 16 ounces of cream cheese and 1/2 cup of softened butter together for a minute or two until smooth. Add 4 1/2 cups of powdered sugar, 1 1/4 teaspoons of vanilla extract, and a pinch of salt. Beat for 2 to 3 minutes until extra creamy. If it is too thick, add 1 tablespoon of cream or milk.

How to Make Carrot Cake Cupcakes: For cupcakes, we’d recommend baking for 14 to 18 minutes (or until a tester inserted into the center of one comes out clean). Then let them cool for a few minutes in the cupcake pan before transferring them to a cooling rack. The recipe should make 22 to 24 cupcakes.

Using a bundt pan: We have never done this in our kitchen, but a 10-cup or 12-cup Bundt pan should be fine for this recipe. You will likely need to increase the baking time by about 30% in the 10-cup pan, somewhat less in the 12-cup.

Using a 9-inch by 13-inch pan rectangular pan: Simply add all the batter to the rectangular pan and bake. Bake time may be slightly longer.

NUTRITION PER SERVING:

Serving Size 1 slice (1 of 16) / Calories 535 / Total Fat 33.4g / Saturated Fat 6.9g / Cholesterol 69.3mg / Sodium 315.9mg / Carbohydrate 56.4g / Dietary Fiber 2.4g / Total Sugars 40.5g / Protein 5.6g