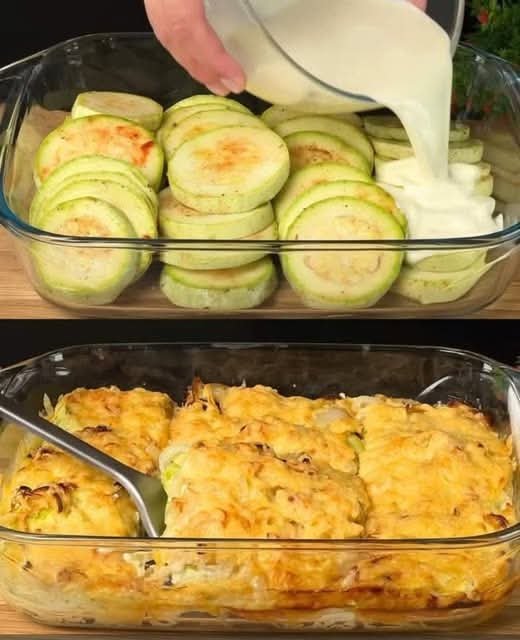
Baked Zucchini with Cheese

Baked Zucchini with Cheese

A creamy, golden-brown vegetable bake featuring tender zucchini and a savory yogurt-egg glaze.


Prep time: 15 minutes


Cook time: 30–35 minutes


Servings: 4 side portions


Ingredients

2 zucchini, sliced into rounds


2 onions, thinly sliced into rounds

2 cloves garlic, finely chopped


2 eggs


150 g yogurt (plain or Greek)


150 g cheese, grated (such as Mozzarella or Cheddar)


Seasonings: Salt, black pepper, paprika, and vegetable seasoning to taste


Oil for greasing and cooking

Instructions

1. Prepare the Vegetables

Preheat your oven to 390°F (200°C). Lightly grease a glass baking dish with oil. Season the zucchini rounds with salt, black pepper, paprika, and vegetable seasoning.


2. Layer the Dish

Arrange the seasoned zucchini rounds and sliced onions in rows in the baking dish, overlapping them slightly to fill the pan. Sprinkle the chopped garlic evenly over the top.


3. Mix the Creamy Glaze

In a small bowl, whisk together the 2 eggs and 150 g of yogurt until smooth. Season this mixture with a pinch of salt and pepper if desired.


4. Top and Bake

Pour the yogurt and egg mixture evenly over the rows of vegetables, ensuring they are well-coated. Sprinkle the 150 g of grated cheese generously over the entire surface.


5. Bake to Perfection

Place the dish in the oven and bake for 30–35 minutes, or until the zucchini is tender and the cheese topping is bubbly and deep golden brown.


6. Serve

Let the dish rest for 5 minutes before serving to allow the creamy sauce to set.

Recipe Variations

Extra Protein: You can tuck slices of cooked ham or turkey between the zucchini layers.


Herb Freshness: Top with fresh chopped parsley or dill after baking for a burst of color and flavor.


Keto Cheddar Quick Bread

Keto Cheddar Quick Bread

Savory, fluffy, and sturdy—perfect for toasting or sandwiches.

  • Prep time: 15 mins

  • Cook time: 40–50 mins

  • Yield: 1 Loaf (approx. 10–12 slices)

Ingredients

Dry Team:

  • 2 cups Almond flour (super-fine)

  • 1 tsp Baking powder

  • ½ tsp Baking soda

  • ½ tsp Salt

  • ½ tsp Garlic powder

  • 1 tbsp Ground psyllium husk powder (this is the secret to a “bread-like” chew)

Wet Team:

  • 3 Large eggs

  • ¼ cup Heavy cream

  • ¼ cup Sour cream (or plain Greek yogurt)

  • ¼ cup Unsalted butter, melted and cooled

The Star:

  • 1 ½ cups Shredded sharp cheddar cheese (plus extra for the crust)

  • Optional: 1 tbsp fresh chives or jalapeño slices for a kick.


Instructions

  1. Prep: Preheat your oven to 375°F (190°C). Line an 8×4 inch loaf pan with parchment paper, leaving an overhang on the sides to easily lift the bread out later.

  2. Mix Dry: In a large bowl, whisk together the almond flour, baking powder, baking soda, salt, garlic powder, and psyllium husk. Ensure there are no large clumps.

  3. Mix Wet: In a separate medium bowl, beat the eggs well. Whisk in the heavy cream, sour cream, and melted butter until the mixture is smooth.

  4. Combine: Pour the wet ingredients into the dry ingredients. Stir with a spatula until a thick, uniform batter forms.

  5. Add Cheese: Fold in 1 ¼ cups of the shredded cheddar (and chives/jalapeños if using) until evenly distributed.

  6. Transfer: Spread the batter into the prepared loaf pan. The batter will be thick, so use your spatula to smooth the top. Sprinkle the remaining ¼ cup of cheese over the top.

  7. Bake: Bake for 40 to 50 minutes.

    • Test: Insert a toothpick into the center; it should come out clean, and the top should be golden brown and firm to the touch.

  8. The Cooling Rule: This is the hardest part! Let the bread cool in the pan for 10 minutes, then lift it out using the parchment paper and move it to a wire rack. Let it cool completely before slicing. Keto breads use eggs and cheese for structure; if you cut it while hot, it may seem moist or “eggy.”


Nutrition Note (Per Slice)

Since this is a Keto recipe, it’s naturally low-carb.

  • Net Carbs: Approximately 3–4g per slice.

  • Protein: High (thanks to the almond flour, eggs, and cheese).

Keto Cheddar Quick Bread

Keto Cheddar Quick Bread

Savory, fluffy, and sturdy—perfect for toasting or sandwiches.

  • Prep time: 15 mins

  • Cook time: 40–50 mins

  • Yield: 1 Loaf (approx. 10–12 slices)

Ingredients

Dry Team:

  • 2 cups Almond flour (super-fine)

  • 1 tsp Baking powder

  • ½ tsp Baking soda

  • ½ tsp Salt

  • ½ tsp Garlic powder

  • 1 tbsp Ground psyllium husk powder (this is the secret to a “bread-like” chew)

Wet Team:

  • 3 Large eggs

  • ¼ cup Heavy cream

  • ¼ cup Sour cream (or plain Greek yogurt)

  • ¼ cup Unsalted butter, melted and cooled

The Star:

  • 1 ½ cups Shredded sharp cheddar cheese (plus extra for the crust)

  • Optional: 1 tbsp fresh chives or jalapeño slices for a kick.


Instructions

  1. Prep: Preheat your oven to 375°F (190°C). Line an 8×4 inch loaf pan with parchment paper, leaving an overhang on the sides to easily lift the bread out later.

  2. Mix Dry: In a large bowl, whisk together the almond flour, baking powder, baking soda, salt, garlic powder, and psyllium husk. Ensure there are no large clumps.

  3. Mix Wet: In a separate medium bowl, beat the eggs well. Whisk in the heavy cream, sour cream, and melted butter until the mixture is smooth.

  4. Combine: Pour the wet ingredients into the dry ingredients. Stir with a spatula until a thick, uniform batter forms.

  5. Add Cheese: Fold in 1 ¼ cups of the shredded cheddar (and chives/jalapeños if using) until evenly distributed.

  6. Transfer: Spread the batter into the prepared loaf pan. The batter will be thick, so use your spatula to smooth the top. Sprinkle the remaining ¼ cup of cheese over the top.

  7. Bake: Bake for 40 to 50 minutes.

    • Test: Insert a toothpick into the center; it should come out clean, and the top should be golden brown and firm to the touch.

  8. The Cooling Rule: This is the hardest part! Let the bread cool in the pan for 10 minutes, then lift it out using the parchment paper and move it to a wire rack. Let it cool completely before slicing. Keto breads use eggs and cheese for structure; if you cut them while hot, they may seem moist or “eggy.”


Nutrition Note (Per Slice)

Since this is a keto recipe, it’s naturally low-carb.

  • Net Carbs: Approximately 3–4 g per slice.

  • Protein: High (thanks to the almond flour, eggs, and cheese).

Healing Garden Vegetable Soup

Healing Garden Vegetable Soup

A nourishing, cozy vegetable soup packed with vitamins, minerals, and anti-inflammatory goodness. Light yet satisfying, this soup is perfect for daily meals, family dinners, and anyone looking to feel better from the inside out.

 Description

This Healing Garden Vegetable Soup is loaded with fresh vegetables simmered gently in a flavorful broth. It’s naturally low in calories, rich in fiber, and bursting with antioxidants. The flavors are clean, comforting, and deeply satisfying—making it a soup your body and your family will crave again and again.

 Ingredients

  • 1 tbsp olive oil

  • 1 medium onion, finely chopped

  • 2 cloves garlic, minced

  • 2 carrots, diced

  • 2 celery stalks, chopped

  • 1 medium potato, thinly sliced

  • 1½ cups broccoli florets

  • 1 zucchini, sliced

  • 1 cup green beans, chopped

  • 6 cups vegetable broth (low sodium)

  • 1 tsp dried thyme

  • ½ tsp turmeric (optional, for healing boost)

  • Salt and black pepper to taste

  • Fresh parsley or dill, chopped (for garnish)

  • Juice of ½ lemon (optional, for brightness)

 Instructions

  1. Heat olive oil in a large pot over medium heat.

  2. Add onion and sauté for 3–4 minutes until soft and translucent.

  3. Stir in garlic and cook for 30 seconds until fragrant.

  4. Add carrots, celery, and potato. Cook for 5 minutes, stirring occasionally.

  5. Pour in vegetable broth and bring to a gentle boil.

  6. Reduce heat and simmer for 10 minutes.

  7. Add broccoli, zucchini, and green beans.

  8. Season with thyme, turmeric, salt, and pepper.

  9. Simmer for another 8–10 minutes until vegetables are tender but vibrant.

  10. Finish with lemon juice if using.

  11. Serve hot, garnished with fresh herbs.

Notes

  • Keep vegetables slightly firm to preserve nutrients.

  • Chop vegetables evenly for consistent cooking.

  • This soup tastes even better the next day!

 Tips for Best Results

  • Use fresh, seasonal vegetables whenever possible

  • Don’t overcook—bright color means more nutrients

  • Add leafy greens (spinach or kale) at the end for extra benefits

  • A pinch of chili flakes adds gentle warmth

 Servings

  • Serves: 4–6 people

  • Prep Time: 15 minutes

  • Cook Time: 25 minutes

Nutritional Information (per serving, approx.)

  • Calories: 120

  • Protein: 4 g

  • Carbohydrates: 20g

  • Fiber: 6 g

  • Fat: 3 g

  • Sodium: varies by broth

Health Benefits

  • Supports digestion and gut health

  • Rich in antioxidants and vitamins A, C, and K

  • Anti-inflammatory and immune-boosting

  • Helps with hydration and detox support

  • Light, comforting, and easy on the stomach

 Q & A

Q: Can I eat this soup every day?
Absolutely! It’s balanced, light, and nutrient-dense.

Q: Can I freeze it?
Yes—store in airtight containers for up to 3 months.

Q: Can I add protein?
Of course! Add lentils, chickpeas, beans, or shredded chicken.

Q: Is this soup good for weight management?
Yes—low calorie, high fiber, and very filling.

Crockpot Christmas Crack

Crockpot Christmas Crack (Chocolate Peanut Clusters)

A massive batch of sweet, salty, and crunchy holiday treats.

  • Prep time: 10 minutes

  • Cook time: 2 hours 30 minutes

  • Yield: 40–50 clusters

Ingredients

  • 16 oz Salted Peanuts

  • 16 oz Unsalted Peanuts (using a mix balances the salt perfectly)

  • 12 oz bag Semi-Sweet Chocolate Chips

  • 10 oz bag Peanut Butter Chips

  • 10 oz bag White Chocolate Chips (or Vanilla Almond Bark/Wafers)

  • Holiday Sprinkles (Red, green, and white)


Instructions

  1. Layer the Peanuts: Pour both the salted and unsalted peanuts into the bottom of a 5-quart (or larger) slow cooker. Spread them out into an even layer.

  2. Add the Sweets: Layer the chips on top of the peanuts in this order:

    • Semi-sweet chocolate chips

    • Peanut butter chips

    • White chocolate chips (or wafers) on top.

    • Note: Do not stir yet! Keep the layers as they are.

  3. Low & Slow Cook: Cover with the lid and set the Crockpot to LOW. Cook for 2 hours.

  4. The First Stir: Remove the lid. Use a heavy spoon to stir everything together until the peanuts are completely coated in a smooth, uniform chocolate-peanut butter mixture.

  5. Final Melt: Replace the lid and cook on LOW for another 30 minutes. Give it one final, thorough stir.

  6. Scoop and Decorate: * Line your counter or baking sheets with parchment paper (or use mini cupcake liners for a cleaner look).

    • Drop the mixture by the tablespoon onto the paper.

    • Immediately add your Christmas sprinkles while the chocolate is still wet.

  7. Set and Cool: Allow the candy to sit at room temperature for at least 1–2 hours until fully hardened. If your kitchen is warm, you can pop the trays in the fridge to speed this up.


Success Tips for the Perfect Batch

  • Avoid the “High” Setting: Chocolate is temperamental. Never use the “High” setting on your slow cooker, or the chocolate will seize and turn grainy.

  • The Condensation Trick: If your slow cooker lid tends to collect a lot of steam, place a clean tea towel or double layer of paper towels across the top of the Crockpot before putting the lid on. This prevents water droplets from falling into the chocolate (which can cause it to ruin).

  • Storage: Store these in an airtight container in a cool place. They also freeze beautifully if you want to make them weeks in advance!

Ingredients (1–2 servings)


1 tsp fresh rosemary (or ½ tsp dried)


1 tsp fresh turmeric root, sliced (or ½ tsp ground turmeric)


1 cinnamon stick


2 cups water


Optional:


½ tsp fresh ginger


A squeeze of lemon


1 tsp raw honey (optional & not recommended for people managing blood sugar)


🔥 Instructions


Bring the water to a gentle boil.


Add turmeric, cinnamon, and rosemary.


Reduce heat and simmer for 10–15 minutes.


Strain into a mug.


Add lemon or honey if desired.


Sip warm.


📝 Description


This earthy, aromatic infusion combines warming spices and herbs long used in traditional wellness practices. It’s soothing, gently stimulating, and perfect as a daily ritual drink.


💡 Tips for Best Results


Use fresh turmeric when possible — it’s more fragrant and potent.


Add a pinch of black pepper to improve turmeric absorption.


Drink consistently, not excessively (1 cup per day is plenty).


Best enjoyed after meals or in the evening.


🍵 Servings


Makes 1 large cup or 2 small cups


Recommended: 1 serving daily