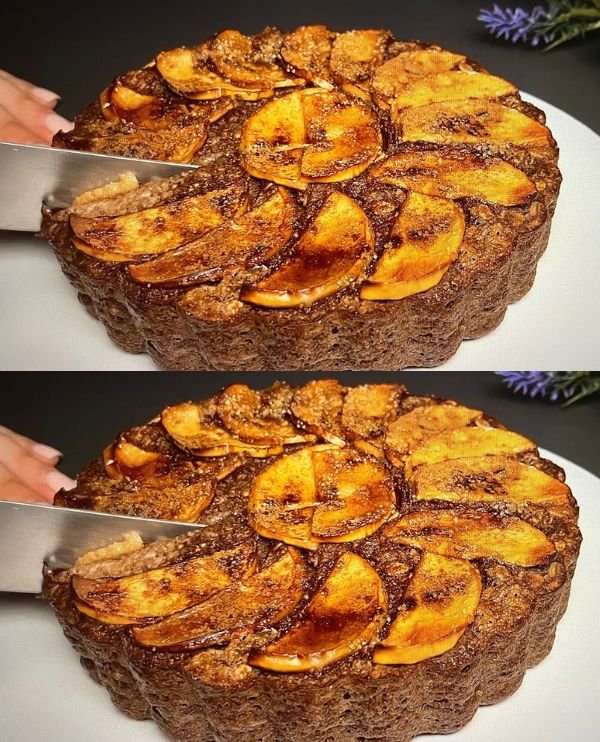
Easy & Delicious Oatmeal Apple Cake

Easy & Delicious Oatmeal Apple Cake


🧾 Ingredients

  • 200 g oat flakes

  • 250 ml milk

  • 3 eggs (room temperature)

  • 2 ripe bananas

  • 1 apple

  • Cinnamon, to taste

Optional (for extra flavor or texture):

  • 1 tablespoon honey or maple syrup (only if bananas are not sweet)

  • A handful of chopped walnuts or pecans


👩‍🍳 Instructions

1. Soak the Oats

Place the oat flakes in a large mixing bowl.

Pour in the milk and stir well.

Let the mixture rest for 10 minutes so the oats soften and absorb the liquid. This helps create a moist and tender cake texture.


2. Prepare the Fruit

Peel the bananas and mash them with a fork until smooth.

Wash the apple, remove the core, and slice it into thin, even slices. Set aside for topping.


3. Make the Batter

Add the mashed bananas to the soaked oats.

Crack in the eggs.

Add cinnamon according to your taste.

Mix everything thoroughly with a whisk or spoon until the batter is smooth and evenly combined.

If using honey or maple syrup, stir it in now.


4. Prepare for Baking

Preheat your oven to 180°C (350°F).

Grease a round cake pan or line it with baking paper.

Pour the batter into the pan and spread it evenly.

Arrange the apple slices neatly on top in a circular or decorative pattern.

If using nuts, sprinkle them over the top.


5. Bake

Place the pan in the preheated oven.

Bake for 35–40 minutes, or until:

  • The cake feels firm in the center

  • A toothpick inserted into the middle comes out clean

  • The apple slices on top are lightly golden

Remove from the oven and let the cake cool in the pan for about 10–15 minutes.


🍽 Serving Suggestions

Serve:

  • Warm or cold

  • With tea or coffee

  • With yogurt or a light drizzle of honey

  • As a breakfast cake or snack


⭐ Helpful Tips

✔ Use ripe bananas for natural sweetness
✔ Thin apple slices bake more evenly
✔ Do not overbake to keep the cake soft
✔ You can add raisins or dates for extra sweetness


📦 Storage

  • Store covered at room temperature for 1 day

  • Refrigerate for up to 3 days

  • Can be frozen in slices for up to 1 month

Grandma’s Chocolate Yogurt Marble Cake

Grandma’s Chocolate Yogurt Marble Cake
This soft and moist cake combines rich chocolate batter with creamy yogurt filling, creating a beautiful marbled look and a tender texture in every slice.


🧾 Ingredients

For the Cake Batter:

  • 3 eggs (room temperature)

  • 150 g (¾ cup) sugar

  • 110 ml vegetable or sunflower oil

  • 110 ml milk

  • 250 g (about 1⅔ cups) all-purpose flour

  • 15 g baking powder

  • 20 g cocoa powder

  • 2 tablespoons milk (for cocoa mixture)

  • A dash of vanilla extract

  • A pinch of salt


For the Yogurt Filling:

  • 300 g thick yogurt or Greek yogurt

  • 1 egg

  • 50 g sugar

  • 1 tablespoon cornstarch


👩‍🍳 Instructions

1. Prepare the Base Batter

In a large mixing bowl, add:

  • Eggs

  • Sugar

  • Salt

  • Vanilla extract

Whisk well until the mixture becomes pale and slightly thick.

Slowly add:

  • Oil

  • Milk

Whisk again until fully combined.

Sift in:

  • Flour

  • Baking powder

Fold gently using a spatula until smooth and lump-free. Do not overmix.


2. Make the Chocolate Batter

Transfer about one-third of the batter into a separate bowl.

In another small bowl, mix:

  • Cocoa powder

  • 2 tablespoons milk

Stir to form a smooth paste.

Add this cocoa paste to the smaller portion of batter and mix until dark and well blended.


3. Prepare the Yogurt Filling

In a bowl, combine:

  • Yogurt

  • Egg

  • Sugar

  • Cornstarch

Whisk until smooth and creamy. Set aside.


4. Assemble the Cake

Preheat oven to 180°C (350°F).

Grease a round cake pan or springform pan.

Pour the chocolate batter into the pan and spread evenly.

Pour the plain batter over the chocolate layer.

Use a skewer or knife to gently swirl the batters together to create a marble effect.

Spoon small dollops of the yogurt mixture on top. They will sink slightly during baking and create creamy pockets inside the cake.


5. Bake

Place the pan in the oven and bake for 35–45 minutes.

Check doneness by inserting a toothpick into the cake portion (not the yogurt spots). It should come out clean.

Remove from oven and let the cake cool completely in the pan before removing.


🍽 Serving

Slice and serve:

  • Plain

  • With tea or coffee

  • Lightly dusted with powdered sugar

  • With fresh fruit


⭐ Helpful Tips

✔ Do not overmix the batter
✔ Use thick yogurt for best texture
✔ Let cake cool fully before slicing
✔ Add chocolate chips for extra richness


📦 Storage

  • Store covered at room temperature for 1 day

  • Refrigerate for up to 3 days

  • Can be frozen for up to 1 month

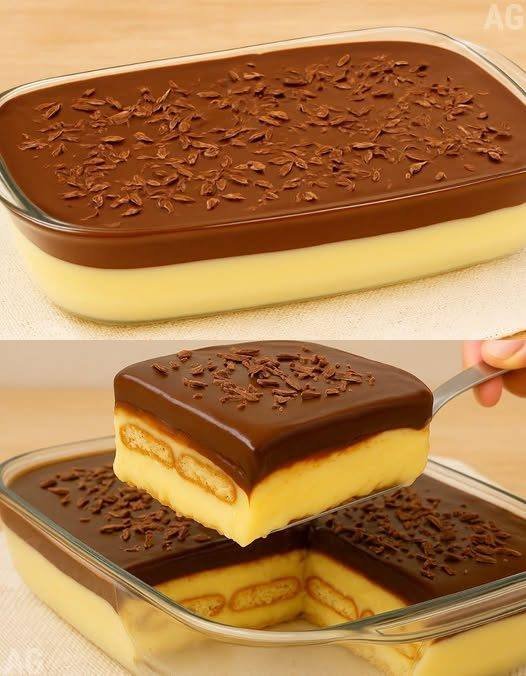
Dreamy Creamy Dessert: Delicious recipe made in a glass dish

Hello, everyone, today we’re going to learn how to make Creamy Dessert using simple ingredients. So grab your pen and paper to jot down the ingredients, then follow the complete preparation method.

How to Make Dreamy Creamy Dessert

An irresistible dessert with smooth cream, crunchy cookies, and just the right touch of chocolate. Perfect for parties and special occasions. See below the list of all ingredients and required quantities. And then, a very complete preparation method with details of the recipe.

Recipe Ingredients:

White Cream:

  • 2 egg yolks
  • 1 can sweetened condensed milk (14 oz / 395g)
  • 2 cups milk (16 fl oz / 480ml)
  • 2 tablespoons cornstarch (0.7 oz / 20g)
  • 1 teaspoon vanilla extract (0.17 oz / 5ml)

Chocolate Ganache:

  • 7 oz chopped semi-sweet chocolate (200g)
  • 1 small box of table cream or heavy cream (6.7 oz / 200g)

Assembly:

  • 1 package of ladyfinger or Maria cookies (about 6 oz / 170g)
  • Milk for soaking the cookies
  • Chocolate sprinkles or chocolate shavings (optional)

Instructions:

White Cream:
First, in a saucepan, combine the sweetened condensed milk, milk, egg yolks, and cornstarch. Stir well before turning on the heat to ensure all ingredients are fully mixed.

Then, place over medium heat, stirring constantly, until the mixture thickens into a creamy consistency.

Right after that, turn off the heat and stir in the vanilla extract. Set aside and let it cool completely.

Ganache:
Next, melt the chocolate using a double boiler or microwave, heating it in 30-second intervals and stirring in between.

After that, add the heavy cream to the melted chocolate and mix until smooth and glossy.

Assembly:
Afterwards, in a glass baking dish, make a layer using cookies dipped in milk. Then, spread half of the white cream on top of the cookies.

Next, add another layer of milk-dipped cookies, followed by the remaining white cream.

To finish, pour the chocolate ganache over the top. If you like, decorate with chocolate sprinkles or shavings.

Lastly, refrigerate for at least 3 hours before serving, so the dessert sets properly and is nicely chilled.

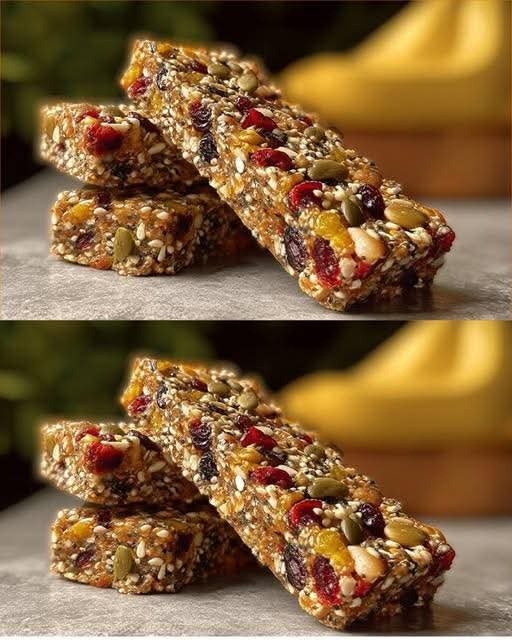
Delicious Nut and Date Energy Bars for a Quick Snack

Delicious Nut and Date Energy Bars for a Quick Snack

If you’re on the hunt for a healthy yet tasty snack, look no further! These Nut and Date Energy Bars are packing a serious punch in both flavor and nutrition. Perfect as a quick pick-me-up or a pre-workout boost, they’re made with wholesome ingredients that are not only good for you but also incredibly satisfying. Their chewy texture, coupled with the crunch from the nuts and seeds, makes them a delightful treat that’s hard to resist. Plus, they’re super easy to whip up at home!


Ingredients You’ll Need

To create your own Nut and Date Energy Bars, you’ll need the following ingredients:


75 g (1/2 cup or 2.6 oz) almonds

50 g (1/2 cup or 1.8 oz) walnuts

50 g (1/2 cup or 1.8 oz) pumpkin seeds

250 g (1 2/3 cups or 8.8 oz) pitted dates

100 g (1/3 cup or 3.5 oz) peanut butter

40 g (1/4 cup or 1.4 oz) dried cranberries

1 pinch of salt

How to Make Nut and Date Energy Bars

Follow these simple steps to create your Nut and Date Energy Bars:

Line an 8×8 inch baking dish with parchment paper to make removing the bars easier.

Using a food processor, coarsely chop the almonds, walnuts, and pumpkin seeds.

Add the pitted dates to the processor. Blend everything together until it becomes a clumpy mixture. If your dates are dry, soak them in warm water for a bit before adding them.

Mix in the peanut butter and a pinch of salt. Blend until you achieve a dough-like consistency.

Stir in the dried cranberries either by hand or with a quick pulse in the processor.

Transfer the mixture to the prepared baking dish and press it down firmly into an even layer.

Place the dish in the refrigerator for at least 1 hour to let the bars firm up.

Once they are firm, lift the mixture out of the dish and slice it into bars. Store any leftovers in the refrigerator.

Why Everyone Is Loving This Nut and Date Energy Bars

With a growing interest in healthy snacking options, people are searching for recipes like these Nut and Date Energy Bars now more than ever. They’re not only convenient but also cater to a variety of dietary preferences, making them a fantastic choice for anyone looking to eat healthier. Packed with protein, fiber, and essential nutrients, these bars are perfect for those busy days when you need that extra energy without compromising on quality.


How to Serve Nut and Date Energy Bars

These delicious energy bars can be enjoyed at any time of the day! Grab one for breakfast as you rush out the door, enjoy them as a mid-afternoon snack, or even serve them at your next gathering as a healthy treat. They pair wonderfully with a cup of yogurt or a smoothie for a balanced meal. You can also sprinkle some extra pumpkin seeds or chopped nuts on top for added crunch if you like!


Expert Tips for Nut and Date Energy Bars

Storage: Keep your energy bars in an airtight container in the fridge for up to two weeks. They also freeze well if you want to make a larger batch ahead of time.

Flavor Variations: Feel free to swap in other nuts like cashews or hazelnuts, or try adding a bit of cocoa powder for a chocolatey twist!

Dietary Swaps: If you’re allergic to peanuts, almond or cashew butter can be a delightful alternative.

Nut and Date Energy Bars: Frequently Asked Questions

1. Can I use other types of nuts?

Absolutely! You can try different nuts or seeds based on your preference.

2. How can I make these bars sweeter?

If you prefer a sweeter bar, consider adding a touch of honey or maple syrup before blending.


3. Are these bars suitable for kids?

Yes, they make a great healthy snack for kids and can be packed in lunchboxes!


Take a little time to make these Nut and Date Energy Bars at home. They’re not only easy to prepare, but they also offer a great way to refuel your body naturally. Enjoy the chewy goodness for yourself and share them with family and friends!

Strawberry Pineapple Mango Smoothie

Strawberry Pineapple Mango Smoothie

Ingredients

Strawberry: 4–5 fresh or frozen berries.


Pineapple: 1/2 cup fresh or frozen chunks.


Mango: 1/2 cup fresh or frozen chunks.


Chia Seeds: 1 tablespoon.


Liquid Base: 1 cup of your choice (Water, Coconut Water, or Almond Milk work best for this flavor profile).


Optional: A squeeze of lime or a teaspoon of honey if you prefer it extra sweet.


Instructions

Prep the Fruit: Wash the strawberries and remove the green stems. If using fresh mango and pineapple, peel and dice them into cubes.


Combine: Add the strawberries, pineapple, mango, and chia seeds into your blender.


Add Liquid: Pour in your chosen liquid base. Using frozen fruit will result in a thicker, colder smoothie; if using fresh fruit, you may want to add 1/2 cup of ice.


Blend: Start on a low speed and gradually increase to high. Blend for about 45–60 seconds until the chia seeds are well incorporated and the mixture is completely smooth.


Serve: Pour into a glass and enjoy immediately.


Why this combination works:

Mango & Pineapple: Provide a creamy texture and a burst of tropical Vitamin C.


Strawberries: Add a light tartness and antioxidants.


Chia Seeds: These are “powerhouse” seeds that add healthy Omega-3 fatty acids and help keep you feeling full longer.

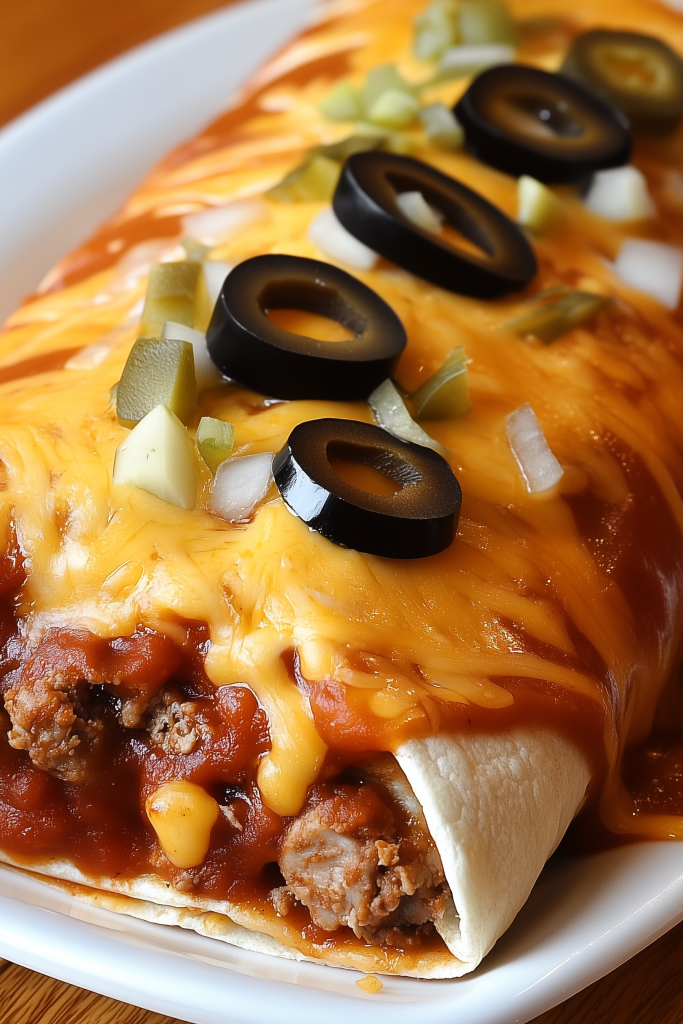
Homemade Enchirito (Taco Bell–Style)

Homemade Enchirito (Taco Bell–Style)
This dish combines the best of a burrito and enchilada: a soft tortilla filled with seasoned beef and beans, topped with flavorful sauce and melted cheese. It’s comforting, hearty, and perfect for family meals.


🧾 Ingredients (Serves 4)

🔸 Beef Filling:

  • 1⅓ lb (600 g) ground beef

  • 1½ tbsp masa harina (corn flour)

  • 4½ tsp chili powder

  • ½ tsp onion powder

  • ½ tsp garlic powder

  • ½ tsp seasoning salt

  • ½ tsp paprika

  • ¼ tsp ground cumin

  • ½ tsp garlic salt

  • ¼ tsp sugar

  • 1 tsp dried minced onion

  • ½ tsp beef bouillon powder

  • ¾ to 1 cup water


🔸 Sauce:

  • 8 oz (1 cup) tomato sauce

  • ⅓ cup water

  • ¼ tsp chili powder

  • 1½ tsp cumin

  • 1½ tsp dried minced onion

  • 1 tbsp white vinegar

  • ½ tsp garlic powder

  • ½ tsp garlic salt

  • ¼ tsp paprika

  • ¼ tsp sugar

  • ¼ tsp cayenne pepper (optional)


🔸 For Assembly:

  • 4 flour tortillas (8-inch)

  • 1 cup refried beans (heated)

  • 1 cup shredded cheddar cheese

  • ¼ cup chopped white onion

  • Sliced black olives (optional)


🍳 Equipment

  • Skillet

  • Small saucepan

  • Baking dish

  • Mixing bowls

  • Spoon or spatula


👩‍🍳 Instructions

1. Make the Seasoning Mix

In a small bowl, combine:

  • Masa harina

  • Chili powder

  • Onion powder

  • Garlic powder

  • Seasoning salt

  • Paprika

  • Cumin

  • Garlic salt

  • Sugar

  • Dried onion

  • Bouillon powder

Mix well and set aside.


2. Cook the Beef

Heat a skillet over medium heat.

Add ground beef and cook until fully browned, breaking it apart with a spoon.

Drain excess fat.


3. Season the Beef

Return beef to the skillet.

Add the seasoning mixture and ¾ to 1 cup water.

Simmer on low heat for 20 minutes, stirring occasionally, until thick and flavorful but still moist.


4. Make the Sauce

In a small saucepan, combine all sauce ingredients.

Bring to a gentle simmer over low heat.

Cook for 15–20 minutes, stirring occasionally.

Remove from heat.


5. Prepare for Baking

Preheat oven to 175°C (350°F).

Lightly grease a baking dish.


6. Assemble the Enchiritos

Warm tortillas until soft.

On each tortilla:

  • Spread ¼ cup refried beans

  • Add ¼ of the beef mixture

Roll tightly and place seam-side down in the dish.


7. Top and Bake

Pour sauce evenly over tortillas.

Sprinkle with:

  • Shredded cheese

  • Chopped onion

  • Olives (optional)

Bake uncovered for 15 minutes, until cheese is melted and bubbly.


🍽 Serving Suggestions

Serve with:

  • Mexican rice

  • Fresh salad

  • Corn on the cob

  • Sour cream or guacamole


📦 Storage

  • Refrigerate leftovers up to 3 days

  • Reheat in oven or microwave

  • Add extra sauce when reheating to keep tortillas soft


⭐ Tips

✔ Use soft tortillas for easy rolling
✔ Add jalapeños for extra heat
✔ Can use chicken or turkey instead of beef
✔ Double recipe for meal prep


🌮 Final Note

This homemade enchirito gives you all the flavor of a restaurant favorite with simple ingredients and fresh preparation. Soft tortillas, savory beef, rich sauce, and melted cheese make it a satisfying meal any day of the week.