Quick and Easy Pizza in a Frying Pan – No Oven Required, in 10 minutes

Hello everyone! Welcome to our food blog, your favorite place to find delicious recipes. Here you will find desserts, snacks, breakfast, appetizers, fresh salads. Let’s get started!

Meal Prep: Quick and Easy Pizza

Learn how to prepare for quick snack or dinner step-by-step recipes inspired by top online culinary schools. Whether you’re an aspiring chef or just love gourmet cooking at home, these professional recipe ideas are perfect for busy days and high-quality meals.

Recipe ingredients:

For the Dough:

1 cup (135 g / 4.7 oz) all-purpose flour/wheat flour

120 ml (4 fl oz / ½ cup) whole milk

1 tbsp butter

1 egg

½ tsp salt

½ tsp sugar

1 tsp baking powder

For the Topping:

Shredded mozzarella cheese

Tomato slices

Ham slices

Tomato sauce

Instructions:

Start by organizing all ingredients. In a mixing bowl, combine the egg, milk, salt, sugar, butter, and flour.


Mix well until the dough becomes smooth and lump-free. Then add the baking powder and mix again until fully incorporated.


Heat a non-stick skillet over low heat. Pour the batter into the skillet and spread it evenly.

Cover the skillet and cook on low heat for about 3-5 minutes, or until the bottom is lightly golden. Flip the dough carefully.


Add your pizza toppings: tomato sauce, cheese, ham, tomato slices, and sprinkle with oregano.


Cover again and let it cook for another 3-5 minutes, or until the cheese is melted and bubbly.

Extra Tip: Customize with your favorite toppings—like pepperoni, olives, or fresh basil—for a personal touch. Perfect for a quick dinner or an afternoon snack!

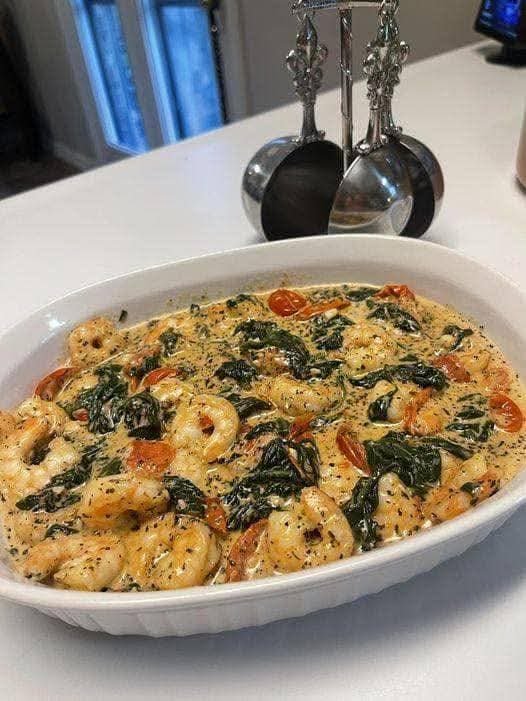
Creamy Garlic Shrimp Tuscan Style – Rich, Savory, and Easy to Make

Servings: 4

Total Time: 25 minutes

Difficulty: Easy

Calories per Serving: ~320 kcal

Macros (per serving): 35g Protein | 4g Net Carbs | 18g Fat | 1g Fiber

Introduction

This Creamy Garlic Tuscan Shrimp is a luxurious, restaurant-quality dish you can make at home in under 30 minutes. Rich, garlicky, and bursting with flavor, it’s the perfect dinner for anyone following a keto, low-carb, high-protein, or WW-friendly lifestyle.


The shrimp are tender and juicy, simmered in a creamy garlic sauce with sun-dried tomatoes and spinach, making it a colorful, nutrient-packed meal. Every bite delivers indulgence without the guilt — creamy, savory, and satisfying.


Whether you’re cooking for a busy weeknight or a special occasion, this recipe is a quick, wholesome, and macro-friendly way to enjoy seafood.


👀 Look at the Recipe

Texture: Tender shrimp with a silky, creamy sauce

Flavor: Garlic-forward with sun-dried tomato sweetness and fresh spinach

Diet Benefit: Low-carb, high-protein, and packed with vitamins from fresh greens

Ingredients Needed

For the Shrimp:


1 lb (450g) large shrimp, peeled and deveined

2 tbsp olive oil

½ tsp salt

¼ tsp black pepper

1 tsp paprika (optional)

For the Creamy Tuscan Sauce:


3 cloves garlic, minced

½ cup sun-dried tomatoes, chopped

1 cup heavy cream (or coconut cream for dairy-free)

½ cup grated Parmesan cheese

2 cups fresh spinach

1 tsp Italian seasoning

Optional: ½ tsp red pepper flakes for heat

👩‍🍳 How to Make Our Creamy Garlic Tuscan Shrimp

Sauté the shrimp: Heat olive oil in a large skillet over medium-high heat. Season shrimp with salt, pepper, and paprika. Cook shrimp for 2–3 minutes per side until pink and opaque. Remove and set aside.

Cook the aromatics: In the same skillet, add minced garlic and sun-dried tomatoes. Sauté for 1–2 minutes until fragrant.

Make the sauce: Pour in heavy cream and stir in Parmesan cheese. Simmer for 2–3 minutes until slightly thickened.

Add spinach and seasoning: Stir in fresh spinach and Italian seasoning (plus red pepper flakes if using) until the spinach wilts.

Combine shrimp and sauce: Return cooked shrimp to the skillet and toss to coat. Heat through for 1–2 minutes.

Serve immediately: Pair with cauliflower rice, zucchini noodles, or a side of steamed vegetables for a low-carb, protein-packed meal.

Storage & Serving Suggestions

Store: Keep in an airtight container in the fridge for up to 3 days.

Reheat: Gently warm in a skillet over low heat to avoid overcooking the shrimp.

Serving Pairings: Serve over zucchini noodles, cauliflower rice, or a light salad for a complete low-carb dinner.

💡 Tips & FAQs

1. Can I make this dairy-free?

Yes — use coconut cream instead of heavy cream and omit Parmesan or use a dairy-free cheese alternative.

2. How do I prevent shrimp from overcooking?

Cook shrimp just until they turn pink and opaque; they cook quickly and continue cooking slightly when added back to the sauce.


3. Can I prepare this ahead of time?

You can prep sauce and veggies in advance, but cook shrimp fresh for best texture.


4. Is this dish suitable for WW?

Yes — depending on portion, it’s around 6 points per serving, mainly protein-rich with minimal carbs.


5. Can I adjust the spice level?

Absolutely — add more red pepper flakes for heat or omit entirely for a milder dish.

Creamy Peaches & Cream Smoothie

Creamy Peaches & Cream Smoothie


This recipe serves one large glass or two smaller ones. It’s naturally sweet, velvety, and packed with vitamins.


Ingredients


2 cups Frozen Peach Slices: (Frozen gives it that thick, soft-serve texture seen in your photo).


1 cup Milk of choice: (Whole milk, almond milk, or oat milk all work great).


1/2 cup Greek Yogurt: Vanilla or plain for extra creaminess and protein.


1 tbsp Honey or Maple Syrup: Optional, depending on how sweet your peaches are.


1/4 tsp Vanilla Extract: To give it that “peaches and cream” flavor profile.


Optional: A pinch of cinnamon or a scoop of protein powder.


Instructions


Layer the Blender: Pour your liquid (milk) in first, followed by the yogurt, vanilla, and sweetener. Adding liquids first helps the blender blades move freely.


Add the Fruit: Add the frozen peach slices on top.


Blend: Start on a low speed and gradually increase to high. Blend until the mixture is completely smooth and those beautiful swirls form.

Check Consistency: If it’s too thick, add a splash more milk. If you want it thicker, add a few more frozen peaches or a couple of ice cubes.


Garnish: Pour into a tall glass and top with two fresh thin peach slices, just like in your picture!


Quick Tips for the Best Results


The Peach “Hack”: If you only have fresh peaches, peel and slice them, then freeze them on a tray for 2 hours before blending. This prevents the smoothie from becoming watery.


Nutrient Boost: Toss in a tablespoon of chia seeds or flax seeds; they won’t change the flavor but will add healthy fats and fiber


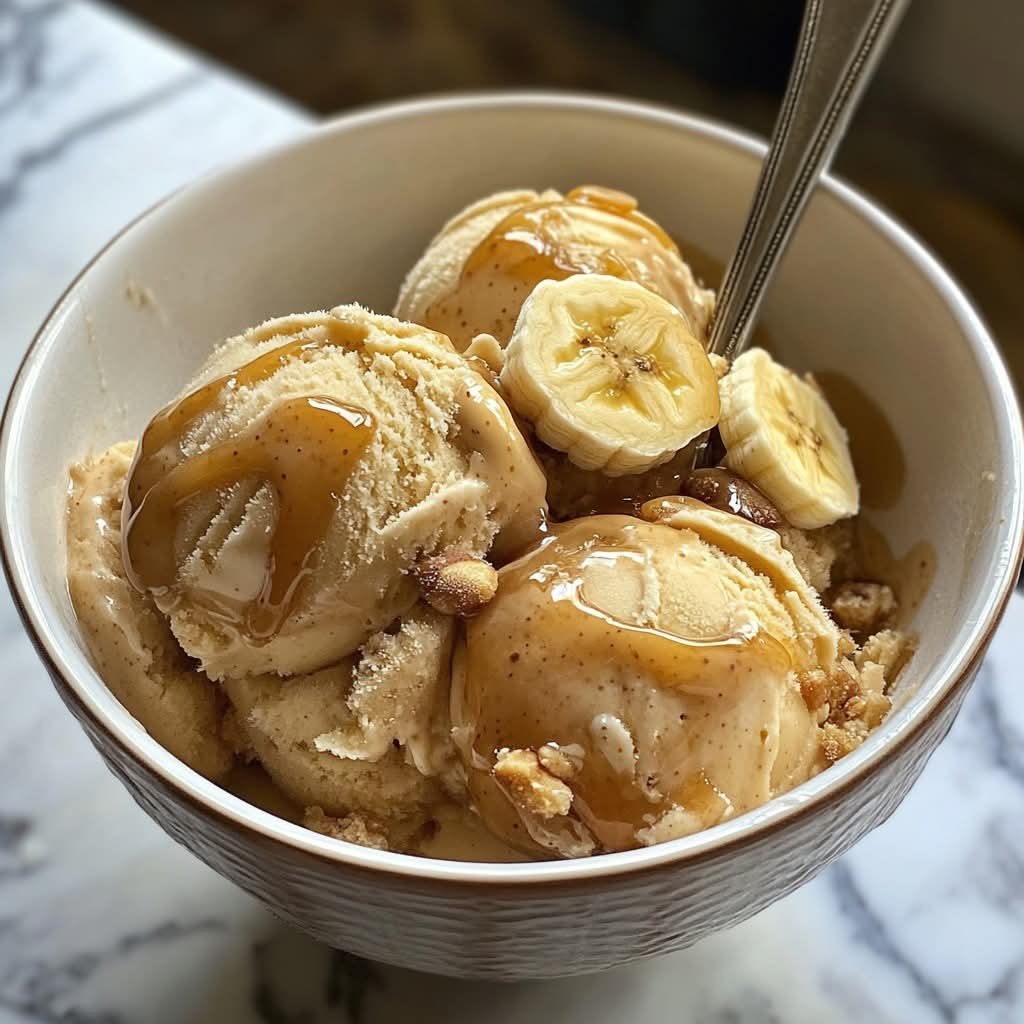
Salted Caramel Banana Sundae

Salted Caramel Banana Sundae

Ingredients

The Base (The Scoops):


4 large ripe bananas: Sliced and frozen for at least 6 hours.


2 tbsp almond butter or peanut butter: For richness and a tan color.


1 tsp vanilla extract: For depth.


A pinch of sea salt: To create that “salted” profile

Fresh Banana: 1/2 banana, sliced into rounds.


Caramel Sauce: 2 tbsp (store-bought or homemade using melted coconut sugar and coconut milk).


Crushed Pecans or Walnuts: 1/4 cup, roughly chopped for crunch.


Cinnamon: A light dusting over the top.

Instructions

Prepare the Base: Place your frozen banana slices into a high-speed blender or food processor.


Blend: Pulse until the bananas look like small crumbs. Add the nut butter, vanilla, and salt. Continue blending on high until the mixture transforms into a smooth, soft-serve consistency.


Note: If the blender struggles, add 1–2 tablespoons of milk (dairy or plant-based) to help it move.

Firm Up (Optional): For those perfect round scoops shown in the image, transfer the mixture to a container and freeze for 30–60 minutes.


Assemble: Use an ice cream scoop to place three large mounds into a bowl.

Garnish: Drizzle the caramel sauce generously over the scoops. Press your fresh banana slices into the side and sprinkle the crushed nuts and a dash of cinnamon over everything.


Pro-Tip for Style

To get that glossy, professional look on the caramel, warm the sauce slightly before drizzling. It will flow over the cold “ice cream” just like it does in your picture

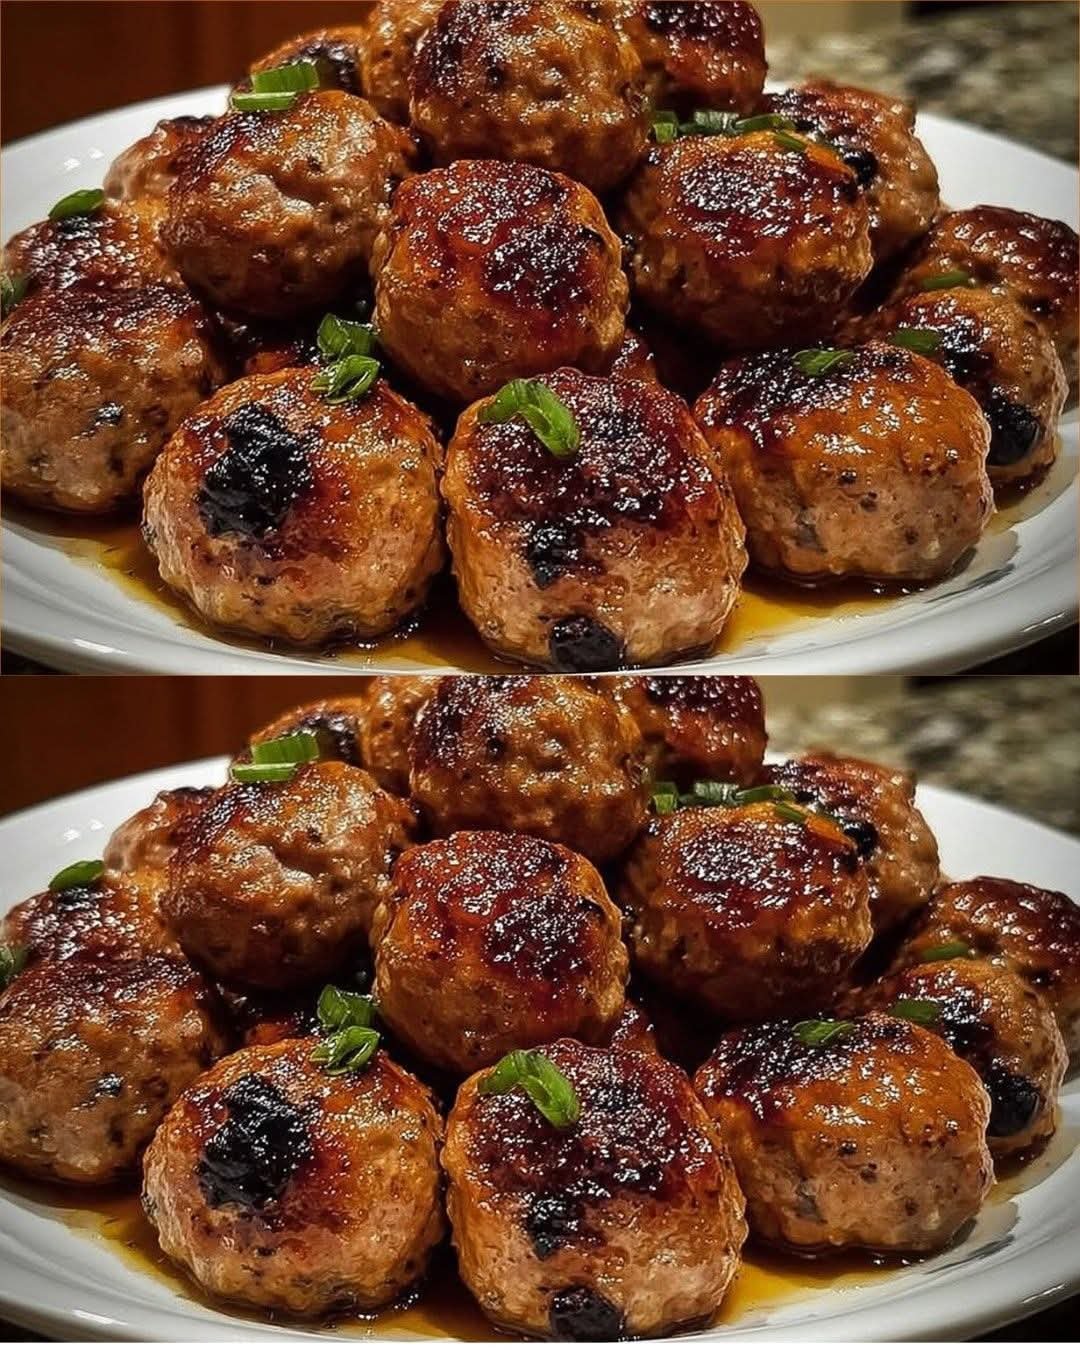
Mushroom Quinoa Meatballs

Mushroom Quinoa Meatballs

Mushroom Quinoa Meatballs are a deliciously hearty option that everyone loves! With their rich, savory flavor and satisfying texture, they make the perfect meatball substitute. This recipe has been trending lately as more people seek out tasty plant-based meals that are not only healthy but also easy to prepare. Whether you’re vegan, vegetarian, or just looking to eat a bit lighter, these meatballs pack a punch of umami goodness, thanks to the mushrooms and nutritional yeast. Plus, they’re packed with protein and fiber from the quinoa, making them a nutritious choice for any meal!


What Goes Into These Mushroom Quinoa Meatballs

2 cups mushrooms, finely chopped (about 250g)

1 cup cooked quinoa (about 170g)

1/2 cup breadcrumbs (about 60g)

1/4 cup nutritional yeast (about 25g)

2 cloves garlic, minced

1 tablespoon soy sauce

1 teaspoon dried oregano

Salt and pepper to taste

Olive oil for cooking

How to Make Mushroom Quinoa Meatballs

Preheat the oven to 375°F (190°C).

Line a baking sheet with parchment paper.

Heat a drizzle of olive oil in a skillet over medium heat. Add the minced garlic and sauté until fragrant, about 1 minute.

Add the finely chopped mushrooms to the skillet and cook for about 8-10 minutes until they are soft and any liquid has evaporated.

Transfer the mushroom mixture to a large bowl. Mix in the cooked quinoa, breadcrumbs, nutritional yeast, soy sauce, oregano, salt, and pepper until combined.

Roll the mixture into meatballs, about 1-1.5 inches in diameter, and place them on the baking sheet.

Bake in the preheated oven for 20-25 minutes, flipping the meatballs halfway through, until they are golden brown.

Serve with marinara sauce, over spaghetti, or in a vegan sub sandwich, garnished with fresh herbs of your choice.

Why This Recipe Is So Popular Right Now

People are searching for Mushroom Quinoa Meatballs because of their increasing focus on healthy eating and plant-based diets. As more folks look for recipes that are not only satisfying but also easy to prepare, this dish checks all the boxes. It’s perfect for meal prep and family dinners, and it’s a fantastic way to sneak more vegetables into your diet. Plus, the versatility of these meatballs makes them perfect for various occasions!


Best Ways to Serve It

Mushroom Quinoa Meatballs can be enjoyed for dinner, as a hearty snack, or even for brunch. Pair them with a comforting marinara sauce over a bed of spaghetti for a classic Italian twist, or serve them in a sub sandwich with fresh veggies and your favorite sauce for a delicious lunch. You might also consider topping them with some fresh herbs like basil or parsley for that extra pop of flavor!

Expert Tips for Mushroom Quinoa Meatballs

Storage: Store leftover meatballs in an airtight container in the fridge for up to 4 days. They also freeze well for up to 2 months—just reheat when ready to enjoy!

Flavor Variations: Feel free to spice these up with different herbs or spices. Try adding some red pepper flakes for a kick or experiment with different types of mushrooms for unique flavors.

Dietary Swaps: For a gluten-free option, use gluten-free breadcrumbs. You can also swap out quinoa for other grains like brown rice if you prefer.

Mushroom Quinoa Meatballs: Frequently Asked Questions

Can I make these meatballs ahead of time?

Absolutely! You can prepare the mixture and shape the meatballs a day in advance. Just store them in the fridge and bake them when you’re ready to eat.


What can I serve these meatballs with?

They’re great with marinara sauce over pasta, on top of a salad, or in a sandwich with fresh veggies. The options are endless!


Can I bake these meatballs instead of frying?

Yes! Baking is a healthier alternative, and it gives the meatballs a nice golden brown crust.

How do I know when the meatballs are done?

They should be golden brown on the outside and cooked through. You can also check the internal temperature; they should reach at least 165°F (74°C).


Try out these Mushroom Quinoa Meatballs at home and enjoy this healthy and flavorful dish that everyone will love!

Delicious Potato Meat Patties

Delicious Potato Meat Patties

If you’re searching for a comforting dish that brings warmth to your table, these delicious potato meat patties are just the thing! They’re soft on the inside with a crispy exterior, making them a favorite for many households. Packed with potatoes and flavorful minced meat, these patties are not only delightful but also a wonderful way to use up any leftover boiled potatoes you might have. Plus, they’re easy to prepare and can be enjoyed any time of the day—what’s not to love?


Gather Your Delicious Potato Meat Patties Ingredients

5 boiled potatoes

1 tsp salt

20 g butter (about 1.5 tbsp)

1 egg

1 bunch parsley, finely chopped

200–220 g all-purpose flour (about 1.5 – 2 cups)

1 tsp baking powder

2 onions, finely chopped

1 red pepper, finely chopped

1 bunch green onions, finely chopped

350 g minced meat (about 12 oz)

Salt and mixed spices to taste

1 tsp sweet paprika

1 tsp tomato sauce

Vegetable oil for frying

How to Make Delicious Potato Meat Patties

Start by mashing the boiled potatoes in a large bowl until they’re nice and smooth.

Add the salt, butter, and egg to the mashed potatoes. Mix everything until well combined.

Stir in the chopped parsley for a bit of freshness.

Gradually add the flour and baking powder, stirring until you have a soft, non-sticky dough.

Cover the dough with a cloth or plastic wrap and place it in the refrigerator for 20 minutes to firm up.

While the dough is chilling, combine the minced meat with the chopped onions, red pepper, green onions, salt, mixed spices, sweet paprika, and tomato sauce in another bowl. Mix well until everything is evenly combined.

After the dough has chilled, divide it into equal portions. Flatten each piece slightly in your hand.

Place a spoonful of the meat mixture in the center of each flattened dough piece. Carefully seal the edges and shape the dough into flat patties.

Heat vegetable oil in a frying pan over medium heat.

Fry the patties in the hot oil until they are golden brown and cooked through, about 4-5 minutes per side.

Once done, drain them briefly on paper towels to remove any excess oil before serving hot.

Why Everyone Is Loving This Delicious Potato Meat Patties

People are turning to this recipe now because it combines comfort food with convenience. As the weather cools down, warm dishes like these potato meat patties are in high demand. They’re not only satisfying but also easy to make, using simple ingredients most of us already have at home. Whether you’re preparing dinner for your family or hosting a casual get-together, these patties are sure to be a hit!

How to Serve Delicious Potato Meat Patties

These delicious potato meat patties are perfect for any meal of the day. Serve them as an inviting breakfast, a filling snack, or a cozy dinner. They pair wonderfully with a simple side salad or some pickled vegetables for a refreshing contrast. You can also enjoy them with a dollop of sour cream or a zesty dipping sauce for extra flavor.


Helpful Tricks

Storage Tips: If you have leftovers, store the patties in an airtight container in the fridge for up to 3 days. You can also freeze them for up to a month—just be sure to thaw before frying again!

Flavor Variations: Feel free to mix up the spices or herbs in the meat filling. Adding a pinch of chili powder for some heat or swapping out parsley with dill can create a delightful twist.

Make Ahead: You can prepare the patties ahead of time and keep them in the fridge until you’re ready to fry them up!

Delicious Potato Meat Patties: Frequently Asked Questions

Can I use different types of meat?

Yes, feel free to use ground chicken, turkey, or even a meat alternative if you prefer a different flavor.

What can I serve with the patties?

These patties go well with salads, dips like tzatziki, or even steamed veggies for a complete meal.


Can I make these patties vegetarian?

Absolutely! You can replace the minced meat with a mixture of sautéed mushrooms, lentils, or any favorite meat substitute for a delicious vegetarian option.

Give this recipe a try in your kitchen, and you’ll find yourself coming back to it time and again! Enjoy making these delicious potato meat patties, and watch them disappear from your table.