Old-Fashioned 7-Minute Frosting Recipe

Seven-minute frosting is the stuff of legend, at least for those of us of a certain generation—the pillowy white cloud of frosting our grandmothers spread over and between layers of cake. Every bite was a shock of marshmallow sweetness, little more than sugar and air, with nothing but a whisper of vanilla for flavor.

The simplicity of its ingredients, along with the speed of its preparation, made seven-minute frosting a common companion to cakes with a more complicated profile, such as gingerbread, coconut layer cake or devil’s food.

Like any of those old recipes that evolved in the American kitchen, definitions remain conceptual rather than rule-bound, based on intuition rather than training. But the truth of the matter is that seven-minute frosting is a Swiss meringue in disguise; that is, a combination of egg whites and sugar cooked over a water bath and whipped into a glossy meringue.

The ratio of ingredients in any Swiss meringue will vary from baker to baker, and purpose to purpose, as the amount of sugar affects not only sweetness but stability and volume. The amount of sugar and egg whites I’ll use for Swiss buttercream differs from the ratios I lean on for pie, and that same variation is found within the microcosm of seven-minute frosting as well.

Classic recipes call for sugar and egg whites in proportions ranging from 2:1 all the way to 5:1 by weight, and it’s these high-sugar recipes that are the norm. Yet the meringue itself becomes increasingly fluffy and light as the amount of sugar falls, but this lightness comes at the cost of stability, as it’s sugar that keeps the moisture of the egg whites in check, and the meringue aloft.

Old-Fashioned 7-Minute Frosting Recipe

Active: 12 mins

Total: 20 mins

Serves: 40 servings

Makes: 5 cups

Ingredients:

  • 6 ounces egg whites (2/3 cup; 170g), from 5 to 6 large eggs
  • 12 1/4 ounces plain or toasted sugar (about 1 3/4 cups; 340g) (see notes)
  • 3/4 teaspoon (3g) Diamond Crystal kosher salt, or more to taste; for table salt, use about half as much by volume or the same weight
  • 1/4 teaspoon cream of tartar
  • 1 teaspoon (5ml) vanilla extract, or more to taste

Instructions:

For a Stand Mixer With a Bowl-Lift Design: Tear off a long strip of foil and crumple it into a thick ring. Place it in the bottom of a 3-quart saucier, or similarly large, wide pot, and fill with roughly 1 1/2 inches water. Place over high heat until bubbling-hot, then adjust the temperature to maintain a gentle simmer.

In a stainless steel stand mixer bowl, combine egg whites, toasted sugar, salt, and cream of tartar. Set over the steaming water so that the bowl is resting on the foil ring and touching neither the water nor the pot itself. Cook, stirring and scraping constantly with a flexible spatula, until egg whites register 175°F (79°C) on a digital thermometer; this should take no longer than 10 to 12 minutes. Transfer bowl to a stand mixer fitted with a whisk attachment.

For a Stand Mixer With a Tilt-Head Design: Fill a large pot with a few inches of water. Place over high heat until bubbling-hot. In a large glass or ceramic bowl, combine egg whites, toasted sugar, salt, and cream of tartar. Set bowl over the steaming water, then cook, stirring and scraping constantly with a flexible spatula, until egg whites register 175°F (79°C) on a digital thermometer; this should take no longer than 12 minutes. Scrape mixture into the stand mixer bowl and fit stand mixer with a whisk attachment.

Add vanilla extract, and whip the meringue on high speed until glossy, stiff, and cool to the touch. Along the way, pause mixing to taste the meringue, adjusting salt and vanilla as needed; if using an extract of another flavor, fold it in with a flexible spatula at the very end, as the oil content of flavors like citrus, almond, or mint may otherwise deflate the meringue.

Use immediately as a frosting for cake, and serve as soon as possible; at cool room temperature, the frosting will hold for about 24 hours, as the cake will slowly absorb the meringue over time. If desired, after frosting a cake, the exterior layer of meringue can be toasted like a marshmallow using a culinary blowtorch.

Troubleshooting: While the approximate cooking times for the water bath are estimations at best, and will naturally vary from kitchen to kitchen, substantially missing the mark indicates heats that are vastly too high or low. When the meringue cooks much too fast, it is prone to scrambling, regardless of how thoroughly the bowl is scraped, resulting in a lumpy texture and eggy flavor. When the meringue is cooked too slowly, excess evaporation will dry the meringue, making it grainy and dense. In either event, adjusting the heat as needed will resolve the issue.

Notes:

Though technically optional, using quick-toasted sugar will dramatically tame the sweetness of this frosting, while also adding subtle depth of flavor. Or, for a bolder (and entirely different) flavor, try using a light brown sugar (which will produce sea foam frosting) or raw sugar instead; for more information, see our guide to raw sugars.

Old Bay Crab Cake Recipe

A Maryland staple, these crab cakes are made from fresh lump crab meat and just enough filler to bind the crabmeat together.

It’s very important to use fresh, good-quality lump crab meat. Look for fresh-off-the-boat crab meat, which is sold in a clear plastic container, usually resting on ice in the seafood department. It’s expensive, but one pound is enough to make six generous crab cakes (or 12 mini ones), which feeds my family of four easily.

If fresh lump crab meat is not available, the second-best option is refrigerated crab meat, such as Phillip’s, which is readily available year-round. Avoid shelf-stable canned crab meat, which contains additives that affect the taste and texture of the meat. (For a less expensive alternative to crab cakes, or when fresh crab meat is not in season, try fresh salmon cakes.)

Note that celery is not traditional in Maryland crab cakes, but I love the little crunch it adds; feel free to leave it out if you’re a purist.

A Maryland staple, these crab cakes are made from fresh lump crab meat and just enough filler to bind the crabmeat together.

Servings: Makes 6 large crab cakes

Prep Time: 30 Minutes

Cook Time: 10 Minutes

Total Time: 40 Minutes, plus at least 1 hour to let the crab cakes set

INGREDIENTS:

FOR THE CRAB CAKES
  • 2 large eggs
  • 2½ tablespoons mayonnaise, best quality such as Hellmann’s or Duke’s
  • 1½ teaspoons Dijon mustard
  • 1 teaspoon Worcestershire sauce
  • 1 teaspoon Old Bay seasoning
  • ¼ teaspoon salt
  • ¼ cup finely diced celery, from one stalk
  • 2 tablespoons finely chopped fresh parsley
  • 1 pound lump crab meat (see note below)
  • ½ cup panko
  • Vegetable or canola oil, for cooking
FOR THE QUICK TARTAR SAUCE

  • 1 cup mayonnaise, best quality such as Hellmann’s or Duke’s
  • 1½ tablespoons sweet pickle relish
  • 1 teaspoon Dijon mustard
  • 1 tablespoon minced red onion
  • 1-2 tablespoons lemon juice, to taste
  • Salt and freshly ground black pepper, to taste

INSTRUCTIONS:

FOR THE CRAB CAKES
  1. Line a baking sheet with aluminum foil for easy clean-up.
  2. Combine the eggs, mayonnaise, Dijon mustard, Worcestershire, Old Bay, salt, celery, and parsley in a large bowl and mix well.
  3. Add the crab meat (be sure to check the meat for any hard and sharp cartilage) and panko; using a rubber spatula, gently fold the mixture together until just combined, being careful not to shred the crab meat.
  4. Shape into 6 cakes (each about ½ cup) and place on the prepared baking sheet.
  5. Cover and refrigerate for at least 1 hour. This helps them set.
  6. Preheat a large nonstick pan over medium heat and coat with oil.
  7. When the oil is hot, place the crab cakes in the pan and cook until golden brown, 3 to 5 minutes per side.
  8. Be careful as oil may splatter. Serve the crab cakes warm with the tartar sauce.

FOR THE QUICK TARTAR SAUCE

In a small bowl, whisk together the mayonnaise, relish, mustard, onion, and lemon juice. Season with salt and pepper, to taste. Cover and chill until ready to serve.

Make-Ahead Instructions: The crab cakes can be formed, covered, and refrigerated a day ahead of time before cooking. The tartar sauce can be made and refrigerated up to 2 days in advance.

Note: If you can only find jumbo lump crab meat, you may need to break the pieces up a bit. If the clumps are too large, the crab cakes won’t hold together well.

NUTRITIONAL INFO:

Serving size:2 crab cakes

Calories299Fat14gSaturatedfat3gCarbohydrates:9gSugar:1gFiber:1g Protein:32gSodium:1141mgCholesterol:275 mg

Mississippi Mud Cake Recipe

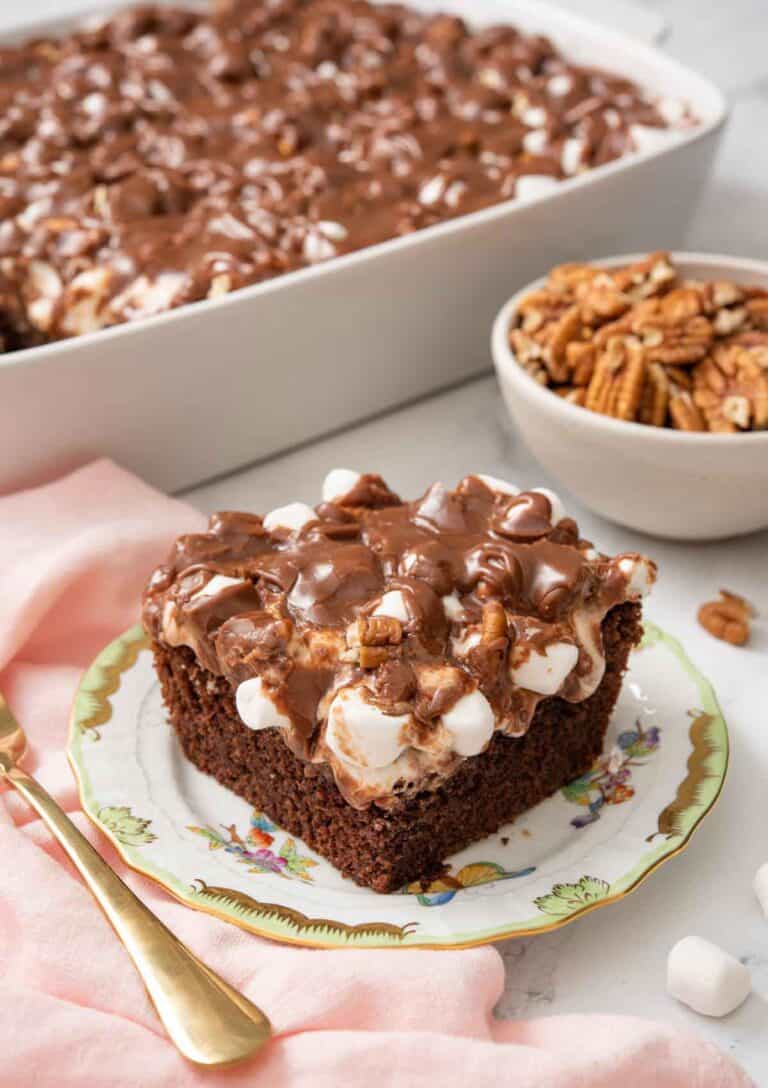
This Mississippi Mud Cake recipe is a decadent dessert that everyone will love. Featuring a gooey and moist chocolate cake topped with mini marshmallows, pecans, and chocolate icing, this classic recipe never disappoints. This indulgent cake is perfect for any occasion!

This Mississippi mud cake is perfect for the chocolate lover in your life! With a layer of tender, chocolatey cake topped with marshmallows, pecans, and chocolate icing, this cake practically bursts with chocolate flavors. You will love how moist and rich this cake is. It will melt in your mouth. 

PRO TIPS FOR MAKING THIS RECIPE
  • The cake will have the texture of a fudgy brownie. It will puff around the sides but will fall a little during cooling.
  • If you’re not a fan of pecans, you can swap them for walnuts.
  • Make sure to use room temperature ingredients so the ingredients mix smoothly into the batter. Overmixing the batter will lead to a tough, dry, and dense cake.
  • I highly recommend using a kitchen scale to measure your flour as it’s the most accurate method and will prevent you from ending up with a dense cake. If you don’t have a scale, fluff your flour with a spoon and spoon it into your cups before leveling it off with a knife. This method prevents you from overpacking the measuring cup.
  • Similarly, use a scale to measure the powdered sugar for the icing, as you do not want the icing to be too thick. If you add too much powdered sugar, your icing will be more like frosting and won’t drizzle the cake over as smoothly.
  • As this Mississippi mud cake is a fudgy brownie-like texture, you must allow for it to cool before slicing into it. This ensures you get perfectly clean slices and that they hold their shape.
  • If you only have jumbo marshmallows, you can cut them into smaller pieces to mimic mini marshmallows

Perfect for the chocolate lover in your life, this Mississippi mud cake is gooey, moist, and full of chocolate flavor. Everyone will be reaching for a second slice of this tender cake!

Prep Time: 10min

Cook Time: 30min

Total Time: 40min

Servings: 12 servings

Calories: 751kcal

Ingredients:

For the Cake:
  • 2¼ cups all-purpose flour (210g)
  • ¾ cup unsweetened cocoa powder (60g)
  • 2 teaspoon baking powder
  • ¾ teaspoon salt
  • ½ teaspoon baking soda
  • 2 cups granulated sugar (400g)
  • 1 cup vegetable oil (240mL)
  • ¾ cup whole milk (180ml)
  • 4 large eggs
  • 1 teaspoon vanilla extract
  • 1 (10-ounce bag) mini marshmallows (283g)
  • 1 cup chopped pecans (113g)
For the Icing:
  • ½ cup unsalted butter (113g)
  • 3 tablespoons unsweetened cocoa powder
  • 5 tablespoons whole milk
  • 3 cups confectioners’ sugar (360g)
  • 1 teaspoon vanilla extract
Instructions:
For the Cake:

Preheat the oven to 350°F. Spray a 9×13-inch baking pan with baking spray.

In a medium bowl, whisk together the flour, cocoa, baking powder, salt, and baking soda.

In a large mixing bowl, whisk together the sugar, oil, milk, eggs, and vanilla. Add the flour mixture to the sugar mixture and stir until well combined and smooth. Pour the batter into the prepared cake pan.

Bake for 30 to 35 minutes or until the center of the cake is springy to the touch.

Meanwhile, after the cake has been baking for 15 minutes, make the icing.

For the Icing:

In a medium saucepan, melt the butter over medium-low heat. Whisk in the cocoa powder and milk until smooth. Add the powdered sugar and vanilla, and whisk until smooth. Remove from the heat and keep warm.

For the Assembly:

Remove the cake from the oven and immediately top with marshmallows and pecans. Drizzle the icing over the marshmallows and pecans. Let the cake cool completely before serving.

Notes:

  • The cake will have the texture of a fudgy brownie. It will puff around the sides but will fall a little during cooling.
  • If you’re not a fan of pecans, you can swap them for walnuts.
  • Make sure to use room temperature ingredients so the ingredients mix smoothly into the batter. Overmixing the batter will lead to a tough, dry, and dense cake.
  • I highly recommend using a scale to measure your flour as it’s the most accurate method and will prevent you from ending up with a dense cake. If you don’t have a scale, fluff your flour with a spoon and spoon it into your cups before leveling it off with a knife. This method prevents you from overpacking the measuring cup.
  • Similarly, use a scale to measure the powdered sugar for the icing, as you do not want the icing to be too thick. If you add too much powdered sugar, your icing will be more like frosting and won’t drizzle the cake over as smoothly.
  • As this Mississippi mud cake is a fudgy brownie-like texture, you must allow for it to cool before slicing into it. This ensures you get perfectly clean slices and that they hold their shape.
  • If you only have jumbo marshmallows, you can cut them into smaller pieces to mimic mini marshmallows.

Nutritional Info:

Calories: 751kcal | Carbohydrates: 107g | Protein: 8g | Fat: 36g | Saturated Fat: 10g | Polyunsaturated Fat: 13g | Monounsaturated Fat: 11g | Trans Fat: 0.4g | Cholesterol: 85mg | Sodium: 316mg | Potassium: 224mg | Fiber: 4g | Sugar: 78g | Vitamin A: 366IU | Vitamin C: 0.1mg | Calcium: 97mg | Iron: 3mg

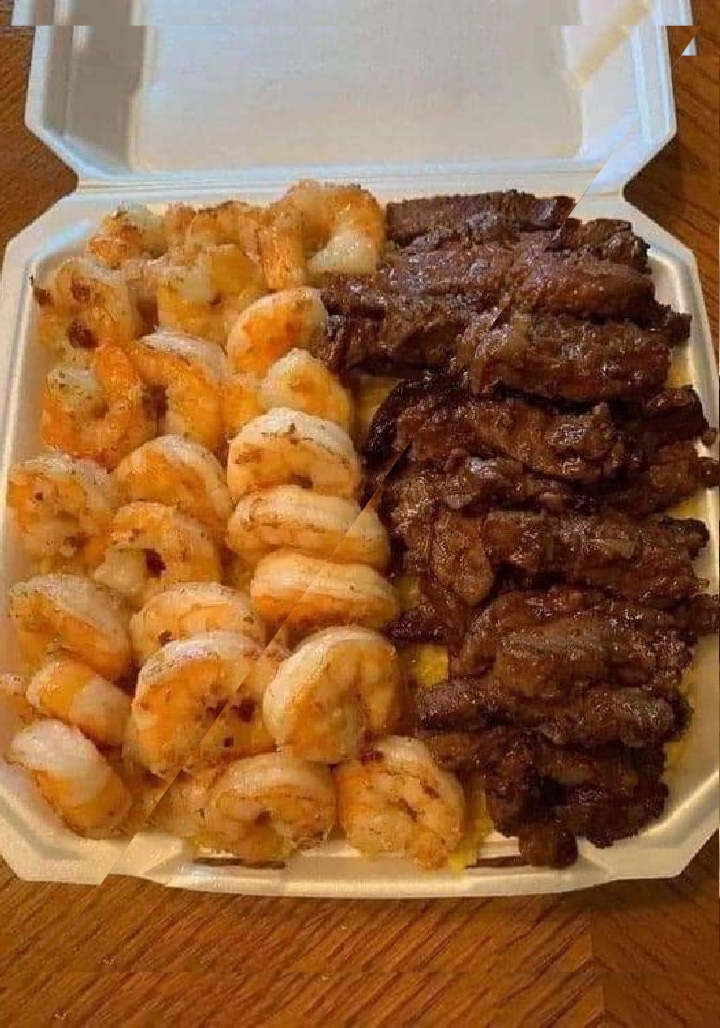
Cajun Shrimp And Steak Alfredo Pasta

STEAK:
  • 1 Ib. steak, cut into cubes (you can use Ribeye or Sirloin)
  • 1/2 cup + 1 Tbsp extra virgin olive oil, divided
  • 1/4 cup soy sauce
  • 1/4 cup Worcestershire sauce
  • 1 Tbsp garlic powder
  • 1 Tbsp Cajun seasoning
  • 1 Tbsp hot sauce
  • 1 Tbsp brown sugar
  • 1 tsp ground black pepper
  • 2 Tbsp butter
  • 2 garlic cloves, minced
  • 1/8 – 1/4 tsp crushed red chili pepper flakes (optional)
PASTA:
  • ½ tsp salt
  • 1 Tbsp olive oil
  • 1 Ib. Penne Pasta
SHRIMP:
  • 10 oz shrimp, peeled and deveined (if frozen, thawed)
  • 1 Tbsp olive oil
  • 1 Tbsp cajun seasoning
  • Pinch of Salt
  • Pinch of freshly ground black pepper
ALFREDO SAUCE:
  • ½ cup unsalted butter
  • 4 oz. cream cheese softened to room temperature
  • 2 cups (1 pint) heavy cream
  • 1 Tbsp Cajun seasoning
  • 1/2 tsp salt, or to taste
  • 1/2 tsp freshly ground black pepper, or to taste
  • 1 and ½ cups freshly grated Parmesan
INSTRUCTIONS:
  1. Place the steak pieces inside of a Ziploc bag. Set aside.
  2. Combine 1/2 cup extra virgin olive oil, soy sauce, Worcestershire sauce, garlic powder, Cajun seasoning, hot sauce, brown sugar, and ground black pepper in a small bowl.
  3. Pour the marinade inside of the Ziploc bag, covering the meat. Seal tightly and refrigerate for 6-8 hours or preferably overnight.
For the Pasta 
  1. Fill a large pot with water and add ½ teaspoon of salt and 1 tablespoon of olive oil. Bring to a boil.
  2. Add the pasta to the boiling water and cook according to package directions.
  3. Drain the pasta water and set the noodles aside.
FOR THE SHRIMP:
  1. In a medium bowl, add shrimp, olive oil, cajun seasoning, and a pinch of salt and pepper and toss to combine and coat the shrimp.
  2. Add shrimp to hot skillet and cook, stirring constantly until shrimp is pink. Scrape shrimp into a separate bowl and set aside.
FOR THE STEAK:
  1. Heat 1 tablespoon of olive oil in the hot skillet.
  2. Remove steak marinade from the refrigerator. Remove the steak chunks from the marinade and place them in the same skillet in a single layer.
  3. Cook for 2-4 minutes, stirring occasionally until golden brown.
  4. Add butter, minced garlic, and crushed red pepper flakes and continue to cook for 1-2 minutes, stirring and tossing to coat the steak. Scrape into a separate bowl and set aside.
FOR THE ALFREDO SAUCE:
  1. In the same skillet, melt the butter over medium-low heat. Once the butter is melted, add the cream cheese and heat until softened.
  2. Pour in heavy cream and season with Cajun spice, salt, and pepper. Whisk to combine.
  3. Bring to a low boil. Once boiling, decrease the heat to low and allow the sauce to simmer for 8-10 minutes, whisking occasionally. The sauce should be thick enough to coat a spoon.
  4. Once the sauce has thickened, turn off the heat and add the parmesan. Stir until cheese is melted and combined. Taste the sauce and adjust the seasonings to your preference.
  5. Add the pasta and toss it around to coat in the Alfredo. Toss in the steak, and shrimp and stir to combine. Serve and enjoy!
NOTES:

You can definitely use your favorite marinade recipe or prepare your steak however you prefer

Oven-Fried Chicken Legs

These Oven-Fried chicken legs are tender and juicy with a deliciously crispy skin. An easy homemade BBQ sauce adds sticky goodness to these drumsticks that are baked in the oven instead of grilled. Serve with mashed potatoes or seasoned rice and drizzle the BBQ sauce over top.

Did you know it’s possible to make tender, juicy baked BBQ chicken legs at home? These drumsticks are coated in a barbecue sauce and baked in the oven for the perfect crispy skin (that doesn’t require a deep fryer or grill).

These drumsticks will rival your favorite chicken restaurant — and the best part is they only require five minutes of active hands-on time!

How to Make Oven-Fried Chicken Legs?

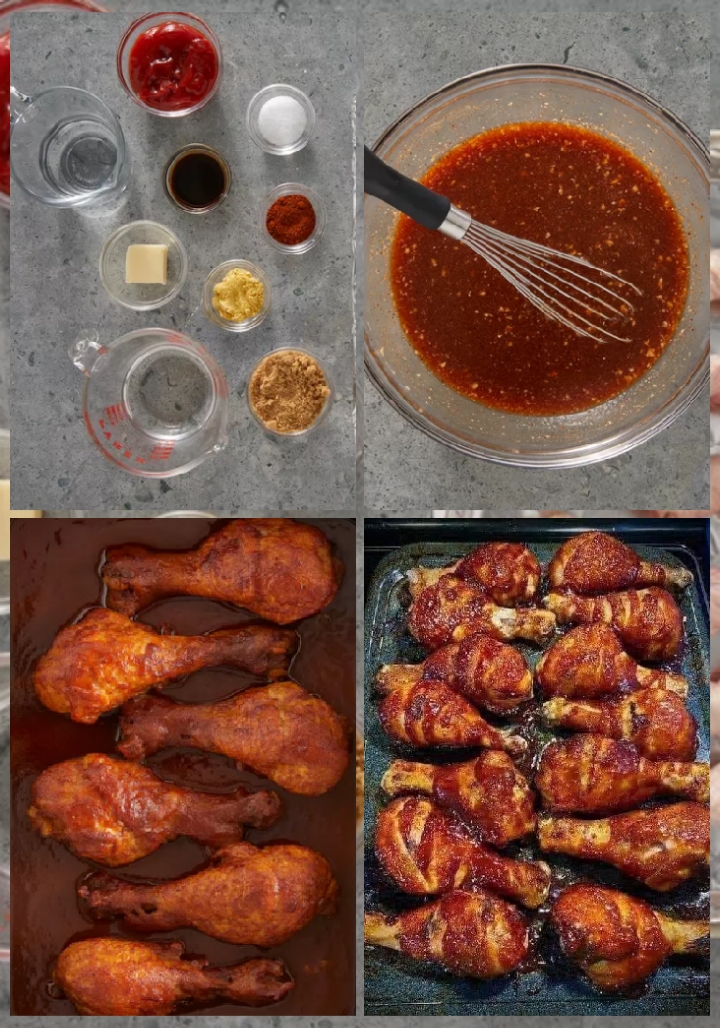
Homemade baked drumsticks are super easy to make with chicken drumsticks and a homemade barbecue sauce. You’ll find the full step-by-step recipe below, but here’s what you can expect:

Start by making the barbecue sauce, with ketchup, vinegar, water, brown sugar, butter, salt, Worcestershire sauce, dry mustard, and chili powder. Coat the drumsticks with the sauce, then bake them until the juices run clear and the chicken reaches an internal temperature of 165 degrees F.

Do You Put Barbecue Sauce on Before or After Baking?

This recipe calls for you to add the barbecue sauce before baking, but there’s nothing stopping you from whipping up a second batch of sauce to add to the drumsticks after.

Should You Bake BBQ Drumsticks Covered or Uncovered?

For perfectly tender, juicy chicken drumsticks, you should bake them covered with foil — just like in this recipe. You can take the foil off for the last few minutes of the bake to let the skin crisp up, though.

How Long Do You Bake BBQ Chicken Legs?

Baking time for drumsticks will vary depending on the size of them. This recipe calls for an hour of baking time. But, you’ll know when the drumsticks are done with the juices run clear and a digital thermometer reads 165 degrees F when inserted near the bone.

How to Store Baked BBQ Chicken Legs

Store leftover drumsticks in an airtight container in the fridge for up to four days. Reheat in the oven until warmed through — or eat them cold!

How to Freeze Baked BBQ Chicken Legs

Freeze cooked chicken legs in a zip-top freezer bag labeled with the date for up to three months. Thaw in the fridge overnight.

Prep Time: 5 mins

Cook Time: 1 hr

Total Time: 1 hr 5 mins

Servings: 3

Yield: 6 drumsticks

INGREDIENTS:

  • 6 chicken drumsticks
  • ⅓ cup ketchup
  • ⅓ cup white vinegar
  • ½ cup water, or more to taste (Optional)
  • ¼ cup brown sugar
  • 4 teaspoons butter, cut into small chunks
  • 1 teaspoon salt, or to taste
  • 2 teaspoons Worcestershire sauce, or to taste
  • 2 teaspoons dry mustard
  • 2 teaspoons chili powder, or to taste

INSTRUCTIONS:

  1. Assemble ingredients, preheat oven to 400 degrees F (200 degrees C), and place drumsticks in a 7×11-inch baking dish.
  2. Whisk ketchup, vinegar, water, brown sugar, butter, salt, Worcestershire sauce, mustard, and chili powder together in a bowl; pour mixture over drumsticks. Cover with aluminum foil.
  3. Bake in the preheated oven until no longer pink at the bone and the juices run clear, about 1 hour, turning chicken about halfway through.
  4. An instant-read thermometer inserted near the bone should read 165 degrees F (74 degrees C).
  5. Serve hot and enjoy!

Nutritional Info:

Servings Per Recipe: 3

Calories 443 Total Fat 22g 28%Saturated Fat 8g 39%Cholesterol 142mg 47%Sodium 2072mg 90%Total Carbohydrate 21g 8%Dietary Fiber 1g 3%Total Sugars 18gProtein 39gVitamin C 6mg 29%Calcium 49mg 4%Iron 3mg 15%Potassium 506mg 11

Scalloped Potatoes Recipe

My favorite cheesy, creamy, garlicky, always-delicious scalloped potatoes recipe.

Scalloped Potatoes are an easy classic recipe, perfect for your Easter dinner, Christmas, Thanksgiving or even just for Sunday dinner.

In this side dish, thinly sliced potatoes and onions are layered in an easy homemade cream sauce and baked until tender, golden, and bubbly. Potato perfection!

POSSIBLE RECIPE VARIATIONS:

There are all sorts of delicious ways that you can customize these homemade scalloped potatoes if you would like. For example, feel free to…

Add bacon or ham: Diced cooked bacon or ham would be a delicious addition here! (Or go for the gold and make scalloped potatoes with ham and bacon!)

Add greens: Fresh kale or baby spinach would also be delicious. Just stir a large handful to the sauce before layering the potatoes.

Add pesto: For an extra herby twist, feel free to stir 1/4 cup of basil pesto into the sauce.

Use half sweet potatoes: I also love making a version of this dish with half Yukon gold and half sweet potatoes. The sweet/savory combo is such a winner.

Use a different cheese: Mozzarella, gouda, fontina or gruyere would also be delicious in place of the sharp cheddar. Or you could also sprinkle some extra crumbled/diced brie, goat cheese, or feta into the casserole.

Use cream: Feel free to sub in heavy cream for half of the milk for an even creamier dish.

Make it gluten-free: Just use a gluten-free all-purpose flour blend (in place of the standard AP flour). Or whisk 2 tablespoons of cornstarch into the cold milk before adding it to the sauce.

Tips for Perfect Scalloped Potatoes
  • Slice the potatoes evenly to ensure the scalloped potatoes cook evenly
  • Use a mandoline to make this job extra quick (a $25 mandoline like this one does a great job and will save you lots of time)
  • A roux is the foundation for a creamy sauce. A roux just means to cook fat (in this case butter) and flour and add liquid to make a sauce!
  • If you decide to add cheese to the sauce (which will actually make these into Potatoes Au Gratin) remove the sauce from the stove and stir in 1 1/2 to 2 cups of cheese (cheddar/gruyere are great choices).
  • Season the potatoes with salt and pepper between layers.
  • Cover with foil while it bakes, this allows it to steam and the potatoes will cook a bit faster.
To Make Scalloped Potatoes Ahead of Time
  • To make these ahead of time (and keep cooking fast on the day of serving) we have tested partially baking them with great results.
  • Bake the dish covered for 50-60 minutes.
  • Remove from the oven and cool completely on the counter (leave them covered, the steam will help to finish cooking).
  • Cover well and refrigerate.
  • On the day of serving, remove from the fridge at least 30 minutes before baking. Bake uncovered about 35 minutes or until heated through.

PREP TIME: 15 MIN

Cook Time: 55 MIN

TOTAL TIME: 80 MIN

Yield: 10 -12 SERVINGS

INGREDIENTS:

  • 3 tablespoons butter
  • 1 small white or yellow onion, peeled and thinly sliced
  • 4 large garlic cloves, minced
  • 1/4 cup all-purpose flour
  • 1 cup chicken stock or vegetable stock
  • 2 cups whole milk (or half and half)
  • 1 1/2 teaspoons Kosher salt
  • 1/2 teaspoon black pepper
  • 2 teaspoons fresh thyme leaves, divided
  • 4 pounds Yukon Gold Potatoes, sliced into 1/8-inch rounds
  • 2 cups freshly-grated sharp cheddar cheese*, divided (feel free to add more cheese if you’d like)
  • 1/2 cup freshly-grated Parmesan cheese, plus extra for serving

INSTRUCTIONS:

  1. Prep oven and baking dish: Heat oven to 400°F. Grease a 9 x 13-inch baking dish with cooking spray, and set it aside.
  2. Sauté the onion and garlic. Melt butter in a large sauté pan over medium-high heat. Add onion, and sauté for 4-5 minutes until soft and translucent. Add garlic and sauté for an additional 1-2 minutes until fragrant. Stir in the flour until it is evenly combined, and cook for 1 more minute.
  3. Simmer the sauce. Gradually pour in the stock, and whisk until combined. Add in the milk, salt, pepper, and 1 teaspoon thyme, and whisk until combined. Continue cooking for an additional 1-2 minutes until the sauce just barely begins to simmer around the edges of the pan and thickens. (Avoid letting it reach a boil.) Then remove from heat and set aside.
  4. Layer the potatoes. Spread half of the sliced potatoes in an even layer on the bottom of the pan. Top evenly with half of the cream sauce. (I usually strain out all of the onions and add them here too.) Then sprinkle evenly with 1 cup of the shredded cheddar cheese, and all of the Parmesan cheese. Top evenly with the remaining sliced potatoes, the other half of the cream sauce, and the remaining 1 cup of cheddar cheese.
  5. Bake: Cover the pan with aluminum foil and bake for 30 minutes. The sauce should be nice and bubbly around the edges. Then remove the foil and bake uncovered for 25-30 minutes, or until the potatoes are cooked through.
  6. Cool. Transfer the pan to a cooling rack, and sprinkle with the remaining teaspoon of thyme and extra Parmesan.
  7. Serve. Serve warm.

NOTES:

Shredded cheese: As always when melting shredded cheese into a recipe, it’s best if you grate the cheese yourself just before adding it to the recipe. Store-bought shredded cheese usually contains a coating that prevents it from melting smoothly.

Nutritional Info:

Calories: 286 | Carbohydrates: 39g | Protein: 9g | Fat: 11g | Saturated Fat: 7g | Cholesterol: 30mg | Sodium: 484mg | Potassium: 1122mg | Fiber: 6g | Sugar: 5g | Vitamin A: 465IU | Vitamin C: 30.8mg | Calcium: 179mg | Iron: 7.7mg