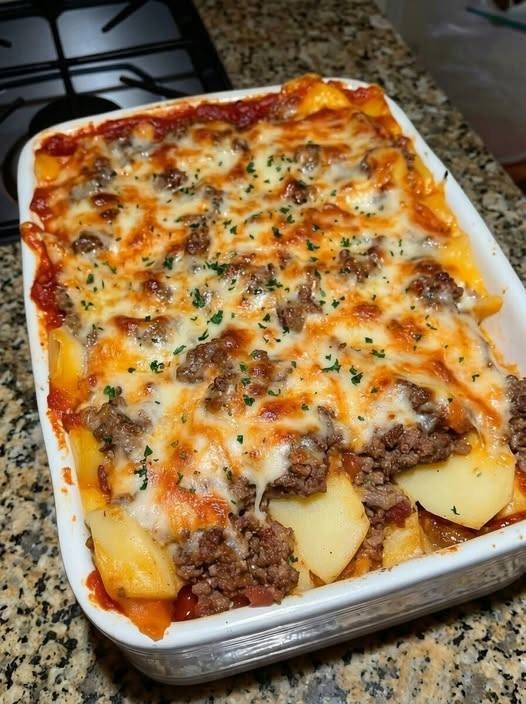
Hamburger Potato Casserole

This hearty Hamburger Potato Casserole is the ultimate comfort food—perfect for family dinners or potlucks. Creamy mushroom soup, seasoned ground beef, and layers of cheesy potatoes come together to create a rich, flavorful dish everyone will love.


Ingredients

Ingredient Amount
Ground beef 1 ½ lb
Russet potatoes 4 large, peeled and thinly sliced
Onion 1 medium, chopped
Shredded cheddar cheese 2 cups
Cream of mushroom soup (condensed) 1 can (10.75 oz)
Milk ¾ cup
Garlic powder 1 tsp
Paprika 1 tsp
Salt & pepper To taste
Olive oil 2 tbsp
Fresh parsley Chopped, for garnish

Instructions

1. Preheat the oven
Set your oven to 375°F (190°C).

2. Prep the ingredients
Peel and thinly slice the potatoes, chop the onion, and shred the cheddar cheese.

3. Cook the ground beef
In a large skillet, heat olive oil over medium heat. Add the ground beef and chopped onion. Cook until the beef is browned and the onion is softened. Drain any excess fat.

4. Make the casserole layers
In a small bowl, whisk together cream of mushroom soup, milk, garlic powder, paprika, salt, and pepper. In a greased 9×13-inch baking dish, layer half of the sliced potatoes, then half of the cooked beef mixture, and half of the shredded cheese. Repeat the layers with the remaining ingredients.

5. Add the soup mixture
Pour the soup mixture evenly over the layered casserole.

6. Bake
Cover the dish with aluminum foil and bake for 60–70 minutes, or until the potatoes are tender.

7. Garnish and serve
Remove the foil, sprinkle with chopped parsley, and let the casserole rest a few minutes before serving.

Mediterranean Creamy Lemon Mousse

Mediterranean Creamy Lemon Mousse

Table of Contents

Creamy Lemon Mousse is one of those desserts that feels light, refreshing, and indulgent all at once. It’s smooth, airy, and perfectly balanced between sweet and tangy, making it an ideal finish to almost any meal. What makes this version especially appealing is its simplicity. With just a handful of ingredients, you can create a dessert that looks elegant enough for guests but is easy enough for everyday cravings. The cold whipping cream provides a fluffy base, condensed milk adds richness and sweetness, and fresh lemon juice brings everything to life with bright citrus flavor. Served chilled and topped with lemon zest, this mousse is proof that simple desserts can still feel special.

Prep Time: 15 minutes

Chilling Time: 2 hours

Total Time: 2 hours 15 minutes

Servings: 4 to 6

Ingredients

1½ cups heavy whipping cream, very cold

¾ cup sweetened condensed milk

¼ cup fresh lemon juice (about 2 lemons)

Zest of 1 lemon, for garnish

Extra lemon zest for serving

Optional: additional lemon juice for extra tang

Optional: whipped cream for topping

Optional: mint leaves for garnish

Optional: crushed biscuits for serving

Optional: pinch of extra zest mixed into the mousse

Instructions

Place the cold heavy whipping cream into a large mixing bowl.

Using a hand mixer or stand mixer, whip the cream on medium speed until soft peaks form.

Reduce the mixer speed to low and slowly pour in the condensed milk.

Continue mixing gently until the condensed milk is fully incorporated.

See also  Mediterranean Dill Pickle Hot Sauce.

Add the fresh lemon juice gradually while mixing on low speed.

Increase the speed slightly and mix until the mousse thickens and holds its shape.

Taste the mousse and adjust with a little more lemon juice if needed.

Spoon the mousse into serving glasses or bowls.

Cover and refrigerate for at least 2 hours to fully set.

Garnish with lemon zest just before serving.

Tips

Make sure the whipping cream is very cold for maximum volume.

Chill the mixing bowl for a few minutes before whipping for better results.

Add the condensed milk slowly to avoid deflating the cream.

Use freshly squeezed lemon juice for the best flavor.

Add lemon juice gradually so you can control the tartness.

Stop mixing as soon as the mousse thickens to avoid overwhipping.

If the mousse feels loose, chill it longer rather than remixing.

Zest the lemon before juicing it for easier handling.

Keep the mousse refrigerated until just before serving.

Garnish at the last moment for the freshest look.

Variations

Make it extra tangy by increasing the lemon juice slightly.

Fold a little lemon zest directly into the mousse for a stronger citrus aroma.

Serve layered with crushed biscuits for added texture.

Pipe the mousse into glasses for a more polished presentation.

Top with a swirl of whipped cream for added richness.

Serve in small portions for a lighter dessert option.

Chill overnight for an even firmer texture.

Use lime juice instead of lemon for a different citrus twist.

Add a thin biscuit base at the bottom of each glass.

Garnish with mint leaves for a fresh finish.

See also  Chicken & Chorizo One-Pan Recipe

Q & A

Why did my mousse not thicken?
The cream may not have been cold enough or was underwhipped.

Can I make this dessert ahead of time?
Yes, it can be made up to 24 hours in advance.

Can I freeze lemon mousse?
Freezing is not recommended, as it can affect the texture.

Is this mousse very sweet?
It’s balanced, but you can add more lemon juice to reduce sweetness.

Can I use bottled lemon juice?
Fresh lemon juice is best, but bottled can work in a pinch.

How long does it keep in the fridge?
Up to 2 days when covered properly.

Can I overwhip the cream?
Yes, overwhipping can make the mousse grainy.

Does the lemon juice help thicken it?
Yes, lemon juice reacts with condensed milk to help set the mousse.

Can I serve it immediately?
It’s best chilled so it fully sets and develops flavor.

Is this dessert suitable for kids?
Yes, it’s gentle and refreshing, perfect for all ages.

Nutrition

(Per Serving, Approximate)

Calories: 320

Protein: 5 g

Fat: 22 g

Carbohydrates: 26 g

Sugar: 24 g

Fiber: 0 g

Sodium: 90 mg

Conclusion

Creamy Lemon Mousse is a dessert that delivers maximum satisfaction with minimal effort. Its light texture, bright lemon flavor, and smooth finish make it a reliable favorite for both casual meals and special occasions. Because it uses just a few basic ingredients, it’s easy to prepare anytime a dessert craving strikes. Whether served plain or dressed up with garnishes, this mousse feels fresh, comforting, and timeless. Once you try it, you’ll likely find yourself returning to this recipe again and again.

Soft Butter Cake

Soft Butter Cake

A classic butter cake with a tender crumb and rich flavor. This cake is soft, moist, and perfect for serving plain or with tea and coffee.


Ingredients

  • 1¾ cups (230 g) cake flour

  • ½ teaspoon baking powder

  • ¼ teaspoon salt

  • 1 cup (250 g) unsalted butter, softened

  • 1 cup (200 g) caster sugar

  • 4 large eggs, room temperature

  • 1 teaspoon vanilla extract

  • ¼ cup (59 ml) milk, room temperature


Instructions

1. Prepare the Pan
Preheat the oven to 170°C (340°F).
Grease a loaf pan and line it with parchment paper.

2. Mix Dry Ingredients
In a bowl, sift together the cake flour, baking powder, and salt. Set aside.

3. Cream Butter and Sugar
In a large bowl, beat the butter and sugar until pale, light, and fluffy. This takes about 3–4 minutes.

4. Add Eggs
Add the eggs one at a time, beating well after each addition. Scrape the bowl as needed.
Mix in the vanilla extract.

5. Add Dry Ingredients and Milk
Add the flour mixture in two additions, alternating with the milk.
Mix gently until just combined. Do not overmix.

6. Bake
Pour the batter into the prepared pan and smooth the top.
Bake for 45–55 minutes, or until a skewer inserted into the center comes out clean.

7. Cool
Let the cake cool in the pan for 10 minutes, then remove and cool completely on a wire rack.


Serving

Serve plain, dusted with powdered sugar, or with fruit and cream.

Aloe Vera and Cinnamon Wellness Drink

Aloe Vera and Cinnamon Wellness Drink

This is a simple natural wellness drink made with aloe vera and cinnamon to support overall body balance and daily nourishment. It is intended as a general health beverage, not a treatment or cure for any disease. Always consult a qualified healthcare professional before using herbal preparations.


Introduction

Aloe vera and cinnamon are commonly used in traditional wellness practices. They are valued for their antioxidant and soothing properties and are often included in routines that focus on general vitality, digestion, and daily well-being.


Ingredients

  • 1 large aloe vera leaf (clear gel only)

  • 1 cinnamon stick or 1 teaspoon ground cinnamon

  • 1 cup warm water

  • 1 tablespoon honey (optional)

  • 1 teaspoon lemon juice (optional)


Instructions

  1. Wash the aloe vera leaf thoroughly.

  2. Cut it open and scoop out the clear gel (about 2 tablespoons).

  3. In a small pot, simmer the cinnamon in water for 5–7 minutes.

  4. Allow the liquid to cool slightly, then remove the cinnamon.

  5. Add the aloe vera gel, honey, and lemon juice.

  6. Blend briefly until smooth.

  7. Consume in moderation as part of a balanced routine.


Tips

  • Use only the clear aloe gel and avoid the yellow sap.

  • Do not exceed recommended amounts of cinnamon.

  • Store leftovers in the refrigerator for up to 24 hours.

  • Pair with a balanced diet, hydration, and healthy lifestyle habits.

  • Consult a healthcare professional before adding new herbal drinks to your routine.

Lemon-Scented Yogurt Blueberry Loaf

Lemon-Scented Yogurt Blueberry Loaf

A moist, tangy cake perfect for tea time.


Ingredients

Dry Ingredients

  • 1 cup (120 g) all-purpose flour

  • ½ teaspoon baking powder

  • ½ teaspoon baking soda

  • ⅛ teaspoon salt

Wet Ingredients

  • 2 oz (57 g) unsalted butter, softened

  • ⅔ cup (134 g) granulated sugar

  • 1 large egg

  • ½ cup (118 ml) yogurt

  • ½ teaspoon vanilla extract

  • Optional: zest of 1 lemon

Fruit

  • 1 cup blueberries (fresh or frozen)


Instructions

Preparation:
Preheat the oven to 350°F (175°C). Grease an 8 × 4-inch loaf pan and line the bottom with parchment paper.

Mix Dry Ingredients:
In a bowl, whisk together the flour, baking powder, baking soda, and salt. Set aside. Lightly coat the blueberries with a small amount of this flour mixture to help prevent sinking.

Cream Butter and Sugar:
In a large bowl, beat the butter and sugar until light and fluffy. If using lemon zest, mix it in at this stage.

Add Egg and Yogurt:
Beat in the egg and vanilla until well combined. Stir in the yogurt until smooth.

Combine:
Gradually add the dry ingredients to the wet mixture, stirring gently just until combined. Avoid overmixing.

Fold in Berries:
Gently fold in most of the blueberries.

Bake:
Pour the batter into the prepared pan. Scatter the remaining blueberries over the top. Bake for 45–55 minutes, or until a toothpick inserted in the center comes out clean.

Cool:
Let cool in the pan for 10 minutes, then transfer to a wire rack to cool completely before slicing.


Optional Lemon Glaze

Mix ½ cup powdered sugar with 1 tablespoon lemon juice. Drizzle over the cooled loaf before serving.

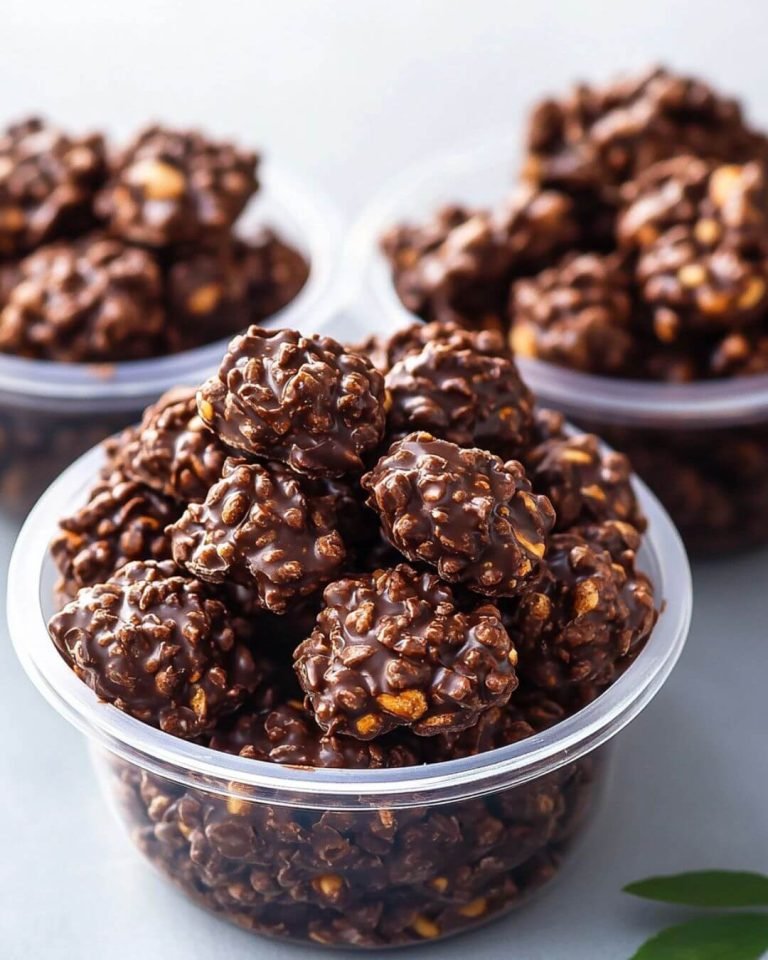
Crispy Cocoa Peanut Clusters

Crispy Cocoa Peanut Clusters

No flour • No chocolate bars • No butter


Ingredients

  • 1 small egg

  • 100 g (½ cup) granulated sugar

  • 30 g (about 4 tablespoons) unsweetened cocoa powder

  • 150 g (about 1 cup) roasted peanuts (unsalted or lightly salted)

  • 40 g (about 1½ cups) crispy rice cereal

  • Optional: a pinch of salt


Instructions

Prep:
Preheat the oven to 300°F (150°C). Line a baking sheet with parchment paper or a silicone baking mat.

Whisk the Base:
In a mixing bowl, whisk the egg and sugar until pale and slightly frothy.

Add Cocoa:
Sift in the cocoa powder (and salt, if using). Whisk until smooth, dark, and glossy.

Fold in Crunch:
Add the roasted peanuts and crispy rice cereal. Gently fold until everything is evenly coated with the cocoa mixture.

Form the Clusters:
Spoon small mounds of the mixture onto the prepared baking sheet, keeping them compact so they hold together while baking.

Bake:
Bake for 15–18 minutes, until the coating sets and looks matte rather than shiny.

Cool Completely:
Allow the clusters to cool fully on the baking sheet. They will firm up and become crunchy as they cool.


Storage Tip

Store in an airtight container at room temperature. These clusters remain crunchy for up to one week.