Easy Strawberry Slab Pie

Easy Strawberry Slab Pie (Perfect for a Crowd)

Introduction

This easy strawberry slab pie is the perfect dessert when you need something delicious, beautiful, and made for sharing. Baked in a large pan and sliced into neat squares, this pie is ideal for parties, picnics, family gatherings, and summer celebrations. With juicy strawberries and a buttery crust, it delivers classic pie flavor with much less effort than a traditional round pie.

Whether you’re a beginner baker or an experienced home cook, this strawberry slab pie recipe walks you through every step for reliable, bakery-style results.


Why You’ll Love This Recipe

  • Crowd-friendly: Feeds many people with minimal effort

  • Easy to make: Uses simple ingredients and a pre-made crust option

  • Customizable: Gluten-free, vegan, and low-sugar adaptations included

  • Year-round option: Works with fresh or frozen strawberries

  • Perfect texture: Juicy filling with a golden, flaky crust

This dessert is light, fruity, and satisfying without being overly sweet—making it a favorite for all ages.


Ingredients

For the Strawberry Filling

  • 6–7 cups fresh strawberries, hulled and sliced

  • ¾ cup granulated sugar (adjust to taste)

  • ¼ cup cornstarch

  • 1 tablespoon lemon juice

  • 1 teaspoon vanilla extract

For the Crust

  • 1 pre-made slab pie crust or enough pie dough for a 9×13-inch pan

Optional Toppings

  • Crumb topping

  • Whipped cream

  • Vanilla ice cream

Dietary swaps:

  • Use a gluten-free pie crust if needed

  • Choose plant-based butter and vegan crust for a dairy-free version

  • Reduce sugar or use monk fruit sweetener for a lower-sugar option


Step-by-Step Instructions

  1. Preheat the oven to 375°F (190°C). Lightly grease a 9×13-inch baking pan.

  2. Prepare the strawberries: wash, hull, and slice them evenly.

  3. Make the filling: In a large bowl, gently toss strawberries with sugar, cornstarch, lemon juice, and vanilla extract until evenly coated.

  4. Prepare the crust: Roll out the dough and press it into the bottom and slightly up the sides of the pan.

  5. Add the filling: Pour the strawberry mixture over the crust and spread evenly.

  6. Optional topping: Add a crumb topping or lattice crust if desired.

  7. Bake: Place in the oven and bake for 40–45 minutes, or until the crust is golden and the filling is bubbling.

  8. Cool completely: Let the pie cool before slicing so the filling sets properly.


Pro Tips for Best Results

  • Use ripe, sweet strawberries for maximum flavor

  • If berries are very juicy, add 1 extra tablespoon cornstarch

  • For a crisp bottom crust, blind bake the crust for 10 minutes before filling

  • Always cool fully before cutting for clean slices


Variations & Substitutions

  • Mixed Berry Slab Pie: Replace half the strawberries with blueberries or raspberries

  • Graham Cracker Crust: For a cheesecake-style base

  • Puff Pastry Version: Light, flaky, and elegant

  • Spiced Filling: Add a pinch of cinnamon or nutmeg

  • Nutty Crunch: Sprinkle chopped almonds or pecans on top


Serving Suggestions

Serve strawberry slab pie with:

  • Freshly whipped cream

  • Vanilla ice cream

  • Mint leaves for garnish

  • A drizzle of balsamic reduction for a gourmet touch

Pair it with iced tea, lemonade, or fruit-infused drinks for a refreshing finish.


Frequently Asked Questions

Can I use frozen strawberries?
Yes. Thaw them completely and drain excess liquid before use.

How do I make it lower in sugar?
Reduce sugar or substitute with stevia or monk fruit sweetener.

Can I freeze strawberry slab pie?
Absolutely. Wrap tightly and freeze for up to 2 months. Thaw in the refrigerator before serving.


Final Thoughts

This easy strawberry slab pie is a reliable, versatile dessert that combines simplicity with irresistible flavor. Whether you’re baking for a crowd or prepping ahead for a special occasion, this recipe delivers consistent results every time. With flexible ingredients and endless variations, it’s a dessert you’ll return to again and again.

🍓 Creamy Strawberry Mint Smoothie

Ingredients

  • Strawberries: 2 cups fresh or frozen (frozen makes it thicker).

  • Milk Base: 1 cup of your preferred milk (dairy, almond, or oat milk all work well).

  • Yogurt: 1/2 cup Greek yogurt or vanilla yogurt for extra creaminess.

  • Sweetener: 1–2 tablespoons of honey or maple syrup (optional, depending on the sweetness of the berries).

  • Freshness: 2–3 fresh mint leaves (plus more for garnish).

  • Ice: A handful of ice cubes (only if using fresh berries).


Instructions

  1. Prepare the Berries: Wash the strawberries and remove the green leafy tops (hulls). If they are very large, cut them in half.

  2. Combine Ingredients: Place the strawberries, milk, yogurt, sweetener, and mint leaves into a blender.

  3. Blend: Start on a low speed and gradually increase to high. Blend for about 45–60 seconds until the mixture is completely smooth and pale pink.

  4. Check Consistency: If you prefer a thinner smoothie, add a splash more milk. If you want it thicker, add a few more frozen strawberries or ice cubes and blend again.

  5. Serve: Pour the smoothie into tall glasses like the ones in the photo.

  6. Garnish: Top each glass with a fresh mint leaf and a slice of strawberry to match the presentation in your image.


Quick Tips for the Best Result

  • For a “Frosty” Texture: Use frozen strawberries instead of fresh ones. This creates a thick, milkshake-like consistency without watering it down with ice.

  • Boost the Nutrition: You can add a tablespoon of chia seeds or flax seeds before blending; they won’t change the flavor much but will add healthy fiber.

AMISH WHITE BREAD

INGREDIENTS FOR AMISH WHITE BREAD

  1. Two cups of heated (45°C/110°F) water
  2. Half a cup of white sugar
  3. a tsp of active dry yeast
  4. Half a cup of vegetable oil
  5. One and a half tablespoons of salt
  6. six cups of bread flour

GUIDELINES  FOR AMISH WHITE BREAD

  • Compile every component.
  • In a large basin, dissolve sugar in warm water; whisk in yeast. Give the yeast five to ten minutes to proof until it resembles a creamy froth.
  • Add salt and oil to the yeast mixture. One cup of flour at a time, mix in.
  • On a surface dusted with flour, knead dough until it’s smooth.
  • Transfer to a lightly oiled bowl, then turn the dough to coat. With a moist cloth, cover. Give it an hour or so to rise until the mass has doubled.
  • Beat down the dough.
  • Work the dough for a few minutes, then split in two. Form into loaves and transfer to two 9×5-inch loaf pans that have been well-oiled.
  • Give the dough 30 minutes or so to rise, or until it has risen an inch above the pans.
  • Meanwhile, heat the oven to 175 degrees Celsius, or 350 degrees Fahrenheit.
  • For thirty minutes, bake the risen loaves in the preheated oven, or until they are golden brown.
  • Enjoy!

Creamy Cucumber Salad Recipe

Creamy Cucumber Salad Recipe

  • Prep time: 15 minutes

  • Chilling time: 30 minutes (optional, for best flavor)

  • Servings: 4


Ingredients

The Base:

  • 2 large English cucumbers: Sliced into thin rounds (English cucumbers have thinner skin and fewer seeds).

  • 1/2 small red onion: Thinly sliced into half-moons.

The Dressing:

  • 1/2 cup sour cream (or Greek yogurt for a lighter version).

  • 2 tablespoons mayonnaise.

  • 1 tablespoon white vinegar or apple cider vinegar.

  • 1 tablespoon fresh dill (chopped) or parsley (as seen in the image).

  • 1 teaspoon sugar (to balance the acidity).

  • 1/2 teaspoon garlic powder.

  • Salt and black pepper to taste.

Garnish:

  • A pinch of paprika (for color).

  • Extra fresh herbs.


Instructions

  1. Prepare the Cucumbers: If you prefer a less watery salad, place the sliced cucumbers in a colander, sprinkle with a little salt, and let them sit for 10 minutes. Pat them dry with a paper towel before mixing.

  2. Whisk the Dressing: In a large mixing bowl, combine the sour cream, mayonnaise, vinegar, sugar, garlic powder, and herbs. Whisk until the dressing is smooth and creamy.

  3. Combine: Add the sliced cucumbers and red onions to the bowl. Toss gently until every slice is thoroughly coated in the dressing.

  4. Season: Taste and add salt, black pepper, and a dash of paprika.

  5. Chill: For the best results, cover the bowl and refrigerate for at least 30 minutes. This allows the flavors to meld and the cucumbers to become slightly marinated.

  6. Serve: Give it a final toss before serving. Top with fresh parsley or dill for a vibrant look.


Pro Tips for Success

  • Vinegar Swap: If you want a brighter citrus note, swap the vinegar for fresh lemon juice.

  • Texture: Keep the cucumber skins on for extra color and nutrients, or peel them in “stripes” for a decorative look.

  • Storage: This salad is best eaten the day it is made, as cucumbers release water over time, which can thin the dressing.

Baklava Bundt Cake

This Baklava Bundt Cake is a fusion dessert that captures the classic flavors of traditional baklava—honey, walnuts, cinnamon, and butter—in a moist, easy-to-slice cake form. Baked in a Bundt pan, it presents the rich, nutty, and syrup-soaked essence of the beloved pastry as a simple, shareable cake.

Why You’ll Love This Recipe

The recipe simplifies the labor-intensive process of layering phyllo dough while delivering the same signature taste and texture. It is designed for reliability, using common baking ingredients and pans. The cake is thoroughly soaked in a spiced honey syrup, ensuring every bite is moist and flavorful.

Ingredients

For the Cake:

  • 3 cups all-purpose flour
  • 1 teaspoon baking powder
  • 1/2 teaspoon baking soda
  • 1/2 teaspoon salt
  • 1 cup unsalted butter, softened
  • 1 3/4 cups granulated sugar
  • 4 large eggs, room temperature
  • 1 teaspoon vanilla extract
  • 1 cup plain Greek yogurt or sour cream, room temperature
  • 1 1/2 cups finely chopped walnuts
  • 1/2 cup granulated sugar (for nut mixture)
  • 2 teaspoons ground cinnamon

For the Honey Syrup:

  • 1 cup granulated sugar
  • 1 cup water
  • 1 cup honey
  • 1 cinnamon stick
  • 3 whole cloves
  • 1 strip of lemon peel

Step-by-Step Instructions

  1. Prepare: Preheat oven to 350°F (175°C). Generously grease and flour a 10-12 cup Bundt pan.
  2. Make Nut Mixture: In a bowl, combine the chopped walnuts, 1/2 cup sugar, and ground cinnamon. Set aside.
  3. Make Cake Batter: In a medium bowl, whisk together flour, baking powder, baking soda, and salt. In a large bowl, cream the softened butter and 1 3/4 cups sugar until light and fluffy. Beat in eggs one at a time, then mix in vanilla extract. Alternately add the flour mixture and the Greek yogurt to the butter mixture, beginning and ending with the flour, mixing just until combined.
  4. Layer in Pan: Spoon about one-third of the cake batter into the prepared Bundt pan and smooth the top. Sprinkle half of the walnut-cinnamon mixture evenly over the batter. Add another third of the batter, then the remaining walnut mixture. Top with the final third of the batter, smoothing gently.
  5. Bake: Bake for 50-60 minutes, or until a long skewer inserted into the center comes out clean.
  6. Make Syrup: While the cake bakes, combine the sugar, water, honey, cinnamon stick, cloves, and lemon peel in a saucepan. Bring to a boil, stirring until sugar dissolves. Reduce heat and simmer for 10-15 minutes without stirring. Remove from heat, discard the spices and peel, and let cool slightly.
  7. Soak Cake: As soon as the cake comes out of the oven, use the skewer to poke holes all over the top (which will be the bottom of the cake). Slowly and evenly pour about two-thirds of the warm syrup over the hotcake. Let the cake cool completely in the pan for at least 2 hours.
  8. Unmold and Finish: Once completely cool, invert the cake onto a serving plate. Rewarm the remaining syrup if needed and brush or drizzle it over the exterior of the cake.

FAQ

Can I use a different type of nut?  Yes. Pistachios or a blend of walnuts and pistachios are common, authentic substitutions.

Discover more
Bread
Butter
sugar
cake
honey
Honey
Sugar
flour
butter
Cake

Can I make the syrup ahead of time?  Yes. The syrup can be made up to a week in advance and stored covered in the refrigerator. Warm before using.

Why did my cake stick to the pan?  Ensure the pan is thoroughly greased and floured, including all crevices. Let the cake cool completely in the pan to allow its structure to set before inverting.

Is the cake overly sweet?  The syrup is integral, but the cake itself is not overly sweet, and the nuts provide balance. The full syrup recipe is traditional for a soaked texture.

You Must Know

It is critical to pour the honey syrup over the cake immediately after it comes out of the oven while both are still warm. This allows the cake to fully absorb the syrup, creating the signature moist, sticky texture. Cooling the cake completely in the pan is also non-negotiable for a clean release.

Storage Tips

Store the cake at room temperature, tightly covered with plastic wrap or under a cake dome, for up to 3 days. For longer storage, wrap individual slices or the whole cake securely and freeze for up to 2 months. Thaw at room temperature. Do not refrigerate, as it can dry out the cake and cause the syrup to harden.

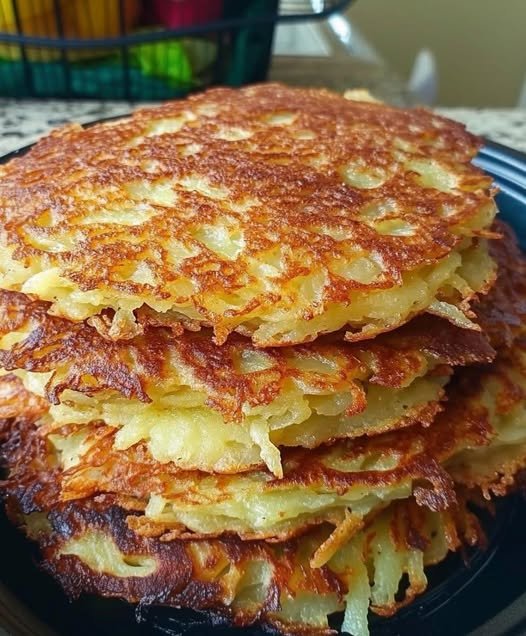
German Potato Pancakes

There are so many potato pancake recipes out there, and they are all claiming to be the original German Potato Pancakes. These are really fun to make and eat. They are crispy, slightly crunchy, and overly tasty. These cakes are truly loved worldwide. Of course, each locale has their own recipe. For instance, Swedish pancakes are also quite popular and eerily similar to the German potato pancakes.

Ingredients

  • 2 ½ pounds Russet potatoes, or any starchy potato, peeled and grated very finely
  • 1 yellow onion, grated very fine
  • 2 large eggs
  • 1 tsp salt
  • ¼ cup all-purpose flour
  • Oil for frying

How To Make German Potato Pancakes

FIRST STEP:

After grating the potatoes, using a towel, thoroughly wring out all the liquid from the potatoes

Place the drained potatoes into a large bowl with the grated onion, salt, eggs, and flour.

Mix it thoroughly with your hands; you want it to be somewhat tacky. Add a little more flour if it is too sticky

SECOND STEP:

Heat 3 tbsp oil in a skillet

Place ⅓ to ½ a cup of mixture into the hot skillet

THIRD STEP:

Fry for three to five minutes on each side, until they are golden.

Briefly drain on paper towels

FOURTH STEP:

Serve immediately, while hot, with applesauce and a sprinkle of powdered sugar, sour cream, or even yogurt.

These could also be served with meat and a gravy, using these as a side dish.

Enjoy!