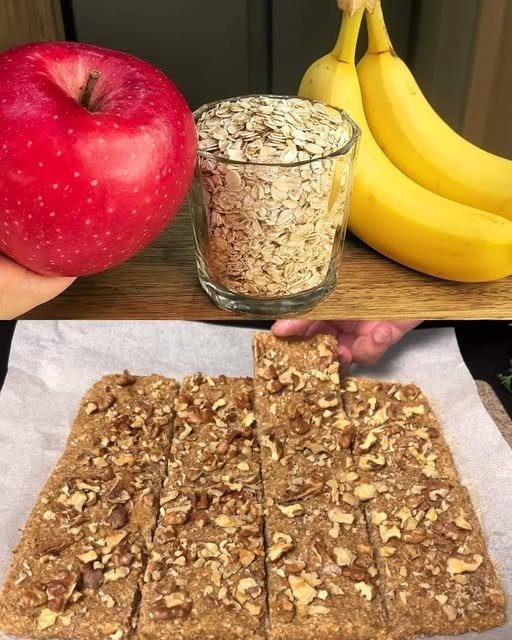
🍎 Apple-Banana Oat Weight Loss Bars

🍎 Apple-Banana Oat Weight Loss Bars

These bars are chewy, naturally sweet, and perfect for meal prepping. Since they use whole ingredients, they keep you full for longer, helping to curb those mid-day cravings.

Ingredients

  • 1 cup Rolled oats (oatmeal)

  • 1 large Apple, peeled and finely chopped (or grated)

  • 1 large Banana, ripe and mashed

  • 1 tsp Cinnamon

  • 2 tbsp Coconut oil, melted

  • 40g Walnuts, roughly chopped

  • Optional: A pinch of salt to enhance the flavor.


Instructions

  1. Prep the Oven: Preheat your oven to 180°C (350°F) and line a small baking dish with parchment paper.

  2. Combine the Wet Ingredients: In a large mixing bowl, mash the banana until smooth. Stir in the melted coconut oil and the finely chopped (or grated) apple.

  3. Add the Dry Ingredients: Add the oats and cinnamon to the fruit mixture. Stir well until the oats are completely coated and the mixture is sticky.

  4. Layer and Topping: Transfer the mixture into your prepared baking dish. Use a spatula to press it down firmly into an even layer (about 1–2 cm thick). Sprinkle the chopped walnuts over the top and press them down slightly so they stick.

  5. Bake: Place in the oven and bake for 20–25 minutes until the edges are golden brown and the center feels firm.

  6. Cool and Slice: Allow the bars to cool completely in the pan before lifting them out. This is crucial—if you cut them while hot, they may crumble. Slice into rectangles or squares.
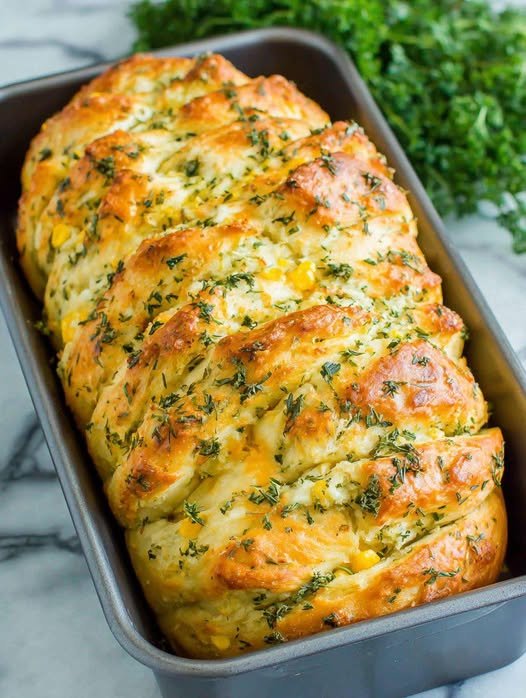
🌽🧀 Cheesy Herb Pull-Apart Bread

This golden, soft, cheesy pull-apart bread is packed with herbs, sweet corn, and melted cheese, just like the one in the image. It’s fluffy on the inside, beautifully browned on the outside, and perfect for sharing. Ideal for tea time, dinner rolls, or as a party centerpiece.


📝 Ingredients

For the Dough

  • 3½ cups all-purpose flour

  • 2¼ teaspoons instant yeast (1 packet)

  • 2 tablespoons sugar

  • 1 teaspoon salt

  • ¾ cup warm milk (not hot)

  • ¼ cup warm water

  • 3 tablespoons melted butter or oil

  • 1 large egg

For the Filling

  • 1½ cups mozzarella cheese, shredded

  • ½ cup cheddar cheese, shredded

  • ½ cup sweet corn (boiled or canned, drained well)

  • 2 tablespoons softened butter

  • 1 teaspoon garlic powder

  • 1 teaspoon dried oregano

  • 1 teaspoon dried parsley

  • ½ teaspoon black pepper

  • ½ teaspoon chili flakes (optional)

  • Salt to taste

For Topping

  • 1 tablespoon melted butter

  • ½ teaspoon dried parsley or mixed herbs


👩‍🍳 Step-by-Step Instructions

1. Prepare the Dough

  1. In a large bowl, mix warm milk, warm water, sugar, and yeast.

  2. Let it rest for 5–10 minutes until foamy.

  3. Add egg, melted butter, salt, and flour gradually.

  4. Knead for 8–10 minutes until soft, smooth, and elastic.

  5. Place in a greased bowl, cover, and let rise 1 hour or until doubled.


2. Make the Filling

In a bowl, mix:

  • Both cheeses

  • Sweet corn

  • Butter

  • Garlic powder

  • Oregano

  • Parsley

  • Black pepper

  • Chili flakes

  • Salt

Set aside.


3. Shape the Bread

  1. Punch down the risen dough.

  2. Roll into a large rectangle (about 12×16 inches).

  3. Spread the cheese-corn filling evenly.

  4. Cut into long strips.

  5. Stack strips on top of each other, then cut into squares.

  6. Arrange upright in a greased loaf pan, creating a pull-apart pattern.


4. Second Rise

  • Cover and let rest 20–30 minutes until slightly puffy.


5. Bake

  1. Preheat oven to 180°C / 350°F

  2. Brush top with melted butter and sprinkle herbs.

  3. Bake for 30–35 minutes until golden brown and fully baked.

  4. If browning too fast, loosely cover with foil.


🧈 Final Touch

Brush with more melted butter while hot for extra softness and shine.


🍞 Serving Suggestions

  • Serve warm with soup or salad

  • Perfect with tea or coffee

  • Great as a party bread or lunchbox treat


⭐ Tips

  • You can add olives, jalapeños, or cooked chicken

  • Use garlic butter instead of plain butter for extra flavor

  • Best enjoyed fresh but reheats well

Christmas Chaos Cake

Christmas Chaos Cake

Serves: 12 | Prep time: 45 mins | Bake time: 30-45 mins

Ingredients

For the Spiced Cake Base:

  • 2 cups All-purpose flour

  • 1 ½ tsp Baking powder & ½ tsp Baking soda

  • ½ tsp Salt

  • 1 tsp Cinnamon & ½ tsp Nutmeg

  • 1 cup Granulated sugar & ½ cup Light brown sugar (packed)

  • ¾ cup Unsalted butter (softened)

  • 3 large Eggs (room temperature)

  • 1 tsp Vanilla extract

  • ½ cup Sour cream & ½ cup Buttermilk

The “Chaos” Mix-ins:

  • ½ cup each: Chopped pecans, shredded coconut, mini chocolate chips, and chopped dried cranberries

  • ¼ cup Crushed candy canes (optional)

  • Optional: Red and green gel food coloring for a marbled look.

For the Cream Cheese Frosting:

  • 8 oz Cream cheese (softened)

  • ½ cup Unsalted butter (softened)

  • 3 cups Powdered sugar

  • 1 tsp Vanilla extract

  • 1–2 tbsp Heavy cream (for consistency)


Step-by-Step Instructions

1. Preparation

Preheat your oven to 350°F (175°C). Grease and flour a 9×13-inch pan for a sheet cake or two 9-inch round pans for a layered look.

2. Mix Dry and Wet Bases

  • Dry: Whisk together the flour, baking powder, soda, salt, cinnamon, and nutmeg.

  • Creaming: In a large bowl, beat the butter and both sugars until light and fluffy (about 2–3 minutes).

  • Wet: Beat in the eggs one at a time, then mix in the vanilla and sour cream until smooth.

3. Combine and Fold

Gradually add the dry ingredients and the buttermilk to the butter mixture, alternating between them. Mix just until combined—do not overmix. Fold in the pecans, coconut, chocolate chips, cranberries, and candy canes.

  • Pro Tip: If you want the marbled look mentioned in the story, divide the batter before adding mix-ins and tint portions with red and green gel coloring.

4. Bake and Cool

Pour the batter into your prepared pan. Bake for 40–45 minutes (for a 9×13 pan) or until a toothpick comes out clean. Let it cool in the pan for 15 minutes, then move to a wire rack to cool completely.

5. Frost and Decorate

Beat the cream cheese and butter until creamy, then gradually add powdered sugar, vanilla, and heavy cream until fluffy. Spread generously over the cooled cake. Top with extra sprinkles, chocolate drizzle, or more crushed candy canes to lean into the “chaos”.


Chef’s Storage & Serving Tips

  • Make-Ahead: You can bake the cake layers 1–2 days in advance; just wrap them tightly in plastic at room temperature until you are ready to frost.

  • Storage: Store leftovers covered at room temperature for 2 days or in the fridge for up to 5 days.

  • Pairing: This festive dessert pairs beautifully with hot cocoa, eggnog, or a peppermint latte.

Spinach Artichoke Crescent Roll Bake

🥬 Spinach Artichoke Crescent Roll Bake

Yields: 8–10 rolls
Prep Time: 20 minutes
Bake Time: 18–22 minutes

A warm, cheesy appetizer that combines creamy spinach and artichokes inside golden, buttery crescent rolls. Perfect for parties, snacks, or cozy meals.


📝 Ingredients

For the Filling:

  • 1 cup frozen chopped spinach, thawed and well-drained

  • 1 cup canned artichoke hearts, chopped and well-drained

  • 4 oz (115 g) cream cheese, softened

  • ¼ cup sour cream

  • ¼ cup mayonnaise

  • ½ cup shredded mozzarella cheese

  • ¼ cup grated Parmesan cheese

  • 1 clove garlic, minced

  • Salt & pepper, to taste

For the Rolls:

  • 1 can (8 oz / 225 g) refrigerated crescent roll dough (sheet or regular)

  • 1 egg, beaten (optional, for brushing tops)

  • Extra mozzarella or Parmesan for topping (optional)

  • Fresh parsley, chopped (for garnish, optional)


👩‍🍳 Step-by-Step Instructions

Step 1 — Preheat & Prepare the Dish

  1. Preheat oven to 375°F (190°C).

  2. Lightly grease a baking dish or oven-safe skillet with butter or cooking spray.


Step 2 — Make the Filling

  1. In a medium bowl, combine cream cheese, sour cream, and mayonnaise. Mix until smooth.

  2. Stir in mozzarella, Parmesan, and garlic.

  3. Add the spinach and artichokes, mixing until evenly combined.

  4. Season with salt and pepper to taste.

Optional: Add a pinch of red pepper flakes or Italian seasoning for extra flavor.


Step 3 — Prepare the Dough

  1. Unroll the crescent dough onto a clean surface. If using perforated crescent rolls, pinch the seams to form a solid rectangle.

  2. Spread the spinach artichoke filling evenly over the dough, leaving about ½ inch from the edges.

  3. Starting from one long edge, roll the dough into a log (like a jelly roll).

  4. Using a sharp knife or unflavored dental floss, slice the log into 1-inch rolls (about 8–10 pieces).


Step 4 — Assemble & Bake

  1. Place the rolls cut side up in the prepared baking dish.

  2. Optional: Brush tops with beaten egg for a golden finish.

  3. Optional: Sprinkle extra mozzarella or Parmesan on top.

  4. Bake for 18–22 minutes or until golden brown and puffed.


Step 5 — Garnish & Serve

  1. Remove from oven and let cool for 5 minutes.

  2. Garnish with fresh parsley if desired.

  3. Serve warm as an appetizer, snack, or side dish.


💡 Tips for Success

  • Drain Well: Squeeze out excess liquid from spinach and artichokes to avoid soggy rolls.

  • Cheese Variations: Try Monterey Jack, cheddar, or Gruyère for different flavors.

  • Make Ahead: Assemble rolls and refrigerate for up to 8 hours before baking. Add 2–3 minutes to baking time.

  • Freezing: Bake, cool, and freeze in an airtight container for up to 1 month. Reheat at 350°F until warmed through.


🍴 Serving Ideas

  • Pair with tomato soup for a cozy meal.

  • Serve alongside a fresh garden salad for lunch.

  • Offer with marinara or garlic dip for extra indulgence.


⏱ Summary Table

Step Time Key Notes
Preheat Oven 5 min Grease baking dish
Make Filling 10 min Drain spinach well
Prepare Dough 5 min Roll tightly for neat slices
Bake 18–22 min Golden brown top
Serve — Best served warm

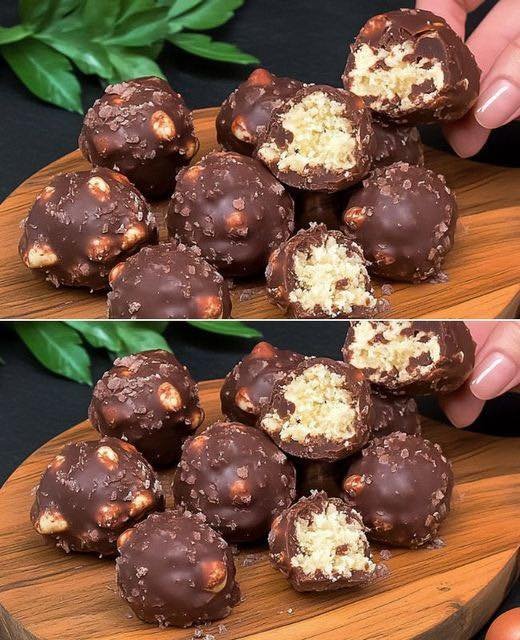
Chocolate-Coated Peanut and Cookie Balls (No-Bake)

Chocolate-Coated Peanut and Cookie Balls (No-Bake)

Yields: About 30 balls
Prep Time: 20–25 minutes
Chill Time: 30–60 minutes

A no-bake treat that combines crushed cookies, peanuts, and chocolate. Crispy, nutty, and easy to make, these bite-sized balls are perfect for snacks, parties, or homemade gifts.


📋 Ingredients

For the Filling:

  • 500 g (17.6 oz) cookies, crushed

  • 120 g (4.2 oz) peanuts, crushed

  • 120 g (½ cup) sugar

  • 60 g (½ cup) cocoa powder

  • 250 ml (1 cup) milk

  • 150 g (⅔ cup) butter

  • A pinch of vanillin or a few drops of vanilla extract

For the Chocolate Glaze:

  • 80 g (2.8 oz) dark chocolate

  • 80 g (2.8 oz) milk chocolate

  • 20 ml (1½ tbsp) vegetable oil

  • 50 g (1.8 oz) peanuts, chopped


👩‍🍳 Step-by-Step Instructions

Step 1: Prepare the Filling

  1. Crush Cookies and Peanuts: Crush the cookies into small pieces using a food processor or a rolling pin in a sealed bag. Roughly chop the peanuts and mix them with the crushed cookies in a large bowl.

  2. Make Chocolate Mixture: In a medium saucepan over medium heat, combine the milk, sugar, cocoa powder, and vanilla. Stir continuously until the sugar dissolves completely.

  3. Add Butter: Add the butter to the saucepan and stir until fully melted and smooth.

  4. Combine: Pour the warm chocolate mixture over the crushed cookies and peanuts. Stir thoroughly until everything is evenly coated. The mixture should be thick and sticky enough to form balls.


Step 2: Shape the Balls

  1. Scoop small portions of the mixture and roll them into balls about the size of a walnut.

  2. Place the balls on a tray lined with parchment paper or a silicone mat.

  3. Chill in the refrigerator or freezer for about 30 minutes to firm up.


Step 3: Prepare the Chocolate Glaze

  1. Combine the dark chocolate, milk chocolate, and vegetable oil in a heatproof bowl.

  2. Melt using a double boiler or microwave in 20–30 second intervals, stirring until smooth.

  3. Stir in the chopped peanuts for extra texture.


Step 4: Coat the Balls

  1. Remove the chilled balls from the fridge.

  2. Using a fork or skewer, dip each ball into the chocolate glaze, ensuring it is fully coated.

  3. Place the coated balls back on the tray and chill for 20–30 minutes until the glaze hardens.


Step 5: Serve and Store

  • Serve immediately, or arrange in a box for gifting.

  • Store in an airtight container in the refrigerator for up to 1 week.

  • For longer storage, freeze in an airtight container for up to 1 month.


💡 Tips for Success

  • Nut Variations: Substitute peanuts with almonds, hazelnuts, or walnuts for a different flavor.

  • Texture: Keep cookie pieces slightly larger for a chunkier consistency.

  • Glaze Tip: If you want a shinier coating, add a tiny extra teaspoon of oil to the melted chocolate.


These no-bake chocolate peanut cookie balls are crunchy, chocolaty, and easy to make, with no oven required. Perfect for snacks, dessert tables, or homemade gifts!

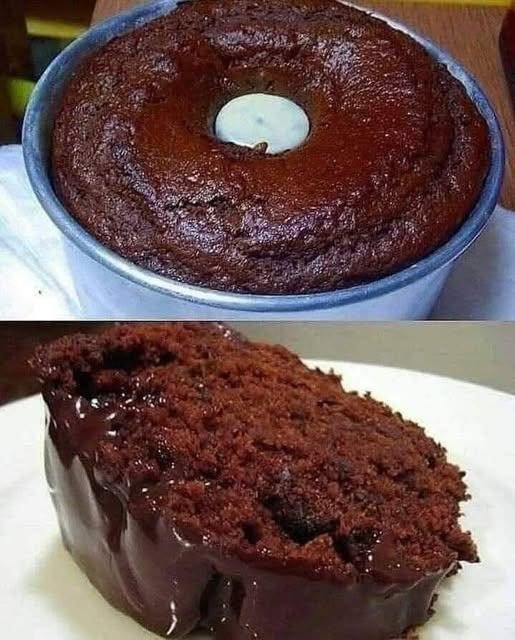
Decadent Chocolate Cake with Wine Glaze

🍫 Decadent Chocolate Cake with Wine Glaze

Servings: 8–10
Prep Time: 15 minutes
Bake Time: 1 hour
Total Time: 1 hour 15 minutes

A moist, flavorful chocolate cake with a subtle hint of cinnamon, topped with a smooth wine glaze. Perfect for any occasion or a special treat.


📋 Ingredients

For the Cake:

  • 1 box yellow cake mix

  • ¼ cup brown sugar

  • ¼ cup white sugar

  • 1 packet instant vanilla pudding mix

  • 2 teaspoons cinnamon

  • 4 large eggs

  • ¾ cup water

  • ¾ cup vegetable oil

  • ½ cup white wine

For the Wine Glaze:

  • 1 stick (½ cup) unsalted butter

  • 1 cup white sugar

  • ¼ cup white wine


👩‍🍳 Step-by-Step Instructions

Step 1: Preheat the Oven

  1. Preheat the oven to 350°F (175°C).

  2. Grease a bundt pan or cake mold generously with butter or cooking spray.


Step 2: Prepare the Cake Batter

  1. In a large mixing bowl, combine the cake mix, brown sugar, white sugar, vanilla pudding mix, and cinnamon. Mix well.

  2. Add eggs, water, oil, and white wine.

  3. Mix by hand or with an electric mixer until smooth and fully combined.


Step 3: Bake the Cake

  1. Pour the batter evenly into the prepared bundt pan.

  2. Bake in the preheated oven for 1 hour, or until a toothpick inserted into the center comes out clean or with a few moist crumbs.

  3. Remove from the oven and allow the cake to cool in the pan for 5–10 minutes.


Step 4: Prepare the Wine Glaze

  1. While the cake is baking, melt the butter in a small saucepan over medium heat.

  2. Stir in the white sugar and white wine.

  3. Cook, stirring constantly, until the sugar dissolves and the mixture is smooth. Remove from heat.

  4. Optional: Simmer for a few extra minutes for a thicker glaze.


Step 5: Glaze the Cake

  1. Carefully invert the slightly cooled cake onto a serving plate or wire rack.

  2. Pour the warm glaze slowly over the cake, letting it soak and drip down the sides.


Step 6: Serve

  • Allow the cake to cool completely before slicing, or serve slightly warm.

  • Optional: Serve with whipped cream or vanilla ice cream.


💡 Tips & Notes

  • Oil Measurement: Ensure the oil is ¾ cup, not ¾ teaspoon, for proper texture.

  • Wine Choice: Any white wine is fine—dry (Chardonnay) or sweet (Riesling) both work.

  • Storage: Keep leftovers in an airtight container at room temperature for up to 3 days or in the refrigerator for up to 1 week.


🔄 Variations

  • Add ¼ teaspoon espresso powder to intensify chocolate flavor.

  • Substitute the glaze with a simple chocolate ganache for a richer finish.

  • Sprinkle chopped nuts or chocolate chips on top before serving.