Bubbly Garlic Cheese Toast

Bubbly Garlic Cheese Toast

Golden, crisp bread topped with a creamy garlic base and melted cheese

This garlic cheese toast features thick slices of bread topped with a smooth garlic cream spread and a generous layer of melted cheese. Baking on a rack keeps the bread crisp underneath, while a short broil at the end creates a lightly browned, bubbly surface.


Recipe Overview

  • Prep Time: 10 minutes

  • Cook Time: 10 minutes

  • Total Time: 20 minutes

  • Yield: 4–6 slices


Ingredients

Garlic Cream Sauce

  • 4 tablespoons unsalted butter, softened

  • 1 tablespoon all-purpose flour

  • ½ cup whole milk or heavy cream

  • 2 garlic cloves, finely minced (or 1 teaspoon garlic powder)

  • ¼ teaspoon salt

  • A small pinch of black pepper

Bread & Cheese

  • 4–6 thick slices sturdy bread (such as Texas toast, sourdough, or brioche)

  • 1½ cups shredded mozzarella or Gruyère cheese

  • ½ cup shredded Parmesan cheese

  • Fresh parsley, finely chopped (optional garnish)


Step-by-Step Instructions

1. Prepare the Oven and Bread

  • Preheat the oven to 400°F (200°C).

  • Line a baking sheet with foil or parchment paper and place a wire rack on top.

  • Arrange the bread slices in a single layer on the rack to allow heat to circulate and keep the bottoms crisp.


2. Make the Garlic Cream Sauce

  • Place a small saucepan over medium heat and melt the butter.

  • Add the garlic and cook gently for about 1 minute, stirring frequently.

  • Whisk in the flour and cook for another 1 minute, creating a smooth base.

  • Slowly pour in the milk or cream while whisking constantly.

  • Continue stirring until the sauce thickens to a spreadable consistency.

  • Remove from heat and season with salt and black pepper.

Tip: For extra coverage, the sauce ingredients can be doubled.


3. Assemble the Toast

  • Spread a generous layer of the warm garlic sauce evenly over each slice of bread, reaching the edges.

  • Sprinkle the mozzarella (or Gruyère) evenly over the sauce.

  • Finish with a layer of Parmesan cheese.


4. Bake

  • Place the tray in the oven and bake for 5–7 minutes, or until the cheese is fully melted.


5. Lightly Brown the Top

  • Switch the oven setting to broil.

  • Broil for 1–2 minutes, watching closely, until the cheese develops light golden spots.


6. Finish and Serve

  • Remove from the oven and allow the toast to rest for 2 minutes.

  • Sprinkle with chopped parsley if desired.

  • Serve warm.


Helpful Tips & Variations

  • Bread choice: Thick, sturdy bread holds the sauce and cheese best.

  • Cheese texture: Freshly shredded cheese melts more smoothly than pre-packaged shredded cheese.

  • Flavor options: Add a pinch of dried herbs or chili flakes to the sauce.

  • Serving idea: Serve alongside soup, salad, or pasta dishes.
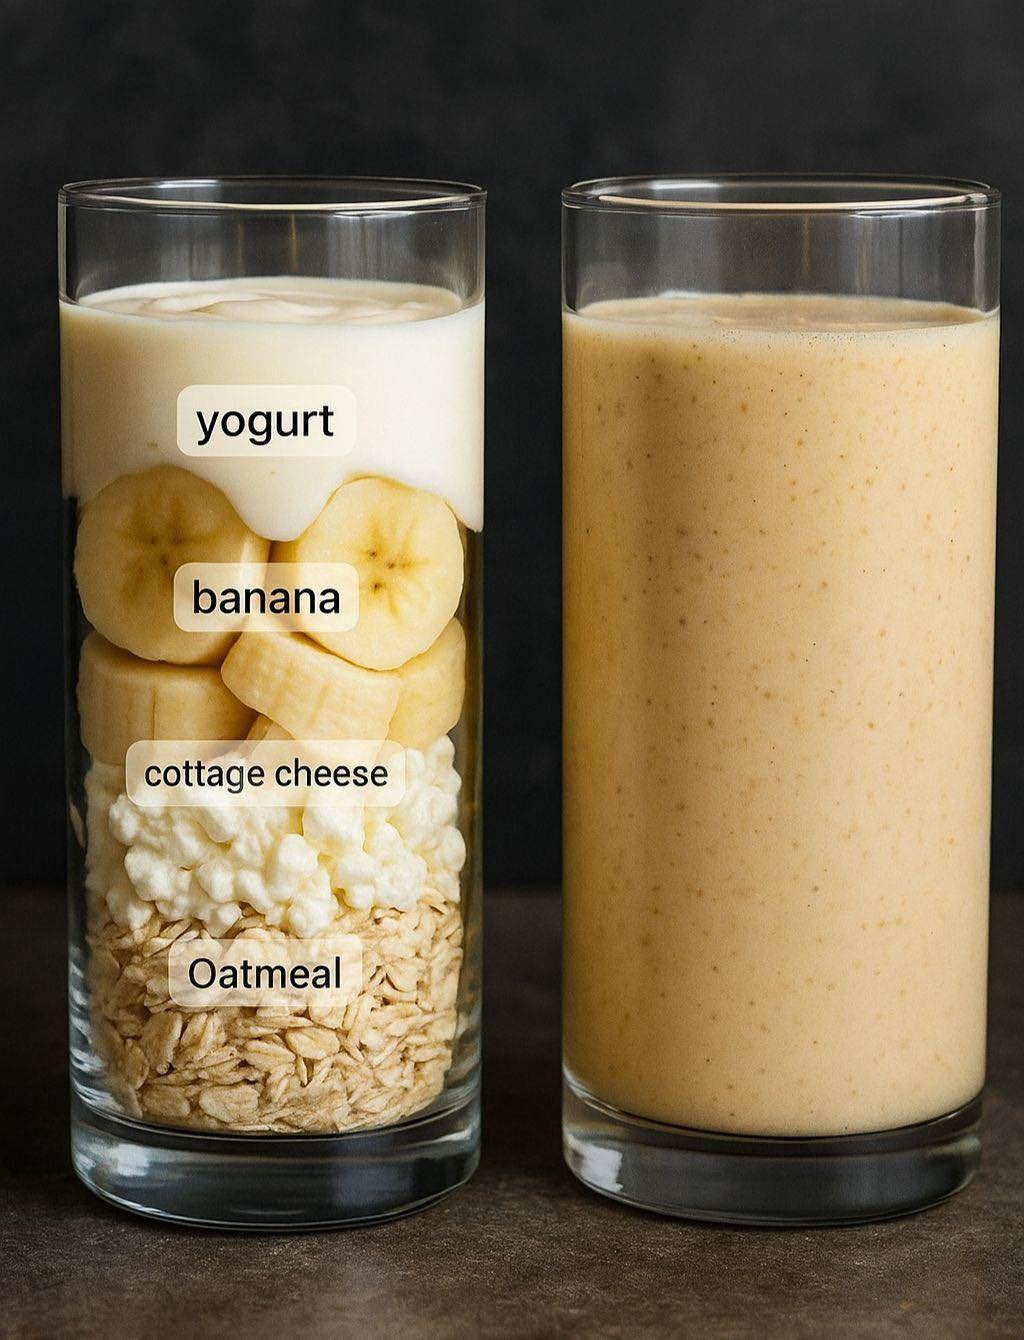
Banana Bread Protein Smoothie

Banana Bread Protein Smoothie

A creamy, filling smoothie inspired by classic banana bread flavors

This Banana Bread Protein Smoothie is thick, smooth, and naturally sweet. It blends oats, banana, yogurt, and cottage cheese into a satisfying drink that works well for breakfast, a light meal, or a post-workout refreshment. Once blended, the texture is completely smooth with no lumps.


Recipe Overview

  • Servings: 1

  • Prep Time: 5 minutes

  • Total Time: 5 minutes


Ingredients

Base Ingredients

  • ½ cup old-fashioned rolled oats

  • ½ cup low-fat or 2% cottage cheese

  • 1 large ripe banana (fresh or frozen, cut into chunks)

  • ½ cup plain or vanilla Greek yogurt

  • ½ cup milk of choice (dairy, almond, oat, or soy)

Optional Flavor Additions

  • ½ teaspoon vanilla extract

  • A small pinch of ground cinnamon

  • 1 teaspoon honey or maple syrup (optional, for added sweetness)


Step-by-Step Instructions

1. Prepare the Oats

  • Add the rolled oats to the blender first, before any liquids.

  • Pulse for 10–15 seconds until the oats turn into a fine powder.

  • This step ensures a smooth texture and prevents graininess.


2. Add the Creamy Ingredients

  • Add the cottage cheese and Greek yogurt to the blender.

  • Pour in the milk to help everything blend evenly.


3. Add the Banana and Flavorings

  • Add the banana chunks to the blender.

  • If using, add vanilla extract, cinnamon, and sweetener at this stage.


4. Blend Until Smooth

  • Start blending on low speed, then gradually increase to high.

  • Blend for 45–60 seconds, stopping to scrape down the sides if needed.

  • Continue blending until the mixture is completely smooth and creamy.


5. Adjust Texture (Optional)

  • If the smoothie is too thick, add a small splash of milk and blend again.

  • For a colder drink, add a few ice cubes and blend briefly.


Why This Smoothie Works Well

  • Oats: Help thicken the smoothie and provide steady energy.

  • Cottage cheese: Blends smoothly and adds a rich, creamy consistency.

  • Greek yogurt: Enhances thickness and balances flavor.

  • Banana: Adds natural sweetness and a classic banana bread taste.


Helpful Tips & Variations

  • Extra flavor: Add a pinch of nutmeg or a spoon of peanut butter.

  • Dairy-free option: Use plant-based yogurt and milk alternatives.

  • Thicker texture: Use a frozen banana instead of fresh.

  • Lighter version: Reduce oats slightly and add more milk.

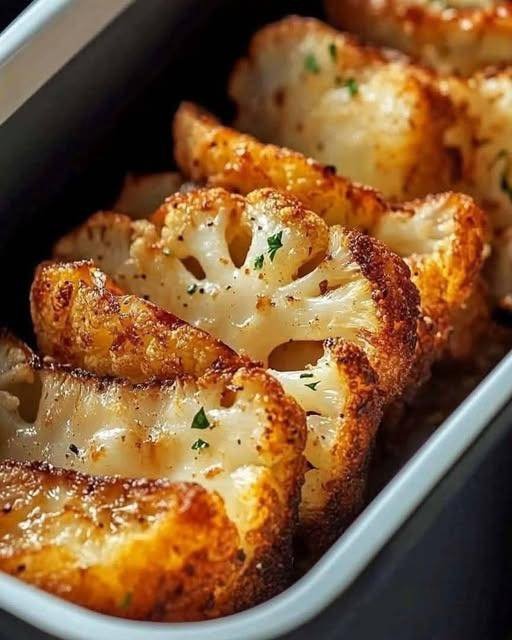
Crispy Golden Baked Cauliflower Steaks

Crispy Golden Baked Cauliflower Steaks

A flavorful oven-baked vegetable dish with crisp edges and a tender center

These baked cauliflower steaks transform a simple vegetable into a satisfying and hearty dish. A well-seasoned coating and high-heat roasting bring out deep flavor and a beautifully golden surface, while the inside stays soft and tender. This recipe works equally well as a main dish or a side.


Recipe Overview

  • Prep Time: 10 minutes

  • Bake Time: 30–40 minutes

  • Total Time: 40–50 minutes

  • Servings: 4


Ingredients

Main Ingredient

  • 1 large head cauliflower, outer leaves removed, core intact

Seasoning & Oil

  • 3 tablespoons olive oil

  • 2 tablespoons finely grated Parmesan cheese (optional)

    • For a plant-based option, use nutritional yeast

  • 1 teaspoon smoked paprika

  • 1 teaspoon garlic powder

  • 1 teaspoon salt, or to taste

  • ½ teaspoon black pepper

Garnish

  • 1 tablespoon fresh parsley, finely chopped


Step-by-Step Instructions

1. Prepare the Oven and Cauliflower

  • Preheat the oven to 400°F (200°C).

  • Line a large baking sheet with parchment paper for easy cleanup.

  • Remove the outer leaves from the cauliflower while keeping the core intact.

  • Using a sharp knife, slice the cauliflower from top to bottom into 1-inch-thick slices.

  • You should get 3–4 full steaks; reserve any loose florets for roasting alongside.


2. Make the Seasoning Mixture

  • In a small bowl, combine:

    • Olive oil

    • Parmesan cheese (if using)

    • Smoked paprika

    • Garlic powder

    • Salt

    • Black pepper

  • Stir until well blended and smooth.


3. Season the Cauliflower

  • Arrange the cauliflower steaks and florets in a single layer on the prepared baking sheet.

  • Brush both sides generously with the seasoning mixture.

  • Make sure the coating reaches all surfaces—this helps develop a golden finish during baking.


4. Bake the First Side

  • Place the baking sheet in the oven.

  • Bake for 15–20 minutes, until the underside begins to turn golden.


5. Flip and Finish Baking

  • Carefully turn each cauliflower piece using a spatula.

  • Return to the oven and bake for another 15–20 minutes, until:

    • The cauliflower is tender when pierced with a fork

    • The edges are deeply golden and lightly crisp


6. Serve

  • Transfer the baked cauliflower to a serving platter.

  • Sprinkle with freshly chopped parsley.

  • Serve immediately while warm.


Helpful Tips & Variations

  • Extra flavor: Add onion powder, dried herbs, or a squeeze of lemon before serving.

  • Crispier finish: Use convection or broil for the last 2 minutes, watching closely.

  • Meal idea: Serve over grains, with a yogurt-based sauce, or alongside roasted vegetables.

  • Leftovers: Reheat in the oven or air fryer to restore crispness.

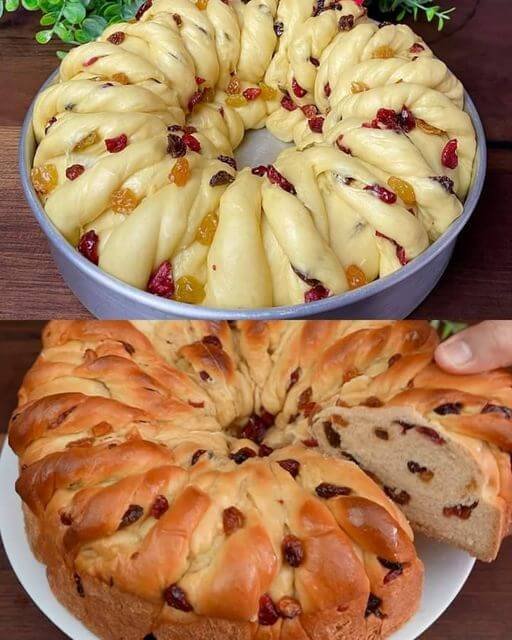
Chef’s Italian Christmas Bread

Chef’s Italian Christmas Bread

This traditional Italian Christmas bread is softly enriched with butter, eggs, citrus zest, and dried fruit. A slow-rise method allows the dough to develop flavor while keeping the crumb tender and light for several days. Shaped into a festive wreath, it is perfect for celebrations, gifting, or enjoying with coffee or tea.


Recipe Overview

  • Cuisine: Italian

  • Category: Sweet Bread / Holiday Baking

  • Prep Time: 30 minutes (plus rising time)

  • Rising Time: About 2½–3 hours total

  • Bake Time: 30–35 minutes

  • Total Time: About 4 hours

  • Yield: 1 large wreath (10–12 slices)


Ingredients

For the Dough

  • 500 g strong bread flour (about 4 cups)

  • 250 ml warm milk (lukewarm, not hot)

  • 7 g active dry yeast (1 standard sachet)

  • 80 g granulated sugar

  • 1 teaspoon salt

  • 1 large egg + 1 egg yolk, at room temperature

  • 100 g unsalted butter, very soft and cubed

  • Zest of 1 orange

  • Zest of 1 lemon


For the Fruit Filling

  • 150 g mixed dried fruit (raisins, sultanas, dried cranberries)

  • 50 g candied orange peel (optional)

  • 2 tablespoons dark rum or fresh orange juice


For the Glaze & Finish

  • 1 egg beaten with 1 tablespoon milk

  • Pearl sugar or powdered sugar, for topping


Step-by-Step Instructions

1. Soak the Dried Fruit

  • At least 30 minutes before mixing the dough, place the dried fruit and candied peel (if using) in a bowl.

  • Pour over the rum or orange juice and stir.

  • Let soak, then drain well before adding to the dough.

  • This step keeps the fruit soft and prevents it from drawing moisture from the bread.


2. Activate the Yeast

  • In a small bowl, combine:

    • Warm milk

    • Yeast

    • 1 tablespoon of the sugar

  • Stir gently and let stand for 10 minutes, until foamy and slightly bubbly.

  • If no foam appears, the yeast may not be active.


3. Mix the Dough

  • In a large bowl or stand mixer, combine:

    • Flour

    • Remaining sugar

    • Salt

    • Orange and lemon zest

  • Add the yeast mixture, whole egg, and egg yolk.

  • Mix until a rough, shaggy dough forms.


4. Add the Butter (Key to Soft Texture)

  • Begin kneading the dough.

  • Add the softened butter one cube at a time, allowing each piece to fully blend before adding the next.

  • Knead:

    • By hand: about 10 minutes

    • By mixer: 6–7 minutes on medium speed

  • The dough should be smooth, elastic, and slightly tacky but not sticky.

  • Gently knead in the drained dried fruit at the very end.


5. First Rise

  • Shape the dough into a ball and place it in a lightly greased bowl.

  • Cover with a clean cloth.

  • Let rise in a warm place for 1½ to 2 hours, until doubled in size.


6. Shape the Wreath

Option 1: Braided Wreath

  • Gently press down the dough to release excess air.

  • Divide into three equal portions and roll each into a long rope.

  • Braid loosely and join the ends to form a circle.

Option 2: Twisted Wreath

  • Roll the dough into a large rectangle.

  • Roll up tightly into a log.

  • Slice lengthwise down the center.

  • Twist the two halves together, keeping the cut sides facing outward.

  • Shape into a circle and seal the ends.


7. Second Rise

  • Place the shaped wreath on a parchment-lined baking tray or in a greased bundt pan.

  • Cover lightly and let rise for 45 minutes, until puffy.


8. Bake

  • Preheat oven to 180°C (350°F).

  • Brush the top gently with the egg-and-milk glaze.

  • Bake for 30–35 minutes, until:

    • Deep golden brown

    • Bread sounds hollow when tapped underneath


9. Cool and Finish

  • Remove from the oven and allow to cool completely on a wire rack.

  • Finish with pearl sugar or a light dusting of powdered sugar before serving.


Helpful Tips & Variations

  • Extra aroma: Add a pinch of ground cardamom or cinnamon to the dough.

  • Alcohol-free: Use orange juice instead of rum.

  • Storage: Wrap well; the bread stays soft for up to 3 days at room temperature.

  • Serving: Slice and enjoy plain or lightly toasted with butter.

Cheesy Air Fryer Hasselback Potatoes

Cheesy Air Fryer Hasselback Potatoes

Crispy edges, soft centers, and melty cheese in every bite

These Cheesy Air Fryer Hasselback Potatoes are a comforting side dish made with simple ingredients and big flavor. Thinly sliced potatoes fan open as they cook, allowing buttery garlic seasoning and cheese to melt into every layer. The air fryer creates a crisp exterior while keeping the inside tender and fluffy.


Recipe Overview

  • Prep Time: 10 minutes

  • Cook Time: 45 minutes

  • Total Time: 55 minutes

  • Servings: 2


Ingredients

  • 2 medium russet potatoes, scrubbed clean

  • 4 tablespoons butter, melted

  • 1 tablespoon garlic paste or finely minced garlic

  • Kosher salt, to taste

  • Black pepper, to taste

  • 3–5 slices Colby Jack cheese, each slice cut into fourths

Optional Toppings

  • Sour cream

  • Fresh chives, finely chopped


Step-by-Step Instructions

1. Prepare the Potatoes

  • Rinse and scrub the potatoes thoroughly.

  • Slice a very thin piece off the bottom of each potato so it sits flat and stable.


2. Create the Hasselback Cuts

  • Place one potato between two chopsticks or wooden spoons.

  • Using a sharp knife, slice across the potato at ¼-inch intervals.

  • The chopsticks will prevent cutting all the way through, keeping the base intact.

  • Repeat with the second potato.


3. Prepare the Air Fryer Basket (Layer-Lifting Method)

  • Place the small potato slices removed from the bottoms into the air fryer basket.

  • Set the sliced potatoes on top of these pieces.

  • This helps the slices fan open during cooking, allowing better crisping and seasoning.


4. Season the Potatoes

  • In a small bowl, combine:

    • Melted butter

    • Garlic

    • Salt

    • Black pepper

  • Gently fan open the potato slices with your fingers.

  • Brush the garlic butter generously over the tops and into the gaps.

  • Sprinkle lightly with additional salt and pepper.


5. First Air Fry Stage

  • Set the air fryer to 370°F (188°C).

  • Cook the potatoes for 20 minutes.


6. Second Air Fry Stage

  • Remove the basket and brush the potatoes with any remaining garlic butter.

  • Return to the air fryer and cook for 20–25 minutes, until:

    • The edges are crisp

    • The centers are fork-tender

    • The slices are fully opened


7. Add the Cheese

  • Carefully tuck the cheese pieces between the potato slices.

  • You can add cheese to every slice or every other slice, depending on preference.

  • Return to the air fryer and cook for 1–2 minutes, just until the cheese melts and becomes lightly bubbly.


8. Serve

  • Remove from the air fryer and let rest for 2–3 minutes.

  • Top with sour cream and fresh chives if desired.

  • Serve hot as a side dish or light meal.


Helpful Tips & Variations

  • Even cooking: Choose potatoes similar in size.

  • Extra flavor: Add paprika, onion powder, or dried herbs to the butter.

  • Cheese swaps: Cheddar, mozzarella, or Monterey Jack work well.

  • Crispier texture: Brush a little butter between slices halfway through cooking.

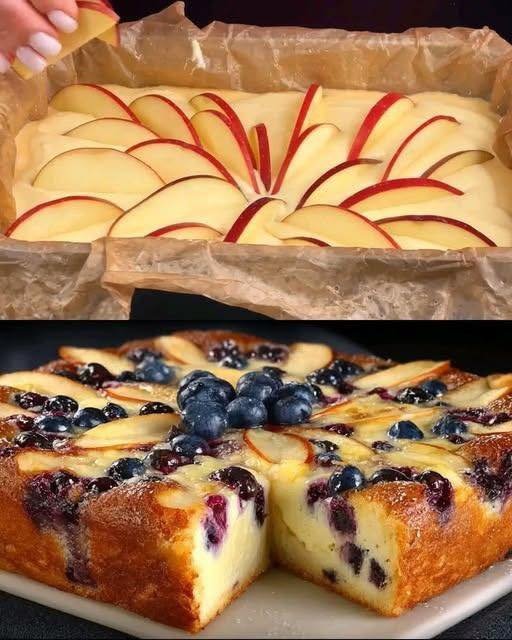
Apple & Blueberry Yogurt Cake

Apple & Blueberry Yogurt Cake

A soft, fruit-filled cake with a tender crumb and gentle sweetness

This Apple & Blueberry Yogurt Cake is a simple, rustic dessert made with everyday ingredients. Yogurt gives the cake a moist, creamy texture, while fresh apple slices and blueberries add natural sweetness and bursts of fruit flavor. It’s ideal for tea time, family gatherings, or a light dessert after meals.


Recipe Overview

  • Cuisine: European-style home baking

  • Category: Dessert

  • Prep Time: 15 minutes

  • Bake Time: 40–45 minutes

  • Total Time: About 1 hour

  • Servings: 8–10 slices


Ingredients

Wet Ingredients

  • 1 cup plain Greek yogurt (room temperature)

  • 3 large eggs (room temperature)

  • ¾ cup granulated sugar

  • ½ cup vegetable oil (or light olive oil)

  • 1 teaspoon vanilla extract

Dry Ingredients

  • 1½ cups all-purpose flour

  • 2 teaspoons baking powder

  • 1 pinch salt

Fruit Topping

  • 1 medium apple, peeled if desired and thinly sliced

  • ½ cup fresh blueberries (washed and dried)

Optional

  • Powdered sugar, for light dusting before serving


Step-by-Step Instructions

1. Prepare the Pan and Oven

  • Preheat your oven to 350°F (175°C).

  • Line the bottom of an 8-inch round cake pan with parchment paper.

  • Lightly grease the sides to prevent sticking.


2. Mix the Wet Ingredients

  • In a large mixing bowl, add the yogurt, eggs, sugar, oil, and vanilla extract.

  • Whisk until the mixture is smooth, pale, and well blended.

  • Make sure there are no visible egg streaks.


3. Combine the Dry Ingredients

  • In a separate bowl, sift together the flour, baking powder, and salt.

  • This helps keep the cake light and evenly textured.


4. Make the Batter

  • Gradually add the dry ingredients to the wet mixture.

  • Gently fold using a spatula or whisk just until combined.

  • Do not overmix; stop as soon as the batter is smooth.


5. Assemble the Cake

  • Pour the batter evenly into the prepared pan.

  • Arrange the apple slices neatly on top in a circular or fan pattern.

  • Scatter the blueberries evenly over the surface, pressing them slightly into the batter.


6. Bake

  • Place the pan in the center of the oven.

  • Bake for 40–45 minutes, or until:

    • The top is lightly golden

    • A toothpick inserted in the center comes out clean or with a few moist crumbs


7. Cool and Serve

  • Remove from the oven and allow the cake to cool in the pan for 15 minutes.

  • Transfer to a wire rack and cool completely before slicing.

  • Dust lightly with powdered sugar if desired.


Tips & Variations

  • Flavor boost: Add lemon zest or a small pinch of cinnamon to the batter.

  • Fruit options: Replace blueberries with raspberries, pears, peaches, or plums.

  • Texture choice:

    • Greek yogurt gives a richer, denser crumb

    • Regular plain yogurt makes the cake lighter and softer

  • Serving idea: Serve slightly chilled or at room temperature with fresh fruit or cream.