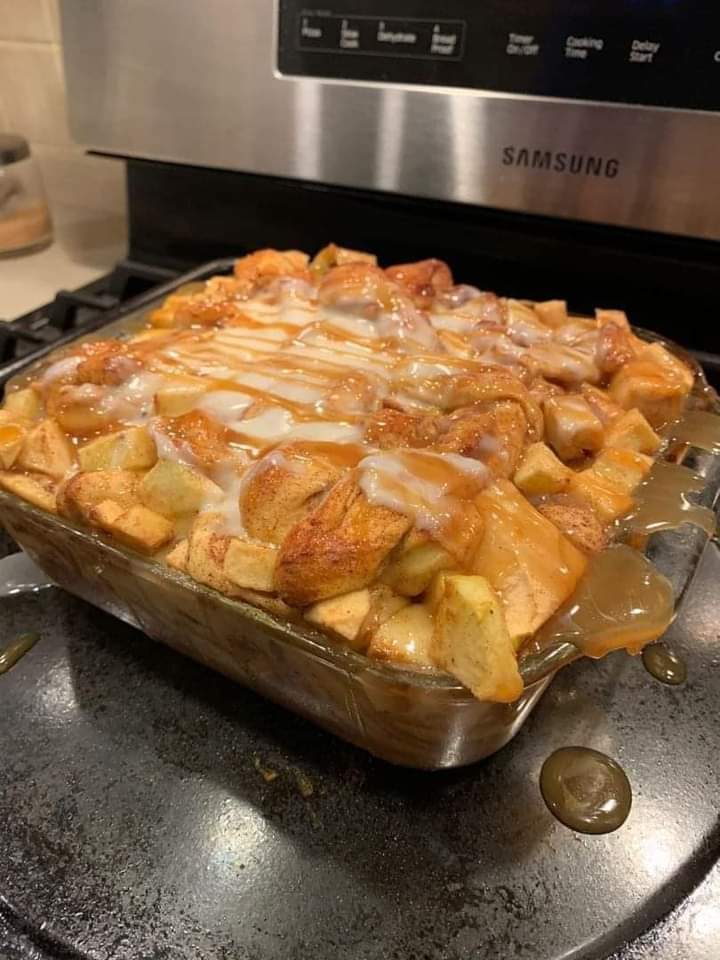
Insanely Delicious Cinnamon Roll Cake With Apples And Pecans

Insanely Delicious Cinnamon Roll Cake With Apples And Pecans combines the flavors of fall like apple and pecan together with refrigerated cinnamon rolls for an easy ooey gooey breakfast cake or quickie coffee cake.

Trust me – stop what you’re doing and make this recipe!

This easy country coffee cake cheats by calling for refrigerated cinnamon roll dough that, once combined with ripe apples and sweet pecans, becomes a coffeetime indulgence you’ll not soon forget.

One bite of a homemade cinnamon roll and you’ll swear you’re going to learn to bake come hell or high water.

Hey, in my case, there’s a first time for everything! But seriously…

Prep Time: 10mins

Cook Time: 40mins

Cooling: 10 mins

Total Time: 1hr

Servings: 8 servings 

INGREDIENTS:

for the cinnamon roll cake

2 tablespoons unsalted butter divided; 1 tablespoon melted, the other at room temperature

1 ½ cups apples peeled, cored, and chopped

1 can (roughly 10 ounces) canned cinnamon rolls

⅛ cup brown sugar light or dark, firmly packed

1 teaspoon cinnamon

⅓ cup light corn syrup

1 tablespoon whiskey may substitute apple brandy, pear cognac or any orange-flavored liquor such as Cointreau

2 large eggs

¾ cup pecans halves and pieces

for the glaze

⅓ cup Confectioners sugar

½ teaspoon vanilla extract

1 to 2 teaspoons milk reduced fat or full fat

INSTRUCTIONS:

Heat oven to 350°F. Use 1 tablespoon of the butter which has softened to room temperature to butter the bottom and sides of a 9-inch round or 8 x 8-inch cake/baking pan. **NOTE in Not Entirely Average test kitchen trial bakes, this cake baked ooey gooey at 350°F with the apples in tact and texture maintained. We also baked this cake at 375°F for the same amount of time and yielded a less ooey gooey cake with slightly broken down apples. Oven accurateness plays a major role in how recipes finish. Take all into consideration when determining the best temperature to set your oven within the 350°F to 375°F range for this recipe.

Spread 1 cup of the apples in the bottom of the pan. Separate the canned cinnamon rolls and cut each into 4 pieces. Arrange cinnamon roll pieces point side up over the apples. Scatter remaining apples.

In a large mixing bowl, combine the remaining tablespoon of butter which you have melted, brown sugar, cinnamon, corn syrup, whisky, and the eggs. Using an electric hand mixer, beat the mixture to 2 to 3 minutes until the brown sugar is visibly at least partially dissolved.

Stir in the pecans and pour over the assembles apples and cinnamon roll points being sure to fill all of the peaks and the valleys.

Bake for 35 to 45 minutes at 350°F or until the top of the cake has turned a deep golden brown. Remove from oven and allow to cool 10 minutes. Cake will have puffed up significantly.

While the cake cools, prepare the sugar icing by whisking all of the glaze ingredients in a small bowl until very smooth. Drizzle over warm coffee cake.

Serve warm with hot coffee as a breakfast, Brunch, or mid-morning treat, or serve warm with a scoop of French vanilla ice cream and a drizzle of hot caramel sauce as a dessert.

Notes:

Substituting Alcohol use apple or orange juice in equal measure in lieu of any alcohol if preferred.

Substituting Pecans use walnuts, macadamias, or whole or chopped almonds in lieu of pecans if preferred.

Make Ahead by one day and refrigerate uneaten portions for up to three days. Reheat in microwave for several seconds to serve warm.

To Freeze use a vacuum sealing system if possible. May also freeze in a plastic freezer bag or casserole dish with a lid.

Nutritional Info:

Serving: 1serving | Calories: 201kcal | Carbohydrates: 30g | Protein: 3g | Fat: 11g | Saturated Fat: 3g | Polyunsaturated Fat: 2g | Monounsaturated Fat: 5g | Trans Fat: 1g | Cholesterol: 54mg | Sodium: 31mg | Potassium: 96mg | Fiber: 2g | Sugar: 23g | Vitamin A: 175IU | Vitamin C: 1mg | Calcium: 28mg | Iron: 1mg
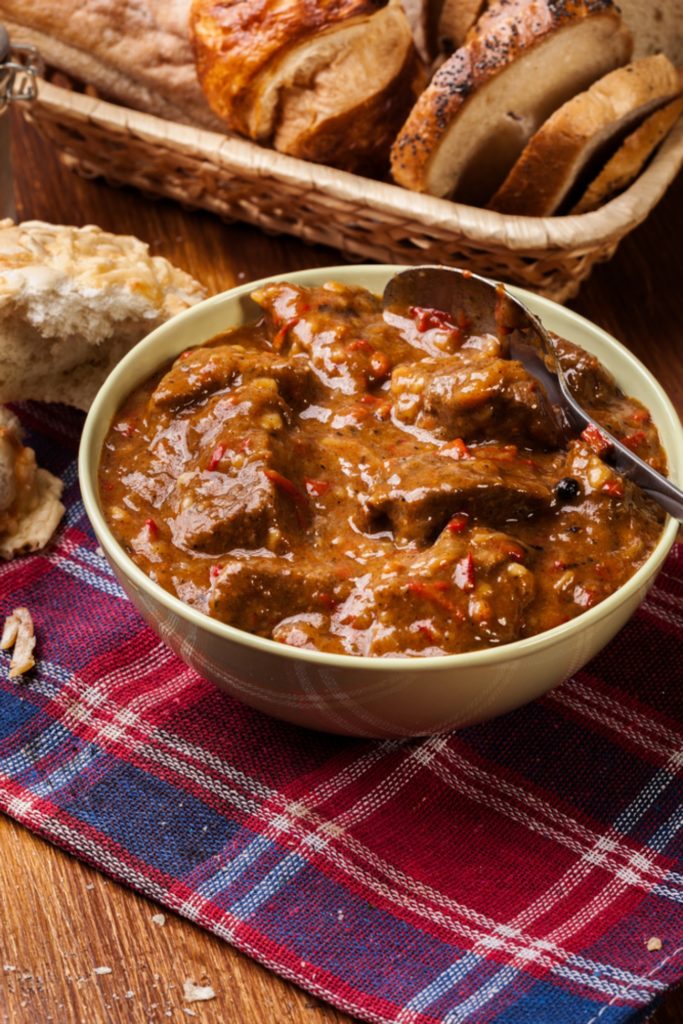
Rustic Beef Stew Recipe

Blustery fall days make us want to eat something that warms the soul, and nothing says warm and cozy like beef stew. This time, we give the slow cooker a rest and let the Dutch oven do the work. Throw a few ingredients into a pot and the kitchen will soon be toasty and smell delicious as this hearty meal bubbles away on the stove.

A good old-fashioned beef stew is delicious, but we love a more rustic take on the traditional recipe. Here’s how we like to put a little twist on it: skip the carrots and celery for fire-roasted red peppers, and instead of potatoes to “thicken” everything up, we add something completely different – cream of mushroom soup. Changing up the classic ingredients with the peppers and creamy soup really offers a deliciously new pop of flavor. C’mon…can you think of a better way to end a fall day?!? Grab a slice of crusty bread and enjoy!

Serves 8

Total Time: 2 hours

INGREDIENTS:

4 cups beef broth

2 pounds beef chuck, cut in 1-inch cubes

3 cloves garlic, minced

3 tablespoons flour

2 tablespoon canola oil

1 tablespoon Worcestershire

1 shallot, diced

1 (14 oz.) can fire roasted red bell peppers

1 (10 oz.) can cream of mushroom soup

1 (6 oz.) can tomato paste

Kosher salt and pepper, to taste

PREPARATION:

Place flour in a large bowl and toss beef until coated.

Heat 1 tablespoon olive oil in a large Dutch oven over medium heat, and, working in batches, brown beef. Set aside.

Add diced shallot and cook for 2-3 minutes or until softened.

Add garlic, stirring frequently for 1 minute or until fragrant.

Mix in fire-roasted bell peppers, tomato paste, beef broth, Worcestershire, and browned beef, stirring to pick up additional flavor from the beef bits. Bring to a boil, then reduce heat and cover for 1 hour.

After 1 hour, stir in cream of mushroom soup and continue cooking for 30 minutes.

Ladle into serving bowls and serve with a side of crusty bread. Enjoy!

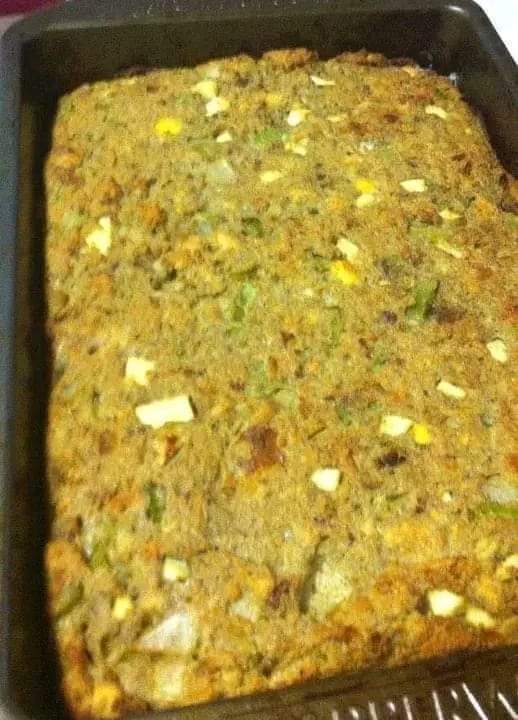
Southern Cornbread Dressing Recipe

This recipe is exactly the way my mom has always made it – who learned it from my Grandma B! It’s thin, crispy around the edges, and is a staple at every single holiday get together.

Course: Side Dish

Cuisine: Southern

Prep Time: 1hour 30minutes 

Cook Time: 1hour 

Servings: 24

INGREDIENTS:

Turkey Stock

3 lbs turkey thighs

2 large yellow onions roughly chopped

6 stalks celery roughly chopped

1 tablespoon sea salt

1 teaspoon black pepper

Dressing

1.5 cups yellow onions diced

1.5 cups celery diced

1.5 cups green peppers diced

1 teaspoon sea salt

½ teaspoon ground black pepper

2 tablespoon bacon fat

15 oz canned very young small sweet peas drained

6 cups cooked cornbread crumbled

12 oz Pepperidge Farm herb stuffing mix

8 cups turkey stock

1 tablespoon ground sage

2 tablespoon poultry seasoning

8 tablespoon melted butter

INSTRUCTIONS:

Turkey Stock

Add turkey thighs, 2 large yellow onions (roughly chopped), 6 stalks of celery, 1 tablespoon sea salt, and 1 teaspoon ground black pepper to pot. Add 12 cups of water, cover with lid, and bring up to a boil. Reduce heat and let simmer until the turkey thighs are falling apart (about 90 minutes).

Remove turkey and (once cool enough to touch) finely shred the meat. Discard the skin and bones.

Pass the stock through a strainer to remove any onions and celery. Note: If you’re making the stock ahead of time (like I always do), transfer to airtight containers and allow to cool for a while. Then refrigerate until ready to use. I also like to store the meat submerged in stock so that it doesn’t dry out.

Dressing

Using medium-high heat, add 2 tablespoons of bacon fat to large pan along with diced onions, peppers, and celery. Season with 1 teaspoon of salt and ½ teaspoon of black pepper. Cook just until vegetables release their juices, about 5 minutes. You’re not trying to cook them fully, you just want them to release their liquids. This step can also be done well in advance and refrigerated until ready to bake.

Preheat oven to 375 F. In a very large mixing bowl, add shredded turkey, sautéed veggies, and peas – mix well to combine.

Add crumbled cornbread and stuffing mix to bowl, along with 4 cups of the turkey stock, and mix well to combine.

Then add poultry seasoning, sage, and melted butter to bowl and mix again.

Finally, add remaining 4 cups of turkey stock and mix one last time. I know it seems like a lot of mixing, but you really want everything evenly distributed in every bite.

Spray two half size sheet pans (18″x13″) with nonstick cooking spray. Pour dressing mixture into pans, divided as evenly as possible.

Place pans on the middle and lower racks of oven and bake for 30 minutes. Then rotate the pans, bring the pan on the bottom up (and vice versa), and bake for another 30 minutes or so. It’s almost impossible (within reason) to overcook this, so you may way to leave it in longer if you prefer crispier edges like my family.

Notes:

Expert Tips

I recommend using a non-sweet cornbread for this dressing. I believe that sugar will take away from the savory goodness of what this recipe is all about.

While it is entirely possible to use store-bought broth, the depth of flavor from making your own is unmatched; but, it should still work! And since you’re not cooking you’re own turkey, you may as well cut another corner and buy a rotisserie chicken. Use the meat for the dressing and discard the skin and bones.

I recommend two specific brands in making this dressing. For the stuffing mix, my mom swears by Pepperidge Farm Herb Seasoned Stuffing. And Le Sueur Very Young Small Sweet Peas are the best peas on the market.

I know they are a non-traditional ingredient in dressing/stuffing, but the peas really add depth in three different ways: heartiness, moisture, and texture.

FAQs

Can I leave out the peas? Yes, you can leave them out – I understand that they are not common in dressing. But you’ll really be missing out on part of what sets this dressing apart from the rest.

Can I make this in a casserole dishes? Yes, you will want to use two 13×9 dishes. And the baking time will vary up, but probably needs an extra 15 minutes or so.

Can I make a smaller portion? If you halve all the ingredients, the proportion will equal a single casserole dish or a single half sheet pan. My family always demands leftovers, so this is barely enough!

Can I freeze the leftovers? Yes! This is a big portion. But the beauty is… If you make both pans at Thanksgiving, you can freeze the second to warm up and serve at Christmas! I would recommend slicing the dressing, wrapping in plastic wrap, and storing in an airtight container until you’re ready to reheat.

Nutritional Info:

Calories: 308kcal | Carbohydrates: 35g | Protein: 15g | Fat: 12g | Saturated Fat: 4g | Cholesterol: 70mg | Sodium: 909mg | Potassium: 304mg | Fiber: 2g | Sugar: 11g | Vitamin A: 220IU | Vitamin C: 9mg | Calcium: 100mg | Iron: 2mg

Crepes Recipe

A basic recipe for savory french crêpes. The instructions show you how crêpes are made in a skillet.

Prep Time: 20mins

Cook Time: 1hr

Resting Time: 15mins

Total Time: 1hr 35mins

Course: Breakfast, Main Course

Cuisine: French

Servings: 6 crepes

Equipment

1 Mixing Bowl

1 Hand Mixer or Whisk

1 Silicone Spatula easier to clean out the bowl

1 Wood or Bamboo Spatula to flip

1 Stainless Steal Non-Stick PFOA-free Frying Pan large

1 Soup Ladle

1 Plate to stack them

INGREDIENTS:

1½ Cup All-purpose Flour unsifted

2 Piece Eggs

2 Cups Milk

pinch Salt

6 Tablespoon Butter to fry, 1 tablespoon per Crepes

INSTRUCTIONS:

To make the Crepes Batter:

Keep all your ingredients on stand-by. Break the eggs into a mixing bowl and whisk or blend with a hand mixer foamy. The eggs have to be beaten until they turn pale yellow.

2 Piece Eggs

Stir some of the flour with the salt into the beaten eggs, together with some of the milk. Don’t add everything in at one time.

1½ Cup All-purpose Flour,2 Cups Milk,pinch Salt

Blend with the hand mixer until it gets thick and then add more milk. Blend and keep on adding all the flour and milk and keep on mixing until it’s well incorporated and you left with a lump-free thin batter.

Leave the batter to rest for 15 minutes.

To fry the Crepes:

Keep the skillet on the stove and the batter nearby with a ladl in it.

Heat up the skillet to a medium-hot setting and stir in a table spoon butter. Wait for it to melt and spread it well. The skillet should be hot but not smoking!

6 Tablespoon Butter

Take the skillet into your hand and pour with the other hand a ladle of batter into the hot pan and move around the pan in a circling motion quickly to spread the batter evenly to all ends. Don’t waste time!

Once your batter has spread and stopped moving around in the pan, take the skillet back to the heat. Keep over a medium-hot setting.

Cook on one side until the crepes turns a bit brown in some spots. The sides will start to detach themselves, making it easier to flip it.

Flip it carefully with a wooden spatula and cook on the other side. Keep on the same heat setting.

Fry your crepes on both sides until done, or they turn a bit brown in some places. It takes about 10 minutes to cook one crepes on a medium-high heat setting on both sides. One side takes about 5 minutes more or less. The crepes should be crispy on the thinnest parts.

Take the crepes from the griddle and place it with a wooden spatula on an empty plate. Reduce stove heat to medium.

Repeat the process with the remaining batter. Always add about 1 tablespoon butter to fry each savory crepes. Keep the skillet on the heat but control the heat, the pan and butter should never smoke (that would be a health hazard)! A little sizzle from the butter is ok.

Notes

If the batter is too thick, add some more milk. It should be the consistency of a syrup falling off a spoon.

Whisk the batter every time quickly before pouring it with the ladle into the skillet.

Don’t over fill the ladle, fill it to 90% because that’s all you need for a thin crepes and it’s also easier to move around the ladle without making a mess (I’m guilty of that!)

See savory filling ideas and serving instructions in the post.

Nutritional Info:

Calories: 284kcal | Carbohydrates: 28g | Protein: 8g | Fat: 16g | Saturated Fat: 9g | Polyunsaturated Fat: 1g | Monounsaturated Fat: 4g | Trans Fat: 0.5g | Cholesterol: 94mg | Sodium: 142mg | Potassium: 179mg | Fiber: 1g | Sugar: 4g | Vitamin A: 561IU | Calcium: 116mg | Iron: 2mg

Chicken Noodles Soup Recipe

One pot chicken noodle soup – Cold kicker soup loaded with chicken, carrots, celery and broth.

COURSE Main Course

CUISINE American

SERVINGS 4 people

INGREDIENTS

1 lb chicken thighs or breasts

¾ cup carrots sliced

¾ cup celery sliced

½ cup onion (yellow or white) chopped

2 cloves garlic minced

8 cups chicken broth

1 cup egg noodles

½ teaspoon black pepper

1 teaspoon parsley dried or ½ tablespoon fresh

1 teaspoon thyme dried or ½ tablespoon fresh

salt to taste

INSTRUCTIONS

Add all the ingredients to your dutch oven or stock pot EXCEPT for the egg noodles and bring to a low simmer.

Cover and cook for about one and a half hours, stirring occasionally.

When done, chicken and veggies will be tender.

Easily shred the chicken with two forks. Add the egg noodles and bring to a boil for about 10 minutes until tender.

Taste soup and salt to taste.

Be careful soup is hot! Remove soup from heat and serve.

Insect Repellent Are You Out Of Repellent An Open Vicks Jar Helps Prevent Mosquitoes And Other Insects

For Headaches:

Feeling that pesky headache? The menthol in search Vicks can ease your pain. Just rub a little on your temples.

Pamper Your Feet:

Want soft feet? Slather some search Vicks on them before bed, pop on some old socks, and wash it off in the morning. For super soft heels, scrub with a pumice stone and moisturize.

Train Your Pets:

Keep your pets from marking inside by applying Vicks to their usual spots. Its strong scent keeps both cats and dogs at bay.

Protect Your Furniture:

Save your furniture from your cat’s claws! Dab some Vicks on their favorite scratching posts.

Fade Stretch Marks:

Regularly applying Vicks can help reduce the visibility of stretch marks over time.

Battle Toenail Fungus:

Apply search Vicks every night, wear socks, and trim the affected nail in the morning. Keep at it until it’s gone.

Heal Bruises Faster:

Speed up your bruise recovery and reduce swelling with a little search Vicks.

Earache No More:

Temporary earache? Try placing a Vicks-coated cotton ball in your ear for a few hours. But if it lingers, see a doctor.

Clearer Skin:

Combat acne by applying a thin layer of Vicks overnight. Wash it off in the morning for cleaner skin with consistent use.

Muscle and Back Pain Relief:

Vicks’ natural ingredients can soothe muscle and back pain. Rub it into areas like sore elbows for relief.

Trim That Belly:

Mix one tablespoon each of crushed camphor, alcohol, and baking soda with half a jar of search Vicks. Apply it to your tummy, wrap in plastic before a workout, and rinse off afterward. Doing this 2-3 times a week can help in toning, just like some commercial creams.

Always do a patch test before trying out new search Vicks uses to ensure your skin loves it as much as you do!