Crispy Golden Baked Cauliflower Steaks

Crispy Golden Baked Cauliflower Steaks

A flavorful oven-baked vegetable dish with crisp edges and a tender center

These baked cauliflower steaks transform a simple vegetable into a satisfying and hearty dish. A well-seasoned coating and high-heat roasting bring out deep flavor and a beautifully golden surface, while the inside stays soft and tender. This recipe works equally well as a main dish or a side.


Recipe Overview

  • Prep Time: 10 minutes

  • Bake Time: 30–40 minutes

  • Total Time: 40–50 minutes

  • Servings: 4


Ingredients

Main Ingredient

  • 1 large head cauliflower, outer leaves removed, core intact

Seasoning & Oil

  • 3 tablespoons olive oil

  • 2 tablespoons finely grated Parmesan cheese (optional)

    • For a plant-based option, use nutritional yeast

  • 1 teaspoon smoked paprika

  • 1 teaspoon garlic powder

  • 1 teaspoon salt, or to taste

  • ½ teaspoon black pepper

Garnish

  • 1 tablespoon fresh parsley, finely chopped


Step-by-Step Instructions

1. Prepare the Oven and Cauliflower

  • Preheat the oven to 400°F (200°C).

  • Line a large baking sheet with parchment paper for easy cleanup.

  • Remove the outer leaves from the cauliflower while keeping the core intact.

  • Using a sharp knife, slice the cauliflower from top to bottom into 1-inch-thick slices.

  • You should get 3–4 full steaks; reserve any loose florets for roasting alongside.


2. Make the Seasoning Mixture

  • In a small bowl, combine:

    • Olive oil

    • Parmesan cheese (if using)

    • Smoked paprika

    • Garlic powder

    • Salt

    • Black pepper

  • Stir until well blended and smooth.


3. Season the Cauliflower

  • Arrange the cauliflower steaks and florets in a single layer on the prepared baking sheet.

  • Brush both sides generously with the seasoning mixture.

  • Make sure the coating reaches all surfaces—this helps develop a golden finish during baking.


4. Bake the First Side

  • Place the baking sheet in the oven.

  • Bake for 15–20 minutes, until the underside begins to turn golden.


5. Flip and Finish Baking

  • Carefully turn each cauliflower piece using a spatula.

  • Return to the oven and bake for another 15–20 minutes, until:

    • The cauliflower is tender when pierced with a fork

    • The edges are deeply golden and lightly crisp


6. Serve

  • Transfer the baked cauliflower to a serving platter.

  • Sprinkle with freshly chopped parsley.

  • Serve immediately while warm.


Helpful Tips & Variations

  • Extra flavor: Add onion powder, dried herbs, or a squeeze of lemon before serving.

  • Crispier finish: Use convection or broil for the last 2 minutes, watching closely.

  • Meal idea: Serve over grains, with a yogurt-based sauce, or alongside roasted vegetables.

  • Leftovers: Reheat in the oven or air fryer to restore crispness.
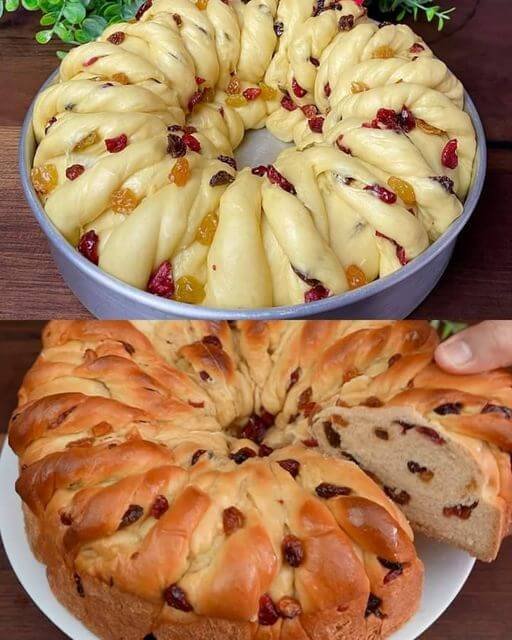
Chef’s Italian Christmas Bread

Chef’s Italian Christmas Bread

This traditional Italian Christmas bread is softly enriched with butter, eggs, citrus zest, and dried fruit. A slow-rise method allows the dough to develop flavor while keeping the crumb tender and light for several days. Shaped into a festive wreath, it is perfect for celebrations, gifting, or enjoying with coffee or tea.


Recipe Overview

  • Cuisine: Italian

  • Category: Sweet Bread / Holiday Baking

  • Prep Time: 30 minutes (plus rising time)

  • Rising Time: About 2½–3 hours total

  • Bake Time: 30–35 minutes

  • Total Time: About 4 hours

  • Yield: 1 large wreath (10–12 slices)


Ingredients

For the Dough

  • 500 g strong bread flour (about 4 cups)

  • 250 ml warm milk (lukewarm, not hot)

  • 7 g active dry yeast (1 standard sachet)

  • 80 g granulated sugar

  • 1 teaspoon salt

  • 1 large egg + 1 egg yolk, at room temperature

  • 100 g unsalted butter, very soft and cubed

  • Zest of 1 orange

  • Zest of 1 lemon


For the Fruit Filling

  • 150 g mixed dried fruit (raisins, sultanas, dried cranberries)

  • 50 g candied orange peel (optional)

  • 2 tablespoons dark rum or fresh orange juice


For the Glaze & Finish

  • 1 egg beaten with 1 tablespoon milk

  • Pearl sugar or powdered sugar, for topping


Step-by-Step Instructions

1. Soak the Dried Fruit

  • At least 30 minutes before mixing the dough, place the dried fruit and candied peel (if using) in a bowl.

  • Pour over the rum or orange juice and stir.

  • Let soak, then drain well before adding to the dough.

  • This step keeps the fruit soft and prevents it from drawing moisture from the bread.


2. Activate the Yeast

  • In a small bowl, combine:

    • Warm milk

    • Yeast

    • 1 tablespoon of the sugar

  • Stir gently and let stand for 10 minutes, until foamy and slightly bubbly.

  • If no foam appears, the yeast may not be active.


3. Mix the Dough

  • In a large bowl or stand mixer, combine:

    • Flour

    • Remaining sugar

    • Salt

    • Orange and lemon zest

  • Add the yeast mixture, whole egg, and egg yolk.

  • Mix until a rough, shaggy dough forms.


4. Add the Butter (Key to Soft Texture)

  • Begin kneading the dough.

  • Add the softened butter one cube at a time, allowing each piece to fully blend before adding the next.

  • Knead:

    • By hand: about 10 minutes

    • By mixer: 6–7 minutes on medium speed

  • The dough should be smooth, elastic, and slightly tacky but not sticky.

  • Gently knead in the drained dried fruit at the very end.


5. First Rise

  • Shape the dough into a ball and place it in a lightly greased bowl.

  • Cover with a clean cloth.

  • Let rise in a warm place for 1½ to 2 hours, until doubled in size.


6. Shape the Wreath

Option 1: Braided Wreath

  • Gently press down the dough to release excess air.

  • Divide into three equal portions and roll each into a long rope.

  • Braid loosely and join the ends to form a circle.

Option 2: Twisted Wreath

  • Roll the dough into a large rectangle.

  • Roll up tightly into a log.

  • Slice lengthwise down the center.

  • Twist the two halves together, keeping the cut sides facing outward.

  • Shape into a circle and seal the ends.


7. Second Rise

  • Place the shaped wreath on a parchment-lined baking tray or in a greased bundt pan.

  • Cover lightly and let rise for 45 minutes, until puffy.


8. Bake

  • Preheat oven to 180°C (350°F).

  • Brush the top gently with the egg-and-milk glaze.

  • Bake for 30–35 minutes, until:

    • Deep golden brown

    • Bread sounds hollow when tapped underneath


9. Cool and Finish

  • Remove from the oven and allow to cool completely on a wire rack.

  • Finish with pearl sugar or a light dusting of powdered sugar before serving.


Helpful Tips & Variations

  • Extra aroma: Add a pinch of ground cardamom or cinnamon to the dough.

  • Alcohol-free: Use orange juice instead of rum.

  • Storage: Wrap well; the bread stays soft for up to 3 days at room temperature.

  • Serving: Slice and enjoy plain or lightly toasted with butter.

Cheesy Air Fryer Hasselback Potatoes

Cheesy Air Fryer Hasselback Potatoes

Crispy edges, soft centers, and melty cheese in every bite

These Cheesy Air Fryer Hasselback Potatoes are a comforting side dish made with simple ingredients and big flavor. Thinly sliced potatoes fan open as they cook, allowing buttery garlic seasoning and cheese to melt into every layer. The air fryer creates a crisp exterior while keeping the inside tender and fluffy.


Recipe Overview

  • Prep Time: 10 minutes

  • Cook Time: 45 minutes

  • Total Time: 55 minutes

  • Servings: 2


Ingredients

  • 2 medium russet potatoes, scrubbed clean

  • 4 tablespoons butter, melted

  • 1 tablespoon garlic paste or finely minced garlic

  • Kosher salt, to taste

  • Black pepper, to taste

  • 3–5 slices Colby Jack cheese, each slice cut into fourths

Optional Toppings

  • Sour cream

  • Fresh chives, finely chopped


Step-by-Step Instructions

1. Prepare the Potatoes

  • Rinse and scrub the potatoes thoroughly.

  • Slice a very thin piece off the bottom of each potato so it sits flat and stable.


2. Create the Hasselback Cuts

  • Place one potato between two chopsticks or wooden spoons.

  • Using a sharp knife, slice across the potato at ¼-inch intervals.

  • The chopsticks will prevent cutting all the way through, keeping the base intact.

  • Repeat with the second potato.


3. Prepare the Air Fryer Basket (Layer-Lifting Method)

  • Place the small potato slices removed from the bottoms into the air fryer basket.

  • Set the sliced potatoes on top of these pieces.

  • This helps the slices fan open during cooking, allowing better crisping and seasoning.


4. Season the Potatoes

  • In a small bowl, combine:

    • Melted butter

    • Garlic

    • Salt

    • Black pepper

  • Gently fan open the potato slices with your fingers.

  • Brush the garlic butter generously over the tops and into the gaps.

  • Sprinkle lightly with additional salt and pepper.


5. First Air Fry Stage

  • Set the air fryer to 370°F (188°C).

  • Cook the potatoes for 20 minutes.


6. Second Air Fry Stage

  • Remove the basket and brush the potatoes with any remaining garlic butter.

  • Return to the air fryer and cook for 20–25 minutes, until:

    • The edges are crisp

    • The centers are fork-tender

    • The slices are fully opened


7. Add the Cheese

  • Carefully tuck the cheese pieces between the potato slices.

  • You can add cheese to every slice or every other slice, depending on preference.

  • Return to the air fryer and cook for 1–2 minutes, just until the cheese melts and becomes lightly bubbly.


8. Serve

  • Remove from the air fryer and let rest for 2–3 minutes.

  • Top with sour cream and fresh chives if desired.

  • Serve hot as a side dish or light meal.


Helpful Tips & Variations

  • Even cooking: Choose potatoes similar in size.

  • Extra flavor: Add paprika, onion powder, or dried herbs to the butter.

  • Cheese swaps: Cheddar, mozzarella, or Monterey Jack work well.

  • Crispier texture: Brush a little butter between slices halfway through cooking.

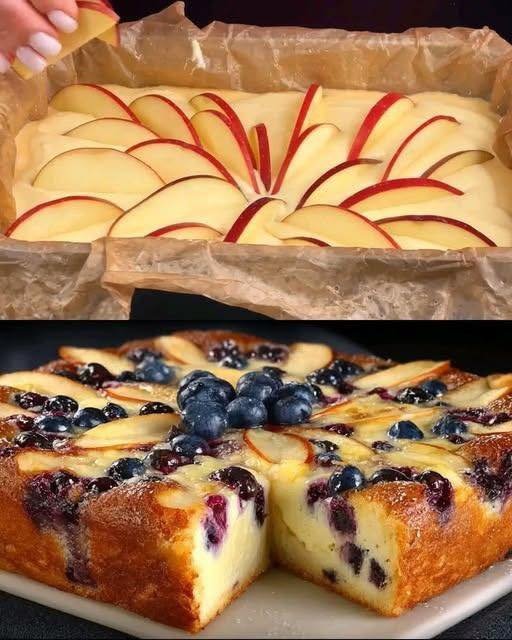
Apple & Blueberry Yogurt Cake

Apple & Blueberry Yogurt Cake

A soft, fruit-filled cake with a tender crumb and gentle sweetness

This Apple & Blueberry Yogurt Cake is a simple, rustic dessert made with everyday ingredients. Yogurt gives the cake a moist, creamy texture, while fresh apple slices and blueberries add natural sweetness and bursts of fruit flavor. It’s ideal for tea time, family gatherings, or a light dessert after meals.


Recipe Overview

  • Cuisine: European-style home baking

  • Category: Dessert

  • Prep Time: 15 minutes

  • Bake Time: 40–45 minutes

  • Total Time: About 1 hour

  • Servings: 8–10 slices


Ingredients

Wet Ingredients

  • 1 cup plain Greek yogurt (room temperature)

  • 3 large eggs (room temperature)

  • ¾ cup granulated sugar

  • ½ cup vegetable oil (or light olive oil)

  • 1 teaspoon vanilla extract

Dry Ingredients

  • 1½ cups all-purpose flour

  • 2 teaspoons baking powder

  • 1 pinch salt

Fruit Topping

  • 1 medium apple, peeled if desired and thinly sliced

  • ½ cup fresh blueberries (washed and dried)

Optional

  • Powdered sugar, for light dusting before serving


Step-by-Step Instructions

1. Prepare the Pan and Oven

  • Preheat your oven to 350°F (175°C).

  • Line the bottom of an 8-inch round cake pan with parchment paper.

  • Lightly grease the sides to prevent sticking.


2. Mix the Wet Ingredients

  • In a large mixing bowl, add the yogurt, eggs, sugar, oil, and vanilla extract.

  • Whisk until the mixture is smooth, pale, and well blended.

  • Make sure there are no visible egg streaks.


3. Combine the Dry Ingredients

  • In a separate bowl, sift together the flour, baking powder, and salt.

  • This helps keep the cake light and evenly textured.


4. Make the Batter

  • Gradually add the dry ingredients to the wet mixture.

  • Gently fold using a spatula or whisk just until combined.

  • Do not overmix; stop as soon as the batter is smooth.


5. Assemble the Cake

  • Pour the batter evenly into the prepared pan.

  • Arrange the apple slices neatly on top in a circular or fan pattern.

  • Scatter the blueberries evenly over the surface, pressing them slightly into the batter.


6. Bake

  • Place the pan in the center of the oven.

  • Bake for 40–45 minutes, or until:

    • The top is lightly golden

    • A toothpick inserted in the center comes out clean or with a few moist crumbs


7. Cool and Serve

  • Remove from the oven and allow the cake to cool in the pan for 15 minutes.

  • Transfer to a wire rack and cool completely before slicing.

  • Dust lightly with powdered sugar if desired.


Tips & Variations

  • Flavor boost: Add lemon zest or a small pinch of cinnamon to the batter.

  • Fruit options: Replace blueberries with raspberries, pears, peaches, or plums.

  • Texture choice:

    • Greek yogurt gives a richer, denser crumb

    • Regular plain yogurt makes the cake lighter and softer

  • Serving idea: Serve slightly chilled or at room temperature with fresh fruit or cream.

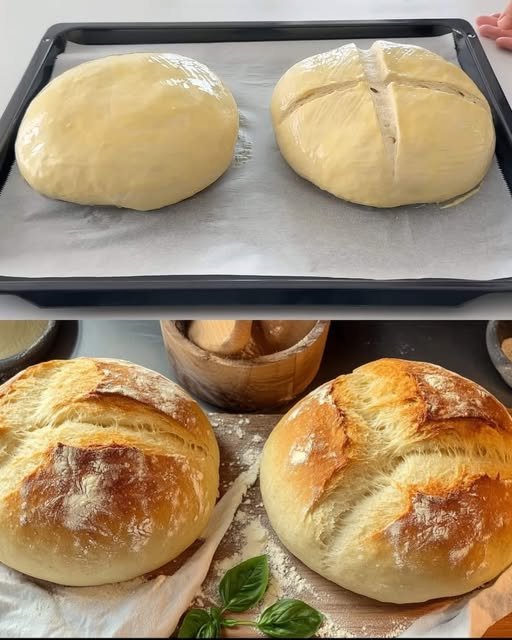
Classic Homemade Artisan Bread

🍞 Classic Homemade Artisan Bread

Crisp Crust • Soft Interior • Simple Ingredients

This Classic Homemade Artisan Bread is perfect for everyday baking. It uses basic pantry ingredients and simple techniques to create two beautiful loaves with a golden crust and light, airy inside. The dough is easy to work with, making it ideal for both beginners and experienced home bakers.


🧾 Yield & Timing

  • Makes: 2 loaves

  • Preparation Time: 20 minutes

  • Rising Time: 1½–2 hours

  • Baking Time: 30–35 minutes


🧺 Ingredients

  • Warm Water: 600 ml total (about 3 glasses)

    • 200 ml for starting the yeast

    • 400 ml added later

  • Dry Yeast: 10 grams (1 standard packet)

  • All-Purpose Flour: 840 grams total (7 cups)

    • 120 g (1 cup) for the yeast mixture

    • 720 g (6 cups) for the dough

  • Sugar: 1 tablespoon (helps awaken the yeast)

  • Salt: 2 teaspoons

  • Olive Oil: 1 tablespoon (optional, for lightly coating the bowl)


🥣 Step-by-Step Instructions

1️⃣ Prepare the Yeast Mixture

In a large mixing bowl, add:

  • 200 ml warm water

  • Dry yeast

  • Sugar

  • 120 g (1 cup) flour

Whisk gently until smooth. Cover the bowl with a clean cloth and let it rest for 10–15 minutes.

What to look for:
The surface should become foamy and slightly bubbly, showing the yeast is active and ready.


2️⃣ Build the Dough

Once the yeast mixture is ready, pour in the remaining 400 ml warm water and add the salt.

Gradually add the remaining 720 g (6 cups) flour, one cup at a time, mixing with a wooden spoon or dough hook until a soft, rough dough forms.


3️⃣ Knead Until Smooth

Transfer the dough to a lightly floured surface. Using gentle, steady motions, knead for 8–10 minutes.

As you work:

  • The dough will become smoother

  • It should feel elastic and slightly springy

Tip: If the dough sticks too much, sprinkle in small amounts of flour—just enough to handle comfortably. A soft dough creates lighter bread.


4️⃣ First Rise

Lightly coat a clean bowl with olive oil. Place the dough inside and turn it once so the surface is lightly coated.

Cover and place in a warm, draft-free area. Allow the dough to rest until it has doubled in size, about 1 to 1½ hours.


5️⃣ Divide and Shape

Gently press the dough to release excess air. Divide it evenly into two portions.

Shape each portion into a smooth, round loaf by tucking the edges underneath. Place both loaves on a parchment-lined baking sheet, leaving space between them.


6️⃣ Second Rise & Surface Design

Cover the loaves and let them rest again for 30 minutes.

While resting:

  • Preheat your oven to 200°C (400°F)

Just before baking, use a sharp knife to gently make a shallow “X” or cross on top of each loaf. This helps the bread expand evenly while baking.


7️⃣ Bake

Place the baking sheet in the oven and bake for 30–35 minutes, until:

  • The crust turns deep golden

  • The loaf sounds hollow when lightly tapped underneath

Optional Bakery-Style Finish:
Place a small oven-safe pan with 1 cup of water on the lower rack during the first 15 minutes to create steam, giving the bread a crisp, professional crust.


8️⃣ Cool Before Slicing

Transfer the baked loaves to a wire rack. Allow them to cool for at least 20 minutes before slicing. This helps the interior texture finish setting properly.


⭐ Helpful Tips

  • Warm water should feel pleasantly warm, not hot

  • Letting the bread cool improves slicing and texture

  • Store cooled bread wrapped in cloth or paper for best freshness

ABC Drink (Apple, Beetroot, Carrot)

ABC Drink (Apple, Beetroot, Carrot)

A fresh, colorful homemade juice made with simple fruits and vegetables

The ABC Drink is a naturally sweet and refreshing juice made from apples, beetroot, and carrots. It can be prepared easily at home using either a juicer or a blender. This drink is popular for its vibrant color, balanced flavor, and simplicity.


Ingredients

  • 2 medium apples (red or green), washed and cored

  • 1 medium beetroot, peeled and washed

  • 3 large carrots, washed and trimmed

  • 1 tablespoon fresh lemon juice (optional, for brightness)

  • ½ inch fresh ginger, peeled (optional, for warmth)

  • ½ cup cold water (only if using a blender)


Equipment Needed

  • Juicer or blender

  • Knife and cutting board

  • Fine-mesh strainer or nut-milk bag (for blender method)

  • Glass or jug for serving


Method 1: Using a Juicer

Step 1: Prepare the Produce

  • Wash all fruits and vegetables thoroughly

  • Peel the beetroot

  • Core the apples

  • Cut ingredients into sizes suitable for your juicer

Step 2: Juice

  • Pass the carrots, beetroot, apples, and ginger (if using) through the juicer one at a time

Step 3: Finish and Serve

  • Stir in lemon juice if using

  • Serve immediately, plain or over ice


Method 2: Using a Blender

Step 1: Chop

  • Cut apples, beetroot, carrots, and ginger into small pieces

Step 2: Blend

  • Add chopped ingredients to the blender

  • Pour in ½ cup cold water

  • Blend on high speed until completely smooth

Step 3: Strain

  • Pour the mixture through a fine strainer or nut-milk bag

  • Press gently to extract the liquid

  • Transfer juice to a glass or jug

Step 4: Serve

  • Add lemon juice if desired

  • Serve chilled


Flavor Notes

  • Apples add natural sweetness

  • Carrots give a mild, smooth base

  • Beetroot contributes deep color and earthy notes

  • Lemon brightens the flavor

  • Ginger adds gentle warmth


Helpful Tips

  • Use fresh, firm produce for the best taste

  • If beetroot flavor feels strong, add one extra apple

  • Chill ingredients before blending for a cooler drink

  • Shake or stir before serving if stored briefly


Storage

  • Best enjoyed immediately after preparation

  • Can be stored in a tightly sealed glass container in the refrigerator for up to 24 hours

  • Stir well before drinking


Serving Ideas

  • Morning refreshment

  • Afternoon drink

  • Served cold with meals

  • Poured into small glasses for sharing