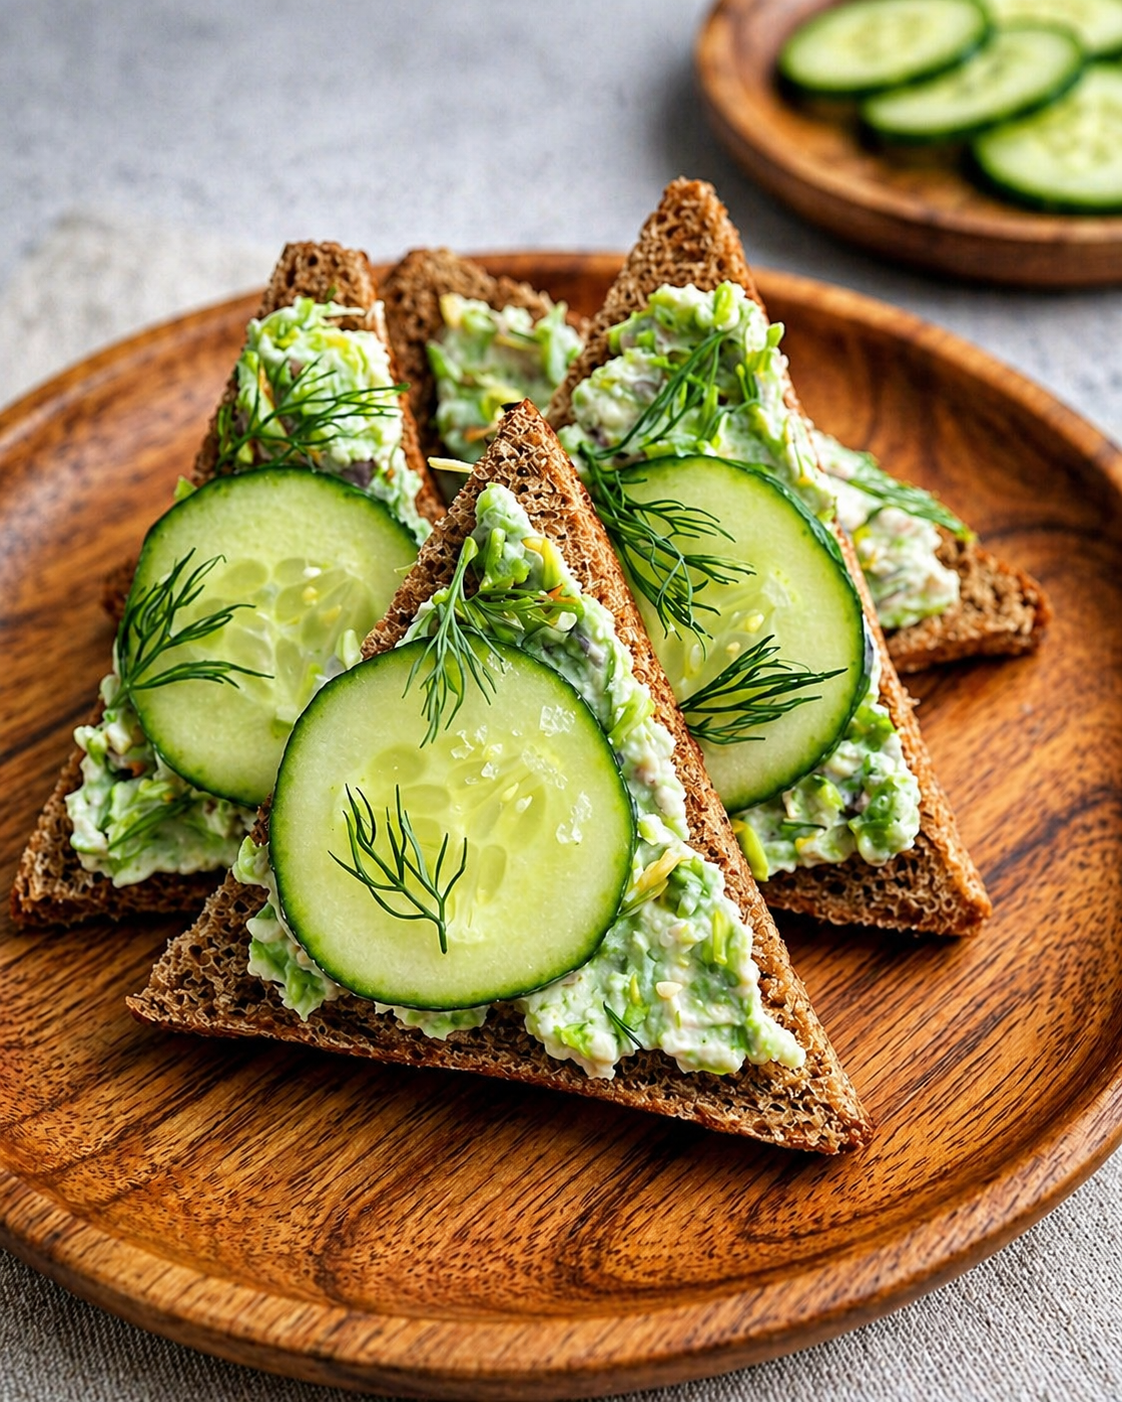
Cucumber Tea Sandwiches

๐Ÿฅ’ Cucumber Tea Sandwiches

๐Ÿ›’ Ingredients

  • ๐Ÿž 8 slices whole wheat or white bread
  • ๐Ÿฅ’ 1 cucumber
  • ๐Ÿง€ 4 oz cream cheese
  • ๐ŸŒฟ 1 tbsp fresh dill
  • ๐Ÿ‹ 1 tsp lemon juice
  • ๐Ÿง‚ Salt
  • ๐ŸŒถ๏ธ Black pepper

๐Ÿ‘ฉโ€๐Ÿณ Step-by-Step Recipe

๐Ÿ”น Step 1: Prepare the Cucumber

  • ๐Ÿฅ’ Wash the cucumber thoroughly.
  • ๐Ÿ”ช Slice it into very thin rounds for easy layering.
  • ๐Ÿงป Pat the slices dry with paper towels to remove excess moisture.
  • โœจ This helps keep the sandwiches fresh and prevents sogginess.

๐Ÿ”น Step 2: Make the Creamy Filling

  • ๐Ÿง€ Add cream cheese to a mixing bowl.
  • ๐ŸŒฟ Stir in chopped fresh dill and lemon juice.
  • ๐Ÿง‚ Season lightly with salt and black pepper.
  • ๐Ÿฅ„ Mix until smooth, creamy, and evenly combined.

๐Ÿ”น Step 3: Prepare the Bread

  • ๐Ÿž Lay the bread slices flat on a clean surface.
  • ๐Ÿ”ช Trim the crusts off for a classic tea sandwich appearance.
  • ๐Ÿงˆ Spread an even layer of the creamy mixture onto each slice.

๐Ÿ”น Step 4: Add the Cucumber

  • ๐Ÿฅ’ Arrange cucumber slices evenly over half of the bread slices.
  • ๐ŸŒฟ Add a few extra dill leaves for fresh flavor if desired.
  • ๐Ÿ“ Keep the cucumber in a single layer for neat sandwiches.

๐Ÿ”น Step 5: Assemble the Sandwiches

  • ๐Ÿž Place the remaining bread slices on top, cream cheese side down.
  • โœ‹ Press gently to hold everything together without squeezing out the filling.

๐Ÿ”น Step 6: Slice & Serve

  • ๐Ÿ”ช Cut each sandwich diagonally into triangles.
  • โœจ Wipe the knife between cuts for clean edges.
  • ๐Ÿฝ๏ธ Arrange neatly on a serving plate.
  • ๐Ÿฅ’ Garnish with extra cucumber or dill before serving.

โ“ Q/A

โ“ How do I keep tea sandwiches from getting soggy?

โœ… Dry the cucumber slices well and spread the filling evenly to create a moisture barrier.

โ“ Can I make these ahead of time?

โœ… Yes, prepare them a few hours in advance and store covered in the refrigerator.

โ“ What bread works best?

โœ… Soft sandwich bread or whole wheat bread works perfectly for tea sandwiches.
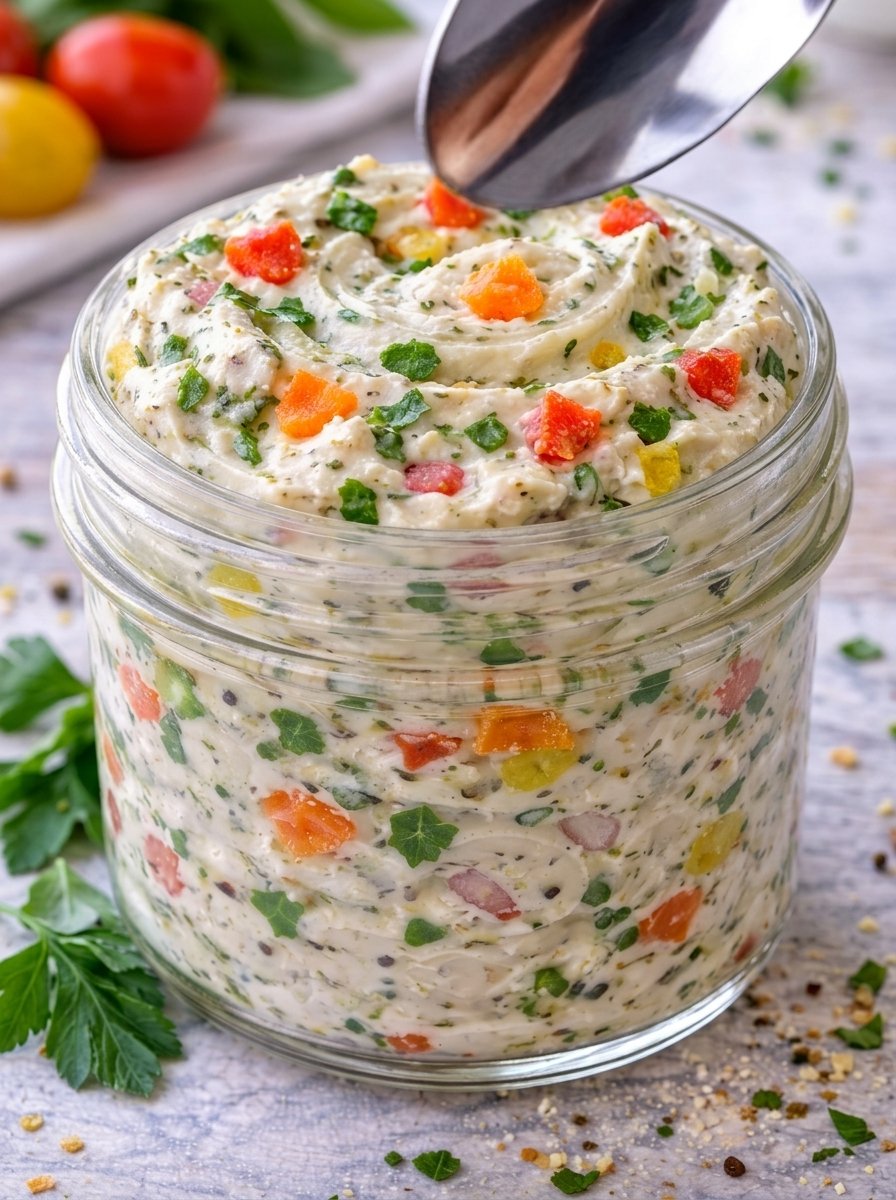
Creamy Herbed Veggie Cheese Spread

Creamy Herbed Veggie Cheese Spread
๐Ÿ›’ Necessary ingredients
๐Ÿง€ 200 g cream cheese, softened
๐Ÿฅ„ 2 tbsp mayonnaise or thick yogurt
๐Ÿซ‘ 3 tbsp finely diced bell peppers
๐ŸŒฟ 2 tbsp finely chopped parsley
๐Ÿง… 1 tbsp very finely chopped onion or green onion
๐Ÿง‚ 1/2 tsp salt
โšซ 1/4 tsp black pepper
๐Ÿง„ 1 small garlic clove, grated or minced
๐Ÿ‹ 1 tsp lemon juice
๐Ÿ‘ฉโ€๐Ÿณ Method
๐Ÿฅฃ Add the softened cream cheese to a bowl.
๐Ÿฅ„ Mix in the mayonnaise or yogurt until smooth and fluffy.
๐Ÿง„ Add garlic, lemon juice, salt, and black pepper.
๐Ÿซ‘ Stir in the finely diced bell peppers.
๐ŸŒฟ Add parsley and onion/green onion.
๐ŸŒ€ Mix everything well until evenly combined.
โ„๏ธ Chill for 20โ€“30 minutes so the flavors blend.
๐Ÿž Serve as a spread for bread, crackers, toast, or sandwiches.
โœจ Tips
๐Ÿ”ช Chop the vegetables very finely so the spread stays smooth.
๐ŸŒถ๏ธ Add a little chili if you want it spicy.
๐ŸงŠ Keep it in a sealed jar in the fridge for up to 3 days.
๐Ÿฅช It works well as a sandwich filling too.
โ“Q/A about the recipe
Q: Can I make it without mayonnaise?
โœ… Yes, use thick yogurt instead.
Q: Can I use different herbs?
โœ… Yes, cilantro, dill, or chives work well.
Q: Why should the cream cheese be softened?
โœ… It mixes more easily and gives a smooth texture.
Q: Can I make it ahead of time?
โœ… Yes, making it a few hours earlier actually improves the flavor.
Q: What can I serve it with?
โœ… Crackers, toasted bread, veggie sticks, wraps, or sandwiches.
Q: Can I make it lighter?
โœ… Yes, use low-fat cream cheese and yogurt instead of mayonnaise.
Q: How do I make it more colorful like the picture?
โœ… Use red, yellow, and orange bell peppers finely diced.
Q: Can I blend it completely smooth?
โœ… Yes, but leave a few chopped veggies for texture if you like.

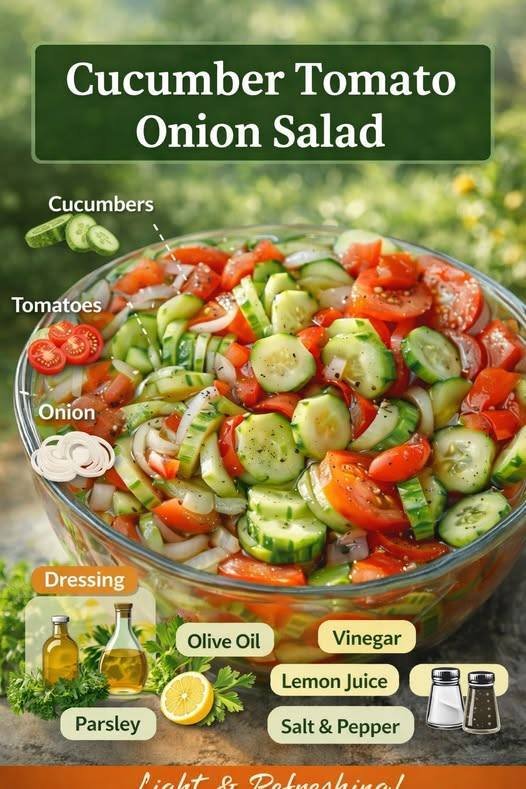
Fresh Cucumber Tomato Onion Salad

This crisp and refreshing cucumber tomato onion salad is perfect for warm days, picnics, or as a light side dish. Itโ€™s simple, hydrating, and packed with bright flavors from fresh vegetables and a tangy dressing.

Ingredients

  • 3 medium cucumbers, thinly sliced
  • 3 large tomatoes, chopped into bite-sized pieces
  • 1 small red or white onion, thinly sliced
  • 2 tablespoons olive oil
  • 2 tablespoons white vinegar or apple cider vinegar
  • 1 tablespoon lemon juice (freshly squeezed)
  • 1 teaspoon sugar (optional, for balance)
  • ยฝ teaspoon salt (adjust to taste)
  • ยฝ teaspoon black pepper
  • 1 teaspoon dried oregano or Italian seasoning
  • 1 tablespoon fresh parsley or dill, chopped (optional)

Instructions

Start by washing all your vegetables thoroughly. Slice the cucumbers into thin roundsโ€”if the skin is thick or bitter, you can peel them partially or completely. Chop the tomatoes into medium chunks, making sure to retain their juices for extra flavor. Thinly slice the onion into rings or half-moons; if you prefer a milder taste, soak the onion slices in cold water for about 5โ€“10 minutes, then drain.

In a large mixing bowl, combine the cucumbers, tomatoes, and onions. Gently toss them together so the ingredients are evenly distributed.

Next, prepare the dressing. In a small bowl, whisk together the olive oil, vinegar, lemon juice, sugar (if using), salt, black pepper, and oregano. Taste the dressing and adjust seasoning as neededโ€”some people prefer a tangier flavor, while others may like it slightly sweeter.

Pour the dressing over the vegetables and toss gently until everything is well coated. The vegetables will begin to release natural juices, blending beautifully with the dressing to create a light, flavorful marinade.

For best results, cover the salad and refrigerate it for at least 20โ€“30 minutes before serving. This allows the flavors to meld together and enhances the overall taste. However, it can also be enjoyed immediately if youโ€™re short on time.

Before serving, give the salad another quick toss and sprinkle fresh parsley or dill on top for added freshness and color.

Tips & Variations

You can customize this salad in many ways. Add sliced avocado for creaminess, feta cheese for a salty kick, or olives for a Mediterranean twist. For extra crunch, include thinly sliced bell peppers. If you like a bit of heat, a pinch of red pepper flakes works well too.

Serving Suggestions

Serve this salad chilled as a side dish with grilled chicken, fish, or barbecue meals. It also pairs wonderfully with rice dishes or can be enjoyed on its own as a light, healthy snack.

Storage

Store leftovers in an airtight container in the refrigerator for up to 2 days. Keep in mind that the vegetables will soften over time, but the flavor will remain delicious.

This salad is simple, vibrant, and incredibly refreshingโ€”perfect for everyday meals or gatherings

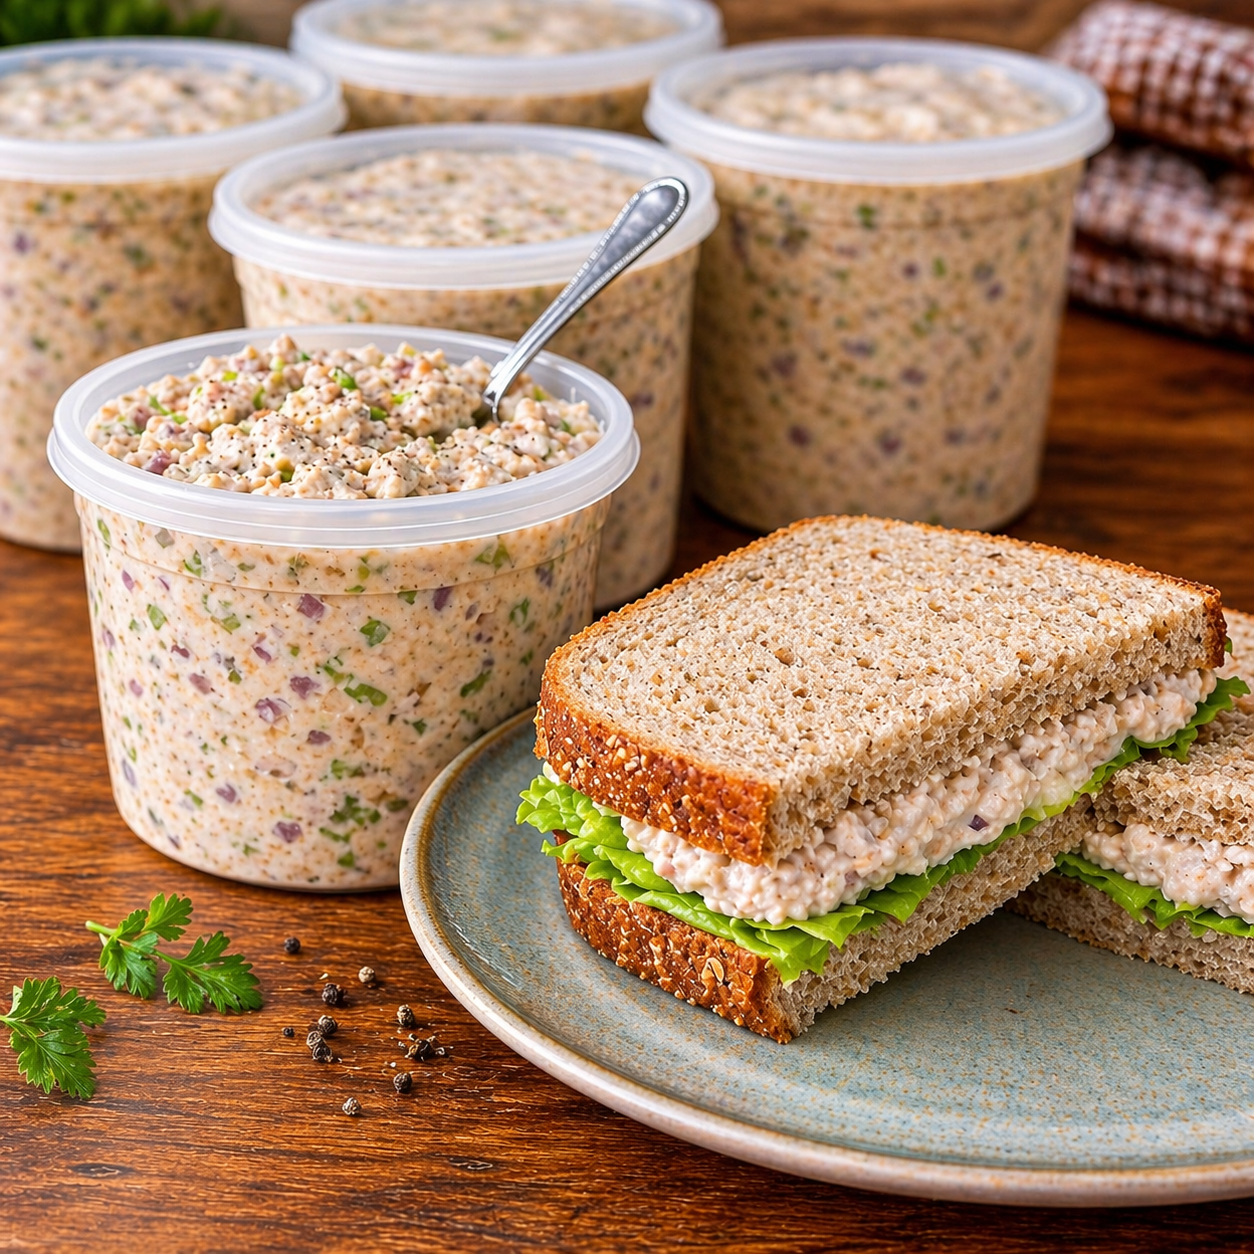
Classic Meal-Prep Chicken Salad

๐Ÿฅช Classic Meal-Prep Chicken Salad

๐Ÿ›’ Ingredients

The Protein:

  • 1 kg (approx. 2.2 lbs) Chicken breast (poached, roasted, or rotisserie)

  • Water or chicken broth for poaching

The Creamy Base:

  • 1.5 cups Mayonnaise (or a mix of mayo and Greek yogurt for a lighter version)

  • 2 tbsp Dijon mustard

  • 1 tbsp Lemon juice ๐Ÿ‹

  • 1 tsp Garlic powder

  • Salt and cracked black pepper to taste

The Mix-ins (The Crunch):

  • 1 cup Celery (finely diced)

  • 1/2 cup Red onion (finely minced)

  • 1/4 cup Fresh parsley or chives (chopped) ๐ŸŒฟ

  • Optional: 1 cup halved red grapes or diced apples (for a hint of sweetness like in the image)

For Serving:

  • Whole grain or sourdough bread ๐Ÿž

  • Fresh lettuce leaves ๐Ÿฅฌ


๐Ÿ‘ฉโ€๐Ÿณ Step-by-Step Instructions

1. Prepare the Chicken ๐Ÿ—

  • If using raw chicken, poach it in simmering water or broth for 12โ€“15 minutes until fully cooked.

  • โžก๏ธ Pro Tip: Let the chicken cool completely before cutting. This keeps the juices inside!

  • Dice the cooled chicken into small, uniform cubes (about 1cm) to match the texture in the photo.

2. Whisk the Dressing ๐Ÿฅฃ

  • In a very large mixing bowl, combine the mayonnaise, Dijon mustard, lemon juice, garlic powder, salt, and pepper.

  • โžก๏ธ Whisk until smooth and creamy. Taste and adjust seasoning if necessary.

3. Add the Crunch ๐Ÿฅ—

  • Add the diced celery, minced onion, and herbs to the dressing bowl.

  • โžก๏ธ If you are adding grapes or apples, toss them in now. Stir well to ensure the aromatics are coated in the dressing.

4. The Big Mix ๐Ÿ”„

  • Fold the diced chicken into the dressing mixture.

  • โžก๏ธ Use a large spatula to turn the chicken over until every piece is generously coated.

5. Portion & Chill โ„๏ธ

  • Transfer the salad into airtight containers (like the round ones in the photo).

  • โžก๏ธ Crucial Step: Refrigerate for at least 1 hour before serving. This allows the flavors to meld together and the dressing to thicken.

6. Assemble the Sandwich ๐Ÿฅช

  • Lay out your bread. Place a fresh, crisp lettuce leaf on the bottom slice (this acts as a barrier to keep the bread from getting soggy!).

  • โžก๏ธ Add a thick layer of chicken salad, top with the second slice of bread, and slice diagonally.


โ“ Common Questions (Q&A)

Q: How long can I keep this in the fridge? A: This chicken salad stays fresh for 3 to 4 days when stored in an airtight container in the refrigerator. ๐ŸงŠโณ

Q: Can I freeze chicken salad? A: It is not recommended. Mayonnaise-based dressings tend to separate and become oily/watery once thawed, changing the texture significantly. ๐Ÿšซโ„๏ธ

Q: My salad is a bit dry the next day, what should I do? A: The chicken and celery often absorb some of the dressing overnight. Simply stir in an extra tablespoon of mayo or a splash of lemon juice to revive the creaminess! ๐Ÿฅฃโœจ


โœจ Pro-Tips for Success:

  • Texture Balance: Finely dicing the celery and onion ensures you get a bit of “crunch” in every bite without any single flavor being too overpowering. ๐Ÿง…๐Ÿ”ช

  • The “Bread Barrier”: Always put the lettuce against the bread to keep your sandwich fresh and firm if you are packing it for lunch later! ๐Ÿฅฌ๐Ÿฅช

  • Herb Freshness: Add the fresh parsley right before serving for the brightest green color and best aroma. ๐ŸŒฟ

Enjoy your meal prep! ๐Ÿ˜‹โœจ

Crispy Cheesy Chicken Fritters

Crispy Cheesy Chicken Fritters

ย Description

These Crispy Cheesy Chicken Fritters are golden on the outside, juicy on the inside, and packed with melty cheese in every bite. Theyโ€™re quick, budget-friendly, and incredibly satisfyingโ€”perfect as an appetizer, snack, or main dish. Serve them with your favorite dip for a crowd-pleasing meal.

ย Servings

Serves: 3โ€“4 people (10โ€“12 fritters)

ย Ingredients

  • 2 cups cooked chicken (shredded or finely chopped) ๐Ÿ—
  • 1 cup shredded mozzarella or cheddar cheese ๐Ÿง€
  • 1/4 cup grated Parmesan cheese
  • 2 eggs ๐Ÿฅš
  • 1/4 cup all-purpose flour
  • 2 tbsp mayonnaise or Greek yogurt
  • 2 tbsp green onions (chopped) ๐ŸŒฟ
  • 1 clove garlic (minced)
  • 1/2 tsp paprika
  • Salt & black pepper to taste
  • 2โ€“3 tbsp oil (for frying)

ย Instructions

  1. Prepare mixture:
    In a large bowl, combine chicken, cheeses, eggs, flour, mayo, green onions, garlic, paprika, salt, and pepper.
  2. Mix well:
    Stir until everything is fully combined into a thick batter.
  3. Heat pan:
    Heat oil in a skillet over medium heat.
  4. Form fritters:
    Scoop mixture and flatten slightly into small patties.
  5. Cook:
    Fry for 3โ€“4 minutes per side until golden brown and crispy.
  6. Drain & serve:
    Remove and place on paper towels. Serve warm.

ย Notes

  • Use finely chopped chicken for better texture
  • Donโ€™t overcrowd the pan
  • Adjust seasoning to taste

ย Tips

  • Add chili flakes for a spicy kick ๐ŸŒถ๏ธ
  • Use leftover rotisserie chicken for convenience
  • Serve with garlic sauce, ranch, or spicy mayo

ย Nutritional Info (Approx per serving)

  • Calories: 320
  • Protein: 26g
  • Fat: 20g
  • Carbs: 8g

ย Benefits

  • High in protein ๐Ÿ’ช
  • Quick and easy meal
  • Great way to use leftovers
  • Kid-friendly and satisfying

ย Q&A

Q: Can I bake instead of fry?
A: Yes, bake at 375ยฐF (190ยฐC) for 20โ€“25 minutes, flipping halfway.

Q: Can I freeze them?
A: Yes, freeze cooked fritters up to 1 month.

Q: Can I make them low-carb?
A: Use almond flour instead of regular flour.

Q: What dip goes best?
A: Garlic mayo, ranch, or spicy sriracha sauce.

Garlic and Herb Marinated Cucumber Salad

Garlic and Herb Marinated Cucumber Salad

Ingredients

  • Cucumbers: 3 to 4 medium English or Persian cucumbers (sliced into thick rounds).

  • Fresh Garlic: 4 to 5 cloves, very finely minced.

  • Fresh Herbs: 2 tablespoons fresh dill, chopped (or 1 tablespoon dried dill).

  • Vinegar: 1/4 cup apple cider vinegar or white wine vinegar.

  • Oil: 2 tablespoons extra virgin olive oil.

  • Sweetener: 1 teaspoon of a granulated sugar substitute (like monk fruit or erythritol) to balance the acidity.

  • Spice: 1/2 teaspoon red chili flakes (adjust for heat).

  • Seasoning: 1/2 teaspoon sea salt and 1/4 teaspoon cracked black pepper.


Preparation Instructions

1. Prepare the Cucumbers Wash the cucumbers thoroughly. You can leave the skin on for extra crunch and nutrients. Slice them into rounds about 1/4 inch thick. If using English cucumbers, there is no need to peel or seed them.

2. Create the Marinade In a small mixing bowl, whisk together the olive oil, vinegar, minced garlic, sweetener, salt, black pepper, and red chili flakes. Stir in the chopped fresh dill until well combined.

3. Combine and Toss Place the sliced cucumbers into a large bowl or a sealable container. Pour the marinade over the cucumbers. Use a large spoon or spatula to toss everything together, ensuring every slice is well-coated with the garlic and herb mixture.

4. Marinate for Flavor While you can eat this immediately, it is best if chilled. Cover the bowl or seal the container and place it in the refrigerator for at least 30 minutes. This allows the cucumbers to soak up the garlic and vinegar flavors.

5. Serving Give the salad one final toss before serving to redistribute the marinade. This dish pairs beautifully with grilled chicken, fish, or as a light snack on its own.


Storage Tip

This salad stays fresh and crunchy in the refrigerator for up to 3 days. In fact, the flavor often improves after the first few hours!