30-Minute Homemade Margherita Pizza (Detailed & Gentle Recipe) ✨🍕

30-Minute Homemade Margherita Pizza (Detailed & Gentle Recipe) ✨🍕

This classic Margherita pizza is all about simple ingredients and fresh flavor. With a soft crust, rich tomato sauce, creamy mozzarella, and fragrant basil, it comes together quickly and delivers bakery-style results at home. Perfect for busy days when you still want something special.


⏱️ Time & Yield

  • Total Time: 30 minutes

  • Servings: 2–3

  • Style: Simple, fresh, and comforting


🧾 Ingredients

For the Pizza Base

  • 1 prepared pizza dough (store-bought or homemade, room temperature)

  • 1 tablespoon olive oil (for brushing)

For the Sauce

  • ½ cup crushed tomatoes or pizza sauce

  • 1 tablespoon olive oil

  • 1 small garlic clove, finely minced

  • ¼ teaspoon salt

  • ¼ teaspoon dried oregano (optional)

Toppings

  • 200 g (about 7 oz) fresh mozzarella cheese, sliced or torn

  • 1 small tomato, thinly sliced (optional but lovely 🍅)

  • Fresh basil leaves, torn 🌿

  • Freshly ground black pepper (optional)


👩‍🍳 Step-by-Step Instructions

1️⃣ Preheat the Oven

Preheat your oven to 475°F (245°C).
If using a pizza stone or steel, place it in the oven while it heats for best results.


2️⃣ Prepare the Sauce

In a small bowl, mix together:

  • Crushed tomatoes

  • Olive oil

  • Garlic

  • Salt

  • Oregano (if using)

Stir until smooth and set aside.


3️⃣ Shape the Dough

Lightly flour your work surface.
Stretch or roll the dough into a round or oval shape, about 10–12 inches wide.
Transfer it to a parchment-lined baking tray or pizza peel.

Brush the edges lightly with olive oil for a golden finish.


4️⃣ Add Sauce and Toppings

Spread a thin, even layer of sauce over the dough, leaving a small border around the edges.
Arrange the mozzarella evenly on top, then add tomato slices if using.


5️⃣ Bake

Bake for 10–14 minutes, or until:

  • The crust is golden

  • The cheese is melted and lightly bubbling


6️⃣ Finish and Serve

Remove from the oven and immediately scatter fresh basil over the top 🌿.
Add a light sprinkle of black pepper if you like.

Let rest for 1–2 minutes, then slice and enjoy warm 🍕


🍽️ Serving Ideas

  • Serve with a simple green salad 🥗

  • Pair with roasted vegetables

  • Enjoy as-is for a classic, comforting meal


💡 Helpful Tips

  • Less sauce keeps the crust crisp

  • Fresh mozzarella gives the best texture

  • Tear basil by hand to keep its aroma bright

Easy Zucchini Flatbread with Herbs (Detailed & Gentle Recipe) ✨🥒

Easy Zucchini Flatbread with Herbs (Detailed & Gentle Recipe) ✨🥒

This zucchini flatbread is light, flavorful, and surprisingly satisfying. Made with simple ingredients and baked until golden, it’s a wonderful option for a light meal, snack, or side dish. The key to success is removing excess moisture from the zucchini, which gives you a flatbread that holds together beautifully and has a pleasant texture.


🧾 Ingredients

  • 1 medium zucchini (about 200 g / 7 oz)
    Fresh, firm zucchini works best.

  • 4 tablespoons oat flour (about 30 g)
    You can make this at home by blending rolled oats until fine.

  • 100 g (1 cup) mozzarella cheese, grated
    Divided, for mixing and topping.

  • 2 large eggs
    Helps bind the mixture and add structure.

  • ½ teaspoon salt

  • ¼ teaspoon freshly ground black pepper

  • 1 teaspoon dried herbs
    Thyme, oregano, or Italian-style herb blend all work well.

  • Optional additions:

    • A pinch of red pepper flakes for warmth

    • Fresh parsley or basil for garnish 🌿


👩‍🍳 Step-by-Step Instructions

1️⃣ Prepare the Zucchini (Very Important)

Grate the zucchini using the coarse side of a grater.
Place it in a clean kitchen towel or cheesecloth and squeeze firmly to remove as much liquid as possible.
This step helps the flatbread bake evenly and hold its shape.


2️⃣ Preheat and Prepare the Pan

Preheat your oven to 400°F (200°C).
Line a baking sheet or round pan with parchment paper to prevent sticking.


3️⃣ Mix the Batter

In a medium bowl, whisk the eggs until well blended.
Add:

  • The squeezed zucchini

  • Oat flour

  • Half of the mozzarella (50 g)

  • Salt, black pepper, and dried herbs

Stir until everything is evenly combined and the mixture looks cohesive.


4️⃣ Shape the Flatbread

Spoon the mixture onto the prepared baking sheet.
Using a spatula, spread it into an even circle or rectangle, about ¼ inch thick.


5️⃣ First Bake

Place the tray in the oven and bake for 15–18 minutes, until:

  • The edges turn lightly golden

  • The center feels set when gently touched


6️⃣ Add the Cheese

Remove from the oven and sprinkle the remaining mozzarella evenly over the top.
Return to the oven and bake for about 5 more minutes, until the cheese is melted and lightly bubbly.


7️⃣ Rest, Slice, and Serve

Let the flatbread rest for a few minutes after baking.
This helps it firm up and makes slicing easier.
Cut into wedges or squares and serve warm.


🍽️ Serving Ideas

  • Dip: Marinara sauce or a simple yogurt-based dip

  • Topping: Fresh greens like arugula and a light drizzle of balsamic glaze

  • Side: Pairs nicely with soup or salad


🧊 Storage & Reheating

  • Store leftovers in a covered container in the refrigerator for up to 3 days

  • Reheat in a dry pan, oven, or air fryer to maintain texture

Roasted Red Pepper, Spinach, and Mozzarella Stuffed Chicken

Roasted Red Pepper, Spinach, and Mozzarella Stuffed Chicken

This dish is a “one-pan wonder” that feels fancy but is surprisingly simple to pull off. The key is to get a nice sear on the chicken before finishing it in the oven.


Ingredients

  • 4 Boneless, skinless chicken breasts

  • 1 cup Roasted red peppers, sliced (jarred works great)

  • 1 cup Fresh baby spinach

  • 1 cup Shredded mozzarella cheese

  • 2 tbsp Olive oil

  • 1 tsp Garlic powder

  • 1 tsp Smoked paprika

  • Salt and black pepper to taste

  • Optional: Fresh basil for garnish or a splash of balsamic glaze.


Instructions

  1. Prep the Chicken: Preheat your oven to 400°F (200°C). Place the chicken breasts on a cutting board. Use a sharp knife to cut a horizontal pocket into the thickest part of each breast, being careful not to cut all the way through.

  2. Season: In a small bowl, mix the garlic powder, smoked paprika, salt, and pepper. Rub this mixture over the outside and inside of each chicken breast.

  3. Stuff It: Stuff each pocket with a handful of spinach leaves, a generous amount of sliced roasted red peppers, and a quarter of the mozzarella cheese. Use toothpicks to seal the edges if the chicken feels too full.

  4. The Sear: Heat olive oil in a large, oven-safe skillet over medium-high heat. Place the chicken in the pan and sear for 3–5 minutes per side until golden brown. This locks in the juices and gives it that beautiful crust seen in your photo.

  5. The Bake: Transfer the entire skillet to the preheated oven. Bake for 15–20 minutes, or until the internal temperature reaches 165°F (74°C) and the cheese is bubbly and melted.

  6. Rest and Serve: Let the chicken rest for 5 minutes before serving. This ensures the juices stay inside the meat. Remove the toothpicks, drizzle with any pan juices, and enjoy!


Pro Tip: If you want a little extra “zing,” try adding a thin layer of basil pesto inside the pocket before stuffing the veggies and cheese.

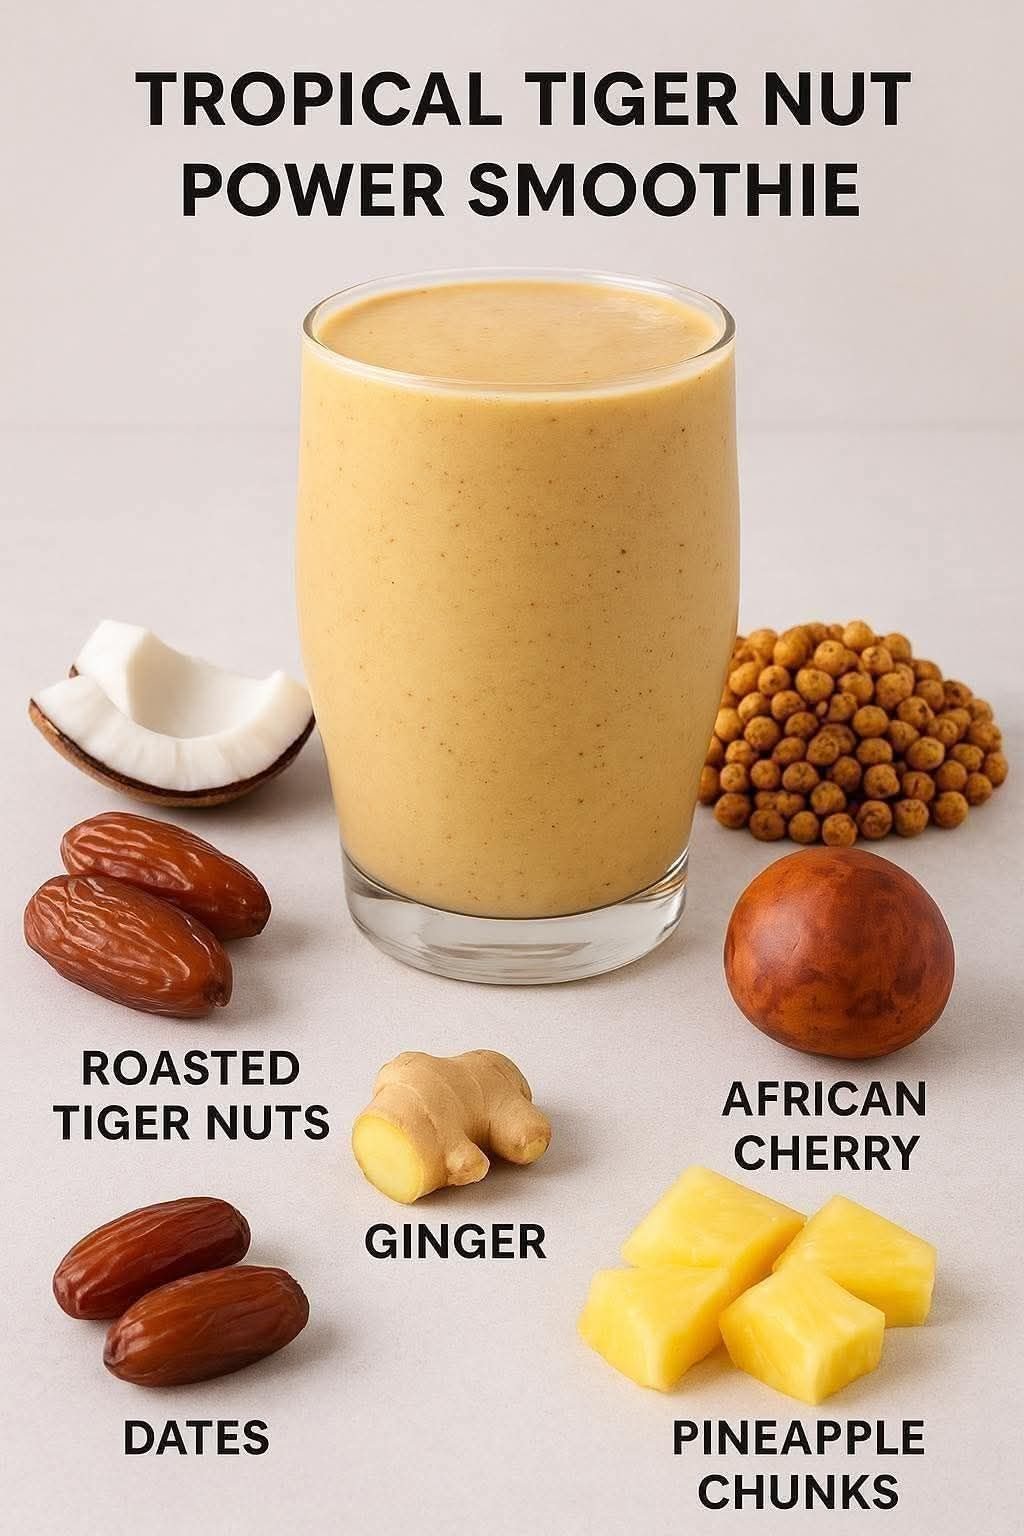
Tropical Tiger Nut Smoothie

Tropical Tiger Nut Smoothie

A creamy fruit and nut–based blended drink

This smoothie combines soaked tiger nuts with tropical fruits and warming ginger to create a naturally sweet, creamy drink. It can be enjoyed as a refreshing beverage or a light snack.


Ingredients

(Makes 2 servings)

  • Tiger nuts — 1 cup, soaked for 4–6 hours or overnight

  • Dates — 4–5, pitted

  • Fresh coconut pieces — ½ cup

  • Pineapple chunks — 1 cup

  • Fresh ginger — 1 small piece (about 1 inch), peeled

  • African cherry (Agbalumo) — 1 fruit, flesh only

  • Cold water — 1 cup (adjust for desired thickness)

  • Ice cubes — optional


Step-by-Step Instructions

1. Prepare the Tiger Nuts

  • Rinse the tiger nuts thoroughly.

  • Soak them in clean water for at least 4–6 hours or overnight.

  • Drain and rinse again before blending.
    Soaking softens the nuts and helps achieve a smoother texture.


2. Prepare the Fruits

  • Pit the dates.

  • Cut the pineapple into chunks if not already prepared.

  • Remove the flesh from the African cherry, discarding the seed.

  • Peel and slice the ginger.


3. Blend

  • Add the soaked tiger nuts to a high-speed blender.

  • Add dates, coconut pieces, pineapple chunks, ginger, and African cherry flesh.

  • Pour in the cold water.

  • Blend until smooth and creamy, stopping to scrape down the sides if needed.


4. Adjust Texture

  • If the smoothie is too thick, add a little more water.

  • If you prefer it colder, add a few ice cubes and blend again.


5. Serve

  • Pour into glasses and serve immediately.

  • Best enjoyed fresh.


Helpful Tips

  • Use a high-speed blender for the smoothest result

  • Strain the smoothie if you prefer a thinner, juice-like consistency

  • Adjust the number of dates based on your sweetness preference


Variations

  • Replace water with coconut water for a lighter texture

  • Add a pinch of cinnamon or nutmeg for extra aroma

  • Substitute mango for pineapple if desired


Storage

  • Best consumed immediately

  • If needed, refrigerate for up to 24 hours in a sealed container and shake well before drinking

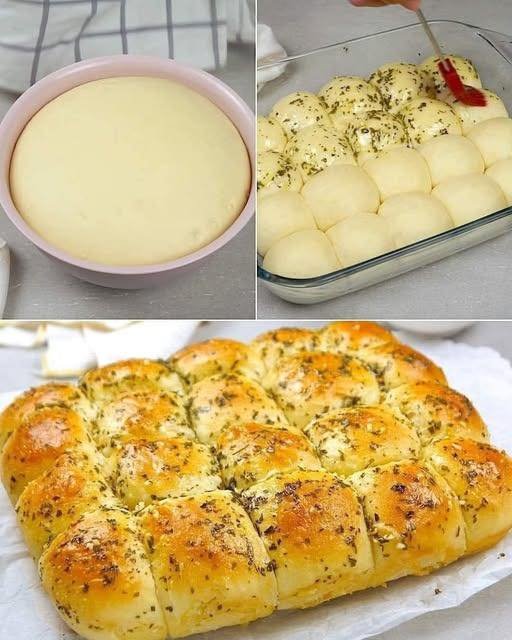
Homemade Garlic Buns

Homemade Garlic Buns

Soft, fluffy buns brushed with aromatic garlic butter

These homemade garlic buns are tender on the inside with a lightly golden top and a rich garlic aroma. They are perfect as a side for soups, pasta, or enjoyed on their own while warm.


Ingredients

Dough

  • All-purpose flour — 400 g (about 3¼ cups)

  • Sugar — 50 g (¼ cup)

  • Salt — 1 teaspoon

  • Instant dry yeast — 7 g (1 packet)

  • Lukewarm milk — 250 ml (1 cup)

  • Egg — 1 large, room temperature

  • Butter — 55 g (¼ cup), softened

  • Minced garlic — 1 tablespoon


Garlic Butter Topping

  • Minced garlic — 1 tablespoon

  • Dried parsley — 2 teaspoons

  • Salted butter — 55 g (¼ cup), melted


Step-by-Step Method

1. Prepare the Dough

  • In a large bowl, combine the flour, sugar, salt, and instant yeast.

  • Add the lukewarm milk and egg.

  • Mix until a rough dough forms.


2. Knead the Dough

  • Knead using a stand mixer or by hand for 5 minutes, until smooth.

  • Cover the dough with a clean towel and let it rest for 20 minutes.


3. Add Butter and Garlic

  • Add the softened butter and minced garlic to the dough.

  • Continue kneading for 5–7 minutes until the dough becomes elastic and slightly glossy.


4. First Rise

  • Lightly grease a bowl with oil.

  • Place the dough inside, cover, and let rise in a warm place for 1 hour, or until doubled in size.


5. Shape the Buns

  • Gently press the dough to release excess air.

  • Shape into a square and divide into 25 equal pieces.

  • Roll each piece into a smooth ball.

  • Cover and let rest for 15 minutes.


6. Second Rise

  • Lightly flatten each dough ball and tuck the edges underneath to create a smooth top.

  • Place in a greased baking pan.

  • Cover and let rise again for 30 minutes, until puffy.


7. Prepare Garlic Butter

  • In a small bowl, combine:

    • Melted butter

    • Minced garlic

    • Dried parsley

  • Mix well.


8. Bake

  • Preheat the oven to 180°C (350°F).

  • Brush the tops of the buns generously with garlic butter.

  • Bake for 15–17 minutes, until lightly golden.


9. Finish and Serve

  • Remove from the oven.

  • While still warm, brush with more garlic butter for extra flavor.

  • Serve warm.


Serving Suggestions

  • Pair with soups or pasta dishes

  • Serve as a dinner roll or party bread

  • Enjoy plain or with cheese spread


Storage Tips

  • Store at room temperature for 1 day

  • Refrigerate for up to 3 days

  • Reheat gently before serving

Anti-Inflammatory Cottage Cheese Veggie Bake

Anti-Inflammatory Cottage Cheese Veggie Bake

A nutrient-dense, high-protein breakfast or brunch that focuses on whole foods and vibrant flavors.

  • Prep time: 15 minutes

  • Cook time: 35–40 minutes

  • Servings: 4–6

Ingredients

  • 2 cups cottage cheese (small curd)

  • 4 large eggs, beaten

  • 1/2 cup almond flour (keeping it gluten-free)

  • 1 tsp turmeric (anti-inflammatory powerhouse)

  • 1/2 tsp ground black pepper (to aid turmeric absorption)

  • 1 tsp garlic powder

  • 2 cups fresh baby spinach, chopped

  • 1 red bell pepper, diced

  • 1 cup broccoli florets, finely chopped

  • 1/4 cup sliced green onions

  • Optional: 1/2 cup sliced mushrooms (as seen in your beautiful photo!)

Instructions

  1. Preheat & Prep: Set your oven to 375°F (190°C) and grease a 9×9-inch baking dish.

  2. Mix the Base: Whisk the cottage cheese, eggs, almond flour, turmeric, black pepper, and garlic powder in a large bowl.

  3. Add Veggies: Fold in the spinach, bell pepper, broccoli, and green onions until evenly distributed.

  4. Bake: Pour into the dish and bake for 35–40 minutes until the center is firm and the edges are golden.

  5. Rest: Let the bake sit for 10 minutes before slicing to ensure it holds its shape.


Why This Dish is a Winner

  • High Protein: Cottage cheese and eggs provide a substantial protein base to keep you full.

  • Anti-Inflammatory: Turmeric and fresh vegetables help reduce inflammation naturally.

  • Great for Beginners: As you mentioned, it’s a simple “mix and bake” process with minimal technical skill required.