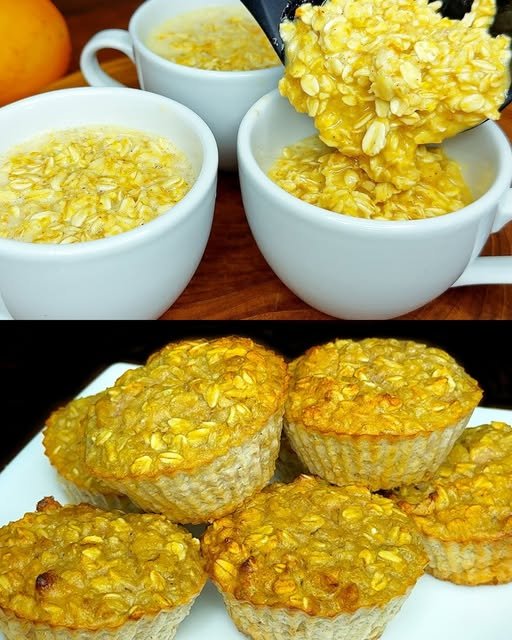
Orange Oat Muffins

Orange Oat Muffins

These muffins are made with oats, fresh orange juice, and eggs, resulting in a moist and lightly citrus-flavored baked product. They are suitable for breakfast or as a small snack.

Preparation Time

10 minutes

Baking Time

20–25 minutes

Yield

6–8 muffins


Ingredients

  • 1 large orange (zest and juice)

  • 1½ cups (120 g) oat flakes (quick oats or rolled oats)

  • 1 cup (240 ml) water or unsweetened plant-based milk

  • 2 large eggs

  • 1 teaspoon baking powder

  • 1 teaspoon vanilla extract (optional)

  • A small pinch of salt

Optional Add-ins

  • Raisins

  • Chopped nuts


Instructions

1. Prepare the Orange

Wash the orange thoroughly. Finely grate approximately 1 tablespoon of the outer zest, avoiding the white pith underneath.
Cut the orange in half and squeeze out the juice. Remove any seeds.


2. Soak the Oats

Place the oat flakes in a large mixing bowl.
Add the freshly squeezed orange juice and the water (or plant-based milk).
Stir well and let the mixture rest for 10 minutes, allowing the oats to absorb liquid and soften.


3. Mix the Batter

Add the eggs, orange zest, baking powder, vanilla extract (if using), and salt to the soaked oats.
Stir until the eggs are fully incorporated and the batter is evenly mixed.
If using raisins or nuts, fold them in gently at this stage.


4. Prepare the Muffin Pan

Preheat the oven to 180°C (350°F).
Line a muffin tin with paper or silicone liners, or lightly grease the cups.

Divide the batter evenly among the muffin cups, filling them almost to the top.


5. Bake

Place the muffin tin in the preheated oven and bake for 20–25 minutes, or until the tops are set and lightly colored.
Allow the muffins to cool in the pan for a few minutes before transferring them to a wire rack.


Helpful Notes

  • For a finer texture, the oats can be blended briefly before soaking.

  • The flavor depends on the natural sweetness of the orange used.

  • Store baked muffins in an airtight container in the refrigerator for up to 3 days.
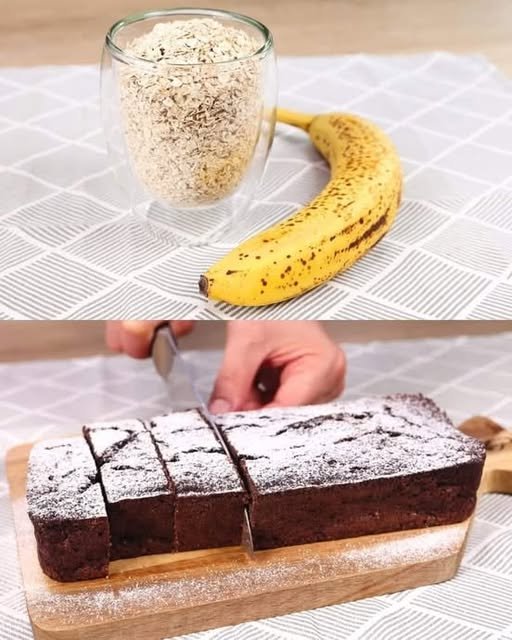
Banana Chocolate Oat Cake

Banana Chocolate Oat Cake

This baked oat-based cake combines bananas, yogurt, cocoa, and chocolate for a soft, dense texture. It is suitable for a small baking dish and can be served warm or at room temperature.

Preparation Time

10 minutes

Baking Time

35–40 minutes

Yield

1 small square or rectangular cake (8–10 slices)


Ingredients

  • 2 ripe bananas, mashed

  • ¾ cup (70 g) oat flakes

  • ½ cup (150 g) plain or Greek yogurt

  • ¼ cup (50 g) condensed milk

  • 3 tablespoons unsweetened cocoa powder

  • 1 teaspoon baking powder

  • 40 g (1.4 oz) chocolate, chopped or chocolate chips

  • Walnuts, roughly chopped (optional)


Instructions

1. Prepare the Wet Mixture

Place the bananas in a medium mixing bowl and mash thoroughly with a fork until mostly smooth.
Add the yogurt and condensed milk. Stir until the mixture is evenly combined and creamy in consistency.


2. Add the Dry Ingredients

Add the oat flakes, cocoa powder, and baking powder to the bowl.
Mix gently with a spatula until the batter is evenly blended and no dry cocoa remains.


3. Incorporate the Chocolate and Nuts

Fold in about half of the chopped chocolate and walnuts, if using.
Mix just until distributed to avoid overworking the batter.


4. Prepare the Baking Dish

Preheat the oven to 180°C (350°F).
Line a small square or rectangular baking dish with parchment paper or lightly grease it.

Pour the batter into the prepared dish and spread it evenly.
Scatter the remaining chocolate and walnuts over the surface.


5. Bake

Place the dish in the preheated oven and bake for 35–40 minutes, or until the edges are set and a toothpick inserted into the center comes out mostly clean with a few moist crumbs.


6. Cool and Serve

Remove the cake from the oven and allow it to cool in the pan for at least 15 minutes before slicing. This resting time helps the oats firm up and improves the final texture.


Helpful Notes

  • For a smoother texture, the oats can be blended briefly before mixing.

  • The cake will become firmer as it cools.

  • Store leftovers in an airtight container in the refrigerator for up to 3 days.

🥩 Steak & Creamy Mushroom Duo

🥩 Steak & Creamy Mushroom Duo

The Ultimate Comfort Plate

A satisfying trio of juicy steak in creamy mushroom sauce, fluffy mashed potatoes, and a fresh crunchy chicken salad—restaurant-style comfort made at home.


🥩 1. Juicy Steak with Creamy Mushroom Sauce

Ingredients

  • 2 steaks (sirloin, ribeye, or striploin)

  • 1 tbsp olive oil

  • 1 tbsp butter

  • 1 cup mushrooms, sliced

  • 1 garlic clove, minced

  • ½ cup beef broth

  • ¼ cup cooking cream

  • Salt & black pepper, to taste

Instructions

  1. Season steaks generously with salt and pepper.

  2. Heat olive oil and butter in a hot pan.

  3. Sear steaks for 2–4 minutes per side (depending on thickness). Remove and rest.

  4. In the same pan, sauté mushrooms until golden. Add garlic and cook briefly.

  5. Pour in beef broth and simmer for 2–3 minutes.

  6. Add cream and cook until the sauce thickens.

  7. Return steaks to the pan and coat them well in the sauce. Simmer 1 minute, then turn off heat.


🥔 2. Fluffy Mashed Potatoes

Ingredients

  • 4 medium potatoes, boiled and peeled

  • 2 tbsp butter

  • ¼ cup warm milk

  • Salt & black pepper

  • Fresh parsley, chopped

Instructions

  1. Mash potatoes while hot.

  2. Add butter and warm milk gradually.

  3. Season with salt and pepper.

  4. Finish with fresh parsley for flavor and color.


🥗 3. Crunchy Chicken Salad

Ingredients

  • 1 cup cooked chicken, diced

  • Chopped lettuce

  • Grated carrots

  • Shredded cabbage

Dressing

  • 2 tbsp mayonnaise

  • 1 tbsp yogurt

  • Salt & black pepper

Instructions

  1. Combine chicken and vegetables in a bowl.

  2. Mix dressing ingredients separately.

  3. Toss everything together until lightly coated.


🍽️ To Serve

Plate the creamy steak beside a generous scoop of mashed potatoes and a refreshing chicken salad. Serve warm and enjoy a complete comfort meal.

Meat-Stuffed Spiral Breakfast Bread

Meat-Stuffed Spiral Breakfast Bread


Ingredients

For the Dough:

  • 800g All-purpose flour

  • 5g Yeast (1 tsp)

  • 5g Salt (1 tsp)

  • 10g Sugar (2 tsp)

  • Approx. 450–500ml Lukewarm water

  • 2 tbsp Vegetable oil

For the Filling:

  • 500g Ground beef or lamb (with a bit of fat for juiciness)

  • 2 Medium onions, very finely diced

  • 1 tsp Black pepper

  • 1 tsp Cumin (optional)

  • 1 tsp Salt

  • 100g Butter, melted (for brushing the dough)


Instructions

1. Prepare the Dough

  1. In a large bowl, mix the flour, yeast, salt, and sugar.

  2. Gradually add the lukewarm water and oil. Knead for about 10 minutes until the dough is smooth and elastic.

  3. Cover and let it rest for 30–45 minutes in a warm place. It doesn’t need to double in size completely, just soften.

2. Prepare the Filling

  1. In a bowl, mix the raw ground meat with the finely diced onions.

  2. Season with salt, pepper, and cumin. Pro Tip: Knead the onions into the meat with your hands to release the onion juices; this keeps the bread moist.

3. Shape the Spirals

  1. Divide the dough into 4–6 equal balls.

  2. On a lightly floured surface, roll one ball out as thin as possible (nearly translucent).

  3. Brush the entire surface with melted butter.

  4. Sprinkle a thin layer of the raw meat mixture across the dough (as seen in your photo).

  5. Carefully roll the dough up into a long, thin log.

  6. Twist the log slightly, then coil it into a spiral (like a snail shell).

4. Bake

  1. Place the spirals on a baking sheet lined with parchment paper.

  2. Brush the tops with egg yolk mixed with a teaspoon of milk for that golden shine.

  3. Bake in a preheated oven at 200°C (400°F) for about 25–30 minutes, or until they are deep golden brown and the meat inside is fully cooked.


Tips for Success

  • The Onions: Don’t skip the onions! They steam the meat inside the dough, making it tender.

  • Resting: If the dough is hard to roll out, let it rest for 5 minutes and try again. This relaxes the gluten.

Classic Sponge Cake

Classic Sponge Cake

A light, airy cake made with whipped eggs and minimal fat

This sponge cake relies on properly beaten eggs to create structure and volume. The result is a soft, fine-crumb cake that can be served plain or paired with fruit, cream, or light glazes.

Prep Time: 15 minutes
Bake Time: 30–35 minutes
Cooling Time: 15 minutes
Servings: 8–10
Pan Size: 8-inch (20 cm) square or round pan
Oven Temperature: 325°F (165°C)


Ingredients

  • 4 large eggs, room temperature

  • ¾ cup (150 g) granulated sugar

  • ¾ cup (90 g) cake flour, sifted

  • ¼ teaspoon salt

  • 1 teaspoon vanilla extract

  • 2 tablespoons milk, warm (optional, for extra moisture)


Step-by-Step Instructions

1. Prepare the Pan and Oven

  • Preheat the oven to 325°F (165°C).

  • Line the bottom of the baking pan with parchment paper.

  • Do not grease the sides; this helps the cake rise evenly.


2. Whip the Eggs and Sugar

  • In a large heat-safe bowl, combine the eggs and granulated sugar.

  • Place the bowl over a pot of gently simmering water.

  • Whisk constantly until the mixture is warm to the touch (about 100–105°F / 38–40°C).
    This helps the eggs whip to a higher volume.

  • Remove from heat and beat with an electric mixer on high speed for 5–7 minutes, until:

    • The mixture becomes pale

    • It triples in volume

    • It forms thick ribbons when lifted


3. Add Flavoring

  • Gently mix in the vanilla extract.

  • If using milk, stir it in carefully at this stage.


4. Fold in Dry Ingredients

  • Sift the cake flour and salt together.

  • Add the dry ingredients in 2–3 additions, folding gently with a spatula.

  • Use a light hand and a folding motion to avoid deflating the batter.


5. Transfer to Pan

  • Pour the batter into the prepared pan.

  • Smooth the top gently.

  • Tap the pan lightly once to release large air bubbles.


6. Bake

  • Bake in the center of the oven for 30–35 minutes, or until:

    • The top is lightly golden

    • The cake springs back when touched

    • A toothpick inserted in the center comes out clean


7. Cool

  • Remove the cake from the oven.

  • Let it cool in the pan for 10–15 minutes.

  • Run a knife around the edges and turn out onto a wire rack to cool completely.


Serving Suggestions

  • Slice and serve plain with tea or coffee

  • Dust lightly with powdered sugar

  • Serve with fruit and whipped cream

  • Use as a base for layered or filled cakes


Helpful Tips

  • Room-Temperature Eggs: Essential for proper volume.

  • Gentle Folding: Prevents the batter from losing air.

  • Accurate Measuring: Use spoon-and-level method for flour.

  • Pan Size: A deeper pan may require a slightly longer bake time.

Hash Brown Breakfast Casserole

Hash Brown Breakfast Casserole

A make-ahead baked dish with potatoes, sausage, eggs, and cheese

This baked breakfast casserole combines shredded potatoes, cooked sausage, eggs, and cheese into a single dish that can be assembled ahead of time and baked when needed. It works well for family breakfasts, guests, or occasions where advance preparation is helpful.

Prep Time: 20 minutes
Bake Time: 45–55 minutes
Optional Chill Time: Up to 24 hours
Servings: 8–10
Pan Size: 9 × 13 inch (23 × 33 cm)


Ingredients

Main Ingredients

  • 1 lb (450 g) frozen hash browns, thawed
    (shredded or diced both work)

  • 1 lb (450 g) breakfast sausage

  • 8 large eggs

  • 1½ cups milk (whole or 2%)

  • 2 cups shredded cheese
    (cheddar, Colby-Jack, or a blend)

Seasonings

  • 1 teaspoon salt

  • ½ teaspoon black pepper

  • ½ teaspoon garlic powder (optional)

  • ½ teaspoon onion powder (optional)

Optional Add-Ins

  • ½ cup chopped bell peppers

  • ¼ cup finely chopped onion

  • ½ cup cooked mushrooms

  • ¼ teaspoon paprika or dried herbs


Step-by-Step Instructions

1. Prepare the Pan

  • Lightly grease a 9×13 inch baking dish with oil or butter.

  • Set aside.


2. Cook the Sausage

  • Heat a skillet over medium heat.

  • Add the sausage and cook, breaking it into small pieces.

  • Cook until fully browned and no longer pink.

  • Drain excess fat and let cool slightly.


3. Layer the Hash Browns

  • Spread the thawed hash browns evenly across the bottom of the prepared baking dish.

  • Press lightly to form an even layer.


4. Add Sausage and Cheese

  • Sprinkle the cooked sausage evenly over the potatoes.

  • Spread 1½ cups of the shredded cheese over the sausage layer.


5. Mix the Egg Custard

  • In a large bowl, whisk together:

    • Eggs

    • Milk

    • Salt

    • Pepper

    • Optional seasonings

  • Whisk until fully blended and smooth.


6. Assemble the Casserole

  • Pour the egg mixture evenly over the layered ingredients.

  • Gently tap the dish on the counter to help the mixture settle.

  • Sprinkle the remaining ½ cup cheese evenly over the top.


7. Bake or Chill

To bake immediately:

  • Preheat oven to 350°F (175°C).

  • Bake uncovered for 45–55 minutes, until:

    • Center is set

    • Top is lightly golden

    • A knife inserted in the center comes out clean

To prepare ahead:

  • Cover tightly and refrigerate for up to 24 hours.

  • When ready to bake, remove from the refrigerator 15–20 minutes before baking.

  • Bake as directed, adding 5–10 minutes if needed.


8. Rest and Serve

  • Let the casserole rest for 10 minutes before slicing.

  • Cut into squares and serve warm.


Helpful Tips

  • Even Cooking: Thaw and drain hash browns well to avoid excess moisture.

  • Cheese Choices: A mix of sharp and mild cheese adds balanced flavor.

  • Clean Slices: Use a sharp knife and wipe between cuts.

  • Pan Depth: A deeper dish may need slightly longer baking time.


Storage

  • Refrigerate leftovers in a covered container for up to 3 days.

  • Reheat individual portions in the oven or microwave.

  • Freezing is possible, though texture may soften slightly after reheating.