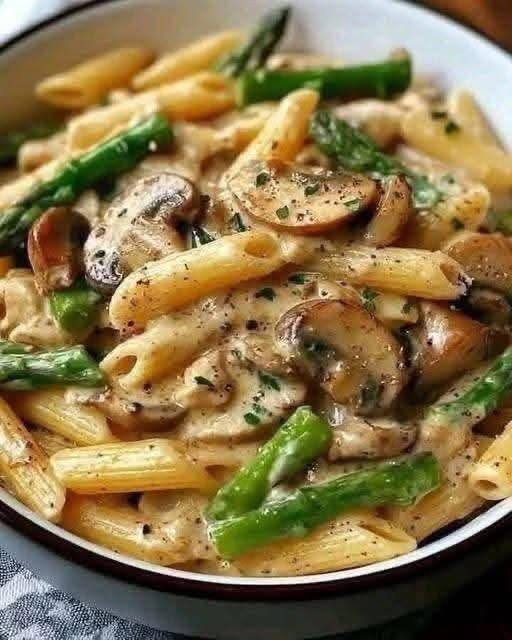
Creamy Garlic Mushroom Chicken Pasta

This Creamy Garlic Mushroom Chicken Pasta is a delicious one-pan meal packed with tender chicken, mushrooms, asparagus, and a rich garlic Parmesan sauce. It’s perfect for a comforting and satisfying dinner!

Total Time:

Prep Time: 10 minutes

Cook Time: 25 minutes

Total Time: 35 minutes

Servings: 4

Ingredients

For the Chicken:

2 large chicken breasts (cut into bite-sized pieces)

1 tsp salt

1/2 tsp black pepper

1/2 tsp garlic powder

1/2 tsp paprika

2 tbsp olive oil

For the Pasta and Vegetables:

8 oz penne pasta (or any pasta of choice)

1 cup mushrooms (sliced)

1 cup asparagus (trimmed and cut into pieces)

3 cloves garlic (minced)

For the Creamy Sauce:

1 cup heavy cream

1/2 cup chicken broth

1/2 cup Parmesan cheese (grated)

1/2 tsp salt

1/4 tsp black pepper

1/2 tsp Italian seasoning

1 tbsp butter

Instructions

Step 1: Cook the Pasta

Cook the penne pasta according to package instructions until al dente. Drain and set aside.

Step 2: Cook the Chicken

Season the chicken pieces with salt, black pepper, garlic powder, and paprika.

Heat olive oil in a skillet over medium-high heat.

Cook the chicken for 5-6 minutes until golden brown and fully cooked. Remove and set aside.

See also  Mediterranean Mushroom Stroganoff

Step 3: Sauté the Vegetables

In the same skillet, melt butter and sauté the mushrooms for 2 minutes until soft.

Add asparagus and cook for another 2 minutes.

Stir in minced garlic and cook for 30 seconds until fragrant.

Step 4: Make the Creamy Sauce

Pour in the chicken broth and let it simmer for 2 minutes.

Add heavy cream, Parmesan cheese, salt, black pepper, and Italian seasoning. Stir and let the sauce thicken for 3-4 minutes.

Step 5: Combine Everything

Return the cooked chicken to the pan.

Add the drained pasta and toss to coat everything in the creamy sauce.

Tips for the Best Flavor

Use fresh Parmesan for the best taste and texture.

Adjust sauce thickness by adding more broth if needed.

For extra flavor, add a pinch of red pepper flakes for a mild spice.

Frequently Asked Questions (FAQs)

Q1: Can I use a different pasta?
Yes! Fettuccine, linguine, or rigatoni all work well.

Q2: How do I store leftovers?
Store in an airtight container in the fridge for up to 3 days. Reheat with a splash of cream or broth to maintain the sauce’s consistency.

Q3: Can I add other vegetables?
Absolutely! Bell peppers, spinach, or zucchini would be great additions.

Nutrition Facts (Per Serving)

(Approximate values)

Calories: 590

Protein: 42g

Carbohydrates: 52g

Fats: 26g

Fiber: 4 g

Conclusion

This Creamy Garlic Mushroom Chicken Pasta is a restaurant-quality dish that’s easy to make at home. The combination of juicy chicken, tender pasta, and a rich Parmesan sauce makes it a meal the whole family will love.

Creamy Southern Chicken Salad – Classic Comfort in Every Bite

  • Servings: 4
  • Total Time: 15 minutes (plus chilled resting time if desired)
  • Difficulty: Easy
  • Calories per Serving: ~320 kcal
  • Macros (per serving, approx.):
    Protein 28g • Carbs 8g • Fat 20g • Fiber 1 g

Introduction

This Creamy Southern Chicken Salad is a true comfort food classic—rich, indulgent, and full of flavor. Tender chicken meets a creamy, tangy dressing with just the right hint of sweetness, accented by crisp celery, fresh herbs, and a touch of crunch.

Perfect for sandwiches, lettuce wraps, or as a protein-packed salad on its own, this recipe hits all the right notes for anyone looking for a quick and satisfying meal. It’s a southern-inspired favorite that balances creaminess with fresh textures, making it perfect for lunches, picnics, or easy dinner prep.

Whether you’re following a low-carb, Weight Watchers, or high-protein lifestyle, this southern-style chicken salad can be tailored to your preferences without losing flavor.

Look at the recipe.

  • Creamy, flavorful dressing with a touch of tang and sweetness
  • Tender, protein-rich chicken with crisp veggies
  • Quick assembly, perfect for meal prep or sandwiches

Ingredients Needed

Chicken Salad Base

  • 3 cups cooked chicken, shredded or diced (skinless, roasted or poached)
  • ½ cup celery, finely diced
  • ¼ cup red onion, finely diced
  • 2 hard-boiled eggs, chopped (optional)
  • 2 tbsp fresh parsley, chopped

Creamy Dressing

  • ½ cup mayonnaise (full-fat or fat-free depending on plan)
  • 1 tsp Dijon mustard
  • 1 tsp apple cider vinegar or lemon juice
  • ½ tsp garlic powder
  • Salt and pepper, to taste
  • Optional: 1 tsp honey or sugar-free sweetener

Serving Ideas

  • Leafy greens for a salad
  • Low-carb wraps or lettuce cups
  • Whole-grain crackers or sandwich bread

How to Make Our Creamy Southern Chicken Salad

  1. Prepare the chicken.  Dice or shred cooked chicken into bite-sized pieces.
  2. Mix the veggies.  In a large bowl, combine celery, red onion, eggs (if using), and parsley.
  3. Make the dressing.  Whisk mayonnaise, Dijon mustard, vinegar or lemon juice, garlic powder, and optional sweetener in a small bowl.
  4. Combine everything.  Toss the chicken and vegetables with the dressing until fully coated.
  5. Chill for best flavor.  Refrigerate 30–60 minutes before serving to allow flavors to meld.

Tip: Adjust the creaminess by adding more or less mayonnaise to your liking.

Macros & Plan Compatibility

Plan Notes
Keto & Low-Carb ✅ Use full-fat mayo and skip sweet additions; ~8g net carbs per serving.
Slimming ⚠️ Use fat-free mayo to reduce syns (~3–4 syns per serving).

High-Protein ✅ High protein with chicken; ~28 g per serving.
Weight Watchers ⚠️ 5–6 SmartPoints per serving using full-fat mayo; can reduce to 1–2 points with fat-free mayo.
Mediterranean ✅ Rich in protein and healthy fats; best as a meal with leafy greens or whole-grain crackers.

Storage & Serving Suggestions

Storage

  • Refrigerate in an airtight container for up to 3 days.

Serving Ideas

  • Spoon over a bed of lettuce for a low-carb salad
  • Use as a sandwich filling or wrap
  • Serve with sliced avocado or pickles for added texture

Tips & FAQs

Can I make this ahead of time?

Yes! It tastes even better after chilling for an hour or more.

What chicken works best?

Poached, roasted, or leftover rotisserie chicken all work perfectly.

Can I make this dairy-free?

Yes, simply ensure your mayonnaise is dairy-free. Eggs are optional.

Is this recipe low-carb?

Yes, using fat-free mayo keeps carbs minimal; omit sweetener for strict low-carb.

How can I make it Weight Watchers-friendly?

Use fat-free mayo and skip optional honey to reduce SmartPoints.

🧀 Cheesy Garlic Bread Recipe (Stuffed Style)

A soft, buttery, and cheesy bread loaf stuffed with gooey mozzarella and infused with aromatic garlic butter. Perfect as a snack, side dish, or even a party appetizer.

🍞 Ingredients

For the Dough:

  • 2 cups all-purpose flour
  • 1 tsp sugar
  • 1 tsp salt
  • 1 tbsp olive oil
  • 1 tsp instant yeast
  • ¾ cup warm water (adjust as needed)

For the Filling:

  • 1½ to 2 cups mozzarella cheese (grated or shredded)
  • (Optional): small bits of pepperoni, cooked bacon, or chopped veggies (bell pepper, onion, olives)

For Garlic Butter:

  • 2 tbsp butter (melted)
  • 3–4 garlic cloves (minced or grated)
  • ½ tsp oregano or Italian seasoning
  • A pinch of salt

🔄 Optional Toppings:

  • Grated Parmesan
  • Chilli flakes
  • Dried herbs (basil, parsley, thyme)

👩‍🍳 Instructions

1. Prepare the Dough

  1. In a large bowl, mix warm water, sugar, and yeast. Let it sit for 5–7 minutes until frothy.
  2. Add flour, salt, and olive oil. Mix to form a soft dough.
  3. Knead for about 8–10 minutes until smooth and elastic.
  4. Cover the bowl with a damp cloth and let it rest for 1–1½ hours, or until doubled in size.

2. Make the Garlic Butter

  • Mix melted butter, minced garlic, salt, and oregano (or Italian seasoning).
  • Set aside to brush over the bread later.

3. Shape and Stuff the Bread

  1. Once the dough has risen, punch it down to release air.
  2. Divide it into two equal portions.
  3. Roll out the first portion into a flat circle (like a pizza base).
  4. Spread mozzarella and optional fillings evenly.
  5. Place the second rolled-out dough layer on top and seal the edges tightly.
  6. Brush generously with the garlic butter mixture.

4. Bake

  1. Preheat oven to 375°F (190°C).
  2. Transfer the bread to a parchment-lined baking tray.
  3. Bake for 18–22 minutes, or until golden brown and puffy.
  4. Once baked, brush with the remaining garlic butter and sprinkle with herbs, chili flakes, or Parmesan if desired.

5. Serve

  • Slice and serve warm!
  • Best enjoyed with marinara sauce, cheesy dip, or even soup.

📝 Notes & Tips

  • Cheese Options: Mozzarella gives the best stretch, but you can mix it with cheddar or provolone for flavor.
  • Crispier Crust: Brush with olive oil instead of butter before baking.
  • Extra Garlicky: Roast garlic before adding to butter for a milder, sweeter flavor.
  • No oven? Cook covered in a skillet on low heat, flipping halfway until golden and the cheese melts.
  • Make Ahead: Prepare dough and refrigerate overnight for deeper flavor.

🍽️ Servings

  • Makes 2 medium stuffed breads (serves 4–6 people).

⚖️ Approximate Nutritional Info (Per Serving, 1/6th of loaf)

(Values may vary depending on toppings and cheese amount.)

Nutrient Amount
Calories 280 kcal
Carbohydrates 30 g
Protein 10 g
Fat 12 g
Saturated Fat 6 g
Fiber 1 g
Sodium 400 mg
Calcium 180 mg

💪 Health Benefits

  • Calcium & Protein: From cheese for bone and muscle health.
  • Garlic: Boosts immunity and heart health.
  • Homemade Bread: Fewer preservatives and customizable ingredients.
  • Olive Oil: Contains healthy monounsaturated fats.

(Enjoy in moderation—it’s indulgent comfort food!)

❓ Frequently Asked Questions (Q&A)

Q1: Can I use store-bought pizza dough?
✅ Yes! It saves time and works perfectly—just let it rest for 20 minutes before shaping.

Q2: How do I store leftovers?
Keep in an airtight container in the fridge for up to 2 days. Reheat in the oven or air fryer for best texture.

Q3: Can I freeze it?
Yes, freeze baked bread for up to 1 month. Thaw and reheat before serving.

Q4: How can I make it spicy?
Add chili flakes to the filling or mix a bit of hot sauce into the garlic butter.

Q5: Can I make it vegan?
Use vegan cheese and plant-based butter, and skip dairy—the result will still be delicious.

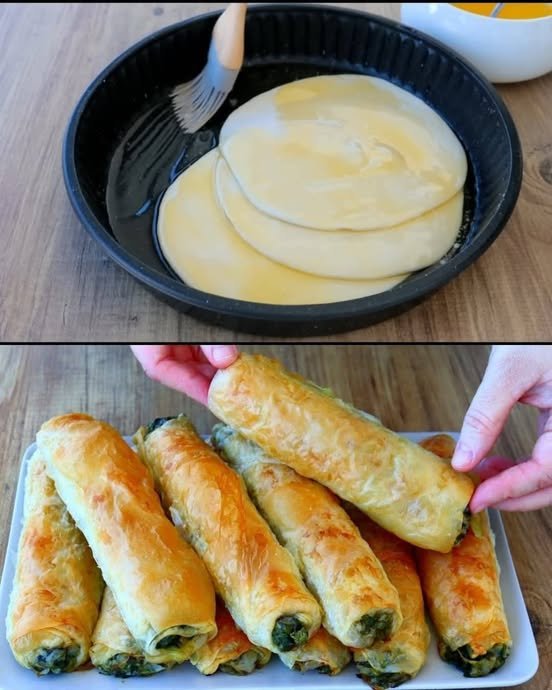
Crispy Spinach & Onion Pastry

Crispy Spinach & Onion Pastry

A flaky, golden pastry filled with a savory spinach and onion mixture. Crisp on the outside, soft and flavorful inside.


Ingredients

For the Dough

  • All-purpose flour: 4 cups (approx. 455 g)

  • Water: 1½ cups (300 ml), room temperature

  • Salt: 1 teaspoon

  • Oil: 1 tablespoon (for greasing the dough)

For Layering & Brushing

  • Melted butter: 100 g

  • Oil: ½ cup (100 ml)

For the Filling

  • Fresh spinach: 500 g, washed, dried, and finely chopped

  • Onion: 1 large, finely diced

  • Salt: to taste

  • Black pepper: to taste


Instructions

1. Prepare the Dough

  • In a large bowl, combine flour and salt.

  • Gradually add water and mix until a soft dough forms.

  • Knead for 8–10 minutes until smooth and elastic.

  • Divide the dough into equal-sized balls.

  • Lightly coat each ball with oil, cover, and let rest for 20 minutes. This helps the dough stretch easily.


2. Prepare the Filling

  • Heat a pan over medium heat.

  • Add the diced onion and sauté until soft and translucent.

  • Add chopped spinach and cook just until wilted and excess moisture evaporates.

  • Season with salt and black pepper.

  • Remove from heat and allow the mixture to cool completely.


3. Prepare the Butter–Oil Mixture

  • In a bowl, mix the melted butter and oil until well combined.

  • Set aside for layering and brushing.


4. Stretch the Dough

  • Place one dough ball on a clean, lightly oiled surface.

  • Dip your hands into the butter–oil mixture.

  • Gently stretch the dough outward using your hands until it becomes very thin and nearly transparent. Take your time to avoid tearing.


5. Fill and Roll

  • Lightly fold in the edges of the stretched dough.

  • Place a line of spinach filling along one side.

  • Carefully roll the dough into a long, thin log.


6. Bake

  • Preheat oven to 180°C (350°F).

  • Line a baking tray with parchment paper.

  • Arrange the rolled pastries on the tray.

  • Brush generously with the remaining butter–oil mixture.

  • Bake for 30–35 minutes, or until golden brown and crisp.


Serving Suggestions

  • Serve warm as a snack, appetizer, or light meal.

  • Pairs well with yogurt dip, mint chutney, or a fresh salad.


Tips for Best Results

  • Ensure spinach filling is completely cooled before rolling.

  • Stretch the dough slowly for best flakiness.

  • Do not overload the filling to keep the pastry crisp.

Classic Easy Crêpes

Classic Easy Crêpes

Thin, tender crêpes suitable for both sweet and savory fillings

Yield

Makes approximately 10–12 crêpes (22–24 cm / 9–10 inch)

Cooking Temperature

Medium heat


Ingredients

  • 1 cup (125 g) all-purpose flour

  • 2 large eggs, at room temperature

  • ½ cup (120 ml) whole milk

  • ½ cup (120 ml) water

  • 2 tablespoons unsalted butter, melted and cooled

  • ¼ teaspoon salt

Optional (for sweet crêpes)

  • 1 tablespoon granulated sugar

  • 1 teaspoon vanilla extract


Instructions


1. Prepare the Batter

  1. Place the flour into a large mixing bowl.

  2. Add the eggs and whisk until a thick, smooth mixture forms. This step helps prevent lumps later.

  3. Gradually pour in the milk and water while whisking continuously. Continue mixing until the batter becomes smooth and fluid.

  4. Add the salt and melted butter. If preparing sweet crêpes, also add the sugar and vanilla extract. Whisk until fully combined.

  5. The finished batter should have the consistency of light cream and pour easily.

  6. Cover the bowl and allow the batter to rest in the refrigerator for 30 minutes. This resting period improves texture and results in softer crêpes.


2. Cook the Crêpes

  1. Heat a non-stick pan or crêpe pan over medium heat.

  2. Lightly coat the surface with a small amount of butter or neutral oil, wiping away any excess.

  3. Pour approximately ¼ cup of batter into the center of the pan.

  4. Immediately lift and rotate the pan so the batter spreads evenly into a thin layer covering the entire surface.

  5. Cook for 1–2 minutes, until the underside is lightly golden and the edges begin to loosen from the pan.

  6. Gently turn the crêpe using a spatula and cook the second side for 30–45 seconds, just until set.

  7. Transfer the cooked crêpe to a plate and repeat with the remaining batter, lightly greasing the pan as needed.


3. Serving Suggestions

Sweet Fillings

  • Fresh berries or sliced fruit

  • Chocolate or hazelnut spread

  • Lemon juice with a light sprinkle of sugar

  • Whipped cream or custard

Savory Fillings

  • Ham and cheese

  • Sautéed mushrooms

  • Spinach with cream or cheese

  • Eggs and herbs

Finishing

  • Dust lightly with powdered sugar

  • Serve with honey, syrup, or fruit sauce


Storage

  • Cooked crêpes can be stacked, covered, and refrigerated for up to 2 days

  • Reheat gently in a dry pan before serving

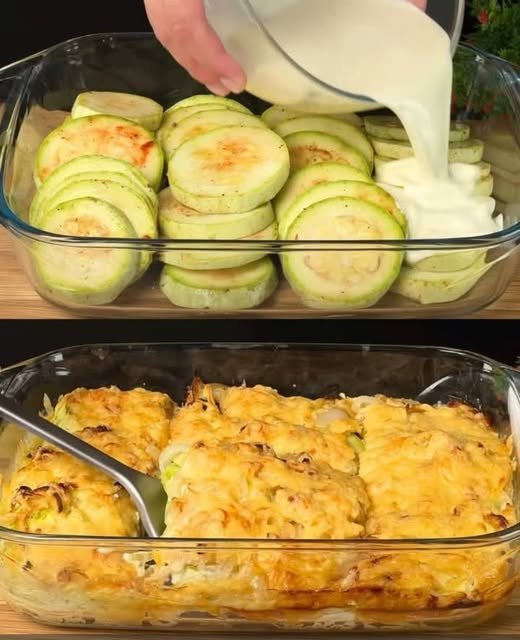
Baked Zucchini with Cheese

Baked Zucchini with Cheese

A creamy, golden-brown vegetable bake featuring tender zucchini and a savory yogurt-egg glaze.

  • Prep time: 15 minutes

  • Cook time: 30–35 minutes

  • Servings: 4 side portions


Ingredients

  • 2 zucchini, sliced into rounds

  • 2 onions, thinly sliced into rounds

  • 2 cloves garlic, finely chopped

  • 2 eggs

  • 150 g yogurt (plain or Greek)

  • 150 g cheese, grated (such as Mozzarella or Cheddar)

  • Seasonings: Salt, black pepper, paprika, and vegetable seasoning to taste

  • Oil for greasing and cooking


Instructions

1. Prepare the Vegetables

Preheat your oven to 390°F (200°C). Lightly grease a glass baking dish with oil. Season the zucchini rounds with salt, black pepper, paprika, and vegetable seasoning.

2. Layer the Dish

Arrange the seasoned zucchini rounds and sliced onions in rows in the baking dish, overlapping them slightly to fill the pan. Sprinkle the chopped garlic evenly over the top.

3. Mix the Creamy Glaze

In a small bowl, whisk together the 2 eggs and 150 g of yogurt until smooth. Season this mixture with a pinch of salt and pepper if desired.

4. Top and Bake

Pour the yogurt and egg mixture evenly over the rows of vegetables, ensuring they are well-coated. Sprinkle the 150 g of grated cheese generously over the entire surface.

5. Bake to Perfection

Place the dish in the oven and bake for 30–35 minutes, or until the zucchini is tender and the cheese topping is bubbly and deep golden brown.

6. Serve

Let the dish rest for 5 minutes before serving to allow the creamy sauce to set.


Recipe Variations

  • Extra Protein: You can tuck slices of cooked ham or turkey between the zucchini layers.

  • Herb Freshness: Top with fresh chopped parsley or dill after baking for a burst of color and flavor.