Strawberry Bombs

Ingredients for Strawberry Bombs 300 g (2 cups) flour 1 egg 45 g (1/4 cup) sugar pinch of salt 7g dry yeast 140 mL (3/5 cup) hot milk 40 g (1/4 cup) softened butter For the decoration: Whipped cream INSTRUCTIONS for Strawberry Bombs In a medium bowl, combine sugar, yeast, and milk and stir to … Read more

Hamburger Steak with Mushroom Onion Gravy

Let the sizzle of this hearty hamburger steak cooking in the skillet call your family to the dinner table. Hamburger Steak with Mushroom Onion Gravy Ingredients for Hamburger Steak with Mushroom Onion Gravy 2 pounds ground chuck 2 tablespoons Worcestershire sauce 1 tablespoon prepared horseradish 2 teaspoons minced garlic 1/4 teaspoon salt 1/4 teaspoon ground black … Read more

Big Boys Fresh Strawberry Pie

Big Boys Fresh Strawberry Pie Recipe Ingredients: For the Pie Crust: 1 pre-made pie crust (or use your favorite homemade crust recipe) For the Strawberry Filling: 4 cups fresh strawberries, hulled and halved 3/4 cup granulated sugar 2 tablespoons cornstarch 1/2 cup water 1 teaspoon lemon juice Red food coloring (optional, for a more vibrant … Read more

Garlic always fresh and intact for 1 year: only cooks know this trick in the kitchen

Garlic is a small, pungent, super savory ingredient that adds a punch of flavor to meat, vegetables, rice and so much more. Learn how to store garlic, whole, cloves or peeled, along with tips on how to buy and how to make it last longer.

Make the most of your garlic and preserve its flavor for longer with these tried and tested storage tips!

I don’t think there is any other ingredient that can be compared to the small but mighty flavor of fresh garlic. It’s incredibly savory with a strong, pungent aroma that transforms into a sweet flavor addition.

My family and I love the garlic-y flavor and I put it in just about everything. Which is why I always have extra on hand. Because of this, I thought it best to share my tried and true tips on how to store garlic properly, to make it last longer.

And if you love this, be sure to check out How to Peel, Cut & Mince Garlic and make Garlic Paste, too!

Learn how to store garlic, whole, cloves or peeled, along with tips on how to buy and how to make it last longer.

Prep Time: 15mins

Total Time: 15mins

Course: Meal Prep, Spice Blend

Cuisine: Asian, Indian, Mediterranean, Thai

Diet: Gluten Free, Vegan, Vegetarian

Servings: 12 cloves

Ingredients:

1 head garlic

Instructions:

Garlic can be stored in a number of different ways – as a whole bulb, individual cloves, peeled or even as garlic paste. Follow any of the methods below, depending on your needs.

How to Store Fresh Garlic

Whole Bulb: Store the whole bulb in a cool, dark, well-ventilated cupboard. Garlic will last the longest stored in a temperature between 60 – 65 degrees F. Because of this, I keep it in a cupboard away from the stove and near the floor. The garlic should last a few months.

Individual, Unpeeled Cloves: Store these right alongside the whole bulbs of garlic in your cupboard. Use within 10 days.

How to Store Peeled Garlic

Break apart the clove and peel away the thin, papery skin. Place the peeled cloves in an airtight container or plastic storage bag, seal tight and store in the fridge. Use within 5-7 days.

How to Store Garlic Paste

To make garlic paste: Peel the entire head of garlic and slice off the stem ends. Place in a blender or food processor with 1 Tablespoon olive oil and blend until smooth, scraping down the sides as needed. Place in an airtight container and store in the fridge to use within 1 week.

How to Freeze Garlic

Whole Heads and Individual, Unpeeled Cloves: Place the garlic in a freezer safe plastic storage bag, push out all the air, seal tight, label, date and freeze. The garlic should last indefinitely.

Peeled Cloves: Spread the individual cloves out on a small baking sheet, cover with plastic wrap and freeze for 1 hour. Wrap the frozen cloves in foil, then place in a freezer safe plastic storage bag, seal tight, label, date and freeze.

Garlic Paste: Place in a small silicone ice cube tray and freeze until firm, about 1 hour. Transfer the cubes to a plastic freezer storage bag, label, date, seal tight and freeze for up to 6 months.

Garlic intact for a year: how to store it

  • Experienced cooks will surely be familiar with this method of preserving garlic. First, take half a kilo of garlic cloves and soak them for about an hour in lukewarm water. After drying them, peel them and you will see that they will flake easily because the skin has softened.
  • Next, place all the garlic cloves in a sterilized glass jar. Next, pour in two tablespoons of coarse salt, this should make about 30 grams of salt. Now you can add a few tablespoons of apple cider vinegar or, if you prefer, pour in the wine vinegar, this ingredient will help keep the garlic intact.
  • Finally, bring some water to a boil and let it cool. Before closing the container with its cap, cut a slice of lemon and place it on the garlic. Close the jar very tightly and shake it so that all the ingredients are mixed.
  • Thus, you will keep your garlic cloves for more than a year in perfect condition and they will not rot. Not only that, because you can consume them whenever you want, without having to peel them every time you need them. This method is used by many cooks, it is practical and above all effective.

Notes:

Keep the bulb whole. This ensures the bulbs stay cool and dry, which are exactly the conditions garlic needs.

Store in a cool, dark, uncrowded cupboard. Garlic will spoil under conditions of heat and light, so it’s best to keep it in the coolest part of your kitchen, ideally away from the stove and near the floor. A well ventilated cupboard or pantry works best.

Do not store in a plastic bag, unless freezing. Garlic needs ventilation and air to breathe, which is why an uncrowded (or empty) cabinet is best. If you would prefer to store it in a bag, mesh bags are the best and paper bags are a close second. However, when storing in the freezer, use a plastic bag to keep all the moisture out.

NUTRITIONAL INFO:

Calories: 3kcal | Carbohydrates: 1g | Protein: 1g | Fat: 1g | Saturated Fat: 1g | Sodium: 1mg | Potassium: 9mg | Fiber: 1g | Sugar: 1g | Vitamin A: 1IU | Vitamin C: 1mg | Calcium: 4mg | Iron: 1mg

Creamy Carrot Cake Recipe

This is the best carrot cake recipe I’ve ever used. We prefer to use a hand grater when preparing the carrots since it creates delicate carrot shreds that melt into the cake batter. Pre-shredded bags or shredding carrots using a food processor are also options, but the carrot shreds will be larger.

This recipe is forgiving. You can make this with or without the nuts or raisins. We love the combination of granulated and brown sugar, but if you only have one of them, use it, and the cake will still be delicious.

Frosting: Our creamy frosting recipe shared below is not a traditional cream cheese frosting. Thanks to whipped cream, it’s creamier and has soft peaks (you can see it in our video). We love it, but if you prefer a more traditional frosting, see the tips section below the recipe. We have provided instructions for a classic cream cheese frosting that works nicely with this cake.

PREP Time: 20 min

COOK TIME: 45 min

TOTAL TIME:  1hrs 5min

Makes 1 (9-inch) double layer cake (16 thin slices) or 22 to 24 cupcakes

INGREDIENTS:

FOR CARROT CAKE
  • 2 cups (260 grams) all-purpose flour
  • 2 teaspoons baking soda
  • 1/2 teaspoon fine sea salt
  • 1 ½ teaspoons ground cinnamon
  • 1 Âĵ cups (295 ml) canola or other vegetable oil
  • 1 cup (200 grams) granulated sugar
  • 1 cup (190 grams) lightly packed brown sugar
  • 1 teaspoon vanilla extract
  • 4 large eggs, at room temperature
  • 3 cups (300 grams) grated peeled carrots, 5 to 6 medium carrots
  • 1 cup (100 grams) coarsely chopped pecans
  • 1/2 cup (65 grams) raisins
FOR CREAMY FROSTING
  • 8 ounces (225 grams) cream cheese, at room temperature
  • 1 Âĵ cups (140 grams) powdered sugar
  • 1/3 cup (80 ml) cold heavy whipping cream
  • 1/2 cup (50 grams) coarsely chopped pecans, for topping cake

DIRECTIONS:

MAKE THE BATTER

  1. Position a rack in the middle of the oven. Grease two 9-inch round cake pans, line the bottom with parchment paper and then grease the top. Or grease and flour the bottom and sides of both pans.
  2. Heat the oven to 350 degrees Fahrenheit (176C).
  3. Whisk flour, baking soda, salt, and cinnamon in a medium bowl until very well blended.
  4. In a separate bowl, whisk the oil, granulated sugar, brown sugar, and vanilla.
  5. Add the eggs, one at a time, whisking after each one.
  6. Switch to a large rubber spatula. Scrape the sides and bottom of the bowl, then add the dry ingredients in three parts, gently stirring until they disappear and the batter is smooth.
  7. Stir in the carrots, nuts, and raisins.

BAKE CAKE

  1. Divide the cake batter between the prepared cake pans.
  2. Bake until the tops of the cake layers are springy when touched and when a toothpick inserted into the center of the cake comes out clean, 35 to 45 minutes.
  3. Cool cakes in the pans for 15 minutes, then carefully turn the cake layers out onto cooling racks. Remove the parchment paper and cool completely.
  4. If you find that a cake layer is sticking to the bottom of the pan, leave the cake pan upside down and allow gravity to do its thing.

TO FINISH

  1. In a large bowl, beat the cream cheese with a handheld mixer on medium speed until creamy, about 1 minute.
  2. Beat in the powdered sugar, a 1/4 cup at a time, until fluffy.
  3. Pour in the whipping cream. Beat on medium speed for 2 to 3 minutes, or until the frosting is whipped and creamy. This frosting resembles the texture of whipped cream. Chill covered until ready to frost the cake.
  4. When the cake layers are completely cool, frost the top of one cake layer, and place the second cake layer on top.
  5. Add the remaining frosting to the top of the carrot cake and use a butter knife or small spatula to swirl the frosting around. Leave the sides of the cake unfrosted. Finish with a handful of nuts on top.

Frosting Substitute — Traditional Cream Cheese Frosting: In a large bowl, beat 16 ounces of cream cheese and 1/2 cup of softened butter together for a minute or two until smooth. Add 4 1/2 cups of powdered sugar, 1 1/4 teaspoons of vanilla extract, and a pinch of salt. Beat for 2 to 3 minutes until extra creamy. If it is too thick, add 1 tablespoon of cream or milk.

How to Make Carrot Cake Cupcakes: For cupcakes, we’d recommend baking for 14 to 18 minutes (or until a tester inserted into the center of one comes out clean). Then let them cool for a few minutes in the cupcake pan before transferring them to a cooling rack. The recipe should make 22 to 24 cupcakes.

Using a bundt pan: We have never done this in our kitchen, but a 10-cup or 12-cup Bundt pan should be fine for this recipe. You will likely need to increase the baking time by about 30% in the 10-cup pan, somewhat less in the 12-cup.

Using a 9-inch by 13-inch pan rectangular pan: Simply add all the batter to the rectangular pan and bake. Bake time may be slightly longer.

NUTRITION PER SERVING:

Serving Size 1 slice (1 of 16) / Calories 535 / Total Fat 33.4g / Saturated Fat 6.9g / Cholesterol 69.3mg / Sodium 315.9mg / Carbohydrate 56.4g / Dietary Fiber 2.4g / Total Sugars 40.5g / Protein 5.6g

Pineapple Cream-Cheese Pound Cake Recipe

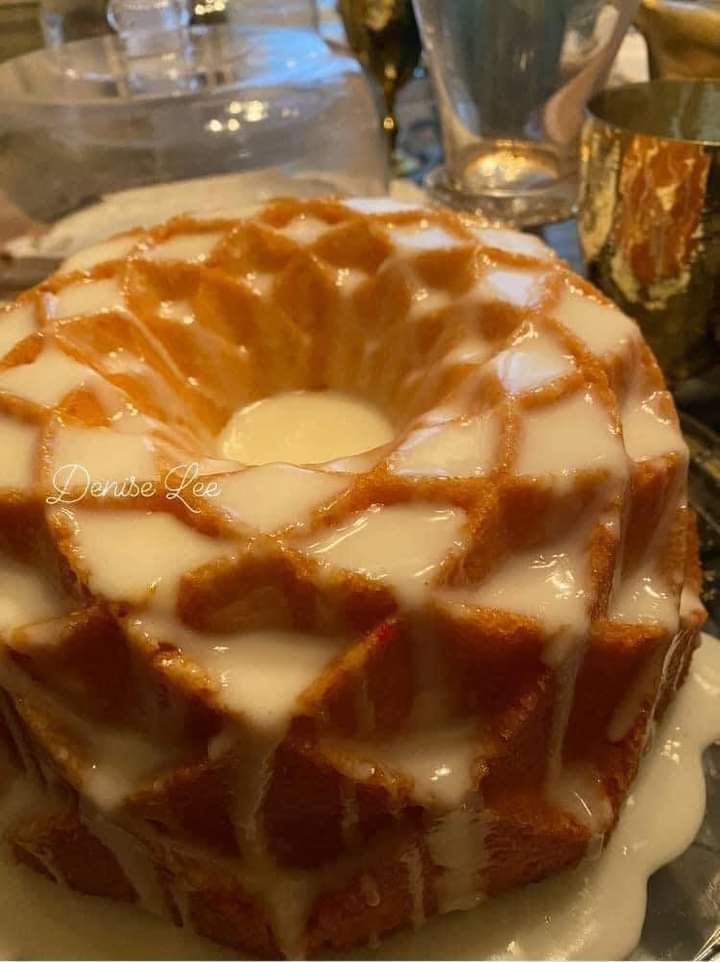
This pineapple pound cake is elevated with sweet tropical flavor, just enough to complement the richly dense pound cake base. Top with a delicate pineapple-vanilla glaze to take it even further.

Deliciously moist and dense pineapple pound cake is dressed with a sweet pineapple vanilla glaze. This supple pineapple cake has the perfect crumb and is great for breakfast, dessert, or as a snack.

Why this recipe works

This pineapple pound cake is elevated with sweet tropical flavor, just enough to complement the richly dense pound cake base. The texture of a good pound cake should be dense, moist, soft and tender – and that’s exactly what you’ll get with this recipe! Top with a delicate pineapple-vanilla glaze to take it even further.

Pound cakes are often made in bundt pans, after all, almost any kind of cake can be made in a bundt pan. Baking this pineapple quick bread in a bundt pan will yield an overall prettier presentation compared to a basic loaf. Let’s get started!


Prep Time: 20mins

Cook Time: 1hr 15mins

Total Time: 1hr 35mins

 Servings: 10 servings

Equipment
  • Stand mixer or hand mixer
  • Mixing bowls
  • 9 inch bundt pan
  • Whisk
  • Wire cooling rack

INGREDIENTS:

Cake
  • 3 cups all-purpose flour
  • 1 teaspoon baking powder
  • 1 cup unsalted Cream Cheese softened
  • 1/2 cup shortening
  • 2 3/4 cups granulated sugar
  • 4 eggs at room temperature*
  • 1/2 cup buttermilk at room temperature*
  • 1 cup crushed pineapple 1 – 8 ounce can drained, juices reserved
  • 1 teaspoon vanilla extract

Glaze

4 Tablespoons cream cheese

2 cups powdered sugar

1/2 teaspoon vanilla extract

1/4 cup reserved pineapple juice

INSTRUCTIONS:

  1. Preheat oven to 325°F. Spray a 9-inch bundt cake pan with nonstick baking spray (the kind with flour) and set aside.
  2. *We recommend a nonstick cooking spray with flour rather than greasing and flouring the bundt pan, but you can grease it well with butter or shortening and then lightly flour the pan.
  3. In a medium-sized bowl, combine the flour and the baking powder. Set aside.
  4. Cream together cream cheese, shortening, and sugar in the bowl of a standing mixer or large mixing bowl.
  5. Add eggs one at a time, beating on high speed for 30 seconds after each addition.
  6. Do not overbeat the eggs, this can cause the cake to be crumbly.
  7. Rotate between adding the flour mixture and the buttermilk, mixing only a little between each addition.
  8. Add in the pineapple and vanilla extract and beat just until the pineapple is evenly distributed.
  9. Pour batter into the prepared bundt pan and bake for 75-85 minutes, until a toothpick inserted in the center comes out with a few moist crumbs. Cool for 30 minutes, then turn out onto a wire rack to cool completely.
  10. Whisk together the glaze ingredients until smooth. Drizzle over the top of the cooled cake.

Notes:

  • Be sure to measure your flour using the scoop and sweep method. You never want to pack flour into a measuring cup. If you add too much flour, you’ll end up with a dry, crumbly cake.
  • The moisture comes from the buttermilk and the pineapple. Drain the pineapple before adding it to the cake batter, but it’s not necessary to really strain it; some of the juices can be added in. Because this cake is so dense and moist, it takes at least 75 minutes to cook. Test the center with a toothpick to make sure there is not still wet batter before removing from the oven.
  • Shortening has a higher melting point than butter, which provides and fluffier and moister cake. You can substitute a third stick of butter for the shortening if you wish.
  • Be sure the eggs and buttermilk are a room temperature and that you beat them well when adding to the batter – this is going to give you more volume in your bundt cake. Room temperature eggs hold more volume than cold eggs.
  • I recommend a nonstick cooking spray with flour rather than greasing and flouring the bundt pan, but you can grease it well with butter or shortening and then lightly flour the pan.
  • For removing the cake from the pan: Uneven baking temperatures in ovens can cause the cake to rise on one side more. If your cake is uneven, you can cut a thin layer off the bottom of the cake so it sits properly when turned out of the bundt pan. Uneven distribution of weight can cause pressure points which in turn can cause crumbling on the bottom in the areas that aren’t supported by an equal weight of cake.
NUTRITIONAL INFO:

Serving: 1slice | Calories: 767cal | Carbohydrates: 113g | Protein: 7g | Fat: 34g | Saturated Fat: 17g | Polyunsaturated Fat: 4g | Monounsaturated Fat: 10g | Trans Fat: 2g | Cholesterol: 122mg | Sodium: 43mg | Potassium: 167mg | Fiber: 1g | Sugar: 83g | Vitamin A: 764IU | Vitamin C: 3mg | Calcium: 58mg | Iron: 2mg