Golden Lentil Patties

Golden Lentil Patties

These protein-packed red lentil patties are crispy on the outside and tender on the inside. They are a fantastic plant-based alternative to traditional meat patties and are perfect for meal prepping or a quick lunch.

Ingredients

  • 1.5 cups (300g) Dried red lentils

  • 1 Large shallot, finely chopped

  • 1 Small carrot, finely grated

  • 2 cloves Garlic, minced

  • 1/2 cup Breadcrumbs (or almond flour for a low-carb version)

  • 1 tsp Cumin

  • 1 tsp Smoked paprika

  • Salt and black pepper to taste

  • Fresh parsley, chopped

  • Oil for pan-frying


Instructions

  1. Prepare the Lentils: Rinse the red lentils thoroughly under cold water. Place them in a pot with 3 cups of water and bring to a boil. Reduce heat and simmer for about 10–12 minutes until soft but not mushy. Drain any excess water very well and let them cool.

  2. Sauté the Aromatics: In a small pan, heat a teaspoon of oil and sauté the chopped shallot and grated carrot for 3–4 minutes until softened. Add the minced garlic for the last minute of cooking.

  3. Mix the Dough: In a large bowl, mash the cooked lentils slightly with a fork. Add the sautéed vegetables, breadcrumbs (or almond flour), cumin, paprika, salt, pepper, and fresh parsley.

  4. Shape the Patties: Mix everything until well combined and the mixture holds its shape. If it feels too wet, add a tablespoon more of your dry base. Form the mixture into equal-sized round patties.

  5. Cook until Golden: Heat a thin layer of oil in a non-stick skillet over medium heat. Place the patties in the pan and cook for 4–5 minutes on each side. They should be deeply golden and crispy.

  6. Serve: These are delicious served hot with a side of garlic yogurt sauce or tucked into a fresh salad.

Savory Golden Flatbreads

Savory Golden Flatbreads

These colorful, veggie-packed flatbreads are incredibly soft and budget-friendly. They make a fantastic breakfast or a quick dinner, and the best part is that they stay flexible even after cooling.

Ingredients

  • 2 Eggs

  • 1.5 cups (360ml) Warm milk

  • 1.5 cups (360ml) Warm water

  • 1 tsp Sugar

  • 1 tsp Salt

  • 1 packet (7g) Dry yeast

  • 3.5 cups All-purpose flour (or a low-carb alternative)

  • 1 Red bell pepper, finely diced

  • 2 Green chilies or green onions, finely chopped

  • 1/2 cup Fresh parsley or cilantro, chopped

  • 1 cup Shredded cheese (optional)

  • Oil or butter for the pan


Instructions

  1. Prepare the Base: In a large bowl, whisk the eggs with the warm milk, warm water, sugar, and dry yeast. Let it sit for 5 minutes until the yeast is activated and slightly bubbly.

  2. Make the Batter: Gradually add the flour and salt to the liquid mixture. Whisk continuously until you have a smooth, pourable batter without any lumps.

  3. Add Vegetables: Fold in the finely diced bell peppers, green onions, and fresh herbs. If you are using cheese, stir it in now. Let the batter rest in a warm spot for about 20–30 minutes to rise slightly.

  4. Heat the Pan: Lightly grease a non-stick skillet with a little oil or butter over medium heat.

  5. Cook the Flatbreads: Pour a ladleful of batter into the center of the pan and spread it out thinly using the back of the spoon. Cook for 2–3 minutes until the bottom is golden brown and bubbles form on the surface.

  6. Flip and Finish: Carefully flip the flatbread and cook the other side for another 2 minutes. Repeat with the remaining batter, stacking the finished flatbreads on a plate to keep them warm.

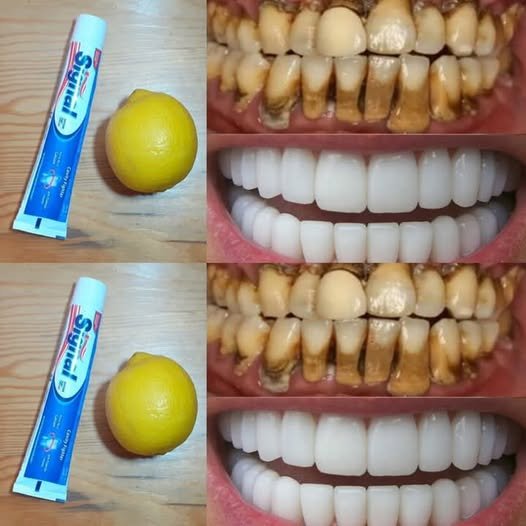
quick “natural” fixes for whitening

The acidity in lemons can actually erode your tooth enamel—the protective outer layer of your teeth. Once enamel is worn away, it doesn’t grow back, which can lead to increased sensitivity and make teeth more prone to staining in the long run.

If you are looking for safer ways to brighten your smile at home, here are a few more gentle options:

  • Baking Soda Brushing: Use a small amount of baking soda mixed with water once or twice a week. It is a mild abrasive that can help scrub away surface stains without the high acidity of lemon.

  • Whitening Toothpaste: Look for toothpaste with the ADA Seal of Acceptance; these contain gentle polishing agents or chemicals that are clinically proven to be safe for daily use.

  • Hydrogen Peroxide Rinses: Many over-the-counter whitening products use a very diluted concentration of hydrogen peroxide, which is safer for enamel than fruit acids.

  • Avoid Staining Foods: Limiting coffee, tea, and dark sodas—or rinsing with water after consuming them—can help prevent new stains from forming.

For significant whitening, especially for the kind of results shown in that image, professional treatments are the only way to go. The transformation in the photo likely involves professional veneers or intensive clinical whitening, rather than a home remedy.

Oven-Baked Cheese Pie

Oven-Baked Cheese Pie

This golden, oven-baked cheese pie is a versatile treat that works beautifully as a high-protein snack or a light dessert. It has a creamy, custard-like texture that feels indulgent while staying simple to prepare.

Ingredients

  • 500g Cottage cheese (drained if very watery)

  • 100g Yogurt (Plain or Greek)

  • 100g Sour cream

  • 2 Large eggs

  • 3 tbsp Honey or Maple syrup (adjust for sweetness)

  • 1 tsp Vanilla extract

  • 40g Cornstarch or Almond flour

  • Optional: A pinch of lemon zest or a handful of berries


Instructions

  1. Preparation: Preheat your oven to 180°C. Lightly grease a 20cm baking dish or line it with parchment paper to ensure easy removal.

  2. Blend the Base: In a large mixing bowl, combine the cottage cheese, yogurt, and sour cream. Use an immersion blender or a whisk to mix until the texture is smooth and uniform.

  3. Add the Bindings: Whisk in the two large eggs one at a time. Once incorporated, stir in your sweetener of choice, the vanilla extract, and any optional zest or fruit.

  4. Thicken: Sift the cornstarch or almond flour into the wet mixture. Fold gently until no dry clumps remain. This step is essential for helping the pie set properly during the baking process.

  5. Bake: Pour the batter into your prepared dish and smooth the top with a spatula. Bake for 35–40 minutes, or until the edges are golden brown and the center has a slight, firm jiggle.

  6. Cool and Serve: Allow the pie to cool completely in the dish. For the best texture, refrigerate for at least two hours before slicing. This allows the flavors to meld and the cheese to firm up perfectly.

Black Pepper Oil Tonic

Black Pepper Oil Tonic

Black pepper oil is often used in traditional wellness practices for its warming properties and strong, spicy aroma. This simple preparation infuses olive oil with the essence of black pepper, creating a versatile oil that can be used as a flavorful condiment or a soothing topical massage oil.

Ingredients

  • 1 cup extra virgin olive oil

  • 2 tbsp whole black peppercorns

  • Optional: 1 clove of garlic or a sprig of fresh rosemary for added aroma


Step-by-Step Instructions

  1. Prepare the Peppercorns: Use a mortar and pestle or the back of a heavy knife to lightly crush the 2 tbsp of black peppercorns. You don’t want a fine powder; simply cracking them open is enough to release their natural oils and piperine.

  2. Heat the Oil: In a small saucepan, pour the 1 cup of olive oil. Turn the heat to low. It is important to heat the oil slowly to avoid scorching it, which would ruin the delicate flavor.

  3. Infuse: Add the crushed peppercorns (and optional garlic or rosemary) to the warm oil. Let the mixture simmer on the lowest possible heat setting for about 5–10 minutes. You should see very small bubbles forming around the peppercorns.

  4. Cool Down: Remove the saucepan from the heat. Let the oil sit and steep until it has cooled completely to room temperature. This resting period allows the infusion to strengthen.

  5. Strain: Once cool, pour the oil through a fine-mesh strainer or a piece of cheesecloth into a clean glass jar or bottle. This removes the solid peppercorn pieces, leaving you with a clear, infused oil.

  6. Storage: Seal the bottle tightly. Store the oil in a cool, dark place like a kitchen pantry. It will stay fresh and flavorful for up to 2 weeks.


Usage Tips

  • Culinary: Drizzle a small amount over grilled vegetables, soups, or salads for a zesty, warming kick.

  • Topical: Some people use a small amount of this oil to massage into joints; however, always perform a patch test on a small area of skin first to ensure no irritation occurs.


A Note on Wellness: While black pepper oil is a wonderful addition to a balanced lifestyle, it is important to consult with a healthcare professional regarding chronic conditions like arthritis or for support with addiction recovery.

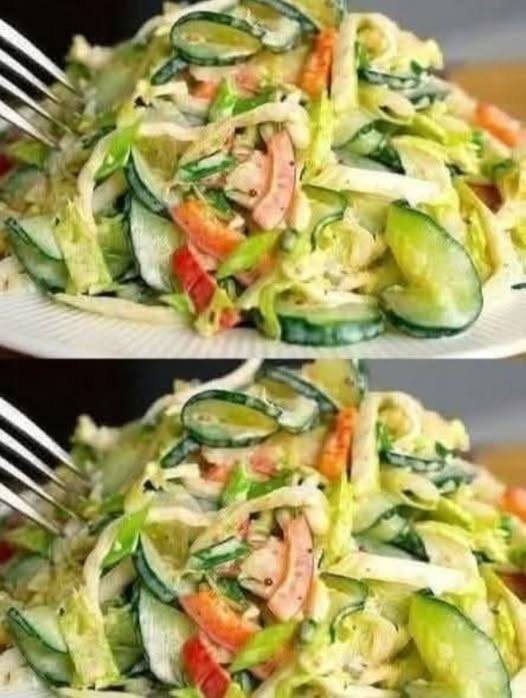
Crunchy Cucumber & Cabbage Fat-Loss Salad

Crunchy Cucumber & Cabbage Fat-Loss Salad

This vibrant salad is a fantastic option for a light lunch or dinner. It combines the crunch of fresh cabbage and cucumbers with a zesty dressing, making it high in fiber and volume while remaining low in calories. It’s a perfect addition to a weight-conscious lifestyle.

Ingredients

  • 2 cups shredded cabbage (green or Napa)

  • 1/2 cucumber, thinly sliced

  • 1/2 red bell pepper, thinly sliced

  • 2 green onions, chopped

  • 2 tbsp fresh dill or parsley, chopped

  • 1/2 avocado, diced (for healthy fats)

  • 1 tbsp lemon juice

  • 1 tsp apple cider vinegar

  • Salt and pepper, to taste


Step-by-Step Instructions

  1. Prepare the Base: In a large mixing bowl, combine the 2 cups of shredded cabbage and the thinly sliced cucumber. If the cabbage is very coarse, massage it with a pinch of salt for a minute to make it more tender.

  2. Add Color and Flavor: Toss in the sliced red bell pepper, chopped green onions, and your choice of fresh dill or parsley.

  3. Creamy Addition: Gently fold in the diced avocado. The avocado adds a creamy texture that pairs perfectly with the crunch of the vegetables.

  4. Dress the Salad: Drizzle the 1 tbsp lemon juice and 1 tsp apple cider vinegar over the mixture. The acidity in the lemon and vinegar helps brighten the flavors and supports digestion.

  5. Season: Add a small pinch of salt and pepper to taste. Toss everything gently to ensure the vegetables are evenly coated with the dressing.

  6. Serve: This salad is best enjoyed fresh to maintain its maximum crunch. If you are preparing it for later, add the avocado and dressing just before serving.


Why It Works

This salad is naturally low in carbohydrates and high in water content, which helps keep you feeling full and hydrated throughout the day.