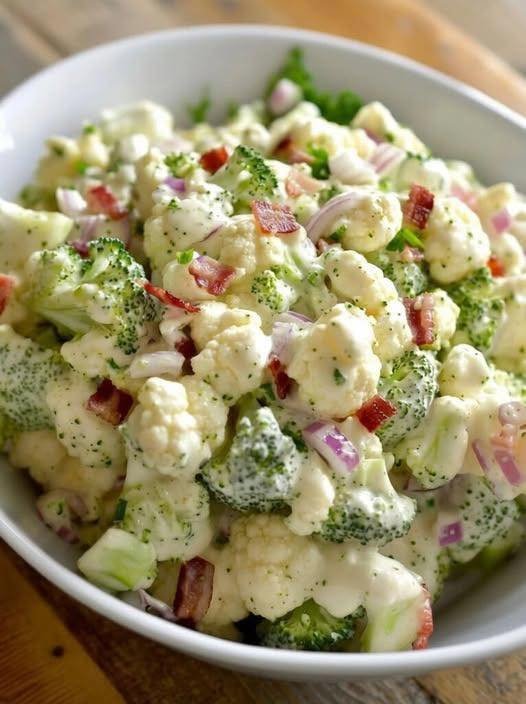
Creamy Broccoli Cauliflower Salad

Creamy Broccoli Cauliflower Salad

A refreshing, hearty salad that combines crisp vegetables with a smooth, flavorful dressing.


Ingredients

The Salad Base:

  • 3 cups Fresh broccoli florets (cut into bite-sized pieces)

  • 3 cups Fresh cauliflower florets (cut into small pieces)

  • 6 slices Bacon (cooked until crisp and crumbled)

  • 3/4 cup Sharp cheddar cheese (freshly grated)

  • 1/3 cup Red onion (finely diced)

  • 1/2 cup Roasted sunflower seeds (or chopped almonds)

The Creamy Dressing:

  • 3/4 cup Mayonnaise

  • 1/4 cup Plain Greek yogurt (or sour cream)

  • 2 tablespoons Apple cider vinegar

  • 2 tablespoons Granulated sweetener (monk fruit or stevia work well here)

  • 1/2 teaspoon Salt

  • 1/4 teaspoon Black pepper


Instructions

1. Prepare the Vegetables

  • Wash the broccoli and cauliflower thoroughly.

  • Important: Pat them completely dry with a clean towel. Drying the vegetables ensures the dressing clings to them instead of sliding off.

  • Chop them into small, even pieces so you get a bit of everything in every bite.

2. Cook the Bacon

  • Fry the bacon in a skillet or bake in the oven until it is very crispy.

  • Drain on paper towels, let it cool, and then crumble it into small pieces.

  • Pro Tip: Keep the bacon separate until you are ready to serve to ensure it stays crunchy.

3. Whisk the Dressing

  • In a medium bowl, whisk together the mayonnaise, Greek yogurt, apple cider vinegar, sweetener, salt, and pepper.

  • Stir until the dressing is completely smooth and creamy.

4. Assemble the Salad

  • In a large mixing bowl, toss together the broccoli, cauliflower, red onion, cheese, and sunflower seeds.

  • Pour the dressing over the vegetables and fold gently until everything is evenly coated.

5. Chill and Serve

  • Cover the bowl and refrigerate for at least 30 minutes. For the best flavor, let it chill for 3–4 hours to allow the flavors to meld.

  • Just before serving, stir in the crumbled bacon (or sprinkle it on top for a nice presentation).


Variations & Storage

  • Low-Carb Tip: This recipe is naturally low-carb if you use a sugar-free sweetener and skip any added dried fruit like raisins.

  • Make Ahead: You can chop the vegetables and make the dressing up to 24 hours in advance. Keep them in separate containers and mix them 1–2 hours before your meal.

  • Storage: Store leftovers in an airtight container in the fridge for up to 3 days. Stir well before serving as the vegetables may release a little moisture over time.

Flourless Golden Breakfast Bites

Flourless Golden Breakfast Bites

These are quick, high-protein, and naturally gluten-free. They have a soft, airy texture and a beautiful golden crust.


Ingredients

  • 2 large eggs

  • 1 cup Cottage cheese (or smooth Ricotta for a finer texture)

  • 1/2 cup Almond flour (or coconut flour, though use only 3 tablespoons if choosing coconut)

  • 1 teaspoon Baking powder

  • 1 tablespoon Honey or Maple syrup (optional, for a hint of sweetness)

  • 1/2 teaspoon Vanilla extract

  • A pinch of salt

  • Butter or oil (for the pan)


Instructions

Step 1: Mix the Base

  1. In a medium bowl, whisk the eggs together with the cottage cheese (or ricotta) until well combined.

  2. If you prefer a smoother texture, you can pulse these two ingredients in a blender for a few seconds.

Step 2: Add Dry Ingredients

  1. Stir in the almond flour, baking powder, vanilla, and a pinch of salt.

  2. Mix until you have a thick, consistent batter. Let the batter sit for 2–3 minutes so the flour can absorb the moisture.

Step 3: Cook

  1. Heat a non-stick skillet over medium-low heat and add a small amount of butter or oil.

  2. Drop large tablespoons of the batter onto the pan. Do not overcrowd, as they need space to be flipped.

  3. Cook for about 3–4 minutes on the first side. You will see small bubbles forming and the edges looking set.

Step 4: Flip and Finish

  1. Carefully flip each piece. They should be a deep, golden brown.

  2. Cook for another 2–3 minutes on the other side until they feel firm to the touch and are cooked through.


Helpful Tips

  • Texture Variation: If you like them more savory, skip the honey and vanilla and add a pinch of garlic powder or dried herbs instead.

  • Serving: These are delicious served warm with fresh berries, a dollop of Greek yogurt, or even a little nut butter.

  • Storage: These keep well in the refrigerator for up to 3 days and can be quickly reheated in a toaster or pan.

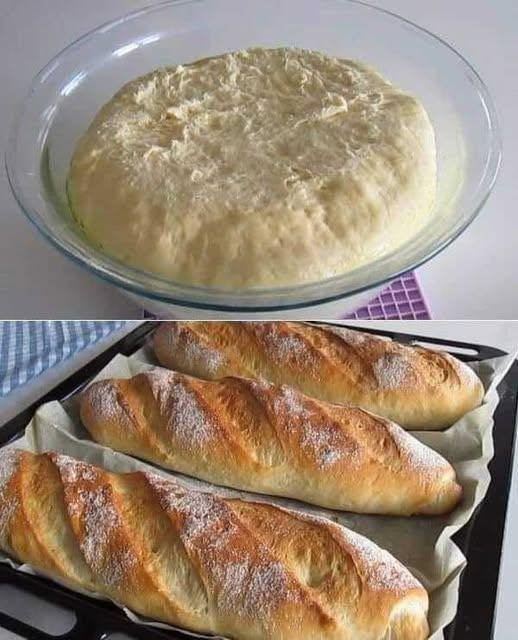
Homemade Crusty Baguettes

Homemade Crusty Baguettes

A simple, reliable recipe for fresh bread with a crispy crust and soft interior.


Ingredients

  • 1 1/3 cups (320 ml) Warm water (ensure it is lukewarm, not hot)

  • 1 tablespoon (10 g) Dry yeast

  • 4 tablespoons (60 ml) Olive oil

  • 1 teaspoon Salt

  • 4 3/4 cups (570 g) Plain flour (plus extra for dusting)


Instructions

Step 1: Activate the Yeast

  1. In a large mixing bowl, combine the warm water and dry yeast.

  2. Let it sit for about 5–10 minutes until it becomes frothy and bubbly.

  3. Stir in the olive oil.

Step 2: Mix the Dough

  1. Gradually add the flour and the salt to the yeast mixture.

  2. Stir with a wooden spoon until a shaggy dough forms.

  3. Turn the dough out onto a lightly floured surface and knead by hand for 8–10 minutes (or use a stand mixer with a dough hook) until the dough is smooth, elastic, and no longer sticky.

Step 3: First Rise

  1. Lightly grease a large bowl with a little olive oil.

  2. Place the dough inside, cover with a clean damp cloth or plastic wrap, and let it rise in a warm, draft-free spot for 1 to 1.5 hours, or until it has doubled in size.

Step 4: Shape the Baguettes

  1. Gently punch down the dough to release the air.

  2. Divide the dough into 3 equal portions.

  3. Roll each piece into a long log shape (baguette style).

  4. Place the loaves on a baking tray lined with parchment paper. Cover and let them rise again for another 30 minutes.

Step 5: Prepare for Baking

  1. Preheat your oven to 200°C (400°F).

  2. Using a very sharp knife or a razor, make 3 to 4 diagonal slashes across the top of each loaf.

  3. Optional: Lightly dust the tops with a little flour for a rustic look.

Step 6: Bake

  1. Place the tray in the oven. For a crispier crust, you can place a small oven-safe pan with an inch of water on the bottom rack to create steam.

  2. Bake for 20–25 minutes or until the loaves are deep golden brown and sound hollow when tapped on the bottom.

  3. Let the bread cool on a wire rack before slicing.


Helpful Tips

  • The “Windowpane” Test: To see if you’ve kneaded enough, stretch a small piece of dough; it should be thin enough to see light through without tearing.

  • Storage: Homemade bread has no preservatives, so it is best enjoyed the same day. To keep it longer, wrap it tightly and store it in a cool place, or freeze slices to toast later.

Garlic & Ginger Wellness Tonic

Garlic & Ginger Wellness Tonic

This concentrated blend is often used in traditional wellness routines. Since it is highly acidic, it is best enjoyed diluted in a glass of water.


Ingredients

  • 1 cup Fresh lemon juice (approx. 4–6 lemons)

  • 1 cup Garlic juice (freshly blended and strained)

  • 1 cup Ginger juice (freshly blended and strained)

  • 1 cup Raw Apple Cider Vinegar (with “the mother”)

  • 1 cup Raw honey (optional, to balance the strong flavors)


Instructions

1. Prepare the Juices

  • Peel the garlic and ginger.

  • Blend them separately (adding a tiny splash of water only if needed to get the blades moving).

  • Strain through a fine-mesh cloth or sieve to extract one cup of clear juice for each.

2. Simmer the Mixture

  • In a non-reactive saucepan (stainless steel or ceramic), combine the lemon juice, garlic juice, ginger juice, and apple cider vinegar.

  • Bring the mixture to a very gentle simmer over low heat.

3. Reduce the Liquid

  • Allow the mixture to simmer uncovered for 20–30 minutes.

  • The goal is to reduce the liquid by about one-quarter to concentrate the ingredients.

4. Cool and Sweeten

  • Remove the pot from the heat and let it cool completely to room temperature.

  • Important: Once cooled, stir in the raw honey. Adding honey to hot liquid can destroy its natural enzymes.

5. Storage

  • Pour the finished tonic into a clean glass bottle or jar and store it in the refrigerator.


Usage and Safety

  • How to take: A common way to use this is to stir 1 to 2 tablespoons into a glass of warm water in the morning.

  • Consistency: Use a glass container for storage, as the acidity can react with plastic or certain metals over time.

  • Note: Because garlic and ginger can have natural blood-thinning effects, it is a good idea to check with a healthcare professional if you are taking any daily medications for blood pressure or heart health.

Lemon, Ginger & Turmeric Wellness Drink

Lemon, Ginger & Turmeric Wellness Drink

A warm, refreshing tonic designed to support digestion and hydration.


Ingredients

  • 1 fresh lemon

  • 1 inch piece of fresh ginger root

  • 1/2 teaspoon turmeric powder (or 1 teaspoon freshly grated turmeric)

  • 2 cups water

  • 1 teaspoon honey (optional, for sweetness)


Instructions

Step 1: Prepare the Ingredients

  1. Wash the lemon, ginger, and turmeric (if using fresh).

  2. Slice the lemon into thin rounds.

  3. Peel and grate the ginger (and the turmeric root, if using).

Step 2: Simmer the Drink

  1. Pour the water into a saucepan and bring it to a gentle boil.

  2. Add the lemon slices, grated ginger, and turmeric.

  3. Lower the heat and let the mixture simmer for 10 minutes to allow the flavors and nutrients to infuse.

Step 3: Strain and Serve

  1. Remove the saucepan from the heat and strain the liquid into a cup or mug.

  2. Stir in the honey if you prefer a touch of sweetness.

  3. Enjoy while warm, ideally in the morning or between meals.


Quick Tips for Success

  • Fresh is Best: Use fresh lemon juice and ginger rather than bottled or dried versions for the most vibrant flavor.

  • Acid Sensitivity: If you have a sensitive stomach, try drinking this after a light snack rather than on a completely empty stomach.

  • Absorption Boost: Adding a tiny pinch of black pepper can actually help your body absorb the curcumin found in the turmeric more effectively.

Guava Leaf Tea for Blood Sugar Control

Guava Leaf Tea for Blood Sugar Control

Description:
Guava leaves have been traditionally used in herbal medicine to help manage blood sugar levels. This tea is simple, natural, and can be a healthy addition to your morning routine.

Ingredients

  • 5–6 fresh guava leaves (or 2–3 tsp dried guava leaves)

  • 2 cups of water

  • Optional: Honey or lemon for taste

Instructions / Method

  1. Rinse the leaves thoroughly to remove any dust or impurities.

  2. Boil water in a small pot.

  3. Add the guava leaves to the boiling water.

  4. Simmer for 10 minutes on low heat.

  5. Turn off the heat and let it steep for another 5 minutes.

  6. Strain the tea into a cup.

  7. Add honey or lemon if desired, though it’s best consumed plain for maximum effect.

Notes & Tips

  • Use fresh leaves whenever possible for stronger flavor and potency.

  • Do not add sugar; it will counteract the blood sugar benefits.

  • Regular consumption is recommended for noticeable benefits, but always consult your healthcare provider.

  • Can be consumed once or twice daily.

Servings

  • Makes 2 cups of tea. Each serving is approximately 1 cup.

Nutritional Info (per cup, plain)

  • Calories: 2–5 kcal

  • Carbohydrates: 0–1 g

  • Fat: 0 g

  • Protein: 0 g

Benefits

  • May help regulate blood sugar levels.

  • Supports digestion.

  • Rich in antioxidants.

  • May aid in weight management.

Q/A for Guava Leaf Tea

Q: Can I use dried guava leaves?
A: Yes, 2–3 tsp of dried leaves is equivalent to 5–6 fresh leaves.

Q: How often should I drink it?
A: 1–2 cups daily is generally safe, but consult your doctor if you have underlying health conditions.

Q: Are there side effects?
A: Rare, but excessive consumption might cause mild digestive discomfort.

Q: Can children drink it?
A: It’s safe in small quantities, but check with a pediatrician.