Carrot Apple Zucchini Muffins with Cream Cheese Frosting
Ingredients:
For the Muffins:
1 cup all-purpose flour
1 cup whole wheat flour
1 teaspoon baking soda
1/2 teaspoon baking powder
1/2 teaspoon salt
1 teaspoon ground cinnamon
1/2 teaspoon ground nutmeg
1/2 teaspoon ground ginger
1/2 cup granulated sugar
1/2 cup brown sugar
1/2 cup vegetable oil
1/4 cup applesauce
3 large eggs
1 teaspoon vanilla extract
1 cup grated carrots
1 cup grated zucchini
1 cup grated apple (peeled and cored)
For the Cream Cheese Frosting:
8 oz cream cheese, softened
1/4 cup unsalted butter, softened
1/2 cup powdered sugar
1 teaspoon vanilla extract
Instructions:
Prepare the Muffins:
Preheat your oven to 350°F (175°C). Line a muffin tin with paper liners or lightly grease it.
In a large bowl, whisk together the flours, baking soda, baking powder, salt, cinnamon, nutmeg, and ginger.
In another bowl, combine the granulated sugar, brown sugar, vegetable oil, applesauce, eggs, and vanilla extract until well mixed.
Gradually add the dry ingredients to the wet ingredients, stirring until just combined.
Fold in the grated carrots, zucchini, and apple.
Divide the batter evenly among the muffin cups, filling each about 2/3 full.
Bake for 20-25 minutes, or until a toothpick inserted into the center comes out clean.
Allow the muffins to cool in the tin for 5 minutes, then transfer to a wire rack to cool completely.
Prepare the Cream Cheese Frosting:
In a medium bowl, beat the softened cream cheese and butter until creamy and smooth.
Gradually add the powdered sugar and vanilla extract, beating until smooth and well combined.
Assemble the Muffins:
Once the muffins are completely cool, spread or pipe the cream cheese frosting over the top of each muffin.
Optionally, garnish with additional grated carrots, zucchini, and apple for a decorative touch.
Ginger water is a wonderfully refreshing and detoxifying drink made by simmering fresh ginger root in water. It’s known for its zesty flavor and numerous wellness benefits — from aiding digestion to boosting immunity. Enjoy it warm or chilled, on its own or with a squeeze of lemon or drizzle of honey.
Servings
Makes 4 cups (about 1 liter) — serves 2–4
Ingredients for Ginger Water
4 cups (1 liter) water
2–3 inches fresh ginger root (peeled and thinly sliced)
Optional:
1–2 tbsp honey or maple syrup (for sweetness)
1 tbsp lemon juice (for brightness)
A few mint leaves (for freshness)
Instructions
Prep Ginger: Peel the ginger root using the edge of a spoon. Slice it thinly to maximize flavor release.
Simmer: Add sliced ginger and water to a small saucepan. Bring to a gentle boil over medium heat.
Infuse: Reduce heat and simmer for 10–15 minutes (longer for a stronger flavor).
Strain: Remove from heat. Strain the liquid into a jar or jug to remove ginger pieces.
Finish: Stir in sweetener and/or lemon juice if using.
Serve: Enjoy hot immediately — or refrigerate and serve chilled over ice.
Notes
The more thinly you slice the ginger, the stronger the infusion.
If you prefer an extra-strong flavor, simmer up to 30 minutes.
Store leftovers in the refrigerator for up to 3 days.
Great served warm in winter or iced in summer.
Tips
Add a cinnamon stick or turmeric slice while simmering for a spice boost.
Use sparkling water after cooling for a homemade ginger soda.
Drink first thing in the morning to help wake up digestion.
Approximate Nutritional Info (per 1 cup without sweetener)
Nutrient
Amount
Calories
2
Carbohydrates
0.5 g
Sugars
0 g
Fat
0 g
Protein
0 g
Sodium
5 mg
(Add ~60 calories per tablespoon of honey.)
Health Benefits
Digestive Aid: Ginger stimulates digestion and reduces bloating/nausea.
Anti-inflammatory: Gingerol compounds in ginger help reduce inflammation.
Immunity Boost: Antioxidants in ginger support immune function.
Hydration: Helps you stay hydrated while giving plain water a flavorful twist.
Q & A
Q: Can I drink ginger water every day? A: Yes — 1–2 cups per day is generally safe and beneficial for most people.
Q: Can I reuse the ginger slices? A: You can reuse once for a lighter second batch, though flavor will be milder.
Q: Is it safe during pregnancy? A: Ginger can help with nausea, but stick to moderate amounts and consult your doctor.
Q: Can I sweeten it with sugar instead of honey? A: Absolutely — use any sweetener you prefer, or leave it unsweetened.
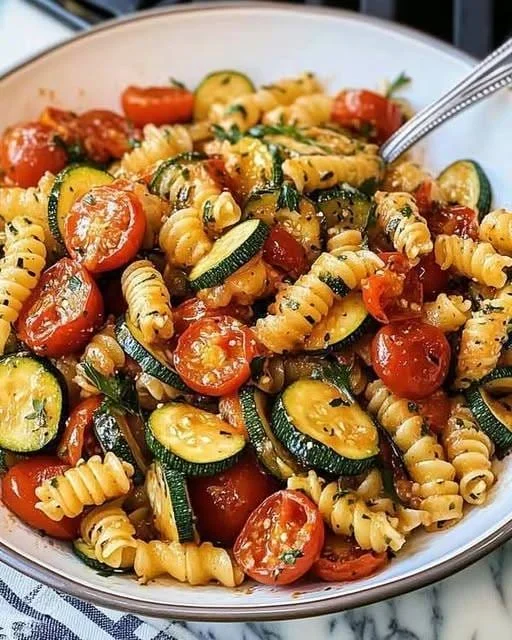
Ingredients:
1 lb (450 g) whole wheat spaghetti
2 tablespoons olive oil
3 cloves garlic, minced
2 medium zucchinis, sliced into thin half-moons
2 cups cherry tomatoes, halved (or 1 can diced tomatoes, drained)
Salt and black pepper, to taste
1/2 teaspoon red pepper flakes (optional, for a kick)
1/4 cup grated Parmesan cheese (optional)
Fresh basil or parsley, chopped (for garnish)
Juice of 1/2 lemon (optional but adds brightness)
Instructions:
1. Cook the Pasta
Bring a large pot of salted water to a boil.
Cook the whole wheat spaghetti according to package instructions until al dente.
Drain, reserving about 1/2 cup of pasta water, and set aside.
2. Sauté the Garlic and Veggies
In a large skillet, heat olive oil over medium heat.
Add the minced garlic and sauté for about 30 seconds until fragrant.
Add the sliced zucchini and cook for 4–5 minutes, stirring occasionally, until just tender.
Toss in the cherry tomatoes and cook for another 2–3 minutes until they start to soften and release their juices.
Season with salt, pepper, and red pepper flakes (if using).
3. Combine with Pasta
Add the cooked pasta to the skillet with the veggies.
Toss everything together, adding a splash of reserved pasta water to loosen the sauce if needed.
Drizzle with lemon juice and adjust seasoning to taste.
4. Serve
Serve warm, topped with freshly grated Parmesan and chopped herbs.
Add a drizzle of olive oil or a few toasted pine nuts for extra richness and crunch, if desired.
The Keto Cheeseburger Quesadillas are the most suitable Mexican dish and recipe. it is using a low-carb tortilla in each slice of cheeseburger quesadillas. Furthermore, it is the finest and most comfortable dinner recipe. In this recipe, bacon and ground beef are the best combinations of tomato sauce and Worcestershire. The keto cheeseburger quesadillas are the best combination of bacon, ground beef, chopped onion, tomato paste, Worcestershire sauce, mustard, cream cheese, tortillas, and shredded cheddar cheese. With the help of these things, you can make the keto cheeseburger quesadillas very tasty, crispy, creamy, and favorable.
Ingredients:
Shredded cheddar cheese 1 1/4 cup
Regular and low-carb tortillas 5 small
Cream cheese 2 ounces
Mustard 1 tsp.
Tomato paste 2 tbsp.
Worcestershire sauce 2 tsp.
Chopped onion 1/2 cup
Ground beef 1 pound
Bacon 3 slices
Instructions:
Use a large skillet, add the bacon, and cook it until it becomes brown and crisp.
Take out the bacon from the skillet add the onion and ground beef to the same skillet and cook it for 3 minutes.
Decrease the heat from medium to low and add the Worcestershire sauce, cream cheese, cooked bacon, mustard, and tomato paste, and sprinkle them with the shredded cheddar cheese.
Top them with beef mixture and fold them in the tortillas.
Cook them for 5 to 6 minutes and take them out from the heat.
Now, serve it.
Notes:
Detail:
The keto cheeseburger quesadillas are made with ground portions of beef and portions of beef.
To make this recipe creamy, you can use the cream cheese.
Chop the slices of bacon into the small pieces.
Frequently asked questions:
Information:
What should I serve with the keto cheeseburger quesadillas?
You can serve the keto cheeseburger quesadillas with Chuy’s jalapeno ranch, avocado ranch dip, smoked queso, ranch zucchini chips, zucchini tortillas, fajita veggies, no-bake cheesecake, chili cheese collard green chips, and keto cinnamon twist.
Is meal prep is good for cheeseburger quesadillas?
Yes, meal prep is good for the cheeseburger quesadillas.
Nutritional facts:
Seving size: 1 quesadillas
Total carbohydrates: 22 g
Calories: 394 kcal
Protein: 33 g
Total fat: 24 g
Sodium: 698 mg
Cholesterol: 99 mg
Fiber: 15.6 g
Sugar: 1.8 g
Looking for a delicious low-carb alternative to baked potatoes? Look no further! This Keto Cauliflower Steak recipe is not only flavorful but also packed with nutrients, making it the perfect side dish or even a main course. Featuring crispy edges, a cheesy topping, and delicious garnishes, these cauliflower steaks are sure to impress. Follow this detailed guide for a comprehensive step-by-step approach, nutritional information, and tips to create the perfect dish.
Ingredients
For the Cauliflower Steaks
1 large head of cauliflower
2 tablespoons olive oil (extra virgin for better flavor)
1 teaspoon salt
1 teaspoon black pepper
1 teaspoon garlic powder
1 teaspoon onion powder
1 teaspoon dried parsley (or fresh, finely chopped if available)
For the Topping
2 tablespoons unsalted butter (melted)
1 cup shredded cheese (cheddar, mozzarella, or a blend)
1/2 cup crumbled bacon (cooked until crispy)
1/2 cup sour cream (full-fat for best flavor)
Equipment Needed
Baking sheet
Parchment paper (optional, for easy cleanup)
Sharp knife
Basting brush
Oven
Large mixing bowl
Instructions
Step 1: Preheat Your Oven
Begin by preheating your oven to 400°F (200°C). Preheating is crucial for achieving a crispy exterior on your cauliflower steaks.
Step 2: Prepare the Cauliflower
Take a large head of cauliflower and remove the outer leaves. Rinse it under cold water to clean it. Pat it dry with a kitchen towel.
Step 3: Slice the Cauliflower
Using a sharp knife, carefully slice the cauliflower into thick steaks, approximately 1-inch thick. You should aim for about 4-6 steaks, depending on the size of your cauliflower head. Keep any florets that fall off for roasting or other recipes.
Step 4: Season the Steaks
In a large mixing bowl, combine 2 tablespoons of olive oil, 1 teaspoon of salt, 1 teaspoon of black pepper, 1 teaspoon of garlic powder, 1 teaspoon of onion powder, and 1 teaspoon of dried parsley. Whisk these ingredients together until well combined.
Step 5: Brush the Cauliflower
Place the cauliflower steaks on a baking sheet lined with parchment paper (if using). Brush each steak generously with the olive oil seasoning mixture using a basting brush. Make sure to coat both sides for maximum flavor.
Step 6: Bake the Cauliflower
Place the baking sheet in the preheated oven and bake the cauliflower steaks for 30 minutes, flipping them halfway through. This ensures even cooking and helps develop a nice golden-brown color.
Step 7: Add Butter and Cheese
After the initial baking time, remove the cauliflower steaks from the oven. Brush each steak with 2 tablespoons of melted unsalted butter for added richness. Then, sprinkle 1 cup of shredded cheese evenly over the top of each steak.
Step 8: Broil for Perfection
Return the baking sheet to the oven and switch the setting to broil. Broil the cauliflower steaks for 2-3 minutes or until the cheese is bubbly and golden brown. Keep a close eye on them during this step to prevent burning.
Step 9: Add Bacon and Sour Cream
Once the cheese is melted and bubbly, remove the baking sheet from the oven. Sprinkle 1/2 cup of crumbled bacon over the top of each steak. Finally, add a dollop of 1/2 cup of sour cream on top of each steak for a creamy finish.
Step 10: Serve and Enjoy
Plate the cauliflower steaks and garnish with additional parsley if desired. Serve immediately while hot and enjoy your delicious, low-carb alternative to baked potatoes!
Nutritional Information (per serving, based on 4 servings)
Calories: 290
Total Fat: 24g
Saturated Fat: 12g
Carbohydrates: 7g
Fiber: 3g
Net Carbs: 4g
Protein: 12g
SmartPoints: 7 points per serving (may vary based on specific ingredients used)
Tips for Making the Best Cauliflower Steaks
Select a Fresh Cauliflower: Choose a firm, heavy head of cauliflower with tightly packed florets. Avoid any that have brown spots or blemishes.
Thickness Matters: Aim for 1-inch thick steaks to ensure they hold together during cooking. Thinner slices may fall apart or become too crispy.
Season Generously: Don’t shy away from seasoning! The flavor of the cauliflower is subtle, so robust seasoning is essential to elevate the dish.
Experiment with Cheese: Feel free to mix and match cheeses based on your preference. Gruyère, pepper jack, or even feta can add unique flavors to the dish.
Bacon Alternatives: If you’re looking for a lower-fat option, consider turkey bacon or leave out the bacon altogether for a vegetarian version.
Meal Prep: This recipe is great for meal prepping. The steaks can be baked in advance and reheated as needed throughout the week.
Storage: Store any leftovers in an airtight container in the refrigerator for up to 3 days. Reheat in the oven or microwave before serving.
Conclusion
This Keto Low-Carb Cauliflower Steak recipe offers a delicious, satisfying alternative to traditional baked potatoes. Bursting with flavor from the olive oil, garlic, and cheese, it’s a dish that everyone will love—keto dieters and non-dieters alike. Not only is it simple to prepare, but it also provides a healthy dose of vegetables and can be customized to suit your taste. Enjoy these cauliflower steaks as a side dish or make them the star of your next meal!


 Description
 Servings
 Ingredients for Ginger Water
 Instructions
 Notes
 Tips
 Approximate Nutritional Info (per 1 cup without sweetener)
 Health Benefits
 Q & A


 Chicken Bacon Ranch Taquitos
 Ingredients:
 Instructions:
 Variations & Tips: