Baked Pasta with Minced Meat and Cheese

Baked Pasta with Minced Meat and Cheese

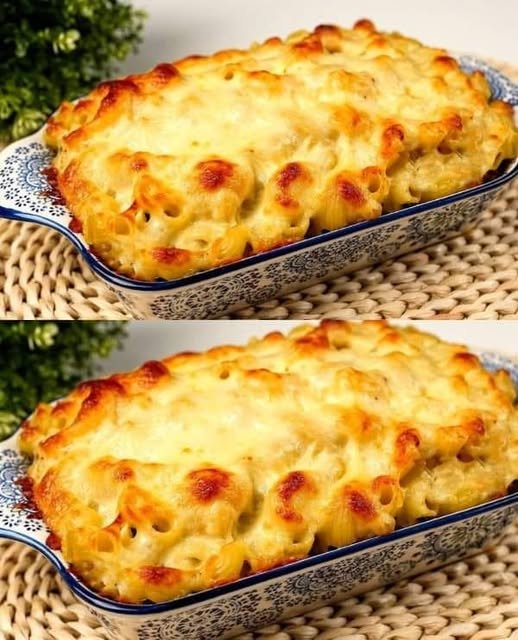
A comforting oven-baked pasta dish made with seasoned minced meat, a light egg-and-cream mixture, and a melted cheese topping.


Preparation Overview

  • Preparation time: 15 minutes

  • Cooking time: 30 minutes

  • Resting time: 5 minutes

  • Total time: About 50 minutes

Yield

  • Serves 4 people


Ingredients

Pasta

  • 250 g short pasta (penne, macaroni, or fusilli)

  • 1 teaspoon salt (for boiling water)

Meat Mixture

  • 300 g minced meat (beef, turkey, or chicken)

  • 1 shallot, finely chopped

  • 1–2 tablespoons vegetable oil or olive oil

  • 1 teaspoon paprika

  • 1 teaspoon dried oregano

  • Ground black pepper, to taste

Egg & Cheese Topping

  • 3 large eggs

  • 3 tablespoons cream (or half-and-half)

  • 100 g cheese (mozzarella, cheddar, or Gruyère), shredded


Step-by-Step Instructions

1. Cook the Pasta

Bring a large pot of water to a rolling boil. Add the salt, then add the pasta.

Cook according to the package instructions until just tender. Drain well and set aside.


2. Prepare the Meat Mixture

Heat the oil in a large skillet over medium heat.

Add the chopped shallot and cook for 2–3 minutes, stirring occasionally, until softened.

Add the minced meat. Cook, stirring and breaking it up, until it is evenly cooked through and no longer pink.

Sprinkle in the paprika, oregano, and black pepper. Stir well and cook for 1 minute more to blend the flavors.

Remove the pan from the heat.


3. Prepare the Egg and Cream Mixture

In a bowl, whisk together the eggs and cream until smooth.

Stir in half of the shredded cheese. This mixture helps hold the pasta together as it bakes.


4. Assemble the Dish

Preheat the oven to 190°C (375°F).

Lightly grease a medium baking dish.

Add the cooked pasta and meat mixture to the dish and mix gently until evenly combined.

Pour the egg and cream mixture evenly over the pasta.

Sprinkle the remaining cheese evenly on top.


5. Bake

Place the baking dish on the center rack of the oven.

Bake for 20–25 minutes, until the top is lightly golden and the egg mixture has set.


6. Rest and Serve

Remove from the oven and allow the dish to rest for 5 minutes before serving. This helps the layers hold together when sliced.

Serve warm with a simple green salad or cooked vegetables on the side.


Storage

  • Store leftovers covered in the refrigerator for up to 2 days

  • Reheat gently in the oven or microwave until warmed through


Optional Notes

  • You may add cooked vegetables such as peas or bell peppers

  • Cheese types can be mixed for varied flavor

  • For a softer texture, add 1–2 tablespoons of milk to the egg mixture
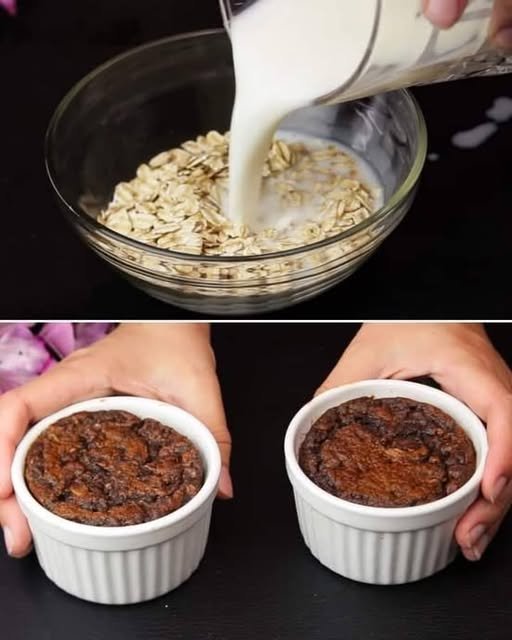
Oatmeal & Cocoa Breakfast Cake

Oatmeal & Cocoa Breakfast Cake

A soft, lightly sweet breakfast-style cake made with oats, banana, and cocoa. Suitable for a quick morning meal or a light snack.


Preparation Overview

  • Preparation time: 10 minutes

  • Soaking time: 10 minutes

  • Cooking time: 20–25 minutes (oven) or 2–3 minutes (microwave)

  • Total time: About 40 minutes

Yield

  • Makes 1 large serving or 2 small portions


Ingredients

  • 40 g oatmeal (about ½ cup rolled oats or quick oats)

  • 120 ml milk (dairy or plant-based)

  • 1 large egg

  • 1 ripe banana

  • 8 g cocoa powder (about 1 tablespoon, unsweetened)

  • 5 g baking powder (about 1 teaspoon)

Optional

  • A small pinch of ground cinnamon

  • A few dark chocolate chips or fresh fruit for topping


Step-by-Step Instructions

1. Soak the Oats

Place the oatmeal in a mixing bowl. Pour in the milk and stir gently.

Let the mixture rest for 10 minutes so the oats absorb the liquid and soften evenly.


2. Prepare the Banana

Peel the banana and place it in a separate bowl.

Mash thoroughly with a fork until smooth and free of large lumps.


3. Mix the Batter

Add the mashed banana and the egg to the soaked oats.

Whisk until the mixture is evenly combined.

Sift in the cocoa powder and baking powder. Add cinnamon if using.

Stir gently until the batter looks smooth and evenly colored, with no dry patches.


4. Prepare the Cooking Dish

Lightly grease two small oven-safe ramekins or one microwave-safe mug or bowl.

Pour the batter into the container(s), filling no more than three-quarters full.


5. Cook

Oven Method

  • Preheat the oven to 180°C (350°F)

  • Place the ramekins on a baking tray

  • Bake for 20–25 minutes, until the center is set

Microwave Method

  • Cook on high for 2–3 minutes

  • Let stand for 1 minute before serving


6. Serve

Enjoy warm directly from the dish or turn out onto a plate.

Optional toppings include yogurt, fruit, or a light drizzle of honey.


Storage

  • Best enjoyed fresh

  • Can be stored covered in the refrigerator for up to 24 hours

  • Reheat gently before serving


Helpful Notes

  • Riper bananas provide more natural sweetness

  • Texture will be soft and moist, similar to a baked oatmeal

  • Cooking time may vary slightly depending on dish size and appliance

Simple No-Knead Homemade Bread

Simple No-Knead Homemade Bread

A soft, everyday loaf made with basic pantry ingredients and minimal handling.


Preparation Overview

  • Preparation time: 10 minutes

  • First resting time: 1½–2 hours

  • Second resting time: 30–45 minutes

  • Baking time: 25–30 minutes

  • Cooling time: 20 minutes

  • Total time: About 3 hours

Yield

  • Makes 1 standard loaf


Ingredients

  • 200 ml warm water (comfortably warm, not hot)

  • 25 g sugar (about 2 tablespoons)

  • 3 g active dry yeast (about 1 teaspoon)

  • 300 g bread flour or all-purpose wheat flour (about 2 cups)

  • 3 g salt (about ½ teaspoon)

  • 20 g olive oil (about 2 tablespoons)


Step-by-Step Instructions

1. Prepare the Yeast Mixture

Pour the warm water into a large mixing bowl. Add the sugar and yeast, then stir gently until dissolved.

Let the mixture stand for about 5 minutes. A light foam on the surface indicates the yeast is ready to use.


2. Mix the Dough

Add the olive oil and salt to the yeast mixture and stir briefly.

Gradually add the flour, mixing with a spoon or spatula until all the flour is evenly moistened.

The dough will look soft and sticky, which is expected. Ensure there are no dry patches of flour.


3. First Resting Period

Cover the bowl with a clean kitchen towel or lid.

Place it in a warm, draft-free area and let the dough rest for 1½ to 2 hours, or until it has noticeably increased in volume.


4. Shape the Dough

Lightly coat your hands with a small amount of oil.

Gently press down the dough to release excess air.

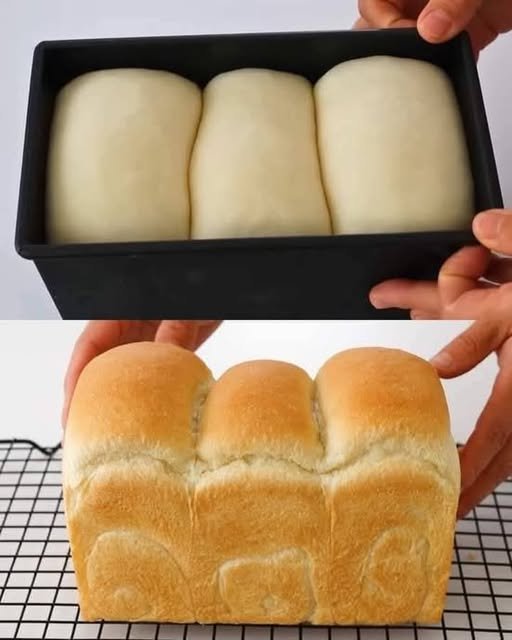
Divide the dough into three equal portions and shape each portion into a smooth ball or short log.

Place the pieces side by side into a lightly greased loaf pan.


5. Second Resting Period

Cover the loaf pan and let the dough rest for 30–45 minutes.

During this time, the dough should rise and fill the pan evenly.


6. Bake

Preheat the oven to 180°C (350°F).

If desired, lightly brush the surface of the dough with a little milk or water for an even finish.

Bake for 25–30 minutes, until the top is lightly browned and the loaf is fully baked.


7. Cool

Remove the bread from the pan and place it on a wire rack.

For a softer surface, you may lightly brush the top with a small amount of olive oil while the bread is warm.

Allow the bread to cool for at least 20 minutes before slicing. This helps maintain the structure of the loaf.


Serving Suggestions

  • Slice and serve with butter, jam, or cheese

  • Suitable for sandwiches or toast

  • Enjoy warm or at room temperature


Storage

  • Store wrapped at room temperature for up to 2 days

  • Refrigeration is not recommended, as it may affect texture

  • Can be frozen once cooled and sliced


Helpful Notes

  • Longer resting times help improve texture

  • Avoid adding extra flour, as the dough should remain soft

  • Suitable for loaf pans or free-form shaping

Cheese-Stuffed Flatbread (Quick Yeast Dough)

Cheese-Stuffed Flatbread (Quick Yeast Dough)

Soft baked flatbreads filled with melted cheese, prepared with a simple yeast dough and baked until lightly golden.


Preparation Overview

  • Preparation time: 15 minutes

  • Resting time: 40 minutes

  • Baking time: 15–20 minutes

  • Total time: About 1 hour 15 minutes

Yield

  • Makes 4 large flatbreads


Ingredients

For the Dough

  • 480 g wheat flour (about 4 cups)

  • 400 ml milk, warm (comfortably warm, not hot)

  • 10 g dry yeast

  • 15 g sugar

  • 20 g olive oil

  • 8 g salt

For the Filling & Topping

  • 200 g mozzarella or cheddar cheese, shredded

  • 1 egg yolk (for brushing)

  • Optional: sesame seeds or nigella seeds

For Handling

  • A small amount of vegetable oil (for greasing the bowl and hands)


Step-by-Step Instructions

1. Prepare the Yeast Mixture

Pour the warm milk into a large mixing bowl. Add the sugar and dry yeast, then stir gently to combine.

Set the bowl aside for 5–10 minutes, until the surface shows light bubbles. This indicates the yeast has activated properly.


2. Form the Dough

Add the olive oil and salt to the milk mixture. Stir briefly.

Gradually add the flour, mixing with a spoon or spatula until a rough dough forms.

Transfer the dough to a clean work surface and knead gently for about 5 minutes, until smooth and flexible.

If the dough feels sticky, lightly oil your hands instead of adding extra flour to maintain a soft texture.


3. Rest the Dough

Lightly grease a bowl with vegetable oil. Place the dough inside and turn it once so the surface is lightly coated.

Cover with a clean cloth and place in a warm, draft-free area. Let it rest for about 30 minutes, or until it has increased in volume.


4. Divide and Fill

Turn the rested dough onto a lightly floured surface and divide it into 4 equal portions. Shape each portion into a smooth ball.

Flatten each ball into a small round disc using your hands or a rolling pin.

Place a portion of shredded cheese in the center of each disc.

Bring the edges of the dough up and over the filling, pinching them together to seal completely.

Gently flatten each filled ball into a thick disc, taking care not to tear the dough.


5. Final Rest and Topping

Line a baking tray with parchment paper and place the shaped flatbreads on it.

Using your fingertips, gently press small indentations across the surface of each disc. This helps maintain an even shape during baking.

Cover and let rest for 10 minutes.

Brush the tops lightly with egg yolk and sprinkle with seeds if desired.


6. Bake

Preheat the oven to 200°C (400°F).

Bake the flatbreads for 15–20 minutes, until evenly baked and lightly golden on top.

Remove from the oven and allow them to cool slightly before serving.


Serving Suggestions

  • Serve warm as a snack or alongside soups and salads

  • Optional: lightly brush with melted butter and sprinkle with chopped parsley before serving


Storage

  • Best enjoyed fresh

  • Leftovers can be stored covered at room temperature for up to 1 day or refrigerated for 2 days

  • Reheat gently in the oven or on a pan before serving


Optional Notes

  • Cheese can be mixed (mozzarella and cheddar together) for balanced flavor

  • Dough can be divided into smaller portions for mini flatbreads

Flourless Almond Carrot Cake (Low-Carb Style)

Flourless Almond Carrot Cake (Low-Carb Style)

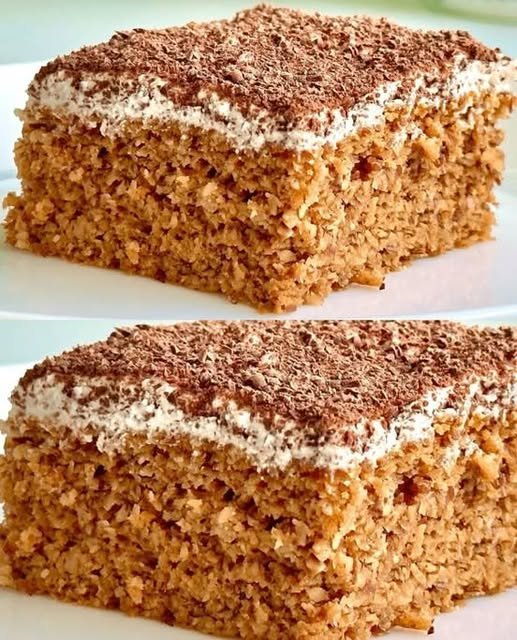
A naturally sweetened cake made without wheat flour, using ground almonds and fresh carrots for a moist, gently textured result.


Preparation Overview

  • Preparation time: 15 minutes

  • Baking time: 30–35 minutes

  • Cooling time: 30 minutes

  • Total time: About 1 hour 20 minutes

Yield

  • Makes 8–10 small slices


Ingredients

Base Ingredients

  • 200 g carrots, peeled and finely grated

  • 200 g ground almonds (almond flour)

Wet Ingredients

  • 2 large eggs (room temperature)

  • 2–3 tablespoons honey (adjust to taste)

Leavening & Flavoring

  • 1 teaspoon baking soda

  • 2–3 drops mild vinegar (such as wine or apple vinegar)

  • A small pinch of ground cinnamon

  • A small pinch of salt

Optional Topping

  • Low-fat Greek yogurt or cream cheese, lightly sweetened with honey

  • A light dusting of cocoa powder or finely grated dark chocolate


Step-by-Step Instructions

1. Prepare the Carrots

Peel and finely grate the carrots using a fine grater.

If the carrots release a lot of liquid, gently press them with a paper towel or clean cloth to remove excess moisture. This helps maintain a balanced texture in the finished cake.

Set aside.


2. Mix the Wet Ingredients

In a large mixing bowl, crack in the eggs. Add the honey and salt.

Whisk until the mixture looks smooth and slightly airy. This helps distribute the sweetness evenly throughout the batter.


3. Prepare the Leavening

In a small spoon or cup, combine the baking soda with the vinegar. The mixture will foam briefly.

Immediately add this mixture to the egg mixture and stir gently until combined.


4. Combine All Ingredients

Add the grated carrots and cinnamon to the bowl with the egg mixture. Stir gently.

Gradually fold in the ground almonds, mixing slowly until everything is evenly combined.

The batter should be thick but spreadable. The almonds will absorb moisture as the mixture rests.


5. Prepare for Baking

Preheat the oven to 180°C (350°F).

Line a small square or rectangular baking dish with parchment paper, or lightly grease it.

Transfer the batter into the prepared dish and smooth the surface with a spatula.


6. Bake

Place the dish on the middle rack of the oven.

Bake for 30–35 minutes, or until:

  • The top looks lightly golden

  • A wooden skewer inserted into the center comes out clean

If the top browns too quickly, loosely cover with parchment paper for the remaining baking time.


7. Cooling and Finishing

Remove the cake from the oven and allow it to cool completely in the pan.

Once cooled, spread a thin layer of sweetened Greek yogurt or cream cheese on top, if desired.

Finish with a light sprinkle of cocoa powder, cinnamon, or finely grated dark chocolate.


Serving Suggestions

  • Slice and serve at room temperature or chilled

  • Pairs well with herbal tea, coffee, or almond milk

  • Suitable as a light dessert or afternoon snack


Storage

  • Store covered in the refrigerator for up to 3 days

  • Bring to room temperature before serving for best texture


Optional Notes

  • Honey can be adjusted based on preference

  • Cinnamon may be replaced or combined with nutmeg

  • The cake has a naturally dense texture due to the almond base

Cottage Cheese Tart with Sour Cream Filling

Cottage Cheese Tart with Sour Cream Filling

A gently baked dessert with a soft, buttery crust and a smooth cottage cheese–sour cream filling. Suitable for dessert, tea time, or light gatherings.


Preparation Overview

  • Preparation time: 20 minutes

  • Resting time (dough): 20 minutes

  • Baking time: 35–45 minutes

  • Cooling & chilling: 2 hours (recommended)

  • Total time: About 3 hours

Yield

  • Serves 8–10 slices


Ingredients

For the Crust

  • 1 large egg (room temperature)

  • 40 g sugar

  • 80 g butter, softened at room temperature

  • 200 g all-purpose flour (about 1½ cups)

  • 1 teaspoon baking powder

  • A small pinch of salt

For the Creamy Filling

  • 400 g cottage cheese (smooth or pressed through a sieve)

  • 200 g sour cream (Greek yogurt may be used as an alternative)

  • 2 large eggs

  • 60 g sugar (adjust to taste)

  • 1 teaspoon vanilla extract

  • 1 tablespoon cornstarch


Step-by-Step Instructions

1. Prepare the Crust Dough

In a medium mixing bowl, add the egg, sugar, and salt. Whisk gently until the mixture becomes pale and well combined.

Add the softened butter and mix until smooth and evenly incorporated. The mixture should look creamy without visible butter pieces.

In a separate bowl, combine the flour and baking powder. Gradually add this to the wet mixture, mixing gently with a spoon or your hands.

Knead lightly just until a soft dough forms. Avoid overmixing, as this helps keep the crust tender rather than firm.

Shape the dough into a flat disc, wrap it, and place it in the refrigerator for 20 minutes. This resting step helps the dough hold its shape during baking.


2. Prepare the Filling

If the cottage cheese has a coarse texture, blend it briefly or press it through a fine sieve until smooth. This step is important for achieving a uniform filling.

In a large bowl, combine the cottage cheese, sour cream, eggs, sugar, vanilla extract, and cornstarch.

Whisk or blend until the mixture is smooth and evenly mixed. The filling should be pourable and free of lumps.


3. Assemble the Tart

Lightly grease a 9-inch (22 cm) springform pan or tart tin.

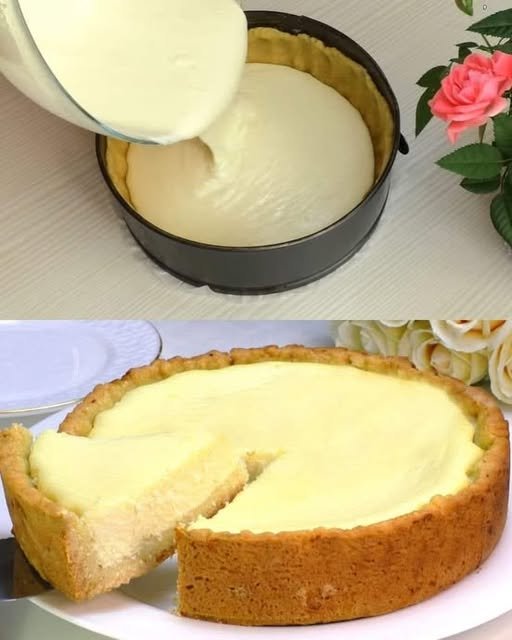
Remove the chilled dough from the refrigerator. Press it evenly into the bottom of the pan and gently up the sides, forming an edge about 3–4 cm high.

Make sure the base and sides are even in thickness to ensure uniform baking.

Carefully pour the prepared filling into the crust and gently level the surface.


4. Bake the Tart

Preheat the oven to 180°C (350°F).

Place the tart on the center rack and bake for 35–45 minutes.

The crust should turn lightly golden, and the filling should appear set around the edges with a slight softness in the center.


5. Cooling and Setting

Once baked, remove the tart from the oven and allow it to cool completely in the pan at room temperature.

After cooling, refrigerate the tart for at least 2 hours before slicing. This step helps the filling achieve its best texture and makes cutting cleaner and easier.


Serving Suggestions

  • Serve chilled or lightly cool

  • Pairs well with fresh fruit, fruit compote, or a light dusting of powdered sugar

  • Can be served plain or with tea or coffee


Optional Variation

For added flavor, gently place a small handful of blueberries, raspberries, or sliced strawberries over the filling before baking. Press them lightly into the surface without stirring.


Storage

  • Store covered in the refrigerator for up to 3 days

  • Best enjoyed within the first 48 hours for optimal texture