Skillet Onion Bread

Skillet Onion Bread

Prep Time: 20–25 minutes (plus 1 hour rising)
Cook Time: 18–22 minutes
Servings: 4–6


Ingredients

For the Dough:

  • 1 egg

  • 200 ml warm milk

  • 1 tsp sugar

  • 1 tsp active dry yeast

  • 1 tbsp vegetable oil

  • 1 tsp salt

  • 250–300 g all-purpose flour (add gradually until dough forms)

For the Onion Filling:

  • 1 large onion, finely diced

  • 2 tbsp butter

  • ½ tsp dried herbs (like oregano or thyme)

  • ¼ cup shredded cheese (optional, for extra richness)

  • Fresh parsley, chopped (for garnish)


Instructions

Step 1: Prepare the Yeast Base

  1. In a large bowl, whisk together warm milk, sugar, and active dry yeast.

  2. Let it sit for 5–10 minutes until the mixture becomes frothy, indicating the yeast is active.


Step 2: Mix the Dough

  1. Add egg, vegetable oil, and salt to the yeast mixture.

  2. Gradually stir in the flour until a soft dough forms.

  3. Knead the dough on a lightly floured surface for 5–8 minutes until smooth and elastic.


Step 3: First Rise

  1. Place the dough in a lightly oiled bowl.

  2. Cover with a clean cloth and let it rise in a warm spot for about 1 hour, or until doubled in size.


Step 4: Prepare the Onion Filling

  1. Melt the butter in a small pan over medium heat.

  2. Sauté the diced onion until soft and translucent.

  3. Stir in dried herbs.

  4. Remove from heat and allow to cool slightly before spreading on the dough.

  5. Optional: Mix in shredded cheese for extra richness.


Step 5: Shape and Fill

  1. Punch down the risen dough.

  2. Roll it out into a large circle or rectangle.

  3. Spread the onion mixture evenly over the dough.

  4. Roll the dough tightly and then coil it into a spiral shape, or gently press it into a disk that fits your skillet.

  5. Optional: Use a knife to make decorative scores on top to let steam escape while cooking.


Step 6: Skillet Cooking

  1. Lightly grease a large, heavy-bottomed skillet (cast iron works best).

  2. Place the shaped dough in the skillet and cover with a lid.

  3. Cook over low heat for 10–12 minutes until the bottom is golden brown.

  4. Carefully flip the bread:

    • Slide the bread onto a large flat plate.

    • Invert the skillet over the plate and flip both together so the other side is down.

  5. Cover again and cook for 8–10 minutes until golden brown and cooked through.


Step 7: Finish and Serve

  1. Brush the top with a little melted butter.

  2. Sprinkle with fresh parsley.

  3. Slice and serve warm.


Tips for Success

  • Keep the heat low: Cooking slowly ensures the center cooks through without burning the outside.

  • Flipping safely: Using a plate to flip prevents the bread from breaking.

  • Filling variations: You can add finely chopped spinach, roasted peppers, or mushrooms for extra flavor.

  • Serving: Best enjoyed fresh, but can be reheated in a skillet or oven
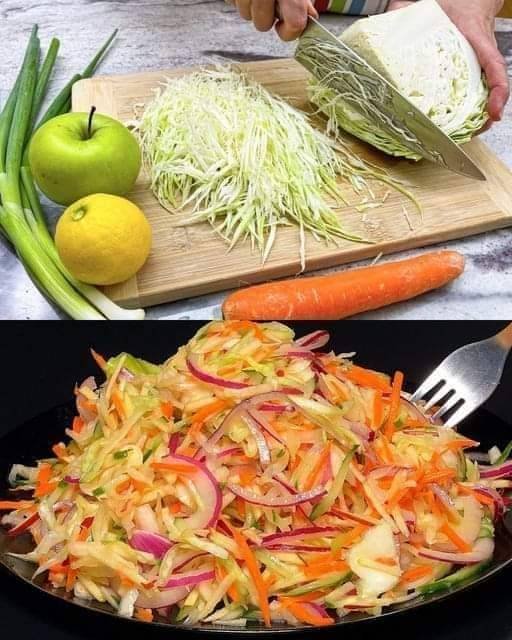
Crunchy Cabbage, Carrot & Apple Salad

Crunchy Cabbage, Carrot & Apple Salad

Prep Time: 10 minutes
Servings: 4


Ingredients

  • 200–400 g cabbage, finely shredded

  • 1 carrot, peeled and grated

  • 1 green apple, cored and thinly sliced or julienned

  • 1–2 spring onions, chopped

  • Fresh dill or parsley, chopped (optional, to taste)

  • Lemon juice, to taste

  • Olive oil, to taste

  • Salt, to taste

  • Optional toppings: sunflower seeds, chopped walnuts, or pumpkin seeds


Instructions

Step 1: Prepare the Cabbage

  1. Remove the outer leaves of the cabbage.

  2. Shred the cabbage as finely as possible using a sharp knife or a mandoline.

  3. Place the shredded cabbage in a large bowl and sprinkle with a pinch of salt.

  4. Lightly massage the cabbage with your hands for 1–2 minutes. This softens the texture and releases some moisture, making it easier to eat.


Step 2: Add the Crunch

  1. Grate the peeled carrot directly into the bowl with the cabbage.

  2. Slice the green apple into thin matchsticks (julienne) or thin slices.

  3. To prevent the apple from browning, toss the slices in a little lemon juice immediately after cutting.


Step 3: Incorporate Herbs and Aromatics

  1. Add the chopped spring onions for a mild onion flavor.

  2. Mix in fresh dill or parsley if using. This adds a bright herbal note to the salad.


Step 4: Dress the Salad

  1. Drizzle olive oil and fresh lemon juice over the vegetables and apple.

  2. Season with additional salt to taste.


Step 5: Toss and Serve

  1. Toss all ingredients thoroughly so the dressing coats every piece of vegetable and fruit.

  2. Let the salad sit for 5–10 minutes before serving. This allows the flavors to meld and the cabbage to soften slightly while retaining crunch.

  3. Optional: Sprinkle sunflower seeds, chopped walnuts, or pumpkin seeds on top for extra texture and a nutty flavor.


Tips for a Perfect Salad

  • Apple Choice: A Granny Smith apple works best due to its tartness, which balances the sweetness of the carrot.

  • Add Protein: For a more filling meal, top the salad with grilled chicken, tofu, or chickpeas.

  • Extra Crunch: Adding seeds or nuts just before serving gives the salad a satisfying texture.

  • Make Ahead: The salad can be prepared 30–60 minutes in advance, but add apples last to prevent browning if storing.

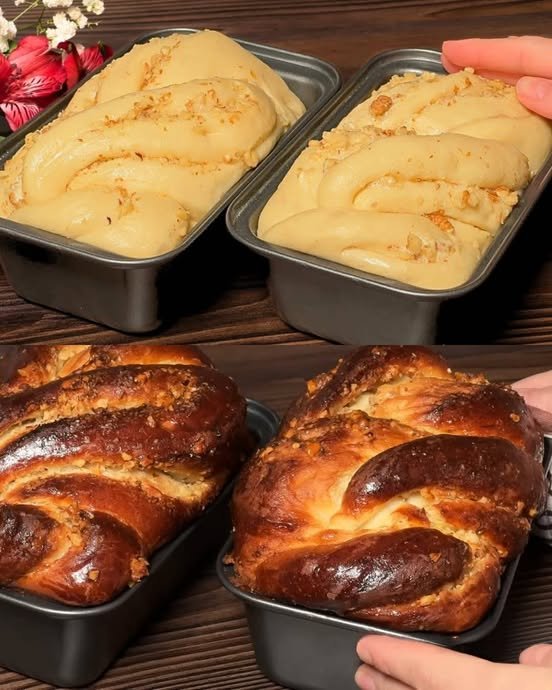
Sweet Walnut-Filled Bread Rolls

Sweet Walnut-Filled Bread Rolls

Prep Time: 30 minutes (plus 2 hours for rising)
Bake Time: 25–30 minutes
Yields: 2 loaves


Ingredients

For the Dough:

  • 500 g wheat flour

  • 200 ml warm milk

  • 80 g sugar

  • 1 tsp vanilla sugar

  • 6 g (1 tsp) dry yeast

  • 1 egg + 1 egg white (reserve the yolk for egg wash)

  • 40 g butter, softened

  • 20 ml vegetable oil

For the Walnut Filling:

  • 1 ½ cups walnuts, finely ground

  • ½ cup sugar

  • 1 tsp cinnamon

  • 2–3 tbsp milk (to create a thick paste)


Instructions

Step 1: Activate the Yeast

  1. In a large bowl, combine warm milk, sugar, and dry yeast.

  2. Stir lightly and let it sit for 5–10 minutes until it becomes frothy. This indicates the yeast is active.


Step 2: Mix the Dough

  1. Whisk in the egg, egg white, vanilla sugar, and vegetable oil.

  2. Gradually add the flour, mixing until a shaggy dough forms.

  3. Add the softened butter and knead for 8–10 minutes until the dough is smooth, elastic, and no longer sticky.


Step 3: First Rise

  1. Place the dough in a lightly oiled bowl.

  2. Cover with a damp cloth and let it rise in a warm spot for 1–1.5 hours, or until it has doubled in size.


Step 4: Prepare the Walnut Filling

  1. While the dough rises, combine ground walnuts, sugar, and cinnamon in a bowl.

  2. Gradually add 2–3 tablespoons of milk until you have a thick, spreadable paste.


Step 5: Shape the Rolls

  1. Punch down the risen dough and divide it into two equal portions.

  2. On a floured surface, roll each portion into a large rectangle.

  3. Spread the walnut filling evenly over the dough.

  4. Roll the dough tightly into a log.

  5. To achieve a braided look: Slice the log in half lengthwise (leaving one end attached) and twist the two strands over each other.


Step 6: Second Rise

  1. Place the braided loaves into greased loaf pans.

  2. Cover and let rise for 30–45 minutes until slightly puffy.


Step 7: Bake

  1. Preheat your oven to 180°C (350°F).

  2. Brush the tops of the loaves with the reserved egg yolk mixed with a splash of milk for a golden shine.

  3. Bake for 25–30 minutes, or until the bread is deep golden brown and sounds hollow when tapped.


Step 8: Optional Finishing Touch

  • For a professional shine, brush the warm bread with a simple sugar syrup (equal parts sugar and water boiled together) immediately after taking it out of the oven.


Tips for Success

  • Yeast activation: Make sure the milk is warm, not hot, to avoid killing the yeast.

  • Softened butter: Helps make the dough soft and fluffy.

  • Filling consistency: The walnut paste should be thick, not runny, to prevent soggy bread.

  • Rising environment: Keep dough in a warm, draft-free area for consistent rising.

  • Storage: Keep in an airtight container; can last 3–4 days at room temperature or up to a week in the refrigerator.

Savory Stuffed Eggplants

Savory Stuffed Eggplants

Prep Time: 15 minutes
Bake Time: 35–40 minutes
Servings: 2–4


Ingredients

For the Eggplant Base:

  • 2 medium eggplants (approx. 600g total)

  • 2 tbsp olive oil (30ml)

  • ½ tsp salt

  • ¼ tsp black pepper

  • ½ tsp sweet paprika

  • ½ tsp dried oregano

For the Savory Filling:

  • 250g minced meat (beef, turkey, or lamb)

  • 1 small onion, finely chopped

  • 2 cloves garlic, minced

  • 1 red bell pepper, diced

  • 1 cup tomato sauce or crushed tomatoes

  • ½ cup shredded mozzarella or parmesan cheese

  • Fresh parsley for garnish


Instructions

Step 1: Prepare the Eggplants

  1. Wash the eggplants and slice them lengthwise into halves.

  2. Score the flesh in a diamond pattern with a knife, being careful not to cut through the skin. This helps the flavors penetrate.

  3. In a small bowl, mix olive oil, salt, black pepper, sweet paprika, and dried oregano.

  4. Brush the seasoned oil generously over the cut sides of the eggplants.


Step 2: Initial Roast

  1. Preheat the oven to 200°C (400°F).

  2. Place the eggplants on a baking sheet, cut side up, and bake for 20 minutes or until the flesh is soft and lightly browned.


Step 3: Make the Filling

  1. While the eggplants roast, heat a skillet over medium heat.

  2. Add the minced meat and cook until fully browned. Drain any excess fat if necessary.

  3. Add the onion, garlic, and red bell pepper. Sauté for 5 minutes until softened and fragrant.

  4. Stir in the tomato sauce, and let the mixture simmer for a few minutes until it thickens slightly.

  5. Taste and adjust seasoning with additional salt or pepper if needed.

  6. Optional: If the mixture seems too dry, add a splash of water or broth.


Step 4: Stuff the Eggplants

  1. Remove the eggplants from the oven.

  2. Use a spoon to gently press down the centers to create a well for the filling.

  3. Spoon the meat mixture into the centers evenly.

  4. Top each eggplant half with a generous layer of shredded cheese.


Step 5: Final Bake

  1. Return the stuffed eggplants to the oven for 10–15 minutes, or until the cheese is melted, bubbly, and golden brown.


Step 6: Serve

  1. Garnish with fresh parsley before serving.

  2. Serve individually or arrange for a beautiful presentation on a platter.


Tips for Success

  • Consistency: If the filling seems too dry, add a splash of water or broth while simmering.

  • Vegetarian Option: Replace minced meat with cooked lentils or chopped mushrooms for a plant-based version.

  • Flavor Boost: Sprinkle a pinch of smoked paprika or chili flakes for a subtle kick.

  • Presentation: Layering the eggplants slightly or serving with a side of rice or salad makes it a complete meal.

Pineapple Dream Dessert

Pineapple Dream Dessert

Prep Time: 15 minutes
Chill Time: 4 hours minimum (overnight is ideal)
Servings: 12–15

Ingredients

For the Crust & Topping:

  • 2 ½ cups graham cracker crumbs (divided)

  • ½ cup unsalted butter, melted

For the Creamy Filling:

  • ½ cup unsalted butter, softened to room temperature

  • 2 cups powdered sugar

  • 1 package (8 oz) cream cheese, softened to room temperature

  • 1 can (20 oz) crushed pineapple, well-drained

  • 1 container (8 oz) whipped topping (like Cool Whip) or 2 cups stiffly whipped heavy cream


Instructions

Step 1: Prepare the Crust

  1. Preheat your oven to 350°F (175°C) if you prefer a slightly firmer crust. (Optional: You can skip baking for a softer crust.)

  2. In a medium bowl, combine 2 cups of graham cracker crumbs with the ½ cup melted butter. Mix until the texture resembles wet sand.

  3. Reserve ½ cup of this crumb mixture for the topping later.

  4. Firmly press the remaining crumbs into the bottom of a 9×13 inch baking dish to form an even crust layer.

  5. Optional: Bake for 8–10 minutes for a slightly crisp crust. Let it cool completely before adding the filling.


Step 2: Make the Creamy Base

  1. In a large mixing bowl, add the softened butter and cream cheese. Beat with an electric mixer on medium speed until smooth and creamy (about 2–3 minutes).

  2. Gradually add powdered sugar and continue to beat until the mixture is fluffy and well combined (about 3–5 minutes).


Step 3: Fold in the Pineapple

  1. Drain the crushed pineapple very well. Press through a fine-mesh strainer with a spoon to remove excess juice, which could make the dessert runny.

  2. Gently fold the drained pineapple into the cream cheese mixture using a spatula, ensuring it is evenly distributed.


Step 4: Add the Whipped Topping

  1. Gently fold in the whipped topping or stiffly whipped heavy cream until fully combined.

  2. Be careful not to overmix; you want to keep as much air in the mixture as possible for a light, fluffy texture.


Step 5: Assemble the Dessert

  1. Spread the creamy pineapple filling evenly over the graham cracker crust.

  2. Sprinkle the reserved ½ cup of graham cracker crumbs evenly on top as a finishing touch.


Step 6: Chill

  1. Cover the dish with plastic wrap or a lid.

  2. Refrigerate for at least 4 hours, but for best results, chill overnight. This allows the layers to firm up and the flavors to meld beautifully.


Tips for Perfect Pineapple Dream Dessert

  • Drain the pineapple thoroughly: Use a fine-mesh strainer and press gently with a spoon to remove extra juice.

  • Room temperature ingredients: Make sure your butter and cream cheese are soft before mixing to avoid lumps in the filling.

  • Gentle folding: Folding preserves the air in the whipped topping, keeping the dessert light and airy.

  • Optional garnishes: Top with toasted coconut, chopped nuts, or extra pineapple chunks for a decorative touch.

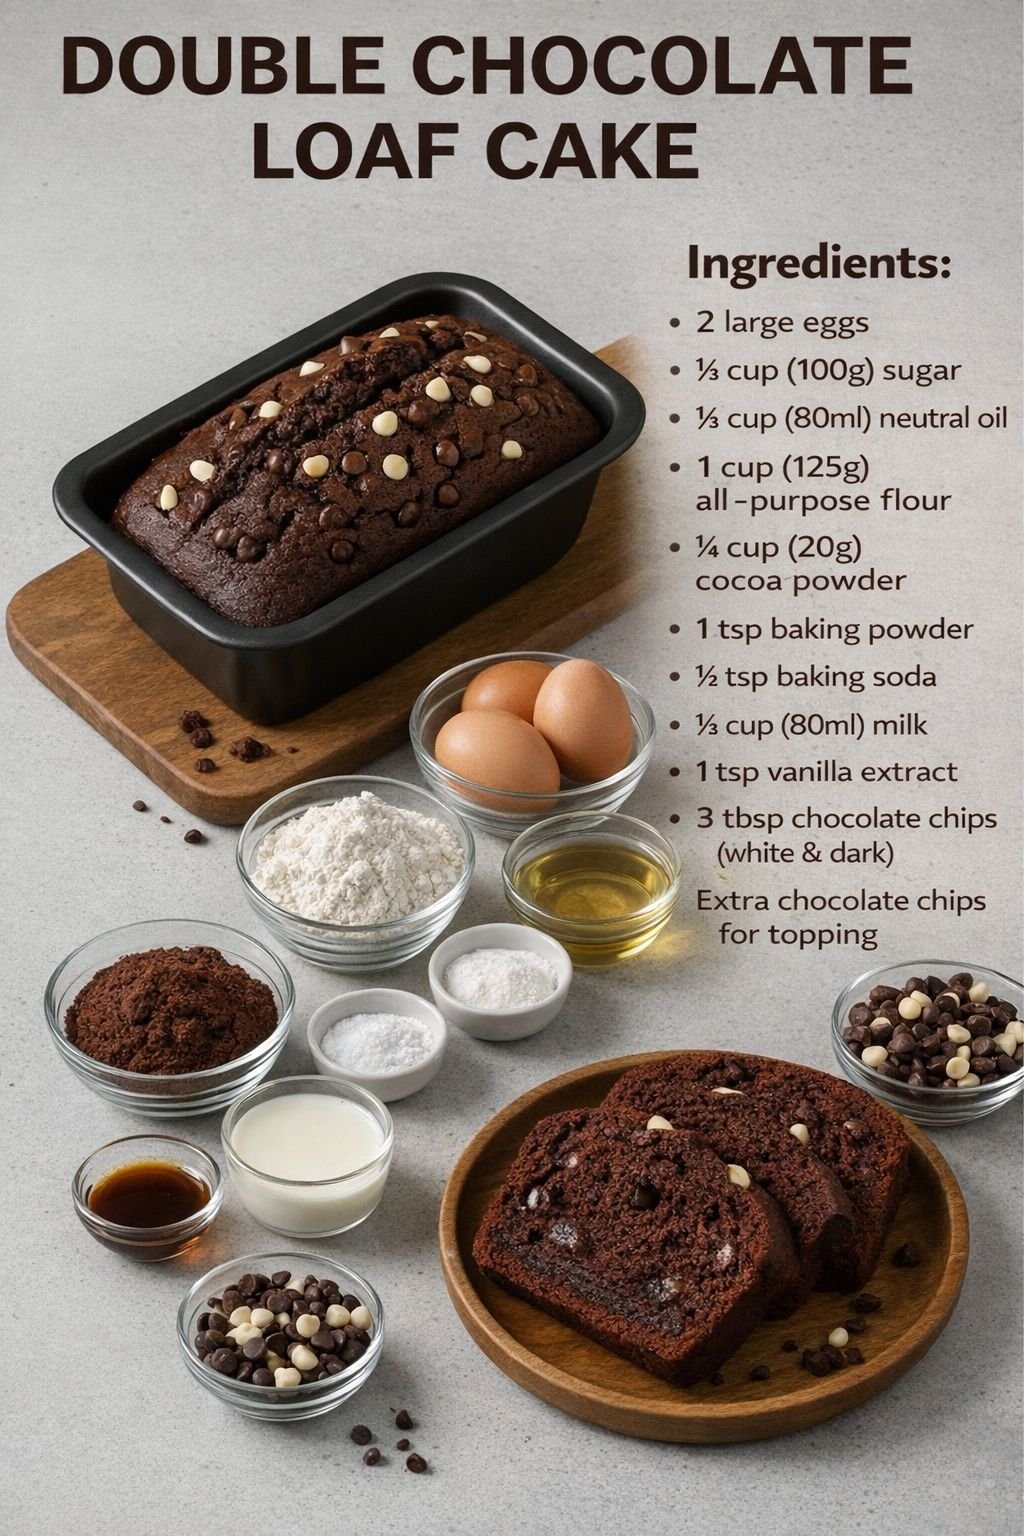
Double Chocolate Loaf Cake

🍫 Double Chocolate Loaf Cake

A rich, moist chocolate loaf packed with chocolate chips. Perfect for breakfast, dessert, or an afternoon treat.


📝 Ingredients

  • 2 large eggs

  • ⅓ cup (100 g) sugar

  • ⅓ cup (80 ml) neutral oil (vegetable or canola)

  • ⅓ cup (80 ml) milk

  • 1 teaspoon vanilla extract

  • 1 cup (125 g) all-purpose flour

  • ¼ cup (20 g) cocoa powder

  • 1 teaspoon baking powder

  • ½ teaspoon baking soda

  • 3 tablespoons chocolate chips (white or dark, or a mix)

  • Extra chocolate chips for topping


👩‍🍳 Instructions

1️⃣ Mix the Wet Ingredients

  1. In a medium bowl, whisk the eggs and sugar until slightly pale and well combined.

  2. Add the oil, milk, and vanilla extract. Stir until smooth.


2️⃣ Combine with Dry Ingredients

  1. Sift together the flour, cocoa powder, baking powder, and baking soda.

  2. Gently fold the dry ingredients into the wet mixture until just combined. Avoid overmixing to keep the cake tender.

  3. Fold in 3 tablespoons of chocolate chips.


3️⃣ Prepare for Baking

  1. Preheat the oven to 175°C (350°F).

  2. Grease a standard loaf pan or line it with parchment paper.

  3. Pour the batter into the pan and smooth the top with a spatula.

  4. Sprinkle extra chocolate chips over the surface.


4️⃣ Bake

  1. Bake for 35–45 minutes.

  2. Test doneness by inserting a toothpick into the center; it should come out clean or with a few moist crumbs.

  3. Let the cake cool in the pan for 10 minutes, then transfer to a wire rack to cool completely.


🍽 Serving Suggestions

  • Serve slightly warm so chocolate chips are melty

  • Pair with a cold glass of milk or a cup of coffee

  • Slice thick for an indulgent snack


🧁 Tips

✔️ Use high-quality cocoa powder for deeper flavor
✔️ Fold gently to keep the cake soft and airy
✔️ Store in an airtight container for 2–3 days
✔️ Freeze slices for up to 1 month